")


- Yayınlayan: Amy Shao 30 Haziran 2026 VSDC Free Video Editor’ün ye...
- Amy Shao tarafından yayımlandı: 11 Mart 2026 Yaratıcı bir insan içi...
- yayınlayan Amy Shao 19/11/25 Uzun zamandır beklenen VSDC 10.2 güncellemesiyl...
- Merhaba, ben Mattea Wharton, Seattle'dan bir seyahat videografçısıyım. Üç yıl bo...
How to Synchronize Video Effects to Music Beat in VSDC Pro
The new version of VSDC Video Editor allows you to easily synchronize video effects, animation, text, or image appearance to the beat of your audio.
Wondering what it may look like? Then imagine an audio visualizer that reacts to each sound beat, or a heart image pumping to the rhythm – you’ve surely seen them on music channels. In the same manner, you’ll be able to synchronize any image or effect to your audio track and make it “react” to the frequency and intensity of the sound.
Since a picture is worth a thousand words, here is an example. If we add an image to the scene, apply the Zoom effect to it, and then synchronize the effect to the beat, the image will be “zooming in and out” based on the rhythm of your soundtrack. Check out the video below to see what it looks like (sound on!).
The new VSDC Pro tool that allows you to achieve this effect is called “Edit the beat” and it’s available in the version 6.4.5.
If you’re curious how it works, here is a quick breakdown. When you activate the Edit the beat mode, VSDC scans the waveform of the selected audio and generates a rhythm graph based on the sound values - such as frequency and intensity. Each value is represented by a control point. The rhythm graph is then applied to the values of the effect of your choice.
For instance – let’s go back to the Zoom effect example – if you choose to synchronize the level of the Zoom effect to the beat, in the resulting video, the louder the sound is, the higher the zoom level will be. Meanwhile, during the moments of silence, the image will appear in its original state.
That was a very basic example to give you a general idea of what it means to synchronize video effects to music. With the Edit the beat feature, you’ll be able to use automatic synchronization presets or adjust the graph manually. And in this article, we’ll show exactly how to do it
Before getting started, download the latest version of VSDC Video Editor here.
If you prefer a video tutorial to the text version, feel free to check out the one below.
How to activate the Edit the beat mode
First of all, import your footage to VSDC. You can either use a music video with the original audio track or add an audio file separately.
Next, you need to decide which effect you would like to synchronize to the sound. For our example, we’ll add Zoom to make the video “pump” to the beat. To add the effect, select the video layer on the timeline, open the Video effects menu, proceed to Transforms >> Zoom. Go through the Object’s position settings window to confirm the position of the effect on the timeline and hit Ok.
Once you’ve added the effect to the scene, make a double-click on the video file. Then right-click on the effect layer and select Properties from the menu.
The Properties window contains the Zoom effect parameters. At this point, you need to decide which parameter you want to synchronize to the music beat. Typically, you want to use the key parameter of the selected effect – the one defining its intensity. For Zoom, that will be the parameter called “Levels”.
To synchronize the selected parameter to the sound, click on the three-dot icon as illustrated below and choose Edit the beat from the Templates menu above the timeline. Then hit the button titled “Create points”. You’ll see a new graph on the timeline with points distributed based on your audio waveform values. Again, the higher a point is located on the timeline, the higher will be the value of the Zoom level at this particular moment.

Most times, however, you’ll want to adjust the distribution of the points – simply because the abundance of sounds and their values jumping up and down may create an unwanted effect. Below, we’ll show you how to do it.
Edit the beat: rhythm graph generation
Once you’ve selected the Edit the beat mode, a new window named “Edit the beat settings” will pop up. This is where you can adjust the parameters of the template.
First, in the Audio object menu, you can select an audio file that will be used for scanning and generating the rhythm graph. It can be either the soundtrack from your video or any other audio file you’ve added to the project.
What deserves your attention next is the dropdown list called “Beat preset” with several options of how you want the graph to be generated.

Here is a brief overview of the available presets:
- Maximum sensitivity and frequency range – the graph will be generated precisely based on the audio frequency and detection of every minor sound change.
- Maximum sensitivity – the graph will be generated based on sound changes while the audio frequency will be ignored.
- Merge nearby points – control points with similar frequency values will not be treated as dynamic changes and will be connected in the form of a straight line.
- Skip low-power sounds – low-power sounds won’t be included to the graph.
- Prefer powerful beats – the graph will mainly contain powerful beats.
- Only powerful beats – the graph will be generated based on the powerful beats only.
Choose any of these templates and generate the graph based on your needs. You’ll further be able to adjust the distribution of the points and other details.
Edit the beat: settings overview
The easiest way to show you how to fine-tune the rhythm graph is to go over each parameter in the Edit the beat settings window.
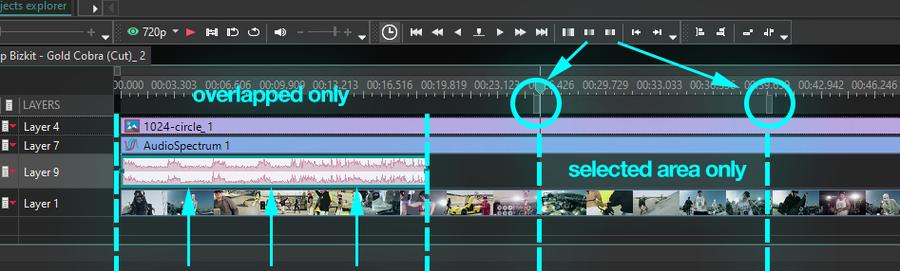
First, you need to decide whether you want to apply the effect to the entire project or just to the area where the effect overlaps with the audio. For the latter option, make sure the “Overlapped only” box is checked.
The“Selected area only” option means that the effect will only be applied to the piece you’ve selected manually on the timeline.
Next comes an especially important parameter, called Silence value. It is the initial value of the effect you’re applying, and it will be used during the moments of silence.
By default, the silence value is often equal to zero, and that means the effect isn’t applied at all.
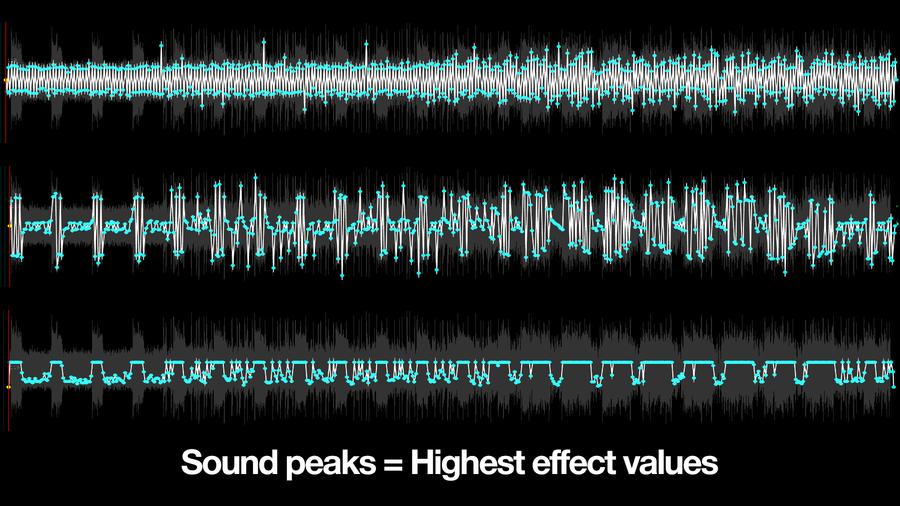
Amplitude is the parameter that sets the deviation of the effect from its silence value. In other words, this parameter helps you control the maximum effect value applied at sound peaks.
For example, if the Silence value is 100, and the Amplitude value is 30, at sound peaks the effect value will be 130. At the negative sound peaks, the minimum effect value will be 70. For the Zoom effect we’ve applied previously, that means that the image will be “pumping” to the beat, and the Zoom levels will be changing between 70 and 130.
Time between points helps you set time gaps between control points. There are two options here: minimum or maximum. By changing these parameters, you can set the minimum and the maximum possible distance between control points.
The tricky part is that the software will generate control points based on the “Time between points” value even if the audio track does not exactly correspond. For example, if you set 5 sec. as the maximum time between points, and there is a whole minute of silence in the audio, VSDC will still place control points on the rhythm graph every 5 seconds despite the silence and the absence of dynamic sound changes.
Priority frequency is a menu for advanced audio frequency detection setup. It allows you to change the following parameters:
- Range – sets minimum and maximum values of the detected audio frequency.
- Preset – contains templates with audio frequency variations for different goals.
- Reset frequency – allows you to reset the Priority frequency value to the default minimum (0 Hz) and the default maximum (22050 Hz).
Sensitivity – determines how accurate audio frequency detection will be. The higher the value here is, the more points the graph will have. That means the effect will react to every slightest frequency change.
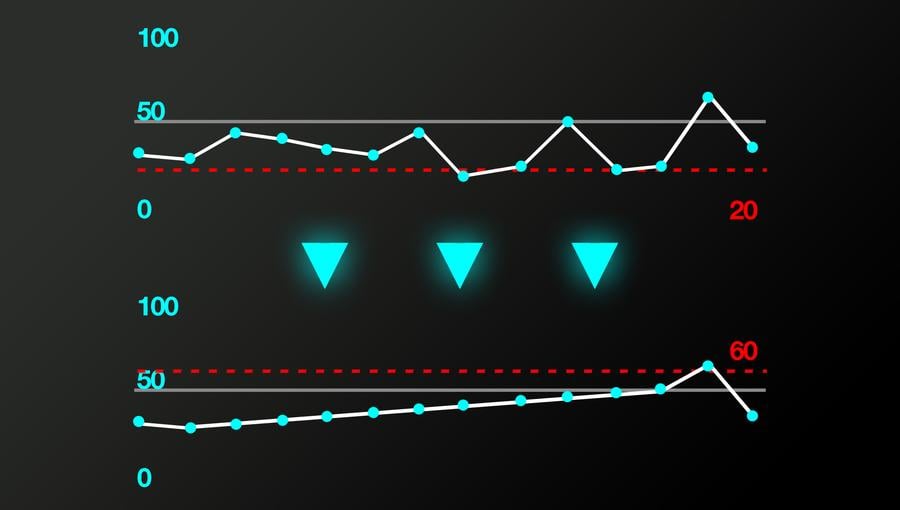
Max dropout limit – is a percentage of the maximum sound value. It sets the bar below which all the points will not be syncing to the effect.
For instance, at Dropout limit = 50%, the values lower than half of the maximum sound value will be ignored, and all the points located below the graph will form a straight line. The straight line will be gradually increasing to the point where it reaches the indicated dropout limit.
Max interpolation threshold – this is the value at which peaks of similar intensity will form a straight line. To determine which values should be considered similar, the Interpolation threshold (% max) sets the possible point value deviation.
Right above the Max interpolation parameter, you’ll notice the Keep peaks checkbox. Make sure it is ticked to keep the peak points in their original locations. If you don’t do it, you’ll lose the dynamic changes of the effect value.
Below, you can set a Scale factor value. The scale factor is a multiplier that allows you to increase or decrease the value of the applied effect for all points at once.
Here is how it works. If the scale factor equals 1, the effect is applied with the original values – based on the audio waveform. If you increase the scale factor to 2, all the effect values will be doubled.
Finally, Point distribution mode is a dropdown menu where you can choose point distribution variations.
Here are your options:
- From silence value to peaks up. If you choose this option, the points will be distributed increasingly starting from the Silence value.
- From silence value to peaks down. Points will be distributed decreasingly starting from the Silence value.
- Vibrations according to silence value. The points get distributed equally in both directions from the Silence value.
- Inverted vibrations according to silence value. The same equal distribution in both directions as described above – but inverted.
- Increased vibrations according to silence value. The points get distributed equally in both directions and their values are maximized.
- Inverted and increased vibrations according to silence value. The points get distributed in both directions – but they are inverted, and their values are maximized.
Go ahead and try the new tool available in VSDC!
Synchronizing video effects to music is an advanced level of post-production involving a steep learning curve – especially if you’ve never worked with sound adjustment before! But once you get the hang of the new feature, you’ll be able to create captivating videos where the visuals are perfectly synced to the music – and that is a huge step forward from the amateur editor level to the level of a post-production professional.
Got questions? Ask away at Bu e-Posta adresi istenmeyen posta engelleyicileri tarafından korunuyor. Görüntülemek için JavaScript etkinleştirilmelidir.
For a weekly dose of inspiration, subscribe to our YouTube channel.
Watch us on YouTube
 / @VSDCFreeVideoEditor
© 2011-2026, www.videosoftdev.com, FLASH-INTEGRO LLC. Gizlilik politikası | Kullanım koşulları | Hakkımızda
Burada atıfta bulunulan tüm ticari markalar, ilgili sahiplerinin mülkiyetindedir.
Bu siteden herhangi bir materyalin kopyalanmasına yalnızca Site Yönetiminin yazılı onayı ile izin verilir.