Video Düzenleyici

Aile tebrik kartından şirket sunumuna kadar her türlü karmaşıklıkta videolar oluşturmak ve düzenlemek için ücretsiz video yazılımını kullanın. Video dosyalarını kesin, birleştirin, görsel ve ses efektleri uygulayın, filtreleme ve görüntü düzeltme kullanın, slayt gösterileri yapın ve uygun bir film müziği ekleyin. Videonuza profesyonel bir görünüm kazandırmak için çok renkli Renk anahtarı ve gelişmiş parametre ayarlarını kullanın. Tüm popüler video ve ses formatları desteklenir.

Video Düzenleyici hakkında daha fazla bilgi edinin...

Video Dönüştürücü

Bu program video dosyalarını bir biçimden diğerine dönüştürmek için tasarlanmıştır. Hemen hemen tüm popüler video biçimleri (hem okuma hem de kaydetme) desteklenir. Ayrıca iPhone, Huawei P30 Pro veya Samsung Galaxy gibi belirli multimedya cihazları için videolar oluşturmak da mümkündür. Programın kullanımı son derece kolaydır, modern bir arayüze ve gerekli tüm video işleme fonksiyonlarına sahiptir.

Video Dönüştürücü hakkında daha fazla bilgi edinin...

Ses Dönüştürücü

Bir ses dönüştürücü kullanarak ses dosyalarını bir biçimden diğerine dönüştürebilirsiniz. Tüm önemli ses biçimleri ve codec bileşenleri desteklenir. Program ayrıca çalma listelerini ve meta etiketlerini yönetmenize izin verir, ayrıca video dosyalarından sesi dışa aktarmak ve parçaları herhangi bir biçimde bilgisayarınıza kaydetmeniz de mümkündür.

Ses Dönüştürücü hakkında daha fazla bilgi edinin...

Ses CD’si Yakalayıcı

Bu ses aracı kompakt disklerden ses parçalarını kopyalamaz ve bunları seçtiğiniz herhangi bir biçimde bilgisayarınıza kaydetmek için tasarlanmıştır. Neredeyse tüm popüler ses biçimleri ve codec bileşenleri desteklenir. Program ayrıca dosyaları otomatik olarak yeniden adlandırma ve meta etiketleri güncelleme için parça ayrıntılarını FreeDB sunucusundan ayıklayabilir.

Ses CD’si Yakalayıcı hakkında daha fazla bilgi edinin...

Çok işlevsellik

Çok işlevsellik

Tek bir ücretsiz video yazılım paketinde çok çeşitli multimedya işleme araçları

Yüksek hız

Yüksek hız

Programlar hızlı, optimize edilmiş çok işlemcili algoritmalar kullanır.

Kullanılabilirlik

Kullanılabilirlik

VSDC video yazılımı, Windows işletim sistemi tabanlı tüm bilgisayarlarda ve cihazlarda ücretsiz olarak indirilebilir.

VSDC – Free MP4 Video Editor for Windows Reviewed

How to edit MP4 video for free on a Windows PC

MP4 is probably the most common video format because the majority of recording devices including cameras, smartphones, and drones produce MP4 files. It’s also the most widely recognizable format that can be opened by iOS and Android phones, most TVs, gaming devices, and DVD players.

Naturally, many people are either looking for a way to quickly edit MP4 videos or to convert their videos into MP4 and edit them afterward. If you’re one of them, this tutorial is for you.

Meet VSDC, a free MP4 video editor for Windows with no watermarks or quality restrictions. VSDC is your best bet because it’s a one-stop shop for working with multimedia files. You can use it when you need a powerful converter, a full-featured MP4 video editor, or when you just need a quick MP4 video splitter to break down your footage into multiple fragments.

Download the latest version of VSDC

We’ve compiled this tutorial, based on the most common tasks involving MP4 video editing. Keep reading it to learn:

  • How to edit MP4 videos using VSDC
  • How to split MP4 videos into parts
  • How to add music to an MP4 video
  • How to remove audio from MP4
  • How to slow down or speed up MP4 videos
  • How to reverse an MP4 video
  • How to create a GIF from MP4 (or convert it to any other format after editing)
  • How to make MP4 video file - instruction for export project from video editor to mp4 file

Here is exactly what you get when you install VSDC Free Video Editor to your PC

Before we jump to a more detailed review of how to edit MP4 videos in VSDC, here is what you’re getting when you install this video editor to your PC.

First of all, this software is very lightweight and requires minimum resources of your PC. That means you can safely use it even if you have a slightly outdated computer with not-so-much memory left. To be precise, you’ll only need 256Mb of RAM and 50Mb of free disk space.

Downloading VSDC may take a few minutes depending on your Internet connection, and when you launch the program, here is what the start screen looks like.

VSDC - free MP4 video editor start screen overview

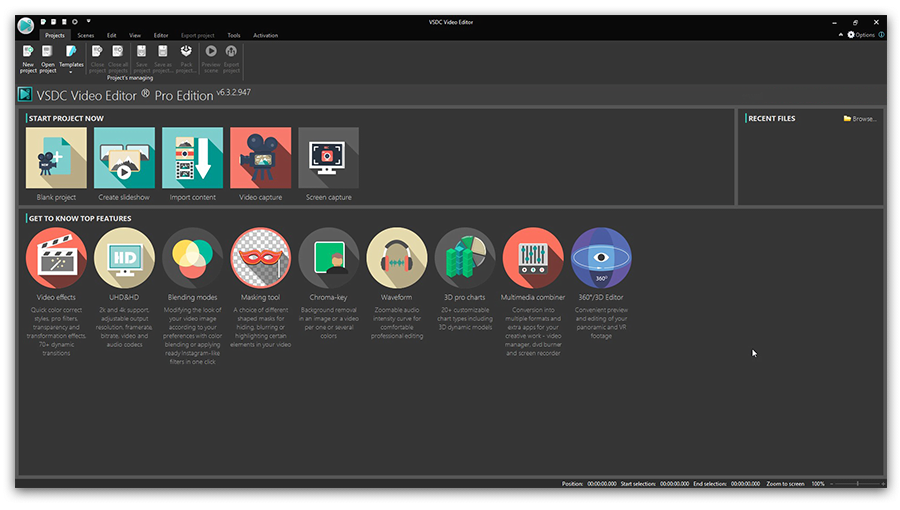
VSDC has a PRO version you’ll be offered to upgrade to after installation. At this point, you can simply close the promotional banner (or click “Continue” if it pops up at the export stage) if you aren’t ready to upgrade.

The suite includes multiple tools, and it’s not just an MP4 video editor. There is also a video grabber, an instrument for capturing desktop screen, a slideshow creator, a video converter, a voice recorder, and a YouTube uploader.

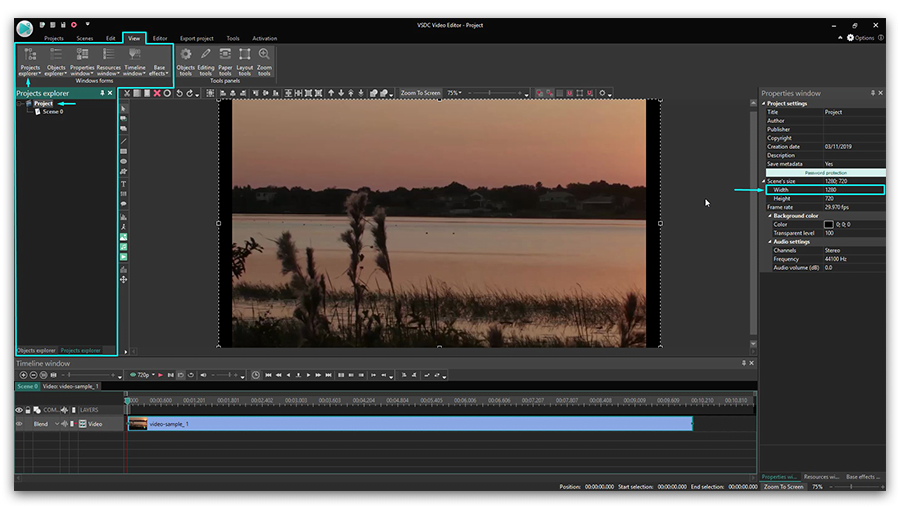
To start working, click on the large “Import content” button and choose a video file from your PC. A “Project settings” window will pop up, and unless you want to change any parameters – resolution, framerate, size of the video – just click “Finish”.

How to edit MP4 videos on Windows

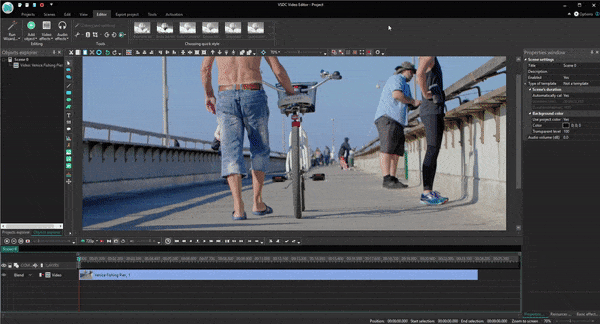
Now that you have a file uploaded to VSDC, take a look at the key menu sections you’ll need for editing it.

VSDC Free Video Editor interface

Once imported, the file is automatically placed on the timeline – your main working area. You’ll be using the green cursor for splitting videos precisely and the red Preview button for checking the results of your actions. If your PC processor struggles with the file size, the video may look choppy during the preview. It doesn’t affect the output file in any way, however, for your convenience we recommend decreasing preview quality using the dropdown menu to the left from the Preview button.

Now, the top ribbon menu contains all the basic tools you’ll need for your project. Add new audio, video, or image files using the green round button and refer to the Cutting and Splitting menu for – you guessed it – cutting and splitting. The latter is also your go-to tab if you need to crop or rotate an MP4 video. Some other tasks, such as playback speed or audio adjustments, are performed in the Properties window – a sticky tab on the right. We’ll get to it in a couple of paragraphs. And finally, the Export project tab is where you get to save the file to your PC after editing.

Now that you have a better understanding of VSDC interface, let’s proceed with some basic tasks this MP4 video editor will help you with.

How to use VSDC as an MP4 video splitter

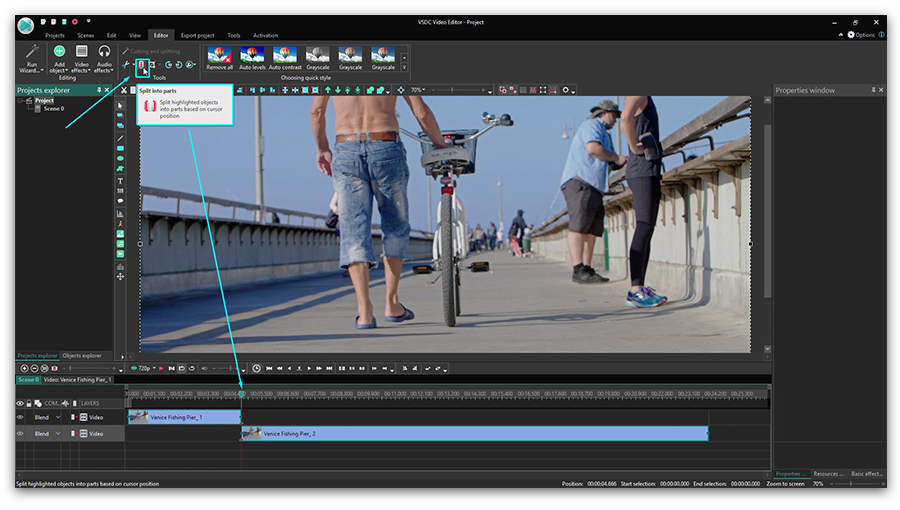
Splitting an MP4 video is no different from splitting any other video file:

  • Place the cursor at the exact moment you want to split the video into parts.
  • Hit the icon looking like a razor from the Splitting and Cutting menu at the top.
  • Click anywhere on the timeline to cancel the selection of the entire video, then select the fragment you need and hit Delete or drag it across the timeline – depending on your final goal.

Free MP4 video splicer

How to add music to an MP4 video/How to remove audio from MP4

To add music to an MP4 file, simply hit the green Add object button and choose a soundtrack from your PC. The audio file will be placed on the timeline, and you’ll be able to split and drag it just like you would do with a video file. To adjust the volume, you’ll need to select the audio file and go to the bottom of the Properties window menu where the Audio volume parameter is available.

Sometimes you may need to do the opposite: extract or remove audio from the MP4 file. Here is how to do it:

  1. Click on the video file or a fragment you’re working with to select it on the timeline.
  2. Go to the Properties window and scroll down to the very bottom.

    How to add or remove music from an MP4 video file

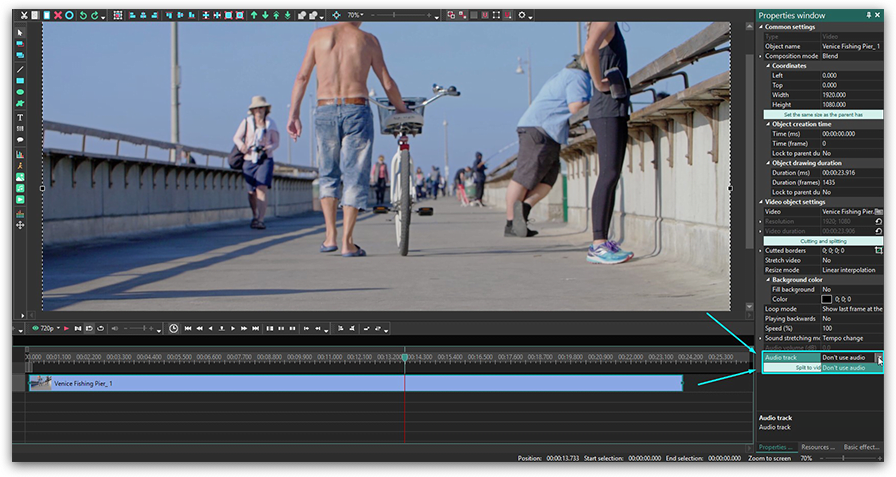
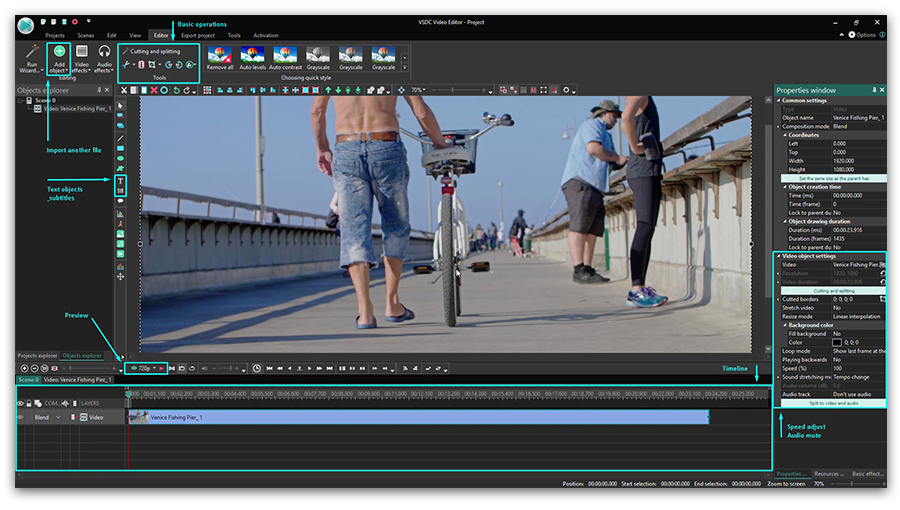
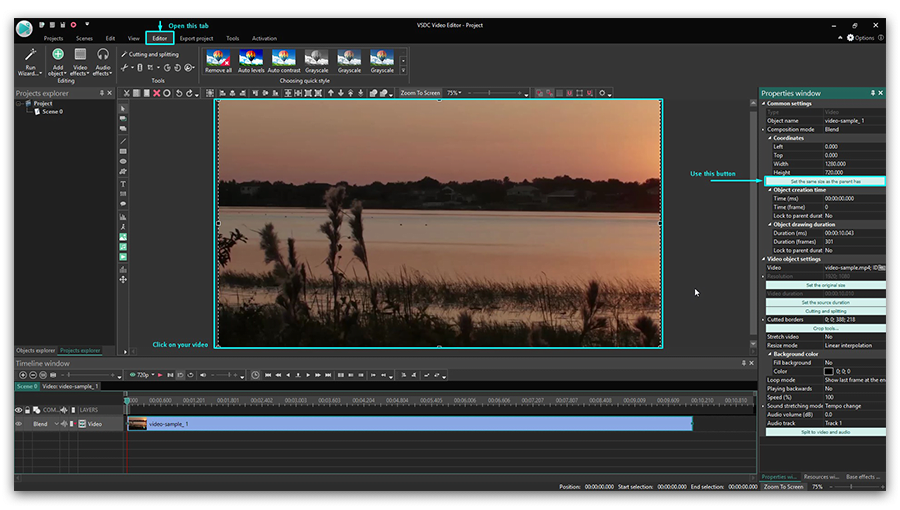
  3. If you choose “Split to video and audio”, you’ll get the sound of your video as a separate track on the timeline (see the illustration, the audio track is placed above the video on the timeline). Splitting is a good idea when you need to apply audio effects, adjust the volume, cut out an audio fragment – in other words, work with the existing audio more precisely.
  4. If you need to remove audio from your video completely, you can either delete the audio track you’ve just got by splitting the file OR you can choose “Don’t use audio” in the Audio track menu section highlighted in the illustration above.

How to slow down or speed up MP4 videos/ How to reverse an MP4 video

To slow down an MP4 video, you need to reduce the playback speed of your file. This is a very easy task:

  1. Select the fragment of the video you want to slow down.
  2. Go to the Properties window and scroll down to the Speed% menu section.
  3. Change the speed according to your needs. For instance, setting the speed at 50% will make your video twice slower.

Slowing down and speeding up an MP4 video

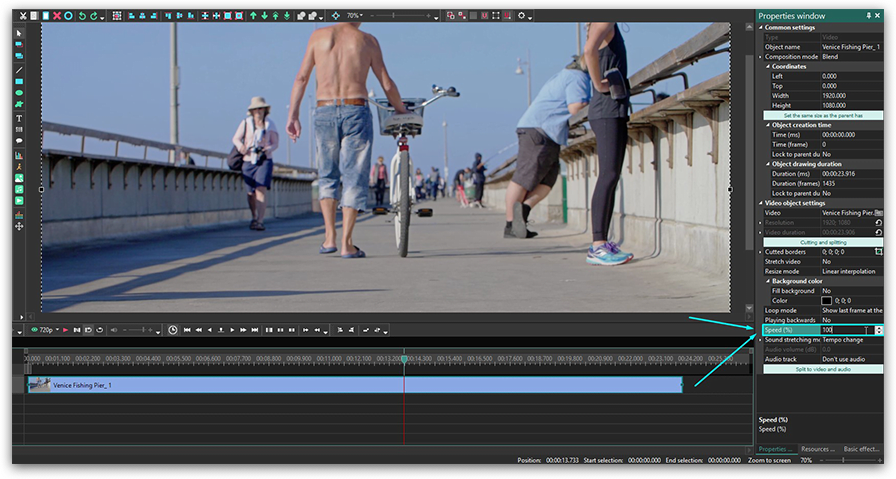
If you need to speed up an MP4 file, use the same settings to increase the speed % to the desired level. We have a separate detailed tutorial on how to speed up a video and achieve a fast-motion effect, if you’d like to learn more.

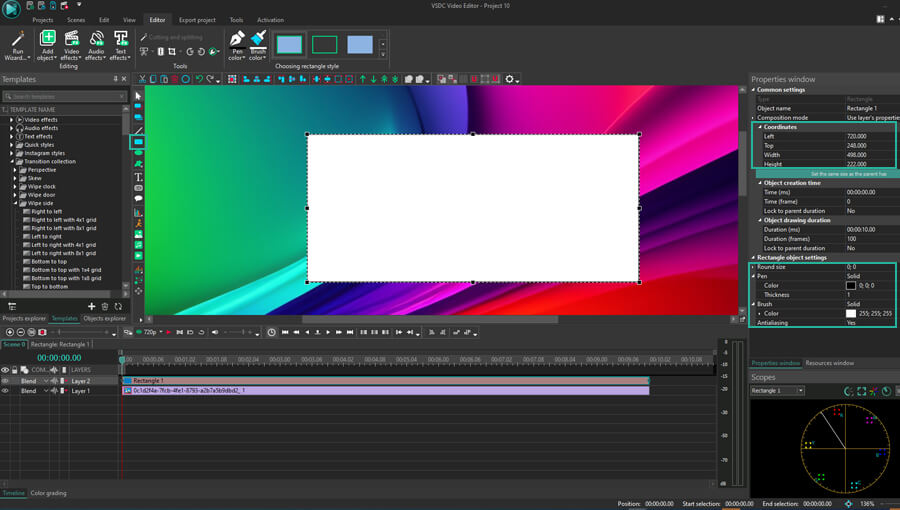
Finally, if you’re trying to find out how to reverse an MP4 video, switch from “No” to “Yes” in the dropdown “Play backward” menu above the Speed% parameter as illustrated above.

Remember that when you change the video playback speed, its audio adapts automatically. Therefore, you might want to mute it or replace it with a more appropriate soundtrack.

How to create a GIF from MP4 (or convert it to any other format after editing)

If you just need to convert an MP4 video file to any other format, we recommend using a free video converter. But if you want to create a GIF from MP4 after editing, just select the corresponding format at the export stage as illustrated below.

Converting an MP4 video file to a GIF or any other format in VSDC

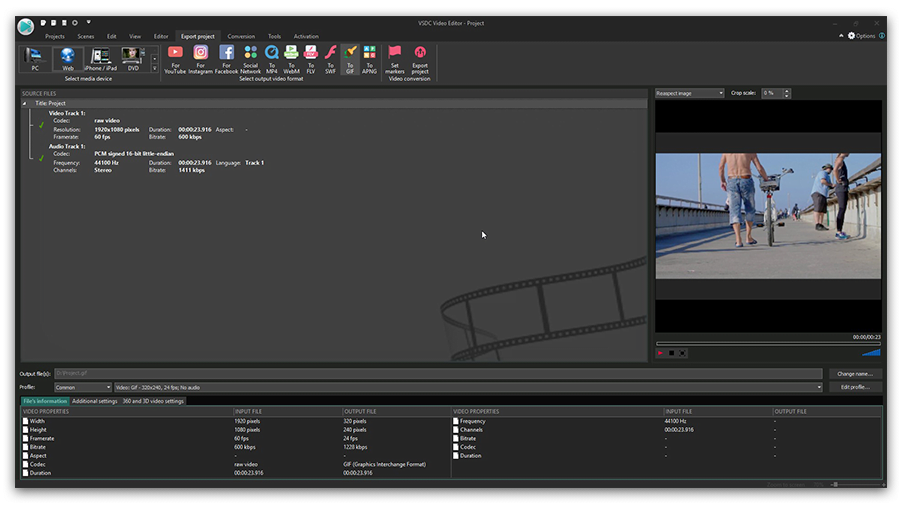
As you can see, there is a large number of other formats you can choose based on your goals. Besides, VSDC allows you to save videos using social media profiles. That means if you’re planning to publish your clip to Facebook, Twitter, Instagram, YouTube, or Vimeo, the program will apply the parameters required by these social media platforms to your file automatically. And if you need to adjust video quality, you can do so using the “Edit profile” button in the lower right corner of the Export screen.

Then use the preview window for a final look and hit the Export project button when ready.

Final thoughts on VSDC as a free MP4 video editor

MP4 is an industry standard supported by most devices and multimedia software. One of its key benefits is high image quality preserved due to the H.264 codec. So, when you need to edit an MP4 video file, you should take this factor into consideration because some free video editors put severe limitations on the file formats and resolution at the export level.

When it comes to VSDC, not only does it allow you to keep the highest quality of the video, it also supports H.265/HEVC – the successor of H.264 codec. That means even if your video is in 4K, you’ll be able to keep its preciseness after editing.

If you’d like to learn more on what VSDC Free Video Editor is capable of, check out its YouTube channel.

Color correction with RGB curves in VSDC Free Video Editor

Oftentimes even when we use professional cameras for video shooting, we get upsetting results: gloomy or overexposed compositions, glares, black background. And if it’s an important event you were trying to capture, there comes huge disappointment. There can be many reasons why your footage came out in poor quality but what really matters is whether it can be fixed. And luckily, in many cases, it is possible, even if you aren’t a professional.

In this article, we will show you how to process photos and videos using simple color correction techniques. Specifically, we’ll be working with RGB curves to change brightness and contrast levels in VSDC Free Video Editor.

Download VSDC to your PC (the program runs on Windows only)

How to open the RGB curves dialog window

After you have installed and launched the program, import the file that needs to be edited. By clicking on it, go to the bottom part of the timeline and select "Color Correction." On the vertical panel in the opened window, click on the icon shaped like three different colored dots - "RGB curves." Upon clicking, the curves dialogue window will unfold.

Changing the brightness and contrast - the basic principles

RGB curves area

Working with brightness and contrast of the image is one of the basics of color correction. To change these two parameters in VSDC, the so-called “method of shifting control points in the composite curve mode” is used. Control points are arbitrary points that belong to the curves of the color channels: red, green, and blue.

The composite curve mode is set by default, and when you open the RGB working area, it is indicated by a white circle (see the illustration on the right). In the graph, the horizontal axis reflects the original brightness values ​​of the pixels, and the vertical axis - the desired (output) values ​​that you get in the editing process. The maximum pixel brightness value is 255. Initially, when an image is loaded into the program, all the original pixel brightness values ​​are equal to the output. That’s why the composite curve is a straight diagonal line passing through the points with coordinates (0; 0) and (255; 255). Points in the lower left corner correspond to black color (shadows), points in the upper right corner correspond to white color (light areas of the image).

A double-click on a specific area of the composite curve provides the necessary control point. Moving the control points (up and down, right or left) of the curve will change the overall color of the image by adjusting the brightness and contrast.

There are several ways to change the position of control points:

  • dragging manually with the mouse.
  • using the arrow keys on the keyboard (up, down, right, left).

By changing the coordinates of the points in the lower left area of the graph, you adjust the dark tones in the image. Meanwhile, the upper right area can be used to adjust the light tones, and when you work with the middle region of the curve, it affects medium tones of the video.


Adjusting the brightness of an image in practice

Let’s now jump from theory to practice. By moving the control point up, as shown in the illustration below, you increase the output value of the pixels relative to the input value. In other words, higher (brighter) values are now assigned to the pixels in a given area, which means that the brightness of the video is increased. In the example below, we took a point in the region of dark tones with coordinates (0; 0). An increase in the output value of this point (upward shift) led to the brightening of the dark areas of the image: the black pixels (with the initial value of 0; 0) acquired a more gray tint.

Now, for a clearer example, let's do the opposite and darken the bright areas of the image. By shifting the control point down, you reduce the output pixel values in a given area, which means you lower the brightness. In the example below, a point of the light-colored area with the coordinates of the maximum value (255; 255) was taken as a guide. Reducing the output value of this point led to the darkening of the bright areas of the image.

Contrast level adjustment

The contrast level of the image directly depends on the composite curve inclination angle. Remember that the original curve has a tilt angle of 45°? Increasing the tilt angle increases the contrast level and on the contrary: decreasing the angle reduces the contrast level.

If in the editing process the curve takes on a non-linear look (for example, an S-shaped composite curve), then the contrast level is characterized by the angle of inclination of the tangent built to a specific control point, as shown in the illustration below.

  • If the tilt angle is less than 45° - the contrast level of the corresponding image area is lowered (1);
  • If the tilt angle is more than 45° - the contrast level of the corresponding image area is increased (2).

So, what do you do if constructing imaginary tangents is not one of your talents? To find out the degree of change in contrast, you can use the simplest mathematical operations:

  • Determine the largest and smallest values along the horizontal axis (input values) and the vertical axis (output values).
  • Calculate the difference between the highest and the lowest values for each of the axes (input and output option):
    (Inputmax – Inputmin) = Differenceinput.
    (Outputmax – Outputmin) = Differenceoutput.
  • Compare the input and the output difference values: the one with a larger difference in values is considered more contrastive.

As an example, consider an image that has the following data:
Inputmin=0;
Inputmax=150.

As a result of adjustments, the image acquires the following values:
Outputmin=30;
Outputmax=250.

Determine the difference between the minimum and maximum values:
Differenceinput=150
Differenceoutput.=220

Comparing the resulting values, we can conclude that the output version of the image has more contrast than the input version (220> 150).

This way, using several control points, you can simultaneously adjust the brightness and the contrast levels in the areas of dark, light and medium tones independently. An extra control point can be deleted by clicking on it and pressing Delete.

Next, we will look at several ways to simultaneously change the levels of brightness and contrast you can apply in practice.


1. Linear brightness and contrast increase.

To simultaneously increase both brightness and contrast, you need to move the control point with coordinates (255; 255) to the left, say, to the value (200; 255).

Therefore, you will get:

  • the slope of the curve is greater than 45°, which means a higher level of contrast;
  • the input value for the white point will be reduced to 200, and the output will take the value - 255. This will automatically increase the brightness level, since the output value of bright tones will be higher than the input.

2. Linear brightness increase with a decrease in contrast

To increase the brightness of the entire image while reducing the contrast, you need to drag the point with the coordinates (0; 0) up, for example, to the value (0; 50).

This way you get the following results:

  • the slope of the curve will be less than 45 degrees, which means that the contrast level will decrease;
  • the input value for the black point will remain unchanged - 0, while the output value will be increased to the level 50, which will increase the brightness level and mute / brighten the dark areas of the image.

3. Non-linear brightness increase

As a control point, we’ll take the one with the coordinates (127; 127) - it corresponds with the middle tones of the image. Then we’ll move it up to the value (127; 170).

We will get the following results (see the illustration below):

  • the overall tonal range remains unchanged;
  • the output value for the selected control point will be increased to 170, which indicates an increase of the brightness level in the mid-tone region;
  • the contrast level in the shadow area will be increased since the angle of inclination of the tangents constructed to the guiding points in this area will be more than 45° (2). The image details that were shadowed will become clearer;
  • the level of contrast in the area of ​​light tones will be lowered since the angle of inclination of the tangents built to the control points in this area will be less than 45° (1). Details in the light areas of the image will become less clear.

4. Linear brightness and contrast levels decrease

To simultaneously reduce the brightness and contrast of the entire image, you must drag the control point with the coordinates (255; 255) down. For example, drag it to the value (255; 200).

This way we get the following:

  • the slope of the curve will be less than 45°, which means a lower level of contrast;
  • the output value for the white tones control point will be reduced to 200, with an input value of 255. This means the brightness level will be lowered (since the output value is greater than the input value) and the bright areas of the video will be muted (without affecting the dark areas significantly).

5. Linear brightness decrease with increased contrast

To reduce the brightness of the entire image while simultaneously increasing the contrast, move the control point with coordinates (0; 0) - black color - to the right, for example, to a value (50; 0).

This way we get the following results:

  • the slope of the curve will be more than 45°, which indicates that the level of contrast increases;
  • the input value for the black point will be increased to 50, while the output value will be 0 indicating a decrease of the brightness level (output value is less than the input value). As a result, the dark areas of the image will become even darker and lose their distinguishable details.

6. Non-linear brightness decrease

As in the case with the non-linear brightness increase, we leave the black (0; 0) and white (255; 255) color points unchanged. As a control point, we take the one belonging to the mid-tone region, with coordinates (127; 127). By moving this control point down, for example, to the level (127; 70), we get the following results:

  • the overall tonal range remains unchanged;
  • the output value for the selected control point will be reduced to a value of 70, which indicates a decrease in the brightness level;
  • the contrast level in the region of highlights will be increased since the angle of inclination of the tangents constructed to the control points in this region will be more than 45° (2). Image details in bright areas will become clearer;
  • the contrast level in the shadow area will be lowered since the angle of inclination of the tangents constructed to the control points in this area will be less than 45° (1). This means that the details in the dark areas of the image will become less clear, yet they will not turn into black spots either.

7. Linear contrast increase

Since the level of contrast directly depends on the difference between the values of the lightest and darkest points of the image, the simplest way to increase the contrast of the image is to reduce the gap between the input values of the black and white points. In other words, we need to increase the input value for the black point (shift it to the right) and decrease it for the white point (shift it to the left). For a more detailed correction, see paragraphs 1 and 5.

8. Linear contrast decrease

Similarly to the previous example, the easiest way to reduce the overall level of image contrast is to bring the output values for the black and white points closer together, i.e. decrease the output value for the white point (shift it down) and increase it for the black point (shift it up).

After that, refer to the instructions in paragraphs 2 and 4.

9. How to work with an S-curve

If you need to increase the contrast of the mid-tones only, you should use an S-shaped curve. First, double click to create three control points on the curve. For example, place one in the mid-tone area (128; 128), one in the shadow area, and one in the area of light tones.

Leave the position of the first control point unchanged, shift the second one down (according to the principle described in paragraph 6), and drag the third point up (according to the principle described in paragraph 3). This way, the dark and the light areas of the image will become flatter. The angles of inclination of the tangents built to the control points in these areas will be less than 45°. That means the image details located in the darkest and lightest areas will become less clear, meanwhile, the mid-tones of the image become more contrasting.

Of course, the process of using an S-shaped curve will be slightly different for each image. However, the basic principle remains the same: by increasing the number and changing the position of the control points, it is possible to achieve both amplification and weakening of the visualization of details in the dark, light and medium tones independently.

10. Using the inverse S-shaped curve

The operation principle of this curve is opposite to the operation principle of the above described S-shaped curve.

To reduce the contrast of mid-tones with a simultaneous increase in clarity in the area of shadows and highlights, do the following:

  • double-click to create at least three control points. As in the previous example, you can take the midpoint (128; 128), the point in the shadow area and the point in the light area.
  • leave the position of the first point unchanged, move the second point up, and the third one - down.

This way, the light and dark areas of the image become more contrasting because the angles of inclination of the tangents built to the control points in these areas will be more than 45°. The image details in these areas will become clearer, while the mid-tones become flatter.

How to use color channels to edit a video or an image

Working with color channels is one way to perform color correction in the RGB mode.

Each color in the RGB color space is achieved by mixing three basic colors: red (Red), green (Green) and blue (Blue). According to the theory we all know, if you mix red and green you get yellow; the mix of red and blue results in purple; the mixture of blue and green results in blue, and so on.

Color channels overview

The brightness of each color is set at a value between 0 and 255. The point with zero values for all three curves (0; 0; 0) corresponds to the black color, and the point with the maximum values (255; 255; 255) – corresponds to white.

To switch to the color correction mode of an individual RGB curve, you need to select the desired color channel in the RGB color space.

Double-click on a particular section of the composite curve will create a control point. When you move the control points (up & down, right & left) of the curve, you change the overall color of the image by adjusting the brightness of a particular color in the selected area.

The principles of working with RGB channel curves are similar to the principles of changing the brightness and contrast levels of a video:

  • By moving the control point of a particular channel up, you assign richer values of the selected color to the pixels in a given region.
  • By shifting the control point down, you assign lower brightness values to the pixels of the selected color channel.

Please note that this process enhances other color channels in the editing area. In the example below, you can see that the decrease in the brightness of image mid-tones in the red channel has led to an increase in the values of blue-green colors and overall darkening of the image.

VSDC Ücretsiz Video Düzenleyici’yi kullanarak bir videodan filigran nasıl hızlı bir şekilde kaldırılır?

Bu talimata bir videodaki filigranı tamamen ücretsiz olarak kaldırmanın ideal bir yolunun bulunmadığı gerçeğiyle başlayalım. Mesele şu ki teknik açıdan bakıldığında metin nesneleri gibi filigranlar, videoya her kare düzeyinde oldukça güvenilir bir şekilde “gömülüdür. Yani filigran kaldırma ile profesyonel olarak ilgileniyorsanız projede kullanılan kaynak dosyalara veya videodaki filigranı otomatik olarak tanıyabilen ve kaldırabilen özel bir yazılıma sahip olmanız gerekir.

Ancak iyi haber şu ki birçok kullanıcıya uygun olan “geçici çözümler” de bulunmaktadır. Özellikle filigranı DeLogo filtresini kullanarak gizleyebilir ve videonun köşesinde veya kenarına yakın bir yerde bulunuyorsa onu çerçevenin küçük bir bitişik parçası ile birlikte kırpabilirsiniz. İkinci seçenek filigrandan tamamen kurtulmanızı sağlar, ancak elbette videonun en boy oranını kaçınılmaz olarak değiştirecektir.

Bu eğitimde size VSDC’yi kullanarak her iki tekniği nasıl uygulayacağınızı göstereceğiz.

VSDC’yi indir (Program yalnızca Windows işletim sisteminde çalışır)

Ücretsiz DeLogo filtresini kullanarak bir videodan filigran nasıl kaldırılır?

Bu yöntem kelimenin tam anlamıyla bir dakikadan az sürer ve filigranlardan, logolardan, GPS koordinatlarından, araç numaralarından, videoya gömülü saat veya tarih rakamlarından kurtulmanın kolay bir yoludur.

Aşağıda bu filtrenin nasıl uygulanacağına ilişkin adım adım talimatlar verilmiştir:

  1. Video dosyanızı VSDC Ücretsiz Video Düzenleyici’ye aktarın.
  2. Video Efektleri menüsünü açın ve ardından Filtreler bölümüne gidin. DeLogo’yu seçin.
  3. Bunu yaptıktan sonra sahnede pikselli dikdörtgen bir nesne belirir. Zaman çizelgesinde aynı anda DeLogo 1 adlı filtreye sahip yeni bir sekme görünür. Aşağıdaki resimde bu sekmenin nasıl göründüğüne bakın. How to remove a watermark from a video for free
  4. Filtre nesnesine tıkladığınızda onu yeniden boyutlandırabilir ve sahnede hareket ettirebilirsiniz.

Şimdi filtrenin ne kadar yoğun olması gerektiğine karar vermeniz gerekiyor. Ayrıca çalıştığınız videonun türüne bağlı olarak piksellerden bulanıklığa veya mozaiğe geçiş yapmayı tercih edebilirsiniz. Bunu aşağıdaki şekilde yapabilirsiniz:

  1. Sağdaki Özellikler penceresini açın. Eğer bulamazsanız DeLogo filtresine sağ tıklayın ve Özellikler’i seçin.
  2. Özellikler penceresinde menüyü DeLogo filtre ayarları satırına kaydırın. 5 yerleşik ön ayar göreceksiniz: Pikselleştirme, 3 çeşit bulanıklık ve Mozaik.
  3. Aşağıdaki alanda istenen görünümü elde etmek için yoğunluk seviyesini ayarlayın.

Sonuçtan memnun kalırsanız “Projeyi dışa aktar” sekmesine gidin ve videoyu istediğiniz biçimde kaydedin.

Dışa aktarma sırasında VSDC’nin videolara filigran yerleştirip yerleştirmediği konusunda periyodik olarak sorular aldığımız için endişelenmenize gerek olmadığını hemen açıklığa kavuşturmak istiyoruz. VSDC tamamen ücretsiz bir video düzenleyicidir. Aksi takdirde bu talimatı yazmamız oldukça mantıksız bir eylem olurdu.

Remove a watermark by cropping it out from a video

Çerçeve kenarlığını kırparak bir videodan filigran nasıl kaldırılır

Farklı yöntemler kullanarak video kenarlıklarının nasıl kırpılacağı hakkında zaten ayrıntılı olarak konuştuk, bu nedenle burada süreci kısaca özetleyeceğiz:

  1. Videonuzu VSDC’ye aktarın.
  2. Üst menüde Kesme ve Bölme Araçları bölümünü bulun. Kenarlıkları kırp simgesi soldan üçüncü sıradadır. Özel bir bölgeyi kırpmak için üzerine tıklayın.
  3. Açılan pencerede çerçeveyi filigran dışında kalacak şekilde ayarlayın.
  4. Kırpma penceresini kapatmak için Tamam’a tıklayın.

Videonun kenarlığı kırpıldıktan sonra çerçeve boyutunun da değiştiğini fark edeceksiniz. Bazı durumlarda videonun orijinal sahne boyutundan daha küçük olması nedeniyle videonun kenarlarında ince siyah kenarlıklar oluşabilir.

Dolayısıyla bu siyah kenarlıkların varlığından rahatsız oluyorsanız projenin boyutunu videonun yeni boyutuna uyarlayarak bunları kaldırabilirsiniz. Bu aşağıdaki şekilde yapılır:

Kırpma penceresinde parantez içindeki videonun değişen yükseklik ve genişlik değerlerine dikkat edin. Projenizi boyutlandırırken bu rakamlara ihtiyacınız olacak.

Crop a video to cut out a watermark or logo

Kırpmayı tamamladığınızda üst menüdeki Görünüm sekmesine gidin ve Proje gezgini bölümünü açın. Proje 1’e (veya başlangıçta belirtteyseniz projenizin adına) tıklayın. Sağ tarafta projenin genişliğini ve yüksekliğini hassas bir şekilde ayarlayabileceğiniz Özellikler penceresi açılır. Örneğin aşağıdaki resimde genişliği biraz azalttık.

How to adjust scene width to the width of a video

Siyah kenarlıklar hemen kaybolmazsa Proje gezginini kapatın ve Düzenleyici sekmesine geçin. Sağdaki özellikler penceresinde “Üst öğeyle aynı boyutu ayarla” düğmesine tıklayın. Bu işlem aşağıdaki resimde gösterildiği gibi çerçeveyi projenin boyutuna göre mükemmel bir şekilde uyarlayacaktır.

Düzenlemekte olduğunuz videoda herhangi bir ek değişiklik yapmayı düşünmüyorsanız dosyayı bu aşamada dışa aktarabilirsiniz. Sürecin teknik kısmıyla ilgili sorularınız için bizimle Facebook üzerinden iletişime geçmekten çekinmeyin.

VSDC project size parameters adjustment

Son söz

Videolardan nesneleri kaldırmak çok yaygın bir görev olsa da telif hakkını korumak için genellikle bir filigran eklendiğini hatırlatmak isteriz. Bu nedenle yüklemeye devam etmeden önce eylemlerinizle bunları ihlal etmediğinizden emin olmanızı öneririz.

Artık VSDC’de DeLogo filtresini kullanarak filigranları nasıl kaldıracağınızı bildiğinize göre aşağıda incelemenizi tavsiye ettiğimiz 5 talimat daha var:

Yayınlanan yeni eğitimler hakkında anında bildirim almak için VSDC YouTube kanalına abone olun.

Hollywood efekti oluşturmak için videoya siyah çubuklar nasıl eklenir?

Videolardaki siyah çubuklar, sinema salonları için yapılmış geniş ekran film yanılsaması yaratmak için uzun süredir kullanılan bir tekniktir. Hangi cihazda çekildiğine bakılmaksızın herhangi bir videoya uygulamak oldukça kolaydır. Bu eğitimde VSDC Ücretsiz Video Düzenleyici’yi kullanarak bir videoya nasıl siyah “Hollywood” çubukları ekleyeceğinizi göstereceğiz. Sadece birkaç dakika içinde bu işlemi tamamlayacaksınız.

Teknik olarak bu efekt çekim sırasında daha doğal bir şekilde elde edilebilir. Bunun için profesyonel bir kamera kullanmanız ve 21:9 en boy oranında çekim yapmanız gerekir. Bu en boy oranına bağlı kalırsanız standart bir 16:9 ekranda film izlerken boş alanı doldurmak için üstte ve altta otomatik olarak siyah çubuklar belirir. Hollywood filmlerini televizyonda izlediğimizde bu şekilde olmaktadır.

Zaten bu eğitimi okuduğunuza göre muhtemelen bu en boy oranına sahip bir video çekemediniz ve şimdi videoya manuel olarak siyah çubuklar eklemenin bir yolunu arıyorsunuz. Aşağıdaki adım adım kılavuz bunu yapmanıza yardımcı olacaktır.

Ama öncelikle bilgisayarınıza VSDC Video Düzenleyici’yi indirmeniz gerekir.

VSDC’yi kullanarak videoya siyah çubuklar nasıl eklenir?

  1. Programı başlatın ve başlangıç ekranındaki İçeriği içe aktar düğmesini kullanarak yakında Hollywood tarzına dönüşecek olan filminizi içe aktarın.
  2. Sol taraftaki menüyü kullanarak aşağıda resimde gösterildiği gibi sahneye dikdörtgen şeklinde bir nesne ekleyin.
  3. Üstteki menüden Fırça rengi simgesini veya Özellikler penceresindeki Fırça rengi menüsünü kullanarak dikdörtgeni siyaha boyayın.
  4. Bir dikdörtgeni çerçevenin genişliği boyunca hızlı bir şekilde genişletmek için Özellikler penceresindeki “Üst öğeyle aynı boyutu ayarla” düğmesine tıklayın. Dikdörtgen tüm sahne alanını kaplar, bu nedenle tek ihtiyacınız olan yüksekliğini istediğiniz gibi manuel olarak ayarlamaktır.Create cinematic bars
  5. Siyah çubuğunuz istediğiniz gibi göründüğünde farenin sağ düğmesini kullanarak üzerine tıklayın ve aynısını oluşturmak için Çoğalt’ı seçin.
  6. İlk başta planladığınız gibi çubukların birini videonun üstüne diğerini de alta yerleştirin.

Böyle hızlı bir manuel yöntemin bazı dezavantajları olduğunu unutmayın. Örneğin videonun küçük bir kısmı kaçınılmaz olarak eklenen nesnelerin arkasına “gizlenir”. Ancak şeritlerin yüksekliğini her zaman ayarlayabilir ve gerekirse daha ince hale getirebilirsiniz. Çekiminizin hiçbir önemli öğesinin dikdörtgenlerin arkasına gizlenmediğinden emin olmak için dışa aktarmadan önce videonun tamamını izlemenizi öneririz.

Videoyu ön izlemek için zaman çizelgesinin hemen üzerindeki kırmızı düğmeyi kullanın. Video ön izleme sırasında takılıyorsa veya gecikiyorsa soldaki açılır menüyü kullanarak çözünürlüğü düşürün. Gecikme genellikle bir video dosyasının çok büyük olup (özellikle 4K ise) işlemcinin bu bilgi hacmi karşısında yetersiz kalması sonucu oluşur. Bilgisayarınızda yeterli bellek yoksa bu kesinlikle standart bir durumdur. Ancak ön izleme sırasında çözünürlüğün takılması veya gecikmesi çıkış videosunun kalitesini değiştirmez.

Düzenlemeyi bitirdikten sonra Projeyi dışa aktar sekmesine gidin ve videoyu istediğiniz biçimde kaydedin. “Profili düzenle” düğmesini kullanarak videonun biçimi, codec bileşeni, kalitesi, kare hızı, genişliği ve yüksekliği dahil her parametresini değiştirebilirsiniz.

Videonuza siyah çubuklar eklemenin yanı sıra VSDC’de gerçek bir film karesi efekti elde etmenize yardımcı olacak pek çok başka teknik bulunmaktadır. Eğer bu tekniklerle ilgileniyorsanız "Metin içinde video" oynatma, "resim içinde resim" ve "bölünmüş ekran" oluşturma talimatlarını okumanızı öneririz.

Herhangi bir sorunuz varsa lütfen bizimle Facebook üzerinden iletişime geçin ve VSDC YouTube kanalına abone olmayı unutmayın.

VSDC’de ağır çekim video efekti nasıl oluşturulur?

Ağır çekim efekti, video düzenleme alanında en popüler efektlerden biridir. Özellikle aksiyon kamerası sahipleri arasında oldukça rağbet görür, çünkü kayıt genellikle yüksek hızda yapılır ve daha sonra sahnelerin her bir küçük ayrıntısını göstermek için videoyu yavaşlatmak gerekir. Ayrıca YouTube sayesinde ağır çekim efektinin, bir kuşun uçuşundan düşen su damlacıklarına kadar hemen hemen her olayı daha muhteşem hale getirebileceğini de biliyoruz.

Videonuz için ağır çekim efekti oluşturmanın hızlı bir yolunu arıyorsanız, aşağıda VSDC Ücretsiz Video Düzenleyici’de nasıl yapılacağına ilişkin adım adım bir kılavuz bulunmaktadır. VSDC Windows işletim sisteminde kullanabileceğiniz bir programdır. Farklı karmaşıklık düzeylerindeki videolarla çalışmak için çok sayıda araç içerir ve dışa aktarırken videonuza filigran eklemez.

Başlamadan önce ücretsiz VSDC video düzenleyicisini indirin ve kurun

Bir video nasıl yavaşlatılır/videoya ağır çekim efekti nasıl uygulanır?

Teknik açıdan bir videoda ağır çekim efekti oluşturmak için yalnızca orijinal kaydın oynatma hızını azaltmanız gerekir. Birçok video düzenleyicide video hızını 2,4,8 ve 16 faktörüyle yavaşlatmak için şablon ayarları bulunur. VSDC bu açıdan daha gelişmiş bir araçtır ve istediğiniz herhangi bir faktörle hız değişikliklerini uygulamanıza olanak tanır. Nasıl çalıştığını görmek için talimatları izleyin:

  1. Video dosyasını VSDC’ye aktarın – otomatik olarak sahneye yerleştirilecektir.
  2. Ağır çekim efektini videonun yalnızca küçük bir bölümüne uygulamanız gerekiyorsa, çalışmayı planladığınız parçayı bölmeniz ve ana parçadan ayırmanız gerekir. Bu efekti videonun tamamına uygulamanız gerekiyorsa doğrudan 4. adıma geçin.
  3. Bir video dosyasını bölmenin en hızlı yolu bölme aracını kullanmaktır. Bu jilet şeklinde küçük bir simgedir, programın arayüzünün üst kısmında bulunan “Kesme ve bölme” bölümünde bulunur. Zaman çizelgesi imlecini bölmek istediğiniz anın üzerine getirin ve aracı uygulamak için bu simgeye tıklayın. Videoyu daha fazla parçaya bölmeniz gerekirse işlemi birkaç kez tekrarlayın.
  4. Ağır çekim efektini uygulamak istediğiniz bölümü seçin.
  5. Hızı düzenlemek için sağdaki Özellikler penceresine gidin. (Özellikler penceresini bulamazsanız video dosyasına sağ tıklayın ve Özellikler’i seçin).
  6. Menüyü aşağıda gösterildiği gibi Hız (%) bölümüne kaydırın.
  7. Video hızını kademeli olarak azaltın ve eylemlerinizin sonucunu görmek için kırmızı renkli Ön izleme düğmesini kullanın.

Slow down a video for free

VSDC’de videoyu yavaşlatma yöntemi oldukça basittir. Değeri %50’ye ayarlarsanız, video orijinalinden 2 kat daha yavaş oynatılır. Buna göre %25’lik bir değer uygularsanız, hız 4 kat azalır vb.

Yeniden çerçeveleme ile ağır çekim efektinin kalitesi nasıl artırılır?

Oynatma hızını %50’den fazla düşürürseniz video titremeye başlayabilir. Bunun nedeni video kare hızının büyük ölçüde düşmesidir. Diğer bir deyişle, oynatma hızını yarıya indirdiğinizde saniyedeki kare sayısı da yarıya iner. Video olduğu gibi zaman içinde “uzatılır” ve karelerin görüntülenme süresi aynı kalır. Sonuç olarak, kareler arasında boşluklar belirir ve bu da kareleri değiştirirken titreme etkisi yaratır. Bunu önlemek için yeniden çerçeveleme kullanmanızı öneririz.

Yeniden çerçeveleme seçeneklerini açmak için oynatma hızı ayarlarının solundaki küçük üçgene tıklayın.

How to achieve a perfect slow-motion effect using reframing

VSDC’de kullanılabilen iki yeniden çerçeveleme modu vardır: Karıştırma ve Optik akış. Farklı algoritmalar üzerinde çalışırlar ve biraz farklı sonuçlar üretirler. Kural olarak, Optik akış her zaman kusursuz bir ağır çekim efekti sunan daha iyi bir seçenektir. Ancak bu mod yapay zeka algoritmalarına dayanarak çalışır ve bu da büyük miktarda bilgisayar kaynağı gerektirdiği anlamına gelir. Optik akış uyguladıysanız ve bilgisayarınızın işlemeyi kaldıramadığını görürseniz Karıştırma modunu kullanın.

Yeniden çerçeveleme modları hakkında daha fazla bilgi edinmek için ayrıntılı kılavuzumuzu okuyabilirsiniz.

Ağır çekim efektiyle çalışmak için ipuçları

Kusursuz bir ağır çekim efekti uygulamak istiyorsanız bilmeniz gereken birkaç şey daha var:

Ağır çekim efekti uygularken videodaki tüm değişikliklerin hem video hem de ses için geçerli olduğunu unutmayın. Başka bir deyişle video parçasını 2 kez yavaşlatarak sese aynı efekti uygularsınız. Bazı durumlarda bu uygun olsa da genel olarak sonuç pek tatmin edici değildir. Bu nedenle ağır çekim videonuzun müziği olarak hangi ses dosyasını kullanmak istediğinizi önceden belirleyin. Klasik müzikleri düşünmenizi öneririz – genellikle bu efekt için mükemmeldirler.

*Video dosyanızı bölerken sorun mu yaşıyorsunuz? Videoların nasıl bölüneceğine dair ayrıntılı talimatlarımıza bakın.

Bu eğitimimizi beğendiniz mi? Benzer video düzenleme teknikleri ile ilgileniyorsanız size yardımcı olacak 3 tane daha eğitim hazırladık:


Program hakkında daha fazla bilgiyi Ücretsiz Video Düzenleyici’nin açıklama sayfasından edinebilirsiniz.

News

New Transition Addition Methods, RAW/BRAW Files Support and Free Waveform

Moment gelmiştir: VSDC 9.1'ün merakla beklenen güncellemesini sunmaktan mutluluk duyuyoruz! Yeni sürümün geliştirilmiş işlevselliği, video montajını hızlandıracak ve düzenleme sürecini...

VSDC 8.3 - 100+ Yeni Şablon, Anahtar Düzenleyici Penceresi, AV1 ve Geliştirilmiş GUI

VSDC 8.3 güncellemesini size sunmaktan mutluluk duyarız! Ekibimiz yeni sürüm üzerinde aktif bir şekilde çalıştı ve şimdi VSDC'de çalışmayı daha kolay hale getirecek tüm değişiklikleri...

2023'te ücretsiz video düzenleme: Bankayı Bozulmadan Yaratıcılığınızın Kilidini Açın

Günümüzün dijital dünyasında yaratıcılık en üst düzeyde hüküm sürüyor. Bireylerin ve markaların izleyicileri büyülemesi ve kalıcı bir izlenim bırakması için sonsuz olanaklar sunar....

En İyi Çevrimiçi Video Düzenleyiciler 2023: Avantajlar ve Dezavantajlar

Şu anda video içeriğinin popülaritesi artıyor ve birçok kullanıcı kişisel ve profesyonel amaçlar için video klipler oluşturma ihtiyacıyla karşı karşıya kalıyor. Pazarda sunulan çeşitli...

VSDC 8.2 – Proxy File Support, Color Keyframes and Vectorscope

Merakla beklenen VSDC video editörü 8.2 güncellemesini açıklamaktan heyecan duyuyoruz. Ekibimiz, bu sürümün düzenleme deneyiminizi yükseltecek heyecan verici özellikler ve geliştirmelerle dolu...

VSDC 8.1 Sürümü Çoklu Kamera, Eğri Çizgi Nesnesi, Kayan Metin Efekti ve Daha Fazlasını İçerir

VSDC 8.1'i sunmaktan mutluluk duyuyoruz. Yeni sürüm, hem profesyonel kameramanları hem de grafik tasarımcıları ve profesyonel olmayan kullanıcıları hedefleyen çok çeşitli güncellemeler içeriyor....

VSDC 7.2 Renk Düzeltme Araç Setini Bir Sonraki Seviyeye Taşıyor (Diğer Güncellemeler)

VSDC ekibi için verimli birkaç ay daha oldu ve video düzenleme paketimizin yeni sürümü olan VSDC 7.2'nin piyasaya sürüldüğünü duyurmaktan heyecan duyuyoruz. Güncellemelerin çoğu renk düzeltme...

Video Renk Düzeltme için 5 Ücretsiz Yazılım

Bir video içerik üreticisiyseniz, renk düzeltmeyi öğrenmenin çok önemli olmasının üç nedeni vardır. İlk olarak, videolarınızı geliştirmenize ve profesyonel görünmelerini sağlamanıza...

VSDC 7.1 GUI ve LUT Düzenleyicisini Geliştirir, Yeni efektler ve Özel Klavye Kısayollar Ekler

VSDC'nin yeni sürümü iki yeni video efekti içerir, LUT düzenleyicisinin işlevselliğini genişletir ve geliştirilmiş bir arayüz, iyileştirilmiş zaman çizelgesi ve özel kısayollar getirerek...

Filigran İçermeyen En İyi 10 Ücretsiz Video Düzenleme Yazılımı

Saatlerce düzenleme yaptığınız bir videoda filigran görmek oldukça sinir bozucudur. Ancak bazı video düzenleme yazılımı geliştiricileri, ürünlerinin ücretsiz kullanımını sınırlamak...
 

Screen Recorder Box

Bu program ile masaüstünüzün video videosunu çekebilir ve bilgisayarınıza çeşitli biçimlerde kaydedebilirsiniz. Bir video düzenleyiciyle eşleştirilmiş program, sunumlar ve demolar oluşturmak için idealdir.

Ekran Kaydedici hakkında daha bilgi edinin...


Video Capture Box

Program, dış aygıtlardan video yakalar ve ücretsiz bir biçimde bilgisayara kaydeder. Video tarayıcılardan, web kameralardan, yakalama kartlarından ve diğer araçlardan da video kaydedebilirsiniz.

Video Yakalama hakkında daha fazla bilgi edinin…


İnceleyen


"VSDC Ücretsiz Video Düzenleyici her ne kadar alışılmadık bir video düzenleyici olsa da şaşırtıcı derecede güçlü"

- PC Advisor


"Bu video düzenleyici size tonlarca kontrol ve düzenleme gücü veriyor"

- CNet


"Bu video düzenleyici tüm popüler video formatlarını destekler ve çok çeşitli özelliklere sahiptir. Aydınlatma seviyesini değiştirebilir, videoları birleştirebilir, filtreler ve geçişler uygulayabilirsiniz"

- Digital Trends