")


Video Düzenleyici
Aile tebrik kartından şirket sunumuna kadar her türlü karmaşıklıkta videolar oluşturmak ve düzenlemek için ücretsiz video yazılımını kullanın. Video dosyalarını kesin, birleştirin, görsel ve ses efektleri uygulayın, filtreleme ve görüntü düzeltme kullanın, slayt gösterileri yapın ve uygun bir film müziği ekleyin. Videonuza profesyonel bir görünüm kazandırmak için çok renkli Renk anahtarı ve gelişmiş parametre ayarlarını kullanın. Tüm popüler video ve ses formatları desteklenir.
Video Dönüştürücü
Bu program video dosyalarını bir biçimden diğerine dönüştürmek için tasarlanmıştır. Hemen hemen tüm popüler video biçimleri (hem okuma hem de kaydetme) desteklenir. Ayrıca iPhone, Huawei P30 Pro veya Samsung Galaxy gibi belirli multimedya cihazları için videolar oluşturmak da mümkündür. Programın kullanımı son derece kolaydır, modern bir arayüze ve gerekli tüm video işleme fonksiyonlarına sahiptir.
Ses Dönüştürücü
Bir ses dönüştürücü kullanarak ses dosyalarını bir biçimden diğerine dönüştürebilirsiniz. Tüm önemli ses biçimleri ve codec bileşenleri desteklenir. Program ayrıca çalma listelerini ve meta etiketlerini yönetmenize izin verir, ayrıca video dosyalarından sesi dışa aktarmak ve parçaları herhangi bir biçimde bilgisayarınıza kaydetmeniz de mümkündür.
Ses CD’si Yakalayıcı
Bu ses aracı kompakt disklerden ses parçalarını kopyalamaz ve bunları seçtiğiniz herhangi bir biçimde bilgisayarınıza kaydetmek için tasarlanmıştır. Neredeyse tüm popüler ses biçimleri ve codec bileşenleri desteklenir. Program ayrıca dosyaları otomatik olarak yeniden adlandırma ve meta etiketleri güncelleme için parça ayrıntılarını FreeDB sunucusundan ayıklayabilir.
 Video Editor
 Video Dönüştürücü
 Ses Dönüştürücü
 Ses CD’si Yakalayıcı

Çok işlevsellik
Tek bir ücretsiz video yazılım paketinde çok çeşitli multimedya işleme araçları

Yüksek hız
Programlar hızlı, optimize edilmiş çok işlemcili algoritmalar kullanır.

Kullanılabilirlik
VSDC video yazılımı, Windows işletim sistemi tabanlı tüm bilgisayarlarda ve cihazlarda ücretsiz olarak indirilebilir.
News:
- published Amy Shao 6/10/25 Yeni ve sıradışı bir şey için bekleyiş nihayet sona...
- Bu tatil sezonu, VSDC Video Editörü'nün en son güncellemesiyle yeni başlangıçlar...
- Değişim, gelişim demektir ve bu süreç sizlerin geri bildirimleri olmadan mümkün ...
- Giriş 2024 yılında görsel efekt oluşturma seçenekleri son derece çeşitli ve en...
How to Make Transitions Smoother Using Bezier Curves
Bezier curves have many uses in video editing, one of which we already explored in our quick guide to drawing shapes. This time, we’ll show you how to use Bezier curves in so-called “easing curves” – the tool allowing you to control how long it takes a transition to kick in or fade out.
Please note that editing transitions along Bezier curves is only available in the Pro version of VSDC.
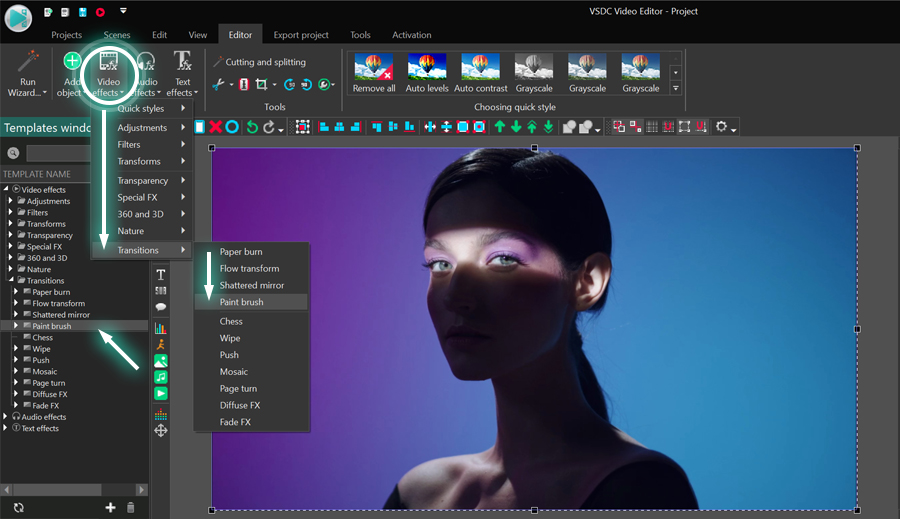
Step 1: Import your footage and add a transition
Making smooth transitions with the Bezier curve is a simple process. First, import your video file to the project. If you already have a blank project opened, you can just drag the video file onto the timeline. Next, add a transition. For this tutorial, we will be using the Wipe transition, but you can choose any of the ones available in the Templates window.
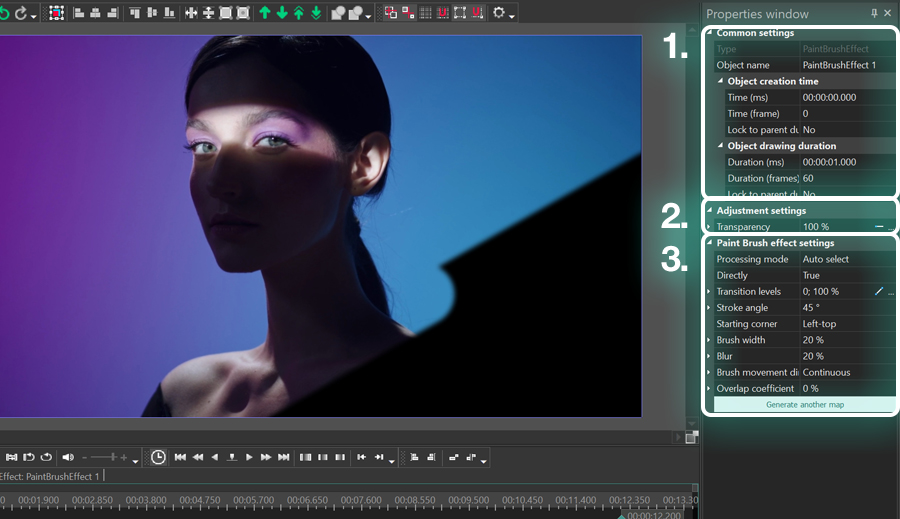
Step 2: Apply transition curve template
Right-click on the transition effect to open the Properties window. For our example, we’ll be working with Transition levels – the parameter setting the speed of the transition. Right-click on the tiny Parameter change icon next to Transition levels and hover over Templates. Then select “Quad Out.”

There are over a dozen options available in the menu; however, for our example, we need to use a template ending with “Out” because the transition is at the end of the video. Had we placed the transition at the beginning of the video, we would have selected a template ending with “In.”
Step 3: Configure Bezier curve
Once you apply the template, the timeline window will display a graph. The curve on the graph is based on the Transition level values, therefore, by changing this curve, you will be adjusting the pace of the transition.
To get started, find the two control points: one at the beginning of the graph and one at the end of it. These are called “keyframes.” Click on either of the keyframes, and you’ll see a vector. Grab the end of the vector and drag it around: both the length and the angle of the vector change the curve and, thus, the pace of the transition.
To adjust the transition at any specific moment, you can create additional keyframes by double-clicking on the graph. The smoother the curve is, the smoother the transition. The opposite is true: if you create a sharp curve, the pace of the transition will spike accordingly.
Create custom video effects using Bezier curves
Customizing transitions with Bezier curves is easy. You can apply them to any parameter that includes values changing along a curve and achieve outstanding video effects. Furthermore, after creating your ideal transition, you can save it as a template and use it later. Check out a quick tutorial on how to do it.


Bu program ile masaüstünüzün video videosunu çekebilir ve bilgisayarınıza çeşitli biçimlerde kaydedebilirsiniz. Bir video düzenleyiciyle eşleştirilmiş program, sunumlar ve demolar oluşturmak için idealdir.

Program, dış aygıtlardan video yakalar ve ücretsiz bir biçimde bilgisayara kaydeder. Video tarayıcılardan, web kameralardan, yakalama kartlarından ve diğer araçlardan da video kaydedebilirsiniz.

"VSDC Ücretsiz Video Düzenleyici her ne kadar alışılmadık bir video düzenleyici olsa da şaşırtıcı derecede güçlü"
- PC Advisor

"Bu video düzenleyici size tonlarca kontrol ve düzenleme gücü veriyor"
- CNet

"Bu video düzenleyici tüm popüler video formatlarını destekler ve çok çeşitli özelliklere sahiptir. Aydınlatma seviyesini değiştirebilir, videoları birleştirebilir, filtreler ve geçişler uygulayabilirsiniz"
- Digital Trends
© 2011-2025, www.videosoftdev.com, FLASH-INTEGRO LLC. Gizlilik politikası | Kullanım koşulları | Hakkımızda
Burada atıfta bulunulan tüm ticari markalar, ilgili sahiplerinin mülkiyetindedir.
Bu siteden herhangi bir materyalin kopyalanmasına yalnızca Site Yönetiminin yazılı onayı ile izin verilir.