L'editor video consente di modificare file e creare video di qualsiasi complessità. Potete applicare effetti video e audio effects ad oggetti modificati, trasformarli, applicare filtri e correzioni d'immagini. Tutti i popolari formati video e audio sono supportati (sia lettura che salvataggio).
Questo programma serve a convertire video file da un formato ad un altro. Quasi tutti i popolari formati video sono supportati. Inoltre, il programma semplifica drasticamente il compito di convertire video da riprodurre su determinati dispositivi multimedia quali iPhone, Microsoft Zune oppure Archos. Il programma è semplicissimo da usare, dispone di una moderna interfaccia e di tutte le necessarie funzioni per processare i video.
Il convertitore audio vi aiuterà a convertire file audio da un formato ad un altro. Tutti i formati audio e codec chiavi sono supportati. Il programma vi consente inoltre di gestire playlist e meta tags, di estrarre audio dai file video e di salvare queste tracce sul vostro computer in qualsiasi formato.
Questo strumento audio serve a catturare tracce audio dai CD e di salvarle nel computer dell'utente in qualsiasi formato. Quasi tutti i popolari formati e codec sono supportati. Il programma è inoltre in grado di estrarre dettagli di tracce dal server FreeDB al fine di rinominare automaticamente il file e di aggiornare i meta tag.
How to Make Transitions Smoother Using Bezier Curves
Bezier curves have many uses in video editing, one of which we already explored in our quickguide to drawing shapes. This time, we’ll show you how to use Bezier curves in so-called “easing curves” – the tool allowing you to control how long it takes a transition to kick in or fade out.
Please note that editing transitions along Bezier curves is only available in the Pro version of VSDC.
Step 1: Import your footage and add a transition
Making smooth transitions with the Bezier curve is a simple process. First, import your video file to the project. If you already have a blank project opened, you can just drag the video file onto the timeline. Next, add a transition. For this tutorial, we will be using the Wipe transition, but you can choose any of the ones available in the Templates window.
Step 2: Apply transition curve template
Right-click on the transition effect to open the Properties window. For our example, we’ll be working with Transition levels – the parameter setting the speed of the transition. Right-click on the tiny Parameter change icon next to Transition levels and hover over Templates. Then select “Quad Out.”
There are over a dozen options available in the menu; however, for our example, we need to use a template ending with “Out” because the transition is at the end of the video. Had we placed the transition at the beginning of the video, we would have selected a template ending with “In.”
Step 3: Configure Bezier curve
Once you apply the template, the timeline window will display a graph. The curve on the graph is based on the Transition level values, therefore, by changing this curve, you will be adjusting the pace of the transition.
To get started, find the two control points: one at the beginning of the graph and one at the end of it. These are called “keyframes.” Click on either of the keyframes, and you’ll see a vector. Grab the end of the vector and drag it around: both the length and the angle of the vector change the curve and, thus, the pace of the transition.
To adjust the transition at any specific moment, you can create additional keyframes by double-clicking on the graph. The smoother the curve is, the smoother the transition. The opposite is true: if you create a sharp curve, the pace of the transition will spike accordingly.
Create custom video effects using Bezier curves
Customizing transitions with Bezier curves is easy. You can apply them to any parameter that includes values changing along a curve and achieve outstanding video effects. Furthermore, after creating your ideal transition, you can save it as a template and use it later. Check outa quick tutorial on how to do it.
How to Use Bezier Curves for Drawing Shapes
Bezier curve is a tool that lets you draw odd shapes with precise accuracy. In video editing, it’s one of those rare features that are easy to use and hard not to. Below, we’ll show you how to use Bezier curves in VSDC Free Video Editor for creating shapes you can later use for clipping or inverted masks. For the sake of this tutorial, we’ve selected a heart shape as an example to practice on; once you get the hang of it, you’ll be able to draw any other shape quickly and effortlessly.
Step 1. Launch VSDC Free Video Editor and import your content
First, boot up VSDC Free Video Editor. On the main screen, there are different options for importing your content. You can create a blank project with custom parameters, or you can simply click Import content and select your video files from the computer. If you decide to do the latter, VSDC Free Video Editor will automatically change the project’s parameters to the parameters of your video.
Step 2. Draw the foundation of your shape
Once you access the project’s scene, go to the left-side menu and select the Add free shape tool:
A window called Object position settings will pop up to indicate the position of the shape you’re creating on the timeline – just click OK.
Now, as an easy demonstration of what the Bezier curve is capable of, let’s draw a heart shape. In the previous versions of VSDC, you would have to create up to 100 control points just to draw a smooth-looking heart. However, now you’ll be able to make do with only a couple of control points, even if you have little to no vector drawing experience. The Bezier curves will practically draw the shape for you!
To get started, click anywhere on the scene and while holding the mouse button, drag it to the side. Once you do that, you’ll see two vectors that will start forming the shape. Leave them as they are and repeat your steps to create another control point above the first one: now you have half of the shape! Okay, it may not look like half of a heart shape, but that’s temporary.
Now all you have to do is close the shape before we start turning it into a heart. There are two ways to do that. You can either select the first control point and press the Closed Free Shape button in the Shape Point Settings, or simply hold the Ctrl key and click on your first control point.
Step 3: Adjust the vectors to achieve the desired shape
Vectors determine the shape of your figure; therefore, you can tweak the shape just by dragging them in the desired direction. For instance, to turn the circle into a heart shape, press the Ctrl key and drag one of the vectors at a 45-degree angle. Keep in mind that if you forget to press the Ctrl key, both vectors will be moving along, staying parallel to each other. Once you’re finished with one vector, drag the second one at the same angle but in the opposite direction. Repeat the process with the vectors from the second control point, and voila – you have a heart. You always had.
Make use of your shape
Drawing shapes with the Bezier curve is this easy. You can add as many control points as you want: each will have two vectors to help you form the shape more precisely. Whether you want to create a clipping mask, hide an object behind a shape, or just practice vector drawing – now it’s much easier. We’re excited to see what uses you’ll find for this tool!
La transizione pennello è un effetto popolare che imita i colpi di pennello. Potete usarlo per muovere gradualmente da una scena all’altra coprendo il video con i colpi di pennello o rilevando l’immagine prossimo da sotto una mano di vernice. Ecco qui com’è:
Da questo tutorial scoprirete come applicare questo effetto nei vostri video e adattarlo alla vostra visione. L’effetto pennello è disponibile in VSDC cominciando dalla versione 6.8, quindi assicuratevi di scaricarlaprima di muovere una con il tutorial.
Come applicare transizione pennello in VSDC
Quando scaricate VSDC, lo lanciate sul vostro computer e importate il vostro filmato. Raccomandiamo di usare il pulsante Importare contenuto a meno che volete applicare i parametri personalizzati al vostro progetto. Poi scegliete il video a che volete applicare la transizione, aprite il menù Effetti video, andate a Transizioni e scegliete Pennello.
La finestra Impostazioni della posizione dell’oggetto spunterà indicando che la transizione sarà aggiunta alla fine della scena. Fate un clic su OK per precedere e prevedere il risultato. Notate che se volete allungare la durata, sarete capaci di farlo manualmente. Parleremo più di questo nella sezione seguente.
Come accedere impostazioni di transizione pennello
Per aprire le impostazioni dell’effetto, prima fate un doppio clic sul video a che avete applicato l’effetto. Troverete voi stessi in una tabella nuova con uno strato dell’effetto chiamato EffettoPennello. Fate un doppio clic sul pulsante destro del mouse e scegliete Proprietà. La finestra Proprietà scivolerà dal lato destro.
La finestra proprietà per la transizione pennello include 3 gruppi di impostazioni:
Impostazioni comuni
Impostazioni di regolazione
Impostazioni di effetto pennello
Esaminiamo ogni gruppo delle impostazioni e vediamo che cosa fanno.
Impostazioni comuni
Le impostazioni nel primo gruppo vi permettono di rinominare lo strato dell’effetto della transizione, scrivere il momento esatto quando la transizione deve cominciare (in secondi o in fotogrammi) e mettere la sua durata (in secondi o in fotogrammi). Tenete a mente che potete anche muovere manualmente e allungare lo strato dell’effetto proprio sulla cronologia usando i contatti.
Impostazioni di regolazione
Le impostazioni di regolazione contengono un parametro unico chiamato Trasparenza. La trasparenza vi permette di regolare il livello dell’opacità per i colpi di pennello. Ad esempio, se lasciate il valore predefinito (100%), la vernice non sarà trasparente completamente. Però se diminuite il valore, comincerete a ottenere l’effetto trasparente.
Se espandete il parametro Trasparenza, potete accedere il Valore iniziale e il Valore finale. Questi valori vi permettono di mettere il livello dell’opacità per l’inizio dell’effetto pennello e la sua fine, così creando una transizione più liscia tra le scene.
Impostazioni di effetto pennello
Le impostazioni del terzo gruppo vi permettono di adattare l’effetto ai vostri bisogni. Ad esempio, potete cambiare la direzione e l’angolo dei colpi di pennello, scegliere la larghezza del pennello e altro ancora.
Direttamente
Il primo parametro in terzo gruppo è chiamato Direttamente e riferisce alla direzione della transizione. Se lasciate questo parametro disattivato, il pennello coprirà gradualmente il vostro filmato, colpo dopo colpo. Se attivate questo parametro, la transizione funzionerà nel modo opposto e scoprirà gradualmente il video da una mano di vernice.
Angolo di colpo
Il parametro seguente vi permette di cambiare l’angolo del colpo di pennello. Automaticamente il pennello muove sotto l’angolo di 45 gradi, però potete cambiare questo valore al vostro gusto. Ad esempio, nell’immagine sotto potete vedere come i colpi saranno se usate, diciamo, gli angoli di 90 gradi e 30 gradi.
Oltre all’angolo di colpo potete attivare l’opzione chiamata Direzione invertita e cambiare il lato dove il pennello comincia a muovere. Ad esempio, automaticamente il pennello muove dal lato destro a sinistro. In questo caso la direzione del lato opposto sarà dal lato sinistro a destro.
Angolo iniziale
Questo parametro definisce l’angolo dove l’effetto comincia. Ci sono 4 opzioni ovvie da che potete scegliere: sinistro superiore, destro superiore, sinistro inferiore e destro inferiore.
Larghezza di pennello
La larghezza di pennello è anche abbastanza ovvia. Questo parametro definisce quanto grande e spesso i colpi di pennello sono, e potete lasciare il suo valore costante o farlo dinamico. Ad esempio, se mettete il Valore iniziale a 10% e il valore finale a 50% ogni colpo di pennello successivo sarà più spesso.
Sfocatura
Questo parametro aggiunge la sfocatura alla vernice e fare i colpi di pennello meno definiti. Il valore più alto causa i colpi di pennello più sfocati. Infatti se scrivete 100%, l’effetto assomiglia alla vernice a spruzzo.
Direzione di movimento di pennello
La direzione di movimento di pennello è la schema del movimento del pennello che definisce l’ordine in quale i colpi di pennello sono applicati. Ci sono 5 opzioni da quali potete scegliere:
Non continuo - ogni colpo di pennello successivo comincerà nello stesso lato della scena.
Continuo - ogni colpo di pennello successivo comincia nel lato opposto della scena.
Territoriale - la scena è divisa in qualche area e ogni area è coperta con la vernice.
Casuale (lo stesso angolo) - ogni colpo di pennello apparisce in un posto casuale nella scena sotto lo stesso angolo.
Casuale (angolo casuale) - ogni colpo di pennello apparisce in un posto casuale nella scena sotto l’angolo casuale.
Coefficiente di sovrapposizione
Il coefficiente di sovrapposizione definisce la percentuale dei colpi di pennello che appariscono nella scena allo stesso tempo. Ad esempio, se il numero totale dei colpi di pennello richiesto per coprire la scena completamente è 12, e il coefficiente di sovrapposizione è uguale a 30%, in qualsiasi momento vedrete 4 colpi di pennello invece di solo uno.
Provate transizione di pennello gratis
L’effetto di transizione pennello nuovo è disponibile nella versione gratis di VSDC editor video, quindi se vi piace questo tutorial, andate avanti e scaricate VSDC dal sito ufficiale.
Sentite liberi di inviarci un messaggio su Facebook e assicuratevi di iscrivervi al nostro canale su YouTube per la dose settimanale dell’ispirazione del montaggio video.
Come creare effetto vetro rotto realistico
L’effetto vetro rotto è una transizione popolare che recentemente è diventata disponibile in VSDC Pro. Con la configurazione corretta questo effetto vi aiuterà di aggiungere la profondità al video e raggiungere la prospettiva. Potete usarla per creare una transizione liscia tra le scene, finire un video con un botto e cominciare la vostra storia.
In questo tutorial vi mostreremo come creare un effetto vetro rotto realistico. Però prima di continuare, assicuratevi di scaricare l’ultima versione di VSDC dal sito ufficiale perché l’effetto nuovo non è disponibile nelle versioni prima di 6.8.
Come applicare effetto vetro rotto in VSDC
Per cominciare lanciate VSDC e usate l’opzione Importare contenuto per caricare il vostro filmato all’editor. Quando lo fate, il video automaticamente atterra sulla cronologia e potete cominciare il vostro lavoro.
Per applicare l’effetto vetro rotto, aprite il menù Effetti video il alto e passate a Transizioni. Poi scegliete Vetro rotto.
Quando avete applicato l’effetto, una finestra a comparsa chiamata Impostazioni della posizione dell’oggetto indicherà che l’effetto sarà aggiunto alla fine della scena. Più tardi sarete capaci di cambiare la posizione dell’effetto manualmente.
Usate la finestra d’anteprima per guardare il risultato e se siete felici com’è la transizione - andate avanti e esportate il video o continuate a lavorare con il resto. Se però volete vedere come personalizzare l’effetto, continuate a leggere.
Come accedere impostazioni di effetto vetro rotto in VSDC
Per aprire impostazione dell’effetto prima dovete accedere l’effetto sulla cronologia. Per farlo fate un doppio clic sul video a che avete applicate l’effetto. Da qui fate un clic sul pulsante destro del mouse sullo strato dell’effetto e scegliete Proprietà. La finestra Proprietà scivolerà dal lato destro.
Nella finestra Proprietà ci sono tre gruppi delle impostazioni:
Impostazioni comuni
Impostazioni di regolazione
Impostazioni di effetto vetro rotto
Impostazioni comuni
Impostazioni comuni vi permettono di rinominare lo strato dell’effetto sulla cronologia, definire la durata dell’effetto e mettere il momento esatto quando deve apparire nel video (in secondi or fotogrammi).
Impostazioni di regolazione
Impostazioni di regolazione includono due controlli: Trasparenza dell’effetto e l’opzione Estendere confini dei pezzi rotti (frammenti).
Il controllo primo influenza direttamente l’opacità dei pezzi rotti. Ad esempio, se il valore della trasparenza è uguale a 100%, l’immagine rompe mentre lo sfondo rimane nero. Però se significamente diminuite il livello della Trasparenza, i pezzi rotti diventeranno semi-opachi e invece dello sfondo nero, l’immagine originale rimane visibile.
Notate che se espandete il menù Trasparenza, noterete le due proprietà aggiuntive: il Valore iniziale e il Valore finale. Usate questi valori se volete che il livello di Trasparenza cresca o diminuisca nel corso del tempo.
Tenete a mente che vedrete il valore iniziale e il valore finale per molti altri parametri nella finestra Proprietà. Tutti i valori funzionano nello stesso modo. Fate il valore iniziale più piccolo del valore finale e il valore del parametro crescerà mente la transizione progredisce; fate il contrario e il valore del parametro diminuirà mentre la transizione progredisce.
Ora l’ultimo controllo nelle Impostazioni di regolazione è chiamato Estendere i confini. Automaticamente è disattivato e questo significa che i pezzi rotti del vetro rimangono dentro il fotogramma del video originale, dell’immagine o qualsiasi altro oggetto a che avete applicato questa transizione. Però se attivate questo parametro, i pezzi continuano a muovere liberamente fuori i confini dell’oggetto.
Ora abbiamo coperto le regolazioni dell’effetto più basilari, andiamo avanti e rivediamo i controlli di personalizzazione disponibili nel gruppo terzo delle impostazioni.
Impostazioni dell’effetto vetro rotto
A questo livello, potete regolare il tipo di frattura, il movimento di pezzi rotti, la potenza di impatto e alcuni altri parametri. Esamineremo brevemente ogni parametro sotto.
Preimpostazioni
Preimpostazioni sono le vostre impostazioni dell’effetto salvate nella biblioteca. Diciamo, dopo alternare i controlli per qualche tempo avete raggiunto un effetto di transizione impeccabile e volete salvare questa combinazione dei parametri per la prossima volta. Sarete capaci di salvarla come una preimpostazione e poi trovarla nel menù quando è necessario.
Direttamente
Se lasciate questo parametro disattivato, l’effetto di transizione progredirà nella sequenza diretta che rappresenta un oggetto che cade in pezzi. Se attivate questo parametro, la transizione progredirà nella sequenza invertita: i pezzi rotti formeranno gradualmente un oggetto.
Accelerazione dell’effetto
Questo parametro vi permette di accelerare o decelerare la transizione, secondo i valori che scrivete (potete scrivere i numeri negativi e positivi). Notate che sotto il menù Accelerazione dell’effetto c’è anche un’opzione da applicare cosi detto «Ritardo casuale». Se lo attivate per alcuni pezzi casuali del vetro, la rotazione del movimento sarà in ritardo.
Frattura
Questo parametro definisce il tipo della frattura e include due opzioni: Centrato e Sciolto.
Tutti i due scenari hanno le impostazioni aggiuntive che vi permettono di controllare il numero di crepe, la direzione del movimento per i frammenti, la loro forma e altre caratteristiche. Senza ulteriori indugi, andiamo avanti e vediamo come le cose funzionano.
Frattura centrata
Se scegliete il tipo di frattura centrata, le crepe formeranno le linee dritte che vanno dal punto di impatto che potete muovere da qualche parte che vi piace - come è mostrato nell’immagine sotto.
Divisioni radiali è il parametro che vi permette di mettere il numero di crepe - e quindi il numero dei pezzi rotti.
Valore delta definisce il delta degli angoli formati dalle crepe. Ad esempio, conoscendo che il valore del grado massimo è 3600> potete mettere il valore Delta a 0 e avere 10 crepe, ogni forma un angolo di 360. Però se cominciate a crescere il valore Delta, gli angoli varieranno a base del numero di crepe e lo Spostamento iniziale che mette la deviazione dell’angolo da 00.
Divisioni incrociate è il parametro che vi permette di aggiungere le crepe attraverso le divisioni radiali e rompere il vetro a pezzi più piccoli. Potete cambiare la distanza tra le divisioni incrociate usando il parametro chiamato il valore Delta o muoverli più vicino/lontano dal centro usando il parametro chiamato Moltiplicatore.
Forma casuale è un parametro che vi permette di scegliere se volete che i pezzi rotti siano di una forma casuale strana o rimangano nella forma corretta costruita dalle linee divise.
Per crescere lo spessore dei pezzi rotti, potete usare i parametri chiamati Spessore.
Possibilità di divisione aggiuntiva è il parametro che crea una possibilità per ogni pezzo rotto di andare in frammenti più piccoli. Il valore più alto causa che la frattura aggiuntiva avrà più pezzi casuali.
Per controllare la dimensione dei frammenti, usate il parametro chiamato Frattura massima. Il valore più piccolo causa i frammenti più piccoli.
Colore di lato posteriore definisce il colore di altro lato dei pezzi rotti. Automaticamente l’altro lato è nero, però potete scegliere qualsiasi altro colore e anche mettere il loro livello dell’Opacità.
Ad esempio, se mettete il livello dell’Opacità a zero, tutti i due lati dei pezzi rotti riflettano l’immagine originale. Altrimenti un lato conterrà un frammento dell’immagine e l’altro lato sarà di colore della vostra scelta. Allo stesso modo potete mettere il colore dei confini di frammenti.
Frattura sciolta
Ora abbiamo rivisto lo scenario di frattura primo, vediamo come frattura sciolta funziona.
La differenza principale qui è che se applicate questo scenario le fratture saranno diffuse omogeneamente sull’immagine senza un punto unico visibile dell’impatto.
Per cambiare il numero dei pezzi rotti usate i Punti sull’asse X/Y. Questi parametri mettono il numero degli angoli che appartengono ai pezzi rotti - quindi quando usate il numero più alto, ci saranno più pezzi.
Tenete a mente che per ogni numero potete anche scegliere un valore Delta (X/Y). I valori Delta mettono la deviazione del numero dei punti sull’asse X e Y. Ad esempio, se mettete 5 punti sull’asse X e il valore Delta è 100%, ogni linea orizzontale produrrà da 1 a 10 pezzi rotti.
I parametri seguenti - Spessore, Possibilità di divisione aggiuntiva e il Colore di lato posteriore - sono simili a cose che abbiamo già rivisto nella sezione precedente, quindi vogliamo saltarli e muovere alla funzione prossima chiamata Posizione di frammenti.
Posizione di frammenti è un gruppo delle impostazioni per aiutarvi di personalizzare i frammenti. Il primo parametro in questo menù è chiamato Usare spostamento iniziale, e è attivato automaticamente. Crea un senso della profondità nel video inviando qualche frammento direttamente al primo piano della scena. Se dettavate questo parametro, i pezzi muoveranno dentro solo il campo medio.
Notate che se usate questa funzione potete personalizzare il movimento dei pezzi rotti applicando lo Spostamento minimo e Spostamento delta. Il primo definisce lo spostamento dei pezzi rotti dalla loro posizione originale al primo piano. L’ultimo difinisce la deviazione delta per lo spostamento Minimo.
I parametri seguenti sono chiamati movimento di asse X, movimento di asse Y e movimento di asse Z. Vi aiuteranno di mettere la direzione del movimento intorno all’asse per i pezzi rotti. Automaticamente tutti questi parametri sono messi a 0% e per questo i frammenti rimangono nello stesso posto. Però quando cominciate a crescere i valori, i pezzi cominceranno a muovere nella direzione indicata.
Velocità di movimento definisce la velocità con quale i pezzi rotti muovano fino a quando scompariscono completamente dalla scena. Automaticamente questo valore è messo a 100% che è la velocità massima. Se scrivete invece 0%, i pezzi roteranno intorno a sé senza muovere da qualche parte.
Ora per fare la scomparsa dei pezzi più dinamica, gli sviluppatori hanno aggiunto un’opzione chiamata Ridurre velocità di movimento. Questa funzione riduce la distanza del movimento assegnata ai frammenti particolari prima che scompariscano dalla scena. Come il risultato l’effetto di rottura ha più volume e sembra più cinematografico.
Ci sono 8 scenari di Riduzione da quali potete scegliere e tutti gli scenari creano un effetto leggermente diverso.
I parametri seguenti nel menù sono chiamati movimento di impatto X/Y e vi permettono di sottolineare il punto dell’impatto muovendo i pezzi più lontano dopo la divisione. La direzione del movimento in questo caso sarà definita dai valori che assegnate agli assi X e Y.
Ad esempio se il movimento dell’impatto X è uguale a 0 ma il movimento dell’impatto Y è stato assegnato qualsiasi valore sopra 0, vedrete una divisione verticale. Se assegnate qualsiasi valore sopra 0 a ogni asse, i pezzi rotti divideranno entrambi verticalmente e orizzontalmente.
Per regolare la velocità a quale i pezzi rimbalzeranno dal punto di impatto, usate il parametro chiamato Potenza di impatto. Essenzialmente significa letteralmente la forza dell’impatto. Il valore più alto causa la divisione più grande e i pezzi muoveranno più rapidamente.
Sotto il menù Potenza di impatto troverete i parametri aggiuntivi che vi aiuteranno di regolare l’impatto. Ad esempio, potete Aggiungere spostamento casuale per permettere che i pezzi spostino casualmente dal punto dell’impatto.
Correzione di aspetto è il parametro che regola il movimento dei pezzi rotti secondo la dimensione del video o l’oggetto a che avete applicato la transizione. Se attivate questa opzione i pezzi rotti sposteranno omogeneamente senza riguardo il rapporto di formato dato. Se disattivate questa opzione lo spostamento del movimento sarà basato sul rapporto di formato: ad esempio, se il vostro video ha il rapporto di formato 16:9 i pezzi muoveranno più avanti perché la larghezza del video supera la sua altezza.
Ridurre potenza di impatto è il parametro che vi permette di ridurre la potenza dell’impatto usando i scenari di Riduzione pre-configurati. Potete scrivere qualsiasi valore da -99 a 99. Il valore più basso causa il punto dell’impatto e la divisione meno visibili. Quando mettete il valore, potete aprire il menù Riduzione e scegliere il scenario di riduzione. Salteremo la descrizione di questi scenari perché sono identici a quelli che abbiamo rivisto prima.
Il gruppo seguente dei parametri è chiamato Rotazione di asse X/Y/Z e mette l’angolo di rotazione per i pezzi. Se l’angolo è più di 360°, definiscono il numero di giri che ogni pezzo fa intorno all’asse corrispondente.
Fade-out applica l’effetto fade-out ai pezzi rotti quando raggiungono un punto certo della traiettoria.
Proiezione di prospettiva è una modalità che vi permette di attivare e disattivare la prospettiva. Automaticamente è attivata che significa che lo spettatore ha impressione che i pezzi muovano verso loro. Se disattivate la proiezione di prospettiva i pezzi rotti muoveranno ai confini della scena.
Scaricare la versione nuova di VSDC per provare effetto vetro rotto
Fortunatamente questo tutorial vi ha ispirato e ha cominciato che qualche idea produca. Se siete pronti di provare l’effetto vetro rotto nei vostri video, andate avanti e scaricate VSDC 6.8 dal nostro sito ufficiale.
Avete bisogno di più ispirazione? Quindi assicuratevi di iscrivere al nostro canale su YouTube per essere notificati quando pubblichiamo i video nuovi.
How to Apply test
The Paint Brush transition is a popular effect that imitates brush strokes. You can use it to gradually move from one scene to another by either covering the video with a paint brush stroke by stroke, or revealing the next image from under a coat of paint. Here is what it looks like:
From this tutorial, you’ll find out how to apply this effect in your videos and tailor it to your vision. The Paint Brush effect is available in VSDC starting version 6.8, so make sure to download it before moving one with the tutorial.
How to apply Paint Brush transition in VSDC
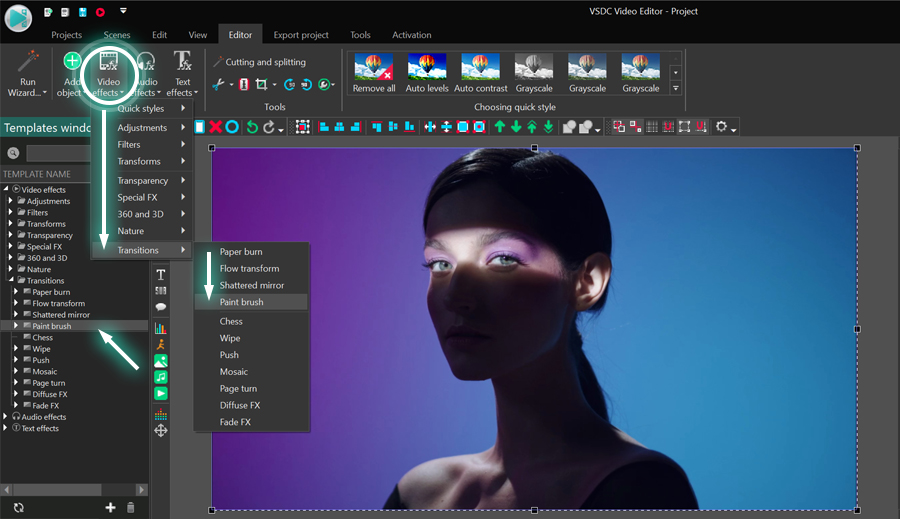
Once you download VSDC, launch it on your computer and import your footage. We recommend using the Import content button unless you want to apply custom parameters to the project. Next, select the video you want to apply the transition to, open the Video effects menu, proceed to Transitions and select PaintBrush.
The Object position settings window will pop up indicating that the transition will be added to the end of the scene. Click OK to proceed and preview the result. Notice that if you want to stretch the duration of the transition, you’ll be able to do it manually. We’ll talk more about it in the following section.
How to access Paint Brush transition settings
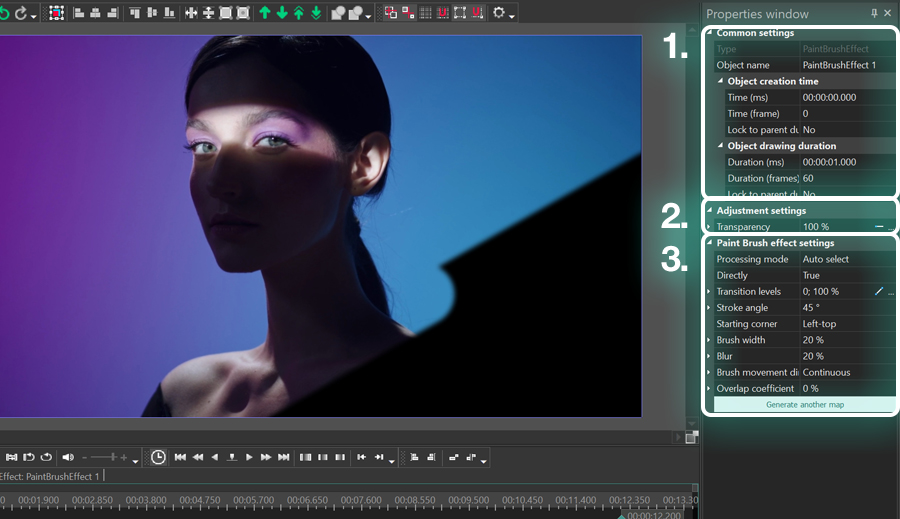
To open the effect settings, first make a double-click on the video you’ve applied the effect to. You’ll find yourself in a new tab with the effect layer named PaintEffect. Make a right click on it and select Properties. The Properties window will slide-in from the right.
The Properties window for the Paint Brush transition includes 3 groups of settings:
Common settings
Adjustment settings
Chess settings - Paint Brush effect settings
Let’s go over each group of settings and see what they do.
Common settings
The settings in the first group allow you to rename the transition effect layer, type the exact moment when the transition should begin (in seconds or in frames) and set its duration (in seconds or in frames). Keep in mind that you can also manually move and stretch the effect layer right on the timeline using the handlers.
Adjustment settings
The Adjustment settings consist of a single parameter, named Transparency. Transparency enables you to adjust the opacity level for the paint strokes. For example, if you leave the default value (100%), the paint will be completely non-transparent. However, if you decrease the value, you’ll start getting the see-through effect.
If you expand the Transparency parameter, you can access the Initial and Final values. These values enable you to set the opacity level for the beginning of the Paint Brush effect and the end of it, thus creating a smoother transition between scenes.
Paint Brush effect settings
The settings in the third group allow you to tailor the effect to your needs. For instance, you can change the direction and angle of the brush strokes, choose the brush width, and more.
Directly
The first parameter in this group is named Directly, and it refers to the direction of transition. If you leave this parameter deactivated, the paint brush will gradually cover your footage, stroke by stroke. If you activate this parameter, the transition will work in the opposite way and gradually uncover video from a coat of paint.
Stroke angle
The following parameter allows you to change the brush stroke angle. By default, the brush moves under a 45-degree angle, however, you can change this value to your taste. For example, in the illustration below, you can see how the strokes will look if you use a 90-degree and a 30-degree angles.
In addition to the Stroke angle, you can activate the option called Opposite side and change the side where the brush starts moving. For example, by default, the paint brush moves from right to left. In this case, the opposite side direction will be from left to right.
Starting corner
This parameter defines the corner where the effect starts. There are 4 self-explanatory options you can choose from: left-top, right-top, left-bottom, and right-bottom.
Brush width
Brush width is rather self-explanatory as well. This parameter defines how wide and thick brush strokes are, and you can leave its value consistent or make it dynamic. For example, if you set the Initial value at 10% and the Final value at 50%, each subsequent brush stroke will be thicker.
Blur
This parameter adds blur to the paint and makes brush strokes less defined. The higher the value, the more blurred the strokes will be. As a matter of fact, if you type 100%, the effect will resemble spray paint.
Brush movement direction
Brush movement direction is the brush movement pattern defining the order in which brush strokes are applied. The are 5 options you can choose from:
Non-continuous – each subsequent brush stroke will start on the same side of the scene.
Continuous – each subsequent brush stroke starts on the opposite side of the scene.
Area-based – the scene gets divided into several areas, and each area gets covered with paint
Random (same angle) – each brush stroke appears in a random place on the scene under the same angle.
Random (random angle) – each brush stroke appears in a random place on the scene under a random angle.
Overlap coefficient
Overlap coefficient defines the percentage of brush strokes that appear on the scene at the same time. For example, if the total number of brush strokes required to cover the scene entirely is 12, and the overlap coefficient equals 30%, at any given moment, you’ll be seeing 4 brush strokes instead of just one.
Try the Paint Brush transition for free
The new Paint Brush transition effect is available in the free version of VSDC Video Editor, so if you liked this tutorial, go ahead and download VSDC from the official website.
Feel free to message us on Facebook and make sure to subscribe to our YouTube channel for a weekly doze of video editing inspiration.
published Amy Shao 6/10/25
L'attesa per qualcosa di nuovo e straordinario è finalmente finita! L'aggiornamento è arrivato e non è solo un'altra versione: è VSDC 10.1!!
Aggiornamento VSDC 10.1:...
Questa stagione festiva inaugura nuovi inizi con l'ultimo aggiornamento di VSDC Video Editor! Abbiamo ascoltato i vostri suggerimenti e deciso di concentrarci sul miglioramento degli strumenti che amate...
Il cambiamento è sinonimo di miglioramento, e questo processo non sarebbe possibile senza il vostro contributo. Dopo aver esaminato attentamente i vostri feedback, abbiamo affrontato diversi problemi...
Introduzione
Nel 2024 la gamma di opzioni per creare effetti visivi è incredibilmente varia e diventa sempre più difficile identificare le scelte migliori.
Qui puoi trovare una guida ai migliori software...
VSDC 9.2 è qui e offre funzionalità rivoluzionarie, come il nuovo strumento di segmentazione assistito dall'IA, questo update consente una rimozione precisa degli oggetti, correzioni del colore avanzate...
Con questo programma è possibile registrare i video dal desktop e salvarli sul computer in diversi formati. Insieme al video editor è ideale per creare presentazioni e demo.
Il programma serve per catturare video da dispositivi esterni e e per registrarli sul computer in qualsiasi formato video. Potete salvare il video da sintonizzatori video, webcam, schede di acquisizione e vari dispositivi.
"VSDC Free Video Editor is a surprisingly powerful, if unconventional video editor"
- PC Advisor
"This video editor gives you tons of control and editing power"
- CNet
"The editor handles many common formats and boasts a good deal of capabilities when it comes time to alter lighting, splice video, and apply filters and transitions in post production"
 User Help Manual
 ")


 Editor Video
 Convertitore Video
 Convertitore Audio
 Audiograbber