 User Help Manual
 ")


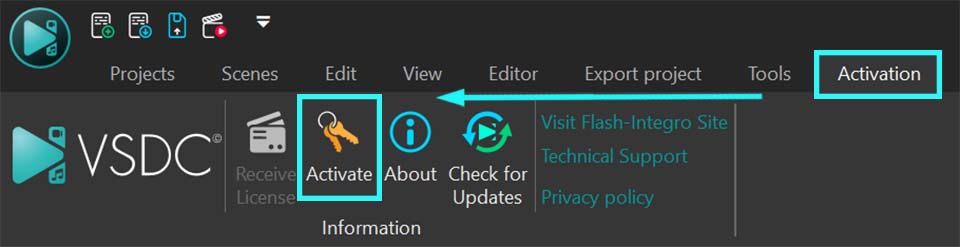
Editor Video
L'editor video consente di modificare file e creare video di qualsiasi complessità. Potete applicare effetti video e audio effects ad oggetti modificati, trasformarli, applicare filtri e correzioni d'immagini. Tutti i popolari formati video e audio sono supportati (sia lettura che salvataggio).
Convertitore Video
Questo programma serve a convertire video file da un formato ad un altro. Quasi tutti i popolari formati video sono supportati. Inoltre, il programma semplifica drasticamente il compito di convertire video da riprodurre su determinati dispositivi multimedia quali iPhone, Microsoft Zune oppure Archos. Il programma è semplicissimo da usare, dispone di una moderna interfaccia e di tutte le necessarie funzioni per processare i video.
Convertitore Audio
Il convertitore audio vi aiuterà a convertire file audio da un formato ad un altro. Tutti i formati audio e codec chiavi sono supportati. Il programma vi consente inoltre di gestire playlist e meta tags, di estrarre audio dai file video e di salvare queste tracce sul vostro computer in qualsiasi formato.
Audiograbber
Questo strumento audio serve a catturare tracce audio dai CD e di salvarle nel computer dell'utente in qualsiasi formato. Quasi tutti i popolari formati e codec sono supportati. Il programma è inoltre in grado di estrarre dettagli di tracce dal server FreeDB al fine di rinominare automaticamente il file e di aggiornare i meta tag.
 Editor Video
 Convertitore Video
 Convertitore Audio
 Audiograbber

Versatilità
Più strumenti contemporaneamente per elaborare file video e audio in una singola applicazione.

Alta velocità
I nostri programmi
impiegano rapidi algoritmi di alta qualità per processori singoli a multipli.

Accessibilità
I nostri prodotti sono disponibili per essere scaricati gratuitamente su tutti i computer e dispositivi che supportano i sistemi operativi Windows.
Notizie:
- Ciao, sono Mattea Wharton, una videomaker di viaggi di Seattle. Per tre anni ho ...
- published Amy Shao 6/10/25 L'attesa per qualcosa di nuovo e straordinario è ...
- Questa stagione festiva inaugura nuovi inizi con l'ultimo aggiornamento di VSDC ...
- Il cambiamento è sinonimo di miglioramento, e questo processo non sarebbe possib...
Crea Immagini di Sfondo e Sfondi Dinamici con VSDC
pubblicato da Heinz Neuhauser il 01/09/25
Come creare un logo animato con gradiente in VSDC
Avrete probabilmente visto quegli sfondi dinamici ipnotici in cui i colori si fondono e fluiscono insieme, creando un affascinante flusso di movimento e luce. Spesso presenti sulle schermate di blocco degli smartphone, sono difficili da ignorare perché sono così vividi, fluidi e avvincenti. Sorprendentemente, è possibile ricreare queste meravigliose transizioni di colore in prima persona utilizzando VSDC PRO. Tutto ciò che serve è un po' di immaginazione, perché il resto si realizza facilmente con gli strumenti di VSDC!
E se state utilizzando la versione gratuita, potete comunque realizzare design statici di bell'aspetto, che saranno esattamente come desiderate e, per di più, saranno soltanto VOSTRI.
Quindi non aspettate, immergetevi nell'articolo e iniziate a creare!

Disegni a colori statici (GRATUITI)
Per cominciare, esaminiamo le funzionalità disponibili nella versione gratuita di VSDC per questo compito. Iniziate creando un nuovo progetto: cliccate su "Progetto vuoto" nella pagina iniziale oppure selezionate "Nuovo progetto" dal menu in alto nella scheda Progetti. Poiché state progettando uno sfondo per smartphone, sarà necessario scegliere la risoluzione appropriata. Se la risoluzione desiderata non è presente nell'elenco delle impostazioni che appare all'avvio del progetto, potete regolare manualmente la larghezza e l'altezza direttamente lì.
Le risoluzioni comuni per smartphone includono:
- 1080x1920 (Full HD, standard per molti dispositivi)
- 1440x2560 (Quad HD, per telefoni di fascia alta)
- 1242x2688 (varianti iPhone Pro Max)
- 1125x2436 (iPhone X/XS/11 Pro)
 Una guida per inserire l'altezza e la larghezza esatte per le dimensioni del tuo progetto
Successivamente, utilizzi lo strumento Forma libera per creare lo sfondo. Si assicuri che la forma copra l'intera scena. Se utilizza la versione 10.1 o successiva di VSDC, può accedere alla galleria incorporata di forme predefinite. Semplicemente faccia clic con il tasto sinistro sull'opzione Forma libera, selezioni "Dalla galleria" e scelga una forma adatta al suo progetto: in questo caso, utilizzeremo il quadrato e lo estenderà per riempire completamente la scena.
Per applicare un gradiente puntuale alla sua forma, la selezioni sulla linea temporale per accedere alle sue impostazioni nella finestra delle proprietà. Individui l'opzione Pennello e la imposti su "Punto di gradiente".
Successivamente, faccia doppio clic sulla sua Forma libera nella linea temporale per visualizzare i suoi punti di controllo. Questi punti determineranno la distribuzione del gradiente. Selezioni il primo punto, quindi si rechi alla Finestra delle proprietà del punto selezionato. Attivi "Impostazioni di gradiente pennello" e regoli il colore secondo le sue necessità. Ripeta questo processo per ogni punto.
Preparazione alla selezione dei colori per uno sfondo sfumato personalizzato mediante l'attivazione della modalità corretta.
Nel nostro esempio, la Forma libera è composta da quattro punti principali, pertanto la sfumatura si basa su quattro colori. Se si necessita di una sfumatura più graduale o complessa con colori aggiuntivi, sarà necessario creare più punti in fase di progettazione iniziale della Forma libera.
Se nota che un determinato colore appare troppo brillante o non abbastanza brillante, è possibile regolarlo selezionando il punto corrispondente nelle proprietà e modificando il parametro "Peso" per ottenere il risultato desiderato.
Scegliere la tavolozza e utilizzare il parametro Peso per controllare la miscelazione dei colori
Ora che la Sua immagine con gradiente è pronta, è il momento di salvarla! Si rechi nella scheda Editor e individui il cerchio verde con l'icona a chiave inglese (lo strumento di riparazione), quindi selezioni "Crea snapshot". Instantaneamente, la Sua immagine apparirà nella Finestra delle risorse, da dove potrà esportarla facendo clic destro su di essa e scegliendo l'opzione corrispondente. Una volta salvata, la trasferisca sul Suo telefono e la imposti come sfondo.
 Utilizzo dello strumento istantanea per creare un'immagine fissa del tuo design sfumato
Certamente, tali immagini possono essere create non soltanto per gli smartphone, ma anche per un'ampia gamma di altri scopi.

Visualizzazione dello sfondo statico finale così come appare su un dispositivo mobile
Rendi le Tue Immagini Dinamiche con i Fotogrammi Chiave Colore (PRO)
Se effettua l'upgrade alla versione PRO, potrà arricchire la Sua immagine con effetti dinamici. Per ottenere questo risultato, sarà necessario definire dei fotogrammi chiave e assegnare loro valori di colore specifici. Creiamo una sfumatura animata in cui ogni angolo dell'immagine cicla attraverso una sequenza di colori.
Per questo progetto, i colori iniziali sono impostati come segue: l'angolo in alto a destra è blu, l'angolo in alto a sinistra è giallo, l'angolo in basso a destra è viola e l'angolo in basso a sinistra è verde.
Attivazione della funzionalità keyframe per iniziare ad animare i cambiamenti di colore nel tempo
Cliccare su qualsiasi punto Forma libera sulla timeline e individuare l'opzione Colore. Cliccare sui tre puntini nell'angolo di questa impostazione per aprire l'Editor chiavi.
Per facilitare il flusso di lavoro nell'Editor chiavi, si rinomini la scheda "Colore*" in "1" (che corrisponde al colore che questo punto possiede). Si ripeta questa sequenza per ciascuno dei quattro punti presenti sulla timeline. Poiché i punti sono quattro in totale, si dovrebbero ottenere quattro schede nell'Editor chiavi.
Rinominare e organizzare le schede dell'editor per un processo di animazione più efficiente
Per ciascuno di questi punti, imposteremo tre fotogrammi chiave. La preghiamo di tenere presente che il tempo di visualizzazione per il primo fotogramma chiave è lo stesso per tutti i punti: il secondo fotogramma chiave condivide un altro tempo uniforme, e così via.
Prendiamo come esempio il punto che abbiamo contrassegnato con il numero uno. Per noi si tratta di un colore sfocato. Sposti il cursore sul segno di circa 2,5 secondi e clicchi sull'icona a forma di diamante per aggiungere un fotogramma chiave nell'Editor chiave. Ripeta le stesse operazioni per i segni di 5 secondi e 7,5 secondi.
Per impostazione predefinita, tutti i fotogrammi chiave appena aggiunti per un determinato punto conservano il valore di colore originale assegnato a quel punto (per noi è il blu). La stessa procedura si applica ai restanti punti della Forma libera.
Ora impostiamo i colori per ogni fotogramma chiave. Si rechi nella scheda 1 dell'Editor chiave, trovi il secondo fotogramma chiave, vi faccia doppio clic e scelga, ad esempio, il colore giallo. Imposteremo i colori per il fotogramma chiave in ogni scheda in questo modo.
L'angolo in alto a destra (blu): blu → giallo → verde → viola → blu. Il punto d'angolo in alto a sinistra (giallo): giallo → verde → viola → blu → giallo. Il punto d'angolo in basso a destra (viola): viola → blu → giallo → verde → viola. Il punto d'angolo in basso a sinistra (verde): verde → viola → blu → giallo → verde.
L'Editor chiave regola la posizione di ciascun punto in base al colore da Lei scelto, consentendo di alterare la tonalità o persino il colore stesso semplicemente spostando il punto, sebbene il risultato finale dipenda in ultima analisi dalle Sue preferenze personali.
Aggiunta e manipolazione di fotogrammi chiave di colore per creare movimento dinamico
Clicchi l’opzione Giocare e veda il risultato! Molto bello, non è vero?
Il risultato finale di una transizione fluida dei colori in uno sfondo dinamico
Se desidera renderlo più accattivante, può facilmente ravvivarlo con la funzione del punto di tracciamento. Vada alla Scene 0 e faccia doppio clic sulla timeline. Individui l’opzione “Aggiungere punto di tracciamento” nella barra degli strumenti Oggetti, clicchi su di essa e la posizioni dove preferisce nell’anteprima.
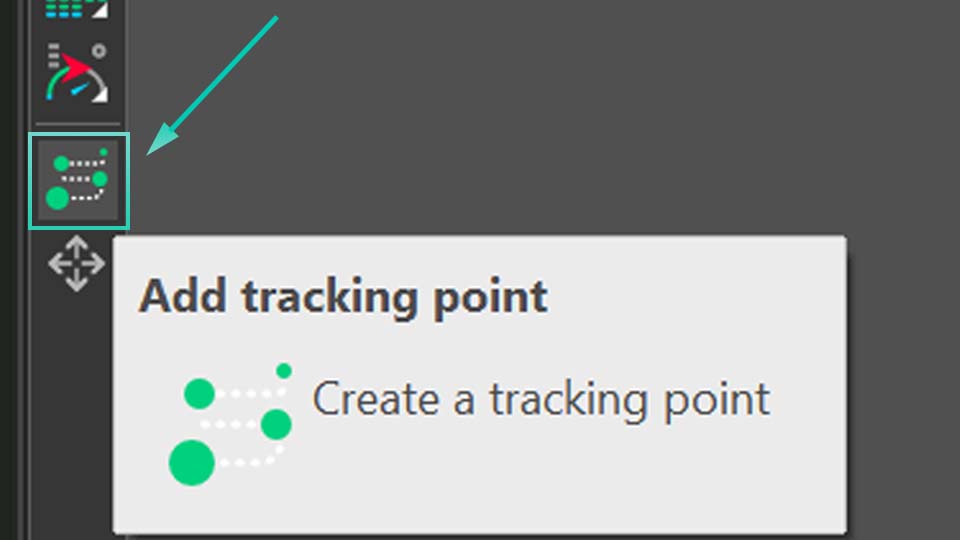
Utilizzo dello strumento Aggiungi punto di tracciamento per collegare e animare una sorgente luminosa
Nella Finestra delle proprietà, attivi le Impostazioni di gradiente pennello e imposti il valore del colore per la luce dinamica futura, regoli opacità e spessore a suo piacimento.
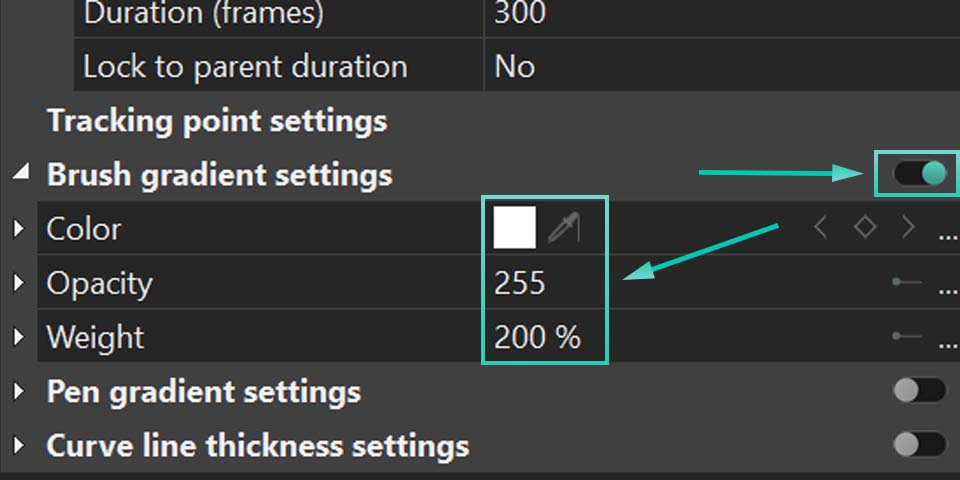
Regolazione del colore, dell'opacità e del peso dello strumento Pennello per disegnare strisce chiare
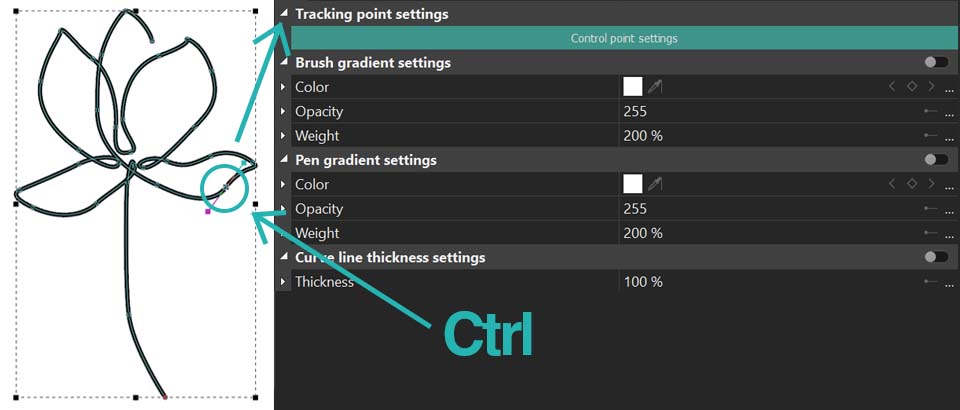
Dopodiché, le servirà soltanto impostare la traiettoria che la sua luce sequenziale dovrà seguire. A tale scopo, faccia doppio clic sul suo punto di tracciamento nella timeline e scelga un altro strumento dalla barra degli strumenti Oggetti: Movimento. Selezioni questo strumento e scelga il luogo dove la luce sequenziale deve transitare, cliccando su questo luogo nella scena. Se desidera continuare la traiettoria, selezioni il punto che ha appena aggiunto, clicchi nuovamente sullo strumento movimento e aggiunga un altro punto. Può creare tutte le traiettorie che desidera. Se desidera saperne di più sullo strumento Movimento, per favore legga questo articolo.
E questo è il risultato, solo un esempio di ciò che si può realizzare con VSDC!
Mostrando l'effetto completato con colori fluidi e una scia di luce in movimento
Scopri altri tutorial di VSDC e sblocchi tutto il potenziale della Sua creatività. Se ha domande, siamo sempre lieti di ricevere una Sua email all’indirizzo Questo indirizzo email è protetto dagli spambots. È necessario abilitare JavaScript per vederlo..
Non dimentichi di guardare i nostri video tutorial su YouTube e di seguirci sui social media.


Con questo programma è possibile registrare i video dal desktop e salvarli sul computer in diversi formati. Insieme al video editor è ideale per creare presentazioni e demo.

Il programma serve per catturare video da dispositivi esterni e e per registrarli sul computer in qualsiasi formato video. Potete salvare il video da sintonizzatori video, webcam, schede di acquisizione e vari dispositivi.

"VSDC Free Video Editor is a surprisingly powerful, if unconventional video editor"
- PC Advisor

"This video editor gives you tons of control and editing power"
- CNet

"The editor handles many common formats and boasts a good deal of capabilities when it comes time to alter lighting, splice video, and apply filters and transitions in post production"
- Digital Trends
© 2011-2025, www.videosoftdev.com, FLASH-INTEGRO LLC. Tutela della privacy | Condizioni di utilizzo | Chi siamo
Tutti i marchi citati nel presente documento sono di proprieta esclusiva dei rispettivi proprietari.
La copia di qualsiasi materiale da questo sito e consentita solo con il consenso scritto dell'amministrazione sito.