 User Help Manual
 ")


Editor Video
L'editor video consente di modificare file e creare video di qualsiasi complessità. Potete applicare effetti video e audio effects ad oggetti modificati, trasformarli, applicare filtri e correzioni d'immagini. Tutti i popolari formati video e audio sono supportati (sia lettura che salvataggio).
Convertitore Video
Questo programma serve a convertire video file da un formato ad un altro. Quasi tutti i popolari formati video sono supportati. Inoltre, il programma semplifica drasticamente il compito di convertire video da riprodurre su determinati dispositivi multimedia quali iPhone, Microsoft Zune oppure Archos. Il programma è semplicissimo da usare, dispone di una moderna interfaccia e di tutte le necessarie funzioni per processare i video.
Convertitore Audio
Il convertitore audio vi aiuterà a convertire file audio da un formato ad un altro. Tutti i formati audio e codec chiavi sono supportati. Il programma vi consente inoltre di gestire playlist e meta tags, di estrarre audio dai file video e di salvare queste tracce sul vostro computer in qualsiasi formato.
Audiograbber
Questo strumento audio serve a catturare tracce audio dai CD e di salvarle nel computer dell'utente in qualsiasi formato. Quasi tutti i popolari formati e codec sono supportati. Il programma è inoltre in grado di estrarre dettagli di tracce dal server FreeDB al fine di rinominare automaticamente il file e di aggiornare i meta tag.
 Editor Video
 Convertitore Video
 Convertitore Audio
 Audiograbber

Versatilità
Più strumenti contemporaneamente per elaborare file video e audio in una singola applicazione.

Alta velocità
I nostri programmi
impiegano rapidi algoritmi di alta qualità per processori singoli a multipli.

Accessibilità
I nostri prodotti sono disponibili per essere scaricati gratuitamente su tutti i computer e dispositivi che supportano i sistemi operativi Windows.
Notizie:
- published Amy Shao 6/10/25 L'attesa per qualcosa di nuovo e straordinario è ...
- Questa stagione festiva inaugura nuovi inizi con l'ultimo aggiornamento di VSDC ...
- Il cambiamento è sinonimo di miglioramento, e questo processo non sarebbe possib...
- Introduzione Nel 2024 la gamma di opzioni per creare effetti visivi è incredib...

VSDC
Store
VSDC Flash Elements
10 modelli
$9
CompraDescrizione
Elementi flash animati che appaiono e scompaiono — senza bisogno di mascheratura!Questo pacchetto include scintille, esplosioni, loop di pennello, puntini lampeggianti, cuori fluttuanti e linee animate pensate per evidenziare i momenti chiave del tuo video.Se stai cercando sovrapposizioni di animazioni flash, effetti di apparizione/scomparsa o accenti animati per il montaggio video, questa raccolta merita la tua attenzione!
Caratteristiche principali
Stile Disegnato a ManoLoop Fotogramma per FotogrammaFormato Sequenza PNG
Colori RegolabiliFormato: 16x9Numero di Elementi: 10
Dimensione del File: 5 MB
VSDC
Store
Collezione Aurora Drift
10 modelli di sfondo
$9
Compra
Descrizione
Dai un tocco di eleganza ai tuoi progetti con la collezione Aurora Drift: 10 design unici ispirati alla bellezza naturale della luce che scorre dolcemente e ai delicati gradienti di colore. Questi sfondi trasmettono calma e raffinatezza, rendendoli perfetti per conferire un tono elegante ai tuoi video, alle tue presentazioni e a tanti altri tipi di progetti.
Caratteristiche principali
100% Completamente Personalizzabile
Disponibile Immediatamente
Facile da Utilizzare
Numero di Elementi: 10
Dimensione del File: 200 MB
Risoluzione: 2560x1440
Frequenza dei Fotogrammi: 30 FPS
migliori software per la gradazione e la correzione del colore
Se siete creatori di video, ci sono tre motivi per cui è fondamentale imparare la correzione del colore. Innanzitutto, vi aiuta a migliorare i vostri video e a renderli professionali. In secondo luogo, consente di abbinare i colori di diverse clip in modo che appaiano più coerenti. Infine, la correzione del colore può aiutarvi a correggere filmati sovraesposti, sottoesposti e slavati, tutti e tre dovuti a condizioni di illuminazione insufficienti o a impostazioni sbagliate della videocamera.
Tuttavia, quando si è agli inizi, si potrebbe non essere pronti ad acquistare programmi costosi. Per fortuna esiste un software gratuito con cui fare pratica.
In questo articolo abbiamo recensito i 9 migliori software di color grading. Questi editor video includono tutti gli strumenti essenziali per la correzione del colore primario e secondario, oltre ad altre funzioni che vi aiuteranno a creare un bellissimo filmato.
Key Takeaways
Prenderemo in considerazione i 9 migliori editor video gratuiti con un ricco set di strumenti di color grading:
- VSDC Free Video Editor
- Adobe Premiere Pro
- iMovie
- Final Cut Pro
- Red Giant Magic Bullet Suite
- FilmConvert Nitrate
- Baselight
- ColorDirector
- SpeedGrad
Cosa rende grande un software per la gradazione del colore
Non esiste una risposta breve a questa domanda, ed ecco perché. Tecnicamente parlando, gli strumenti di correzione del colore - come le ruote cromatiche, i selettori del bilanciamento del bianco e del nero, le curve HSL e i controlli di contrasto, luminosità e gamma - sono molto simili o uguali, indipendentemente dal software di editing video. Se si comprendono i principi principali della correzione del colore e il funzionamento di ciascuno di questi strumenti, è possibile eseguirla con qualsiasi programma.
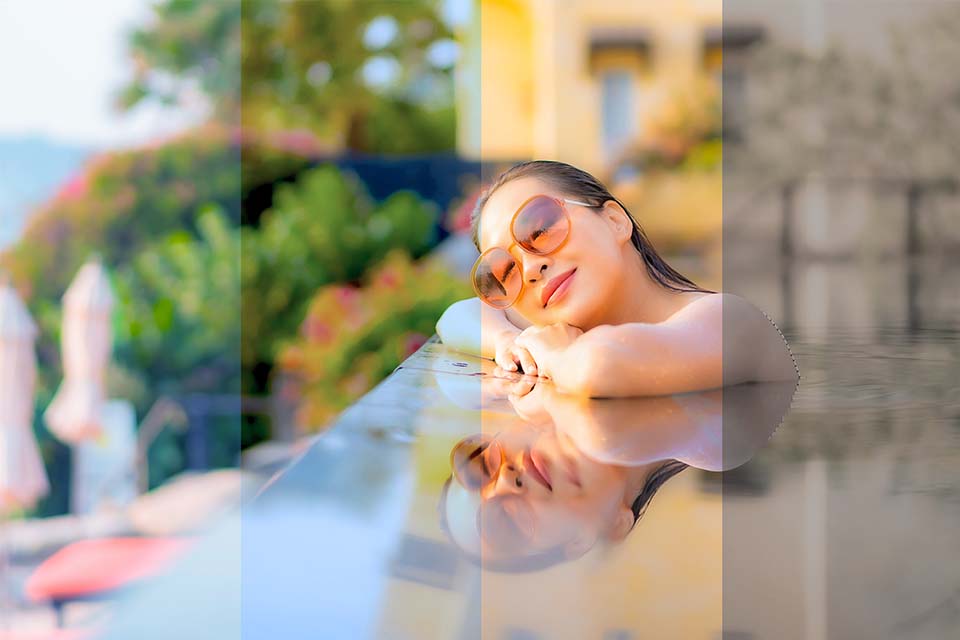
Importanza del Color Grading
Anche quando si usano telecamere professionali per le riprese, il video che ne risulta non sempre ci soddisfa: l'immagine può essere cupa o sovraesposta, ci sono bagliori, lampi di luce e l'atmosfera generale non sembra affatto cinematografica. I motivi per cui le riprese risultano di scarsa qualità possono essere molteplici: cattiva illuminazione, impostazioni sbagliate della telecamera o semplicemente l'impossibilità di creare un ambiente particolare. Ma ciò che conta davvero è se si può rimediare. Fortunatamente, la maggior parte degli editor video offre un'ampia gamma di strumenti di color grading per migliorare l'immagine, dare un tono e migliorare la narrazione visiva del filmato.
Considerazioni chiave prima della scelta
Sebbene in entrambi i casi si lavori sui colori del video e queste due nozioni siano spesso usate in modo intercambiabile, la correzione del colore e il color grading sono tecniche diverse. Quando si esegue una correzione del colore, in genere si intende migliorare il video rendendolo più naturale e vibrante. Se si uniscono diversi spezzoni di filmati girati in condizioni di illuminazione diverse, la correzione del colore significa anche far corrispondere i clip e assicurarsi che abbiano lo stesso livello di luminosità, contrasto e gamma.
Anche il color grading ha lo scopo di migliorare il video, ma questa tecnica non si limita a regolare il bilanciamento del colore. Gli editor usano invece il color grading per creare una certa atmosfera ed estetica visiva, per esprimere la loro visione artistica, in modo che i colori del video diventino parte della storia. Il color grading spesso implica l'uso di filtri e la modifica dei toni di colore; viene sempre dopo la correzione del colore.
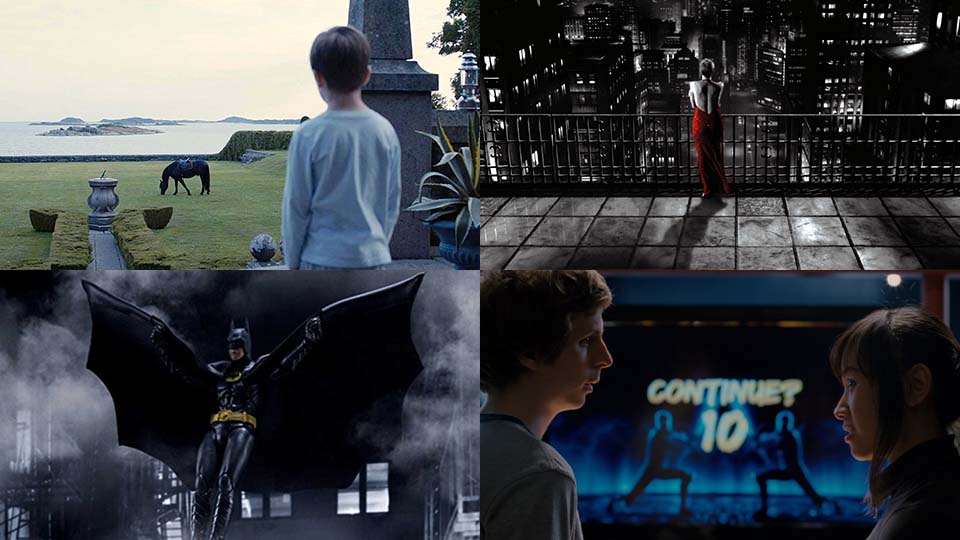
Alcuni grandi esempi di lavori di color grading unici e memorabili sono Melancholia (drammatici toni di colore freddi), Sin City (effetto bianco e nero, più isolamento del colore usato per creare una somiglianza con un fumetto), Batman (colori attenuati, toni scuri) e, naturalmente, film come La La Land, Pirati dei Caraibi e Scott Pilgrim.
Considerazioni chiave prima della scelta
Come scegliere un buon software di regolazione del colore? Per cominciare, è possibile restringere la ricerca esaminando i requisiti di sistema. Ad esempio, se il vostro computer ha poca RAM, potreste dover eliminare Adobe Premier perché richiede una macchina potente per funzionare bene; oppure, se siete utenti Mac, dovrete eliminare VSDC perché questo software di editing video funziona solo su PC Windows (anche se VSDC è sicuramente un'opzione interessante, con funzioni preziose, accessibilità e nessuna necessità di computer potenti che lo rendono una scelta universale).
Pensate poi ad altri strumenti o effetti di cui potreste aver bisogno per i vostri progetti. Ad esempio, se avete intenzione di usare molto gli effetti speciali, nessun software di editing video è migliore di Final Cut Pro. Se avete bisogno di strumenti di editing audio elaborati, iMovie potrebbe essere una scelta eccellente.
Una volta rimaste 2-3 opzioni, provate i programmi rimanenti. Solo allora potrete scegliere il software con cui vi sentite a vostro agio. Se non riuscite a trovare tutto ciò che vi serve in un unico programma, è una pratica comune utilizzare diverse soluzioni per l'editing video.
I migliori 9 software per la gradazione e la correzione del colore
1. VSDC Free Video Editor
VSDC è un editor video gratuito per Windows che si è affermato come uno strumento molto efficace per il color grading e la correzione del colore, oltre che come una versatile suite di editing video che va ben oltre. Sia che stiate cercando di correggere filmati con problemi di illuminazione o che vogliate raggiungere un particolare stile artistico, VSDC vi fornisce un'ampia gamma di strumenti per padroneggiare le vostre capacità di editing video.
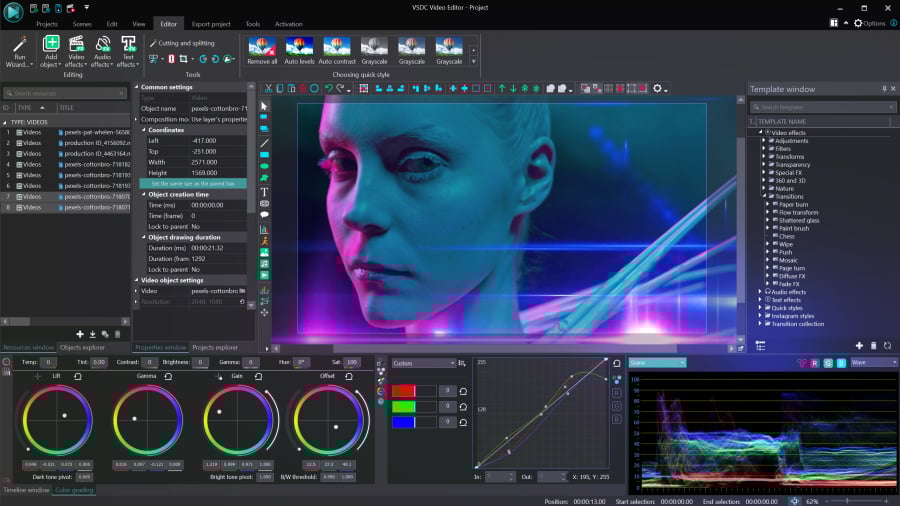
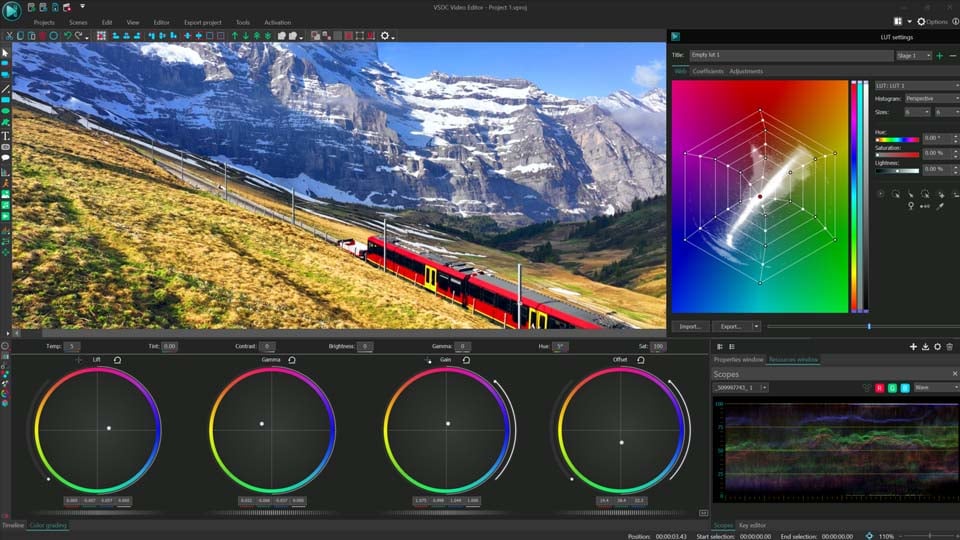
Quando si parla di correzione del colore, i creatori di solito fanno riferimento alla correzione del colore primaria e alla correzione del colore secondaria. La correzione primaria del colore implica "grandi linee", ovvero regolazioni che influiscono sull'estetica generale del video. Tali regolazioni includono il bilanciamento del bianco, i livelli di luminosità e contrasto e la correzione dei toni di colore. In VSDC, è possibile eseguire la correzione del colore primario utilizzando le ruote dei colori Lift, Gamma e Gain, i punti di bilanciamento del bianco e del nero, le curve RGB e di Tonalità e Saturazione, nonché i controlli manuali del colore (luminosità, contrasto, gamma, saturazione, temperatura ecc.). Ciò significa che è possibile correggere video sovraesposti o sottoesposti, correggere le luci, i mezzitoni e le ombre e migliorare rapidamente l'aspetto del video. Per analizzare la distribuzione del colore ed eseguire la corrispondenza cromatica dei clip, è possibile utilizzare la finestra dedicata Capo di applicazione.
Per la correzione del colore secondario, che implica la correzione di colori isolati o di ambiti di toni di colore, è possibile utilizzare l'editor LUTintegrato, che consente anche la creazione di LUT personalizzate. Ad esempio, è possibile regolare una specifica tonalità di colore sul video rendendola più satura o meno potente: questo funziona bene per gli artefatti e la correzione del tono della pelle. Inoltre, è possibile scambiare completamente alcuni colori nel video completamente alcuni colori nel video o farli cambiare dinamicamente e creare effetti cinematografici come quelli di film famosi (vedere per ricreare il look di Barbie o Oppenheimer).
VSDC ha una versione PRO se siete interessati a utilizzare gli strumenti di editing video più diffusi, come la mascheratura, lo stabilizzatore video o il motion tracking. Tuttavia, se cercate solo un software di correzione del colore video, tutte le funzioni sono gratuite e sarete in grado di esportare i vostri filmati in qualità fino a 4K senza limiti di formato o durata. Oltre alle funzioni di editing video, include componenti aggiuntivi come un registratore video, un registratore di schermo e un registratore vocale. Tutto questo fa di VSDC una scelta di prim'ordine: scaricate il programma e verificatelo voi stessi!
Pro
- Strumenti di correzione del colore primari e secondari; - Ruote colore Lift, Gamma e Gain; - Punti di bilanciamento del bianco e del nero; - Curve RGB, Tonalità e Saturazione; - Controlli manuali del colore; - Finestra Color Scopes per l'analisi e la corrispondenza dei colori; - Editor LUT integrato per regolazioni personalizzate; - Applicazione delle LUT ai file BRAW; - Esportazione 4K senza limiti di formato o durata; - Un'ampia gamma di funzioni aggiuntive; - Numerose guide e tutorial didattici su Youtube.
Contro
- Solo per Windows.
 Scaricare VSDC Video Editor
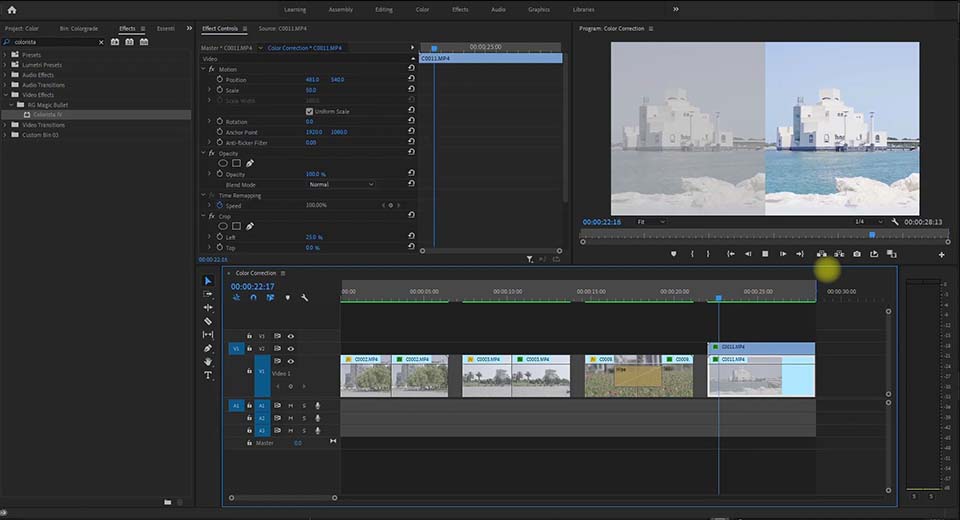
2. Adobe Premiere Pro
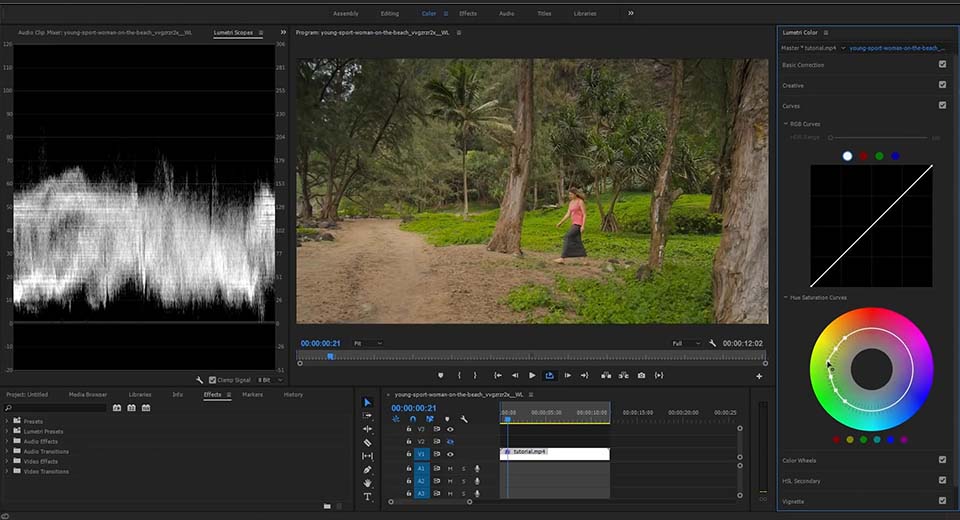
Adobe Premiere Pro è uno dei software più diffusi al mondo, apprezzato per l'ampia gamma di strumenti di correzione del colore di livello professionale progettati per migliorare i progetti video. Tra i versatili effetti di correzione del colore disponibili, troverete opzioni come l'effetto Luminosità e contrasto per la regolazione della gamma tonale del vostro video clip, migliorando contemporaneamente le luci, le ombre e i mezzitoni. Allo stesso modo, l'effetto Cambia colore permette di controllare la tonalità, la luminosità e la saturazione, consentendo regolazioni mirate di specifiche gamme di colore all'interno del filmato e ottenendo gli effetti visivi desiderati.
Inoltre, Premiere Pro introduce strumenti avanzati come l'effetto colore Lumetri con funzionalità complete di correzione e gradazione del colore. Grazie a funzioni come la Correzione di base per la regolazione dell'esposizione e del contrasto, le preimpostazioni creative per regolazioni stilistiche rapide e le curve per una manipolazione precisa del colore, Lumetri Color consente agli utenti di ottenere risultati di livello professionale in modo efficiente.
Pro
- Effetto mixer dei canali per regolazioni avanzate del colore; - Lumetri Color per funzionalità complete di grading e correzione; - Editor LUT integrato; - Aggiornamenti e miglioramenti regolari; - Integrazione con l'ecosistema Creative Cloud.
Contro
- Requisiti di sistema elevati; - Una curva di apprendimento ripida per i principianti; - Solo 7 giorni di prova gratuita.
3. iMovie
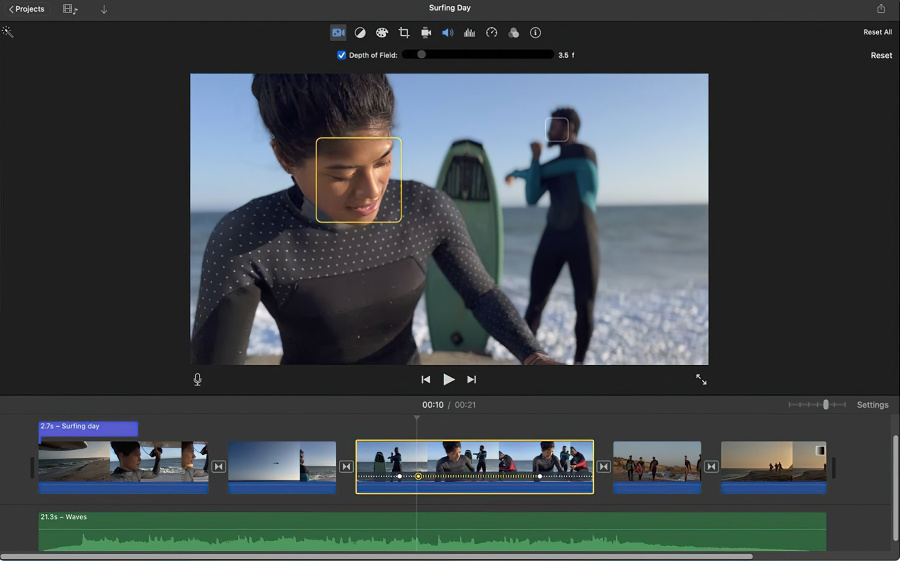
iMovie è un'applicazione di color grading video facile da usare per Mac OS. Fornisce strumenti di base per la correzione del colore che funzionano se si è agli inizi e si ha bisogno di regolare rapidamente l'aspetto del video senza avere a che fare con le curve RGB. iMovie è preinstallato sui computer Mac ed è completamente gratuito.
Gli strumenti di correzione del colore in iMovie possono essere suddivisi in due gruppi: regolazione automatica e regolazione manuale. Il set di strumenti per la regolazione automatica consente di migliorare i colori del video in base al tono della pelle, di utilizzare il selezionatore del bilanciamento del bianco e di abbinare i toni di colore in diverse clip. Questa terza opzione è utile se si devono unire più video girati in condizioni di luce molto diverse. iMovie aiuta a regolare con precisione le impostazioni di contrasto e luminosità e a far corrispondere tutti i video al clip scelto.
In sostanza, gli strumenti di correzione automatica del colore di iMovie migliorano il contrasto e rimuovono il colore del video per renderlo più professionale. Gli strumenti di correzione manuale del colore consentono di regolare le ombre, i valori di contrasto, le luci, la saturazione del colore e i valori di temperatura utilizzando i cursori.
Sebbene iMovie non includa ruote cromatiche, curve o LUT, il suo algoritmo di regolazione automatica può essere sufficiente per una correzione del colore di livello base.
Pro
- Perfetto per i principianti senza strumenti complicati come le curve RGB; - Strumenti per le regolazioni manuali e automatiche; - Una grande varietà di filtri preimpostati; - Incluso in Mac OS standard; - Si integra facilmente con YouTube e Facebook.
Contro
- Solo Mac OS; - Il programma può rallentare quando si lavora con file di grandi dimensioni; - Un set di strumenti ampio ma di base, senza funzioni professionali di color grading; - Compatibilità limitata con i formati.
4. Final Cut Pro
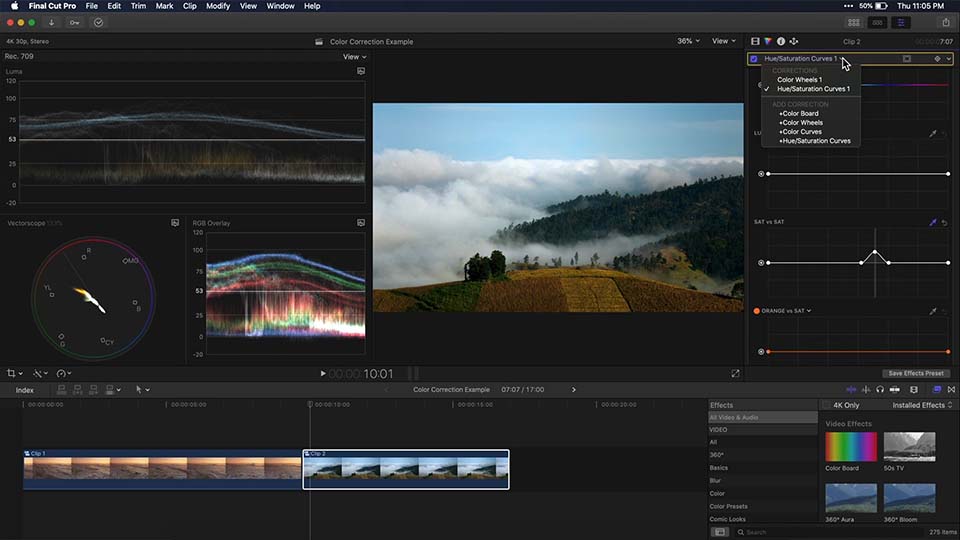
Final Cut Pro è un editor video non lineare inventato da Apple ed è stato il passo successivo per coloro che hanno superato iMovie. Molti possessori di Mac preferiscono utilizzare Final Cut Pro per la sua comoda interfaccia e la velocità di rendering. Proprio come in iMovie, Final Cut Pro offre strumenti per la correzione del colore sia manuale che automatica per migliorare la qualità dei video. La funzione Analizza e correggi del software bilancia automaticamente i colori, l'esposizione e il contrasto durante l'importazione, mentre lo strumento Bilancia colore consente di effettuare regolazioni clip per clip. Inoltre, la funzione Abbina colore consente agli utenti di replicare l'aspetto di un file video su un altro per accelerare il processo di editing.
Per regolazioni più precise, Final Cut Pro offre strumenti di color grading manuale come la scheda Colore, le ruote Colore, le curve Colore e le curve Tonalità/Saturazione. Questi strumenti consentono di regolare con precisione le luci, i mezzitoni, le ombre e il bilanciamento generale del colore. Le maschere possono essere applicate ad aree specifiche dei clip per correzioni mirate e gli effetti possono essere stratificati e temporizzati utilizzando i fotogrammi chiave per un editing avanzato. Grazie agli aggiornamenti in tempo reale e alle rappresentazioni visive tramite Video Scopes, Final Cut Pro facilita un processo di color grading completo e intuitivo per un editing video di livello professionale.
Pro
- Capacità di replicare le gradazioni di colore; - Bilanciamento automatico dei colori; - Regolazione manuale di colore, saturazione ed esposizione; - Correzione mirata di colori o aree specifiche; - Supporto per maschere ed effetti di stratificazione per correzioni mirate;
Contro
- Timeline non tradizionale; - Solo Mac OS; - Alcune funzioni avanzate sono eccessivamente semplificate.
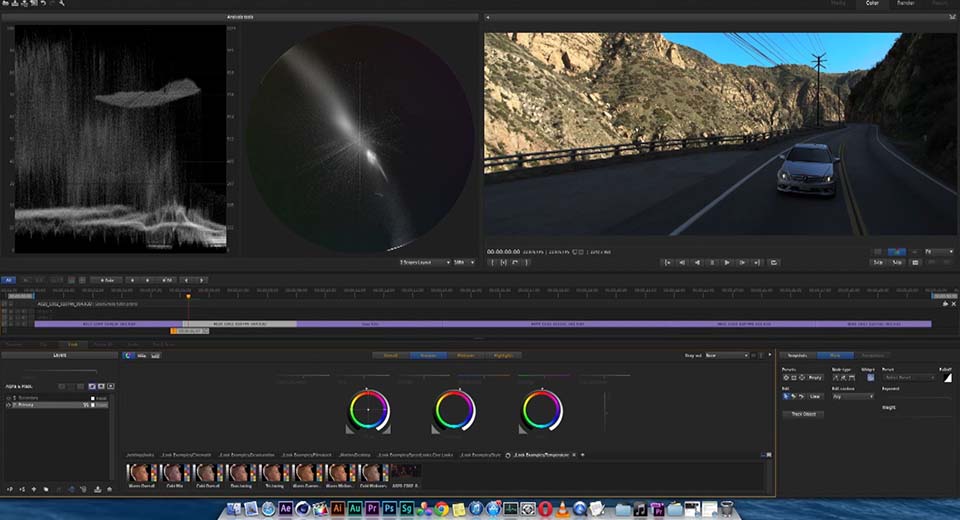
5. Red Giant Magic Bullet Suite
Red Giant Magic Bullet Suite offre una serie completa di plugin progettati per migliorare l'aspetto delle riprese direttamente sulla timeline di editing. Oltre alla semplice correzione del colore, Magic Bullet fornisce simulazioni accurate dei filtri delle lenti e delle pellicole, consentendo di ottenere un contrasto cinematografico e sofisticate palette di colori che ricordano i film a grande budget. Grazie alle preimpostazioni personalizzabili ispirate a film e programmi televisivi famosi, è possibile ottenere risultati di qualità professionale con un'estetica da Hollywood.
Magic Bullet Suite eccelle nel bilanciamento del tono della pelle e nella pulizia cosmetica, consentendo di migliorare rapidamente l'aspetto dei talenti riducendo le rughe e rimuovendo le imperfezioni, pur mantenendo un aspetto naturale.
Il plugin Magic Bullet Looks offre oltre 300 preimpostazioni completamente personalizzabili, che consentono di applicare senza problemi una gradazione del colore di livello professionale alle riprese. Grazie al supporto di oltre 30 nuovi profili di telecamera e ai controlli avanzati per la gestione del colore, Magic Bullet si integra perfettamente nei flussi di lavoro di alto livello, garantendo la compatibilità con qualsiasi filmato e processo di editing.
Pro
- Suite completa di plugin; - Potenti regolazioni del colore; - Bilanciamento efficiente dei toni della pelle; - Efficace riduzione del rumore; - Preset personalizzabili.
Contro
- Richiede un PC potente; - Prezzo elevato.
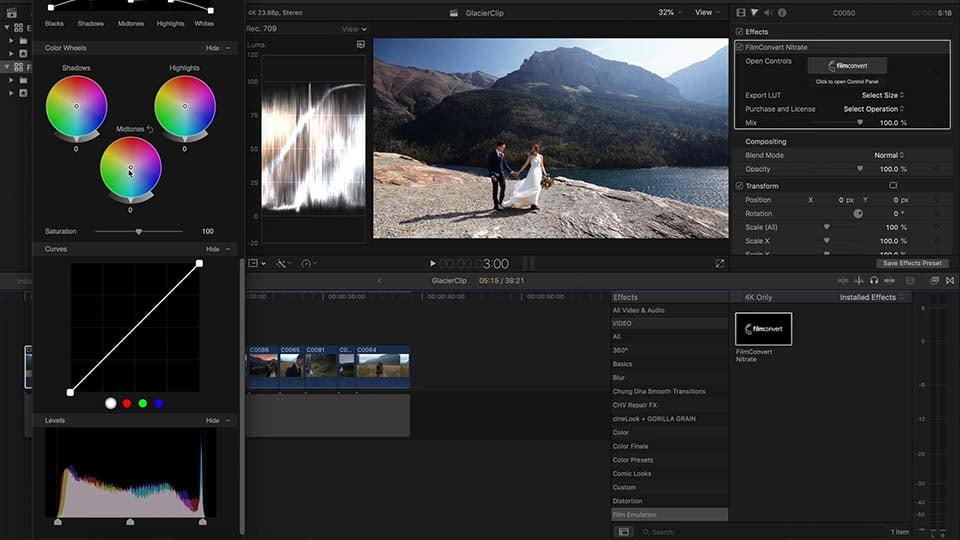
6. FilmConvert Nitrate
FilmConvert Nitrate è un potente plugin di color grading per migliorare un semplice filmato digitale con l'estetica e la consistenza di una vera pellicola. Selezionando da un'ampia gamma di pellicole e preset di grana, gli utenti possono ottenere con facilità un colore preciso e cinematografico. La caratteristica distintiva di Nitrate è la profilazione specifica per la telecamera, che adatta il processo di color grading alla marca, al modello e al profilo della telecamera utilizzata per le riprese. Ciò garantisce che qualsiasi regolazione del colore sia accuratamente allineata alle caratteristiche della telecamera, per una maggiore comodità.
Inoltre, Nitrate permette di gestire l'esposizione, la temperatura, la tinta e la saturazione, mentre le impostazioni della pellicola introducono una suite di emulazioni di pellicola basate sullo standard Cineon LOG, garantendo la conservazione della gamma dinamica. Caratteristiche esclusive come le impostazioni di grana e gli effetti di alone aggiungono profondità e autenticità, simulando le proprietà fisiche della pellicola. Inoltre, l'opzione Livello di Nitrate, gli strumenti di correzione del colore e la possibilità di esportare LUT offrono un controllo completo sul processo di classificazione, rendendo FilmConvert Nitrate uno strumento prezioso per ottenere gradazioni di colore cinematografiche.
Pro
- Emulazione autentica della pellicola; - Profili completi della telecamera; - Personalizzazione della grana; - Possibilità di esportare LUT.
Contro
- Manca di manuali completi; - Compatibilità NLE limitata.
7. Baselight
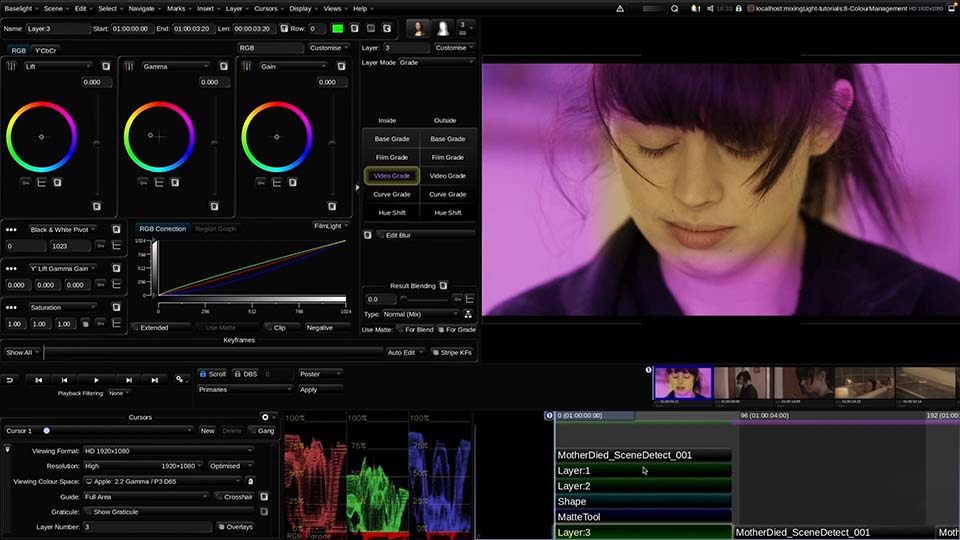
Baselight introduce un'ampia gamma di funzioni innovative per la classificazione e la correzione del colore. Tra i punti salienti c'è il rivoluzionario strumento X Grade, che ottimizza il processo di lavoro selettivo sul colore, migliorando la produttività e semplificando le interazioni con le immagini. Consente ai coloristi di eseguire più correzioni localizzate e complesse in un unico livello, eliminando la necessità di chiavi o opacità. Inoltre, Chromogen consente la regolazione e la riparazione di parti di una LUT senza "rompere" il filmato, perfetto per i moderni dati delle telecamere ad ampia gamma dinamica. La tecnologia Face Track trasforma anche i lavori di bellezza offrendo precise capacità di tracciamento del viso, migliorando significativamente l'efficienza delle attività di correzione del colore.
Pro
- Palette creativa estesa; - Architettura dei livelli unica; - Strumento X grade; - Tecnologia Face Track; - Preset personalizzabili; - Risorse didattiche.
Contro
- Prezzo elevato.
8. ColorDirector
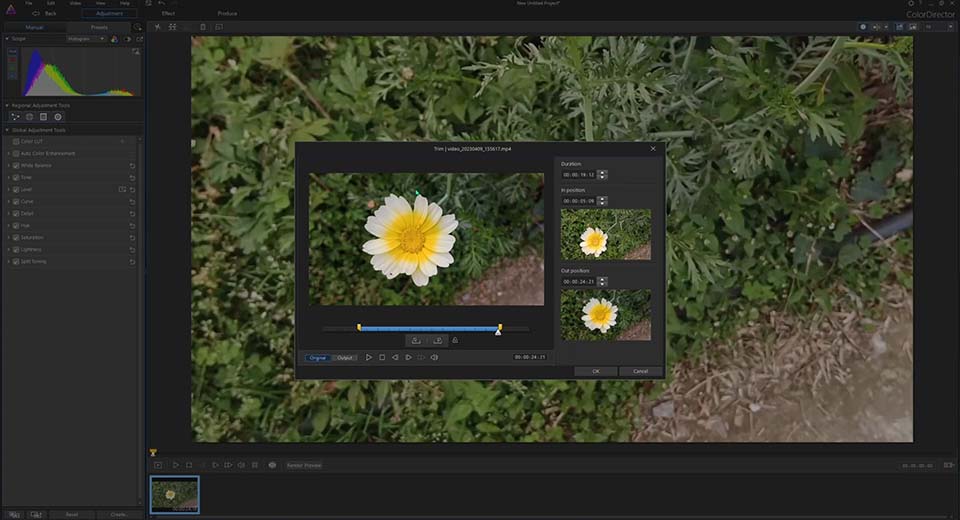
ColorDirector offers a comprehensive suite of tools for transforming any video footage into a cinematic production. It enables seamless color correction, enhancement, and styling to achieve the perfect color effect. Users can create multiple color variations within a single clip using keyframe controls and masks, export LUTs, reproduce color styles from reference clips and ensure color harmony across their videos. The platform supports automatic light source detection to enhance footage with customizable sparks, dynamic lighting effects like sunlight and lens flares, and atmospheric effects such as glow, bokeh, and black mist to add depth and texture to scenes.
ColorDirector also introduces advanced stylized visual effects, including grain, glitch, blur, vignette, and HDR, to add artistic textures or atmospheres to videos. Its professional color tools enhance productivity with features like histograms, RGB parades, waveform monitoring, and AI-powered motion tracking for targeted adjustments. The software includes a green screen maker, access to royalty-free stock assets, and AI color enhancement for precise control over the visual appearance.
Pro
- Support for many different file formats; - Keyframe controls and masks; - LUTs Support; - Customizable presets; - AI-powered motion tracking.
Contro
- Hardware acceleration doesn't operate for color and pixel adjustment; - Lack of tutorials.
9. SpeedGrade
Adobe SpeedGrade offre una suite completa di strumenti per trasformare qualsiasi filmato in una produzione cinematografica. Consente la correzione del colore, il miglioramento e lo styling senza soluzione di continuità per ottenere l'effetto cromatico perfetto. Gli utenti possono creare più variazioni di colore all'interno di una singola clip utilizzando controlli e maschere per i fotogrammi chiave, esportare LUT, riprodurre stili di colore da clip di riferimento e garantire l'armonia dei colori nei loro video. La piattaforma supporta il rilevamento automatico delle fonti di luce per migliorare le riprese con scintille personalizzabili, effetti di illuminazione dinamica come la luce del sole e i lens flares, ed effetti atmosferici come glow, bokeh e black mist per aggiungere profondità e texture alle scene.
ColorDirector introduce anche effetti visivi stilizzati avanzati, tra cui grana, glitch, sfocatura, vignetta e HDR, per aggiungere texture o atmosfere artistiche ai video. I suoi strumenti professionali per il colore migliorano la produttività grazie a funzioni come gli istogrammi, le parate RGB, il monitoraggio della forma d'onda e il tracciamento del movimento basato sull'intelligenza artificiale per regolazioni mirate. Il software include un creatore di green screen, l'accesso a risorse stock royalty-free e il miglioramento del colore AI per un controllo preciso dell'aspetto visivo.
Pro
- Supporto per molti formati di file diversi; - Controlli e maschere Keyframe; - Supporto delle LUT; - Preimpostazioni personalizzabili; - Tracciamento del movimento con intelligenza artificiale.
Contro
- L'accelerazione hardware non funziona per la regolazione del colore e dei pixel; - Mancanza di tutorial.
Conclusione
Il color grading e la correzione del colore si distinguono come meccanismi artistici cruciali che modellano l'umore e lo stile del video, influenzando direttamente la reazione del pubblico manipolando la luce e il colore per evocare emozioni specifiche. La padronanza di queste tecniche può evocare emozioni, coinvolgere il pubblico e stabilire uno stile unico e riconoscibile nel vostro lavoro.
Esiste una grande varietà di strumenti per la correzione e la gradazione del colore, ognuno dei quali offre una serie di funzioni avanzate. La nostra scelta ricade su VSDC Free Video Editor, il miglior programma per il color grading sia per i principianti che per i professionisti: i suoi vari strumenti di correzione del colore, tra cui le ruote cromatiche Lift, Gamma e Gain, i punti di bilanciamento del bianco e del nero e un editor LUT integrato, lo rendono eccezionalmente versatile per qualsiasi esigenza di color grading. A differenza di altri software che possono richiedere un hardware potente o una curva di apprendimento ripida, VSDC offre un'interfaccia semplice e facile da usare, assicurando che gli utenti possano ottenere un color grading di livello professionale senza inutili complessità. Che si tratti di risolvere problemi di illuminazione o di creare effetti cinematografici che ricordino i film iconici, VSDC fornisce gratuitamente tutti gli strumenti necessari, rendendolo la scelta definitiva per migliorare la narrazione visiva dei vostri video.
FAQ
Sono nuovo della gradazione del colore. Da dove posso iniziare?
VSDC è un ottimo punto di partenza perché offre una serie completa di strumenti per la correzione del colore primario e secondario, senza sopraffare i principianti. Per aiutarvi a iniziare a utilizzare VSDC, sono disponibili numerose risorse: il nostro canale YouTube è ricco di tutorial dedicati ai nuovi utenti, che vi guidano passo dopo passo attraverso le funzioni del software. Inoltre, il sito web di VSDC ospita articoli di approfondimento che coprono un'ampia gamma di argomenti, dalle tecniche di color grading di base alle strategie più avanzate. Sfruttando queste esercitazioni e questi articoli, non solo imparerete i fondamenti della gradazione del colore, ma anche come applicarli efficacemente con VSDC, consentendovi di dare vita alla vostra visione creativa.
Ho un budget limitato. Esistono potenti opzioni gratuite?
VSDC offre sia la versione Free che quella Pro del suo software di editing video: mentre la versione PRO vanta una gamma più ampia di funzionalità, la versione Free è completamente attrezzata per insegnare le basi dell'editing video e del color grading. È un ottimo punto di partenza per chi è alle prime armi, in quanto fornisce tutti gli strumenti necessari per apprendere le basi e creare contenuti video coinvolgenti senza l'investimento iniziale.
Il mio computer è vecchio. Posso ancora fare la gradazione del colore?
Assolutamente sì! Uno dei grandi vantaggi di VSDC è la sua compatibilità con i sistemi informatici più vecchi. VSDC è stato progettato per essere leggero ed efficiente, consentendo di operare senza problemi e senza ritardi anche sui PC più vecchi. Ciò significa che potete immergervi nel color grading e nell'editing video senza bisogno di un hardware all'avanguardia. Quindi, anche se il vostro computer dimostra la sua età, VSDC rende il color grading accessibile e realizzabile.
Posso provare questi editor prima di acquistarli?
Certamente! Molti software di editing video, compresi quelli per il color grading, offrono prove gratuite che consentono agli utenti di testare le loro funzioni prima di effettuare l'acquisto. È un ottimo modo per esplorare i vari editor e trovare quello più adatto alle proprie esigenze. Ciò che distingue VSDC in questo contesto è la generosità della sua versione gratuita. A differenza delle tipiche versioni di prova o limitate, la versione gratuita di VSDC è veramente illimitata. Offre agli utenti un set completo di strumenti di editing senza limitazioni di tempo, il che la rende un'opzione eccezionale per coloro che desiderano immergersi nell'editing video e nel color grading senza impegno finanziario.

Con questo programma è possibile registrare i video dal desktop e salvarli sul computer in diversi formati. Insieme al video editor è ideale per creare presentazioni e demo.

Il programma serve per catturare video da dispositivi esterni e e per registrarli sul computer in qualsiasi formato video. Potete salvare il video da sintonizzatori video, webcam, schede di acquisizione e vari dispositivi.

"VSDC Free Video Editor is a surprisingly powerful, if unconventional video editor"
- PC Advisor

"This video editor gives you tons of control and editing power"
- CNet

"The editor handles many common formats and boasts a good deal of capabilities when it comes time to alter lighting, splice video, and apply filters and transitions in post production"
- Digital Trends