- Veröffentlicht von Amy Shao am 19.11.2025 Hier ist das lang erwartete V...
- Hallo, ich bin Amy Shao, eine Reisevideografin aus Seattle. Drei Jahre lang...
- published Amy Shao 6/10/25 Die Wartezeit auf etwas Neues und Außergewöh...
- Mit dem neuesten Update des VSDC Video Editors starten wir gemeinsam in ein...
VSDC als 4K-Videobearbeitungssoftware verwenden: Tipps & Tricks
Shooting ultra HD videos used to be a prerogative of video editing professionals, but those times are over. Nowadays action cameras are eagerly adopting this new format while video hosting services like YouTube are offering its users the ability to upload 4K clips introducing more and more amateurs to this new technology. But where do we stand with 4K video editing software? Is it already available to wide audiences?
According to numerous articles on the Internet if you are planning to work with 4K videos – the money spent on the actual camera is the least of your expenditures. They say that unless you are willing to invest over $2500 on computer upgrades, ultra HD video editing isn’t for you. Fortunately, the Internet is not always right and there are much cheaper ways to edit a 4K video. One of the easiest methods is to find the right software, capable of utilizing even average hardware to the full. We suggest that you download free VSDC Video Editor. VSDC is known for its comparatively low system requirements and the capability to process 4K footage even on low-end computers with limited memory.
Below, we’ll help you get started with VSDC and provide a few tips on editing 4K videos in particular.
Video import
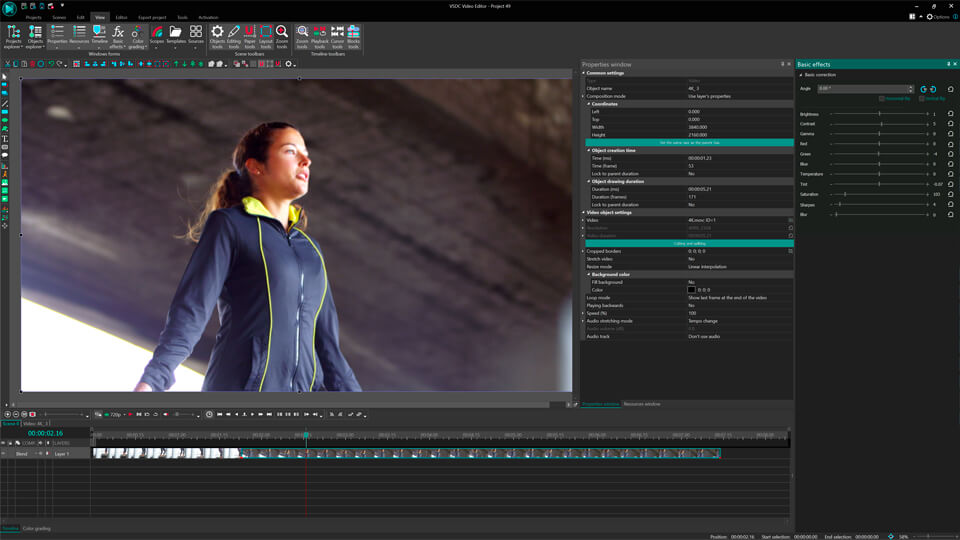
Upon completing the installation process, launch VSDC and click the “Import Content” button from the top menu. Select your 4K video from the computer. This way your video will be imported to the scene without quality loss and the whole editing scene will be adjusted to your ultra HD video parameters.
Color correction
Now it’s time for the actual editing. 4K videos work as a magnifying glass exaggerating the upsides as well as the downsides of your clips, so attention to detail is necessary.

Ultra-realistic videos oftentimes deserve color correction to mask either the bad weather or poor lightning. To improve the color spectrum, proceed to the top left corner of the and select “Video Effects” >> “Adjustment”. Choose between available options to enhance contrast, gamma and other visual aspects of your clip.
Video export
When you are done with editing, it’s time to export your full HD video. Proceed to the top menu and select “Export Project” >> “Web” >> “For YouTube”. Choose a name for your file and the location where you want to save it in the “Output file(s)” field. Complete the process by clicking the “Export Project” tab. This may take some time depending on your hardware.
If you still have any questions about exporting you 4k video, please refer to a one-minute video instruction below.
Want to reduce 4k?
If 4k is too cumbersome for you to work with or the video it doesn’t fit on your storage device you can always shrink the size of your clip with VSDC. For this matter import your video, select the “Export Project” tab and proceed to the “Edit Profile” section. Find the “Profile Filter” option to choose the necessary resolution. 1080 (Full HD) or 720 (HD) will most likely be more than enough for the intended outcome. Press “Apply Profile” to save changes and move on with exporting your project from the top menu.
Bonus features
If you are planning to edit many 4K videos you might want to increase the processing speed. This is made possible with the Pro version of VSDC that allows for hardware acceleration. The Pro version leverages the capacity of your video card (if the video card supports it) speeding up 4K video export.
If you purchased the Pro version, make sure you activate hardware acceleration in the program options. Hardware acceleration is not the only bonus you get with a Pro version of VSDC.
If you are shooting videos with an action camera, you will most definitely find video stabilization tool useful. You will find a detailed instruction on how to use it here. If you prefer visual guides, there is a video instruction for your convenience.
Another feature that may come in handy is advanced resizing. When you import a 4K video to the editor and resize it making it occupy only a part of your scene, you normally lose quality. Well, that’s not the case with the Pro version of VSDC. Advanced resizing methods will help you prevent quality loss and enjoy your videos in the best resolution possible. If you want to learn more about resizing and other advanced features of the pro version, feel free to refer to a detailed guide.
That’s it for now. Enjoy your 4K experience!
You can get more information about the program on Free Video Editor' description page.