")


4K-Video kostenlos bearbeiten mit VSDC Video Editor
4K-Video bearbeiten mit VSDC Video Editor
Ultra-HD-Videos aufzunehmen war früher vor allem professionellen Videobearbeitern vorbehalten, doch diese Zeiten sind vorbei. Heute setzen immer mehr Action-Kameras auf dieses Format, und Plattformen wie YouTube ermöglichen es ihren Nutzern, 4K-Clips hochzuladen. Dadurch kommen immer mehr Hobbyfilmer mit dieser Technologie in Berührung. Doch wie sieht es mit der 4K-Videobearbeitung aus? Gibt es bereits eine Lösung, die auch für ein breites Publikum geeignet ist?
Laut zahlreichen Artikeln im Internet sind die Kosten für die Kamera selbst nur der kleinste Teil Ihrer Ausgaben, wenn Sie mit 4K-Videos arbeiten möchten. Häufig heißt es, dass Ultra-HD-Videobearbeitung nichts für Sie sei, wenn Sie nicht bereit sind, mehr als 2500 Dollar in Computer-Upgrades zu investieren. Zum Glück hat das Internet nicht immer recht. Es gibt deutlich günstigere Möglichkeiten, ein 4K-Video zu bearbeiten. Eine der einfachsten Methoden besteht darin, die richtige Software zu wählen – also ein Programm, das auch durchschnittliche Hardware effizient nutzt. Wir empfehlen Ihnen, den kostenlosen VSDC Video Editor herunterzuladen. VSDC ist für seine vergleichsweise geringen Systemanforderungen bekannt und kann 4K-Material sogar auf einfacheren Computern mit begrenztem Arbeitsspeicher verarbeiten.
Im Folgenden zeigen wir Ihnen den Einstieg in VSDC und geben Ihnen einige praktische Tipps speziell für die Bearbeitung von 4K-Videos.
4K-Video importieren
Nach Abschluss der Installation starten Sie VSDC und klicken Sie im oberen Menü auf die Schaltfläche „Inhalt importieren“. Wählen Sie Ihr 4K-Video auf dem Computer aus. So wird das Video ohne Qualitätsverlust in die Szene importiert, und die gesamte Bearbeitungsumgebung wird automatisch an die Parameter Ihres Ultra-HD-Videos angepasst.
Farbkorrektur für 4K-Videos
Jetzt ist es Zeit für die eigentliche Bearbeitung. 4K-Videos wirken wie ein Vergrößerungsglas: Sie machen sowohl die Stärken als auch die Schwächen Ihrer Clips besonders sichtbar. Deshalb ist hier ein Auge fürs Detail besonders wichtig.
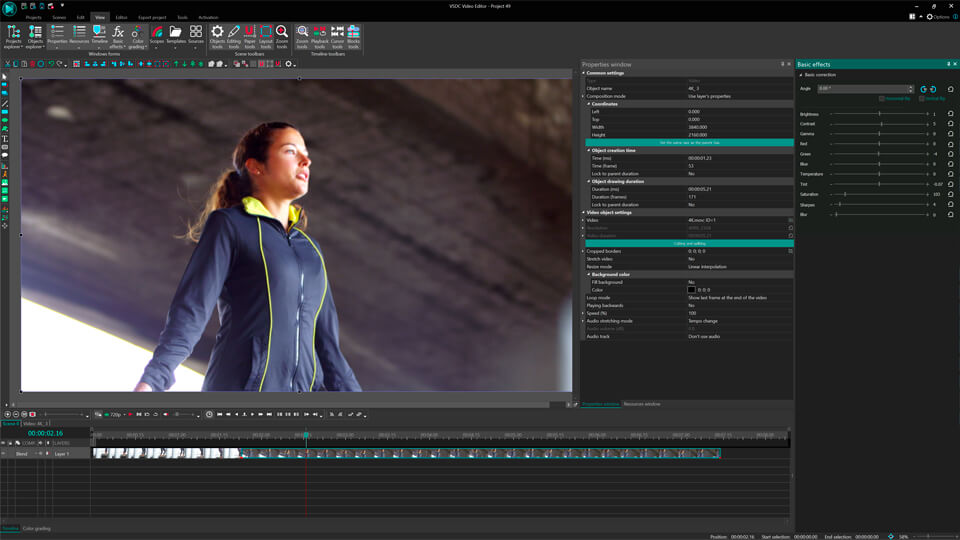
Ultra-realistische Videos profitieren oft von einer Farbkorrektur, um schlechtes Wetter oder ungünstige Lichtverhältnisse auszugleichen. Um das Farbspektrum zu verbessern, gehen Sie in die obere linke Ecke und wählen Sie „Videoeffekte“ >> „Anpassung“. Wählen Sie aus den verfügbaren Optionen, um Kontrast, Gamma und andere visuelle Aspekte Ihres Clips zu optimieren.
4K-Video exportieren
Wenn Sie mit der Bearbeitung fertig sind, ist es Zeit, Ihr Video zu exportieren. Gehen Sie zum oberen Menü und wählen Sie „Projekt exportieren“ >> „Web“ >> „Für YouTube“. Geben Sie im Feld „Ausgabedatei(en)“ einen Namen für Ihre Datei und den gewünschten Speicherort an. Schließen Sie den Vorgang ab, indem Sie auf die Registerkarte „Projekt exportieren“ klicken. Je nach Hardware kann dies etwas Zeit in Anspruch nehmen.
Falls Sie noch Fragen zum Export Ihres 4K-Videos haben, sehen Sie sich bitte die folgende einminütige Videoanleitung an.
4K-Video verkleinern oder in Full HD umwandeln
Wenn 4K für Sie in der Bearbeitung zu aufwendig ist oder das Video nicht auf Ihr Speichermedium passt, können Sie die Auflösung Ihres Clips mit VSDC jederzeit reduzieren. Importieren Sie dazu Ihr Video, wählen Sie die Registerkarte „Projekt exportieren“ und gehen Sie zum Bereich „Profil bearbeiten“. Dort finden Sie die Option „Profilfilter“, mit der Sie die gewünschte Auflösung auswählen können. 1080 (Full HD) oder 720 (HD) sind für das gewünschte Ergebnis in vielen Fällen völlig ausreichend. Klicken Sie auf „Profil anwenden“, um die Änderungen zu speichern, und exportieren Sie Ihr Projekt anschließend über das obere Menü.
Zusätzliche Funktionen für 4K-Videobearbeitung
Wenn Sie regelmäßig 4K-Videos bearbeiten, möchten Sie vermutlich auch die Verarbeitungsgeschwindigkeit erhöhen. Das ist mit der Pro-Version von VSDC möglich, die Hardwarebeschleunigung unterstützt. Die Pro-Version nutzt die Leistung Ihrer Grafikkarte – sofern diese unterstützt wird – und beschleunigt dadurch den Export von 4K-Videos.
Wenn Sie die Pro-Version gekauft haben, stellen Sie sicher, dass die Hardwarebeschleunigung in den Programmeinstellungen aktiviert ist. Und das ist nicht der einzige Vorteil, den Ihnen die Pro-Version von VSDC bietet.
Wenn Sie Videos mit einer Action-Kamera aufnehmen, werden Sie das Tool zur Videostabilisierung mit Sicherheit nützlich finden. Eine ausführliche Anleitung dazu, wie Sie es verwenden, finden Sie hier. Wenn Sie visuelle Erklärungen bevorzugen, steht Ihnen zusätzlich eine Videoanleitung zur Verfügung.
Eine weitere praktische Funktion ist das erweiterte Resizing. Wenn Sie ein 4K-Video in den Editor importieren und seine Größe ändern, sodass es nur einen Teil der Szene einnimmt, verlieren Sie normalerweise an Qualität. Mit der Pro-Version von VSDC ist das jedoch nicht der Fall. Erweiterte Methoden zur Größenänderung helfen Ihnen dabei, Qualitätsverluste zu vermeiden und Ihre Videos in der bestmöglichen Auflösung zu genießen. Wenn Sie mehr über Resizing und andere fortgeschrittene Funktionen der Pro-Version erfahren möchten, können Sie gern eine ausführliche Anleitung lesen.
Das war’s fürs Erste. Viel Spaß mit Ihren 4K-Videos!
Jetzt den VSDC Free Video Editor downloaden - Professionelle Videobearbeitung mit erweiterten Funktionen. Ideal für YouTube, Social Media und professionelle Videoprojekte. Zu den Funktionen.
Sehen Sie uns
 / @VSDCFreeVideoEditor
© 2011-2026, www.videosoftdev.com, FLASH-INTEGRO LLC. Datenschutz | Nutzungsbedingungen | Uber uns
Alle hier genannten Warenzeichen sind das alleinige Eigentum ihrer jeweiligen Inhaber.
Kopieren von Materialien dieser Webseite ist nur mit schriftlicher Genehmigung der Webseite-Verwaltung gestattet.