")


- Yayınlayan: Amy Shao 30 Haziran 2026 VSDC Free Video Editor’ün ye...
- Amy Shao tarafından yayımlandı: 11 Mart 2026 Yaratıcı bir insan içi...
- yayınlayan Amy Shao 19/11/25 Uzun zamandır beklenen VSDC 10.2 güncellemesiyl...
- Merhaba, ben Mattea Wharton, Seattle'dan bir seyahat videografçısıyım. Üç yıl bo...
VSDC 6.7’de Video Metin Efektlerini Kullanmak İçin Kapsamlı Rehber
VSDC’nin yeni sürümü, şık intros, özgün başlıklar ve sahne açılışları oluşturmanızı sağlayan üç güzel animasyonlu metin efekti sunuyor. Bunların yardımıyla popüler daktilo efektini taklit edebilir ve bazı efsanevi video oyunu açılış animasyonlarını yeniden oluşturabilirsiniz (örneğin Call of Duty açılışı gibi, evet!).
Bu ayrıntılı eğitimde, her bir metin efektine yakından bakacağız ve kontrolleri değiştirince neler olduğunu göstereceğiz. Henüz VSDC 6.7’yi indirmediyseniz, artık tam zamanı.
VSDC’de metin efektleri nasıl uygulanır
Metin efektleri, düzenleme menüsündeki yeni bir bölümde bulunur. Buna erişmek için sahneye bir metin nesnesi ekleyin, ardından üzerine sağ tıklayıp Text effects bölümüne gidin.
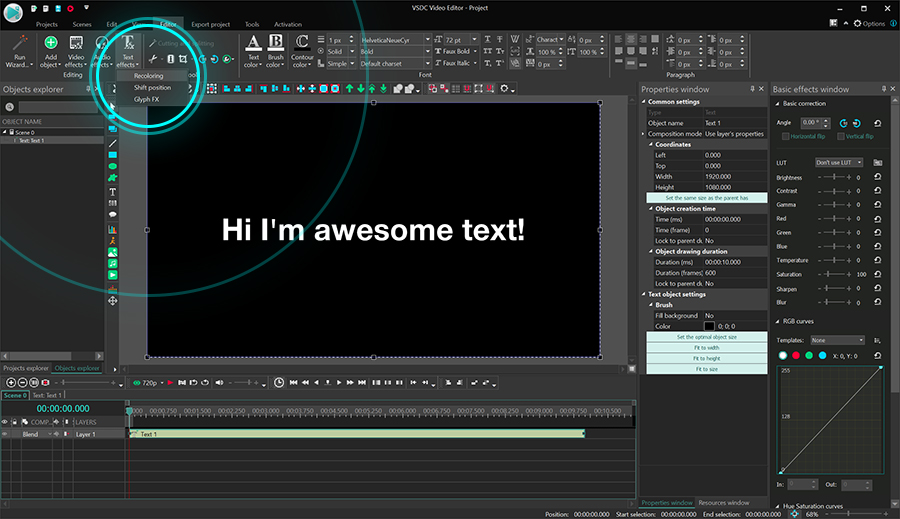
Açılır menüde üç efekt bulunur:
- Recoloring
- Shift position
- Glyph FX
İstediğiniz efekti seçtiğinizde Object's position settings penceresi açılır: bu, efektin geçerli imleç konumundan başlayarak tüm metin nesnesine uygulanacağını gösterir. Efektin varsayılan konumunda değiştirmek istediğiniz bir şey yoksa sadece OK düğmesine tıklayın.
Sonraki bölümlerde her bir efektin nasıl çalıştığını ve ayarları özelleştirerek neler elde edebileceğinizi göstereceğiz.
Recoloring metin efekti
Listedeki ilk efektin adı Recoloring. Bu efekt, metni renkler ve opaklık aracılığıyla canlandırmak için tasarlanmıştır. Varsayılan olarak, bu efekti uyguladığınızda metin sembolleri ekranda tek tek görünür (tamamen şeffaf durumdan tamamen görünür duruma geçerek).
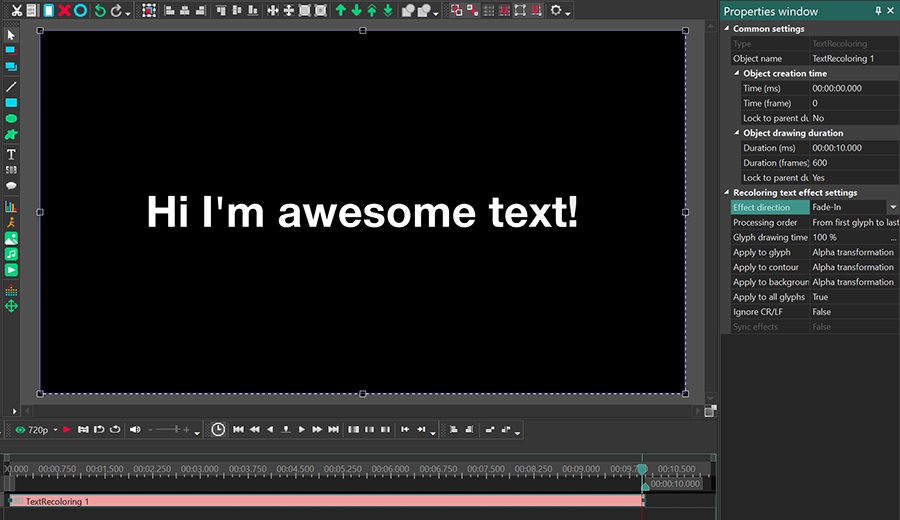
Zaman çizelgesinde efekt katmanının adı TextRecoloring olacaktır. Bu katmana istediğiniz zaman metin katmanına çift tıklayarak erişebilirsiniz. Efekt ayarlarını açmak için TextRecoloring üzerine sağ tıklayın ve Properties seçeneğini seçin. Properties window sağ taraftan açılacaktır.
Özellikler penceresinde iki grup ayar bulunur: Common settings ve Recoloring text effect settings. İlk grup, efekt katmanını yeniden adlandırmanıza, efektin görünmeye başlayacağı anı ve süresini saniye veya kare cinsinden belirlemenize olanak tanır. İkinci grup ise efektin denetimlerini içerir ve onu özelleştirmenizi sağlar.
İkinci gruptaki denetimlerin çoğu tüm efektler için kullanılabilir olacaktır. Şimdi bu denetimlere ve ne anlama geldiklerine bakalım.
Effect direction
Bu denetim için iki seçenek vardır: Fade-in ve Fade-out. Fade-in seçerseniz metin ekranda harf harf görünür. Fade-out seçerseniz önce tüm metin görüntülenir; ardından harf harf kaybolmaya başlar.
Processing order
Bu parametre, harflerin hangi sırayla görünmeye veya kaybolmaya başlayacağını belirler.
Üç seçenek arasından seçim yapabilirsiniz:
- From first glyph to last — harfler doğrudan sırayla görünür veya kaybolur
- From last glyph to first — harfler ters sırayla görünür veya kaybolur
- Random order — harfler rastgele görünür veya kaybolur
Glyph drawing time
Daha anlaşılır olması için, bu bağlamda “glyph” bir sembol ya da harf anlamına gelir. Glyph drawing time adlı parametre, bir sembolün ekranda tamamen görünmesi ya da ekrandan tamamen kaybolması için gereken süreyi kontrol eder.
Glyph drawing time değerini 0%’ın üzerinde herhangi bir değere ayarlarsanız, semboller şeffaf durumdan tamamen görünür hale yavaş yavaş geçer. Değer ne kadar yüksek olursa, görünme o kadar kademeli olur. 0 değerinde semboller bir anda belirir (veya daha önce Fade-out seçtiyseniz anında kaybolur).
VSDC’nin her sembol için çizim süresini nasıl hesapladığını merak mı ediyorsunuz?
Her sembol için çizim süresini hesaplamak için efekt süresini metindeki sembol sayısına bölün. Böylece efekt süresi 10 saniye ve metinde 10 sembol varsa, her sembolün tamamen görünmesi 1 saniye sürer. Bu durumda 1 saniye 100%’e eşittir. Sembollerin daha hızlı görünmesini istiyorsanız, çizim süresini azaltın. Unutmayın: semboller daha hızlı çizilse de tempo aynı kalır — saniyede bir sembol.
Apply to glyph/contour/background
Aşağıdaki üç denetim sırasıyla “Apply to glyph”, “Apply to contour” ve “Apply to background” olarak adlandırılır. Bunlar yalnızca Recoloring efekti için kullanılabilir. Bu parametreler, semboller, kontur ve arka plan için renk animasyonunu ayarlamanıza olanak tanır.
Varsayılan olarak bu parametrelerin her birinde Alpha transformation etkinleştirilmiştir. Bu, metin sembolleri, kontur ve arka plan dahil her şeyin şeffaf durumdan tamamen görünür duruma geçmesi anlamına gelir — yukarıda gösterildiği gibi.
Bunun yerine Color transformation seçerseniz, metnin tamamı görüntülenir ancak semboller tek tek renk değiştirmeye başlar.
Orijinal renk, Properties penceresinde seçtiğiniz renk olacaktır; son renk ise en başta, üstteki düzenleme menüsünü kullanarak metin nesnesini oluştururken seçtiğiniz renktir.
Color and alpha transformation, sembollerin aynı anda hem görünmesi (veya kaybolması) hem de renk değiştirmesi anlamına gelir. Renkler şu sırayla değişir: önce Properties penceresinde seçilen renk görünür, ardından daha önce metin düzenleme menüsünde seçtiğiniz renge dönüşür.
Sembollerin, konturun ya da arka planın animasyonunu devre dışı bırakmak için Do not apply seçeneğini seçin.
Apply to all glyphs
Bazı durumlarda Recoloring efektini yalnızca seçili sembollere uygulamanız gerekebilir. Bunun için Apply to all glyphs denetimine ihtiyacınız vardır. Etkin olduğunda efekt tüm sembollere uygulanır; devre dışı bırakıldığında hangi sembolleri canlandırmak istediğinizi seçmenize izin verir.
Örneğin, efektin hangi sembolden başlaması gerektiğini ve kaç sembole uygulanacağını belirleyebilirsiniz.
Ignore CR/LF
Enter tuşunu kullanarak iki satırlık bir metin oluşturduysanız, iki seçeneğiniz vardır: efekti iki satıra da aynı tempoda uygulamak veya ikinci satıra geçmeden önce efekti duraklatmak. İlkini yapmak için Ignore CR/LF seçeneğini etkinleştirin (True olarak ayarlayın); ikincisi için devre dışı bırakın.
Sync effects
Diyelim ki metne birden fazla efekt uyguladınız ve sembollerin aynı anda hem renk değiştirmesini hem de dönmesini istiyorsunuz. Bu durumda efektleri senkronize etmelisiniz; böylece hepsi aynı sembollere eşzamanlı olarak uygulanır. Bunu yapmak için Random processing order ayarını seçin ve Sync effects seçeneğini etkinleştirin. Devre dışı bırakırsanız, her efekt farklı sembollere rastgele uygulanır.
Bu iki denetimin VSDC’deki tüm metin efektleri için ortak olduğunu unutmayın. Nasıl çalıştıklarını zaten bildiğiniz için sonraki bölümlerde bunları tekrar incelemeyeceğiz.
Shift position metin efekti
Shift position metin efekti, sembollerin ekranda seçilen bir alandan metin yer tutucusuna tek tek kayarak gelmesini sağlamak için tasarlanmıştır. Zaman çizelgesinde bu efekt TextShiftPosition olarak görünür.
Ayarları açmak için efekt katmanına sağ tıklayın ve Properties seçeneğini seçin. Sağ tarafta, metin animasyonunu ayarlamak için ihtiyacınız olan tüm denetimleri içeren Text shift effect settings bölümünü bulacaksınız. Şimdi bu denetimleri ayrıntılı olarak inceleyelim.
Effect direction
Daha önce açıkladığımız mantığı izleyen bu parametre, hareket yönünü belirlemenizi sağlar. Fade-in seçerseniz metin ekranda sembol sembol görünür. Fade-out seçerseniz metin ekrandan sembol sembol kaybolur.
Processing order
Bu parametre, harflerin hangi sırayla görünmeye veya kaybolmaya başlayacağını belirler.
Yine üç seçenek arasından seçim yapabilirsiniz:
- From first glyph to last — harfler doğrudan sırayı izleyerek görünür veya kaybolur
- From last glyph to first — harfler ters sırayı izleyerek görünür veya kaybolur
- Random order — harfler rastgele görünür veya kaybolur
Glyph drawing time
Bu efekt için Glyph drawing time, her sembolün başlangıç konumundan son konumuna — ya da seçtiğiniz yöne bağlı olarak tam tersi istikamette — hareket etmesi için gereken süredir. Değer ne kadar yüksek olursa, hareket o kadar kademeli olur.
Initial glyph position
Bu parametre, metin sembollerinin son konumlarına doğru hareket etmeye başlayacakları başlangıç noktasını belirlemenizi sağlar.
Üç seçenek vardır:
- Constant shift — semboller sabit bir uzaklıktan 45 derecelik açıyla tek tek görünür. Açıyı değiştirebilirsiniz, ancak mesafe aynı kalır.
- Outside text object — semboller arka plan rengiyle birlikte metin yer tutucusunun dışından tek tek görünür. Sembollerin konumu Distance değerine göre değişir. 100% değerinde semboller tam olarak metin yer tutucusunun dışındadır. Ancak değer azaldıkça semboller son konumlarına daha yakın olur.
- Custom point — semboller ekranda sizin elle seçtiğiniz bir noktadan görünür.
Seçtiğiniz konum için üç parametreyi ayarlayabilirsiniz: Angle change per glyph, Angle ve Distance.
Angle change per glyph — bu parametre, sonraki her sembolün hareket açısını değiştirir. Örneğin Angle change 30 derece, başlangıç Angle değeri ise 10 derece olsun. Bu, ilk sembolün 10 derecelik açıyla, sonraki sembolün 40 derecelik açıyla (10+30), üçüncü sembolün ise 70 derecelik açıyla (40+30) görünmesi anlamına gelir ve böyle devam eder.
Angle, sembollerin son konumlarına doğru hareket ederken kullandıkları başlangıç açısını belirler. Angle change per glyph sıfıra eşitse, bu parametrenin tüm hareket süresi için açıyı belirlediğini unutmayın.
Distance, bir sembolün başlangıç konumu ile son konumu arasındaki mesafeyi belirler.
Not: Her üç parametre için de Initial ve Final değerlerini değiştirebilirsiniz; yani efektin başındaki ve sonundaki değerler farklı olabilir.
Glyph FX metin efekti
Glyph FX efekti, sembollerin zoom veya döndürme gibi daha karmaşık animasyonlarla görünmesini ya da kaybolmasını sağlamak için tasarlanmıştır. Bu efekti uyguladığınızda zaman çizelgesinde TextGlyphFX olarak görünür.
Animasyonu özelleştirmek için Properties window penceresini açın ve Glyph FX text effect settings bölümüne kaydırın. Şimdi burada bulunan denetimlere bakalım.
Effect direction
Bu parametre, metin animasyonunun sırasını belirlemenizi sağlar. Fade-in seçerseniz metin ekranda sembol sembol görünür. Fade-out seçerseniz metin ekrandan sembol sembol kaybolur.
Processing order
Bu parametre, harflerin hangi sırayla görünmeye veya kaybolmaya başlayacağını belirler.
Üç seçenek arasından seçim yapabilirsiniz:
- From first glyph to last — harfler doğrudan sırayı izleyerek görünür veya kaybolur
- From last glyph to first — harfler ters sırayı izleyerek görünür veya kaybolur
- Random order — harfler rastgele görünür veya kaybolur
Glyph drawing time
Glyph drawing time, seçtiğiniz efekt yönüne bağlı olarak her sembolün ekranda görünmesi ya da kaybolması için gereken süredir. Değer ne kadar yüksek olursa, animasyon o kadar kademeli olur.
Transformation type
Dönüşüm türleri, metin sembollerinin ekranda nasıl görünüp kaybolacağını belirler. Üç seçenek arasından seçim yapabilirsiniz:
- Zoom — semboller görünürken boyutları büyür; kaybolurken küçülürler
- Skew — semboller seçilen açıyla ekranda görünür ve ters şekilde kaybolur
- Rotate — tüm semboller aynı anda görünür, ancak seçilen açıyla tek tek dönerler
Dönüşüm türünü seçtiğinizde, animasyonu özelleştirmeniz için ek denetimler kullanılabilir hale gelir. Şimdi bunların neler olduğuna bakalım.
Zoom
Bu animasyon adı oldukça açıklayıcıdır. Burada kontrol edebileceğiniz şey, sembollerin hangi ölçekte büyüyüp küçüleceğidir. Özellikle, sembollerin başlangıç ve son boyutunu belirleyen X/Y scale ayarlarını düzenleyebilirsiniz.
Varsayılan olarak her iki ölçeğin de şu değerlere sahip olduğuna dikkat edin: 0;100%. Bu, sembollerin tamamen görünmez durumdan (0%) tam boyutlarına (100%) geçtiği anlamına gelir. Animasyonun başında ya da sonunda sembollerin boyutunu değiştirmek isterseniz, eksen ölçek ayarlarını genişletin ve Initial veya Final değerini uygun şekilde değiştirin.
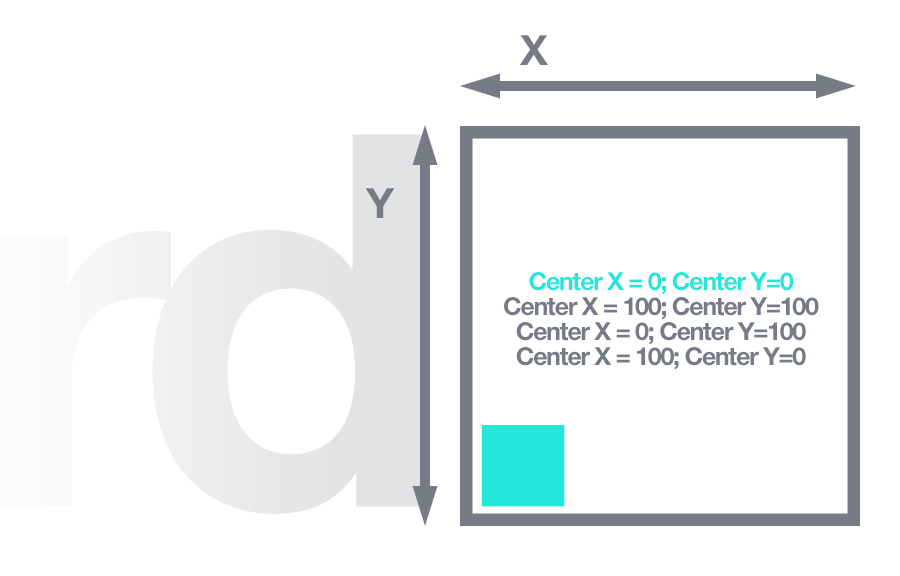
X/Y scale ayarlarına ek olarak, Center X/Y denetimlerini kullanarak sembolün hangi noktadan görüneceğini (ya da hangi noktaya doğru kaybolacağını) da belirleyebilirsiniz. Bunların nasıl çalıştığını anlamak için her sembolün kendi hücresine sahip olduğunu düşünün. Center X/Y parametreleri, sembolün hücrenin hangi bölümünden görünmesi gerektiğini tanımlar. Örneğin, her iki parametre de 0% ise semboller sol alt köşeden görünür. Her iki parametre de 100% ise semboller sağ üst köşeden görünür.
Skew
Bu animasyon türü, metne uygulanan açı ve dönme hareketini birlikte içerir. Bunu seçerseniz şu parametreler kullanılabilir hale gelir: Angle X/Y ve Center X/Y.
Angle X/Y denetimleri, sembolün eksen etrafındaki eğim açısını belirler. Center X/Y denetimleri ise hareket ederken sembollerin sembol hücresi içindeki hangi noktaya bağlı olacağını seçmenizi sağlar.
Rotate
Döndürme ayarları, diğer animasyon türlerinde bulunan ayarlara benzerdir. Dönme açısını ve Center X/Y değerlerini seçebilirsiniz.
Bu durumda Center X/Y değerleri, sembollerin hücre içinde hangi nokta etrafında döneceğini tanımlar. Örneğin, hem Center X hem de Center Y 0% ise (aşağıda gösterildiği gibi), semboller sol alt köşe etrafında döner. Her iki parametre de 100% ise semboller sağ üst köşe etrafında döner ve bu şekilde devam eder.
Yeni animasyonlu metin efektleriyle ilham alın
Yeni animasyonlu metin efektleri, aklınızdaki hemen her metin intro fikrini görselleştirebilecek kadar çok yönlüdür. İlham mı arıyorsunuz? Daktilo efektiyle ilgili video eğitimimizi izleyin ve bunu kendiniz oluşturmaya çalışın.
VSDC Free Video Editor edinin — gelişmiş özelliklere sahip güçlü bir doğrusal olmayan video düzenleme yazılımı. YouTube içerik üreticileri, sosyal medya videoları ve profesyonel projeler için mükemmeldir. Özellikler hakkında daha fazla bilgi alın.
Watch us on YouTube
 / @VSDCFreeVideoEditor
© 2011-2026, www.videosoftdev.com, FLASH-INTEGRO LLC. Gizlilik politikası | Kullanım koşulları | Hakkımızda
Burada atıfta bulunulan tüm ticari markalar, ilgili sahiplerinin mülkiyetindedir.
Bu siteden herhangi bir materyalin kopyalanmasına yalnızca Site Yönetiminin yazılı onayı ile izin verilir.