 User Help Manual
  Learn FAQ
  Send us feedback
 ")


- Published by Amy Shao on March 11, 2026 What is the best gift for...
- published Amy Shao 11/19/25 Meet the long-awaited VSDC 10.2 update: a new ve...
- Hi, I'm Mattea Wharton, a travel videographer from Seattle. For three years I ba...
- published Amy Shao 6/10/25 The wait for something new and unusual is finally...
How to quickly remove a watermark from a video using VSDC Free Video Editor
So, you’re looking for a way to get rid of a watermark in a video for free. Well, you probably already know there’s no perfect way to do that because technically watermarks, just like text objects, are static elements embedded into each video frame. Ideally, you would need the original project files or an expensive watermark remover.
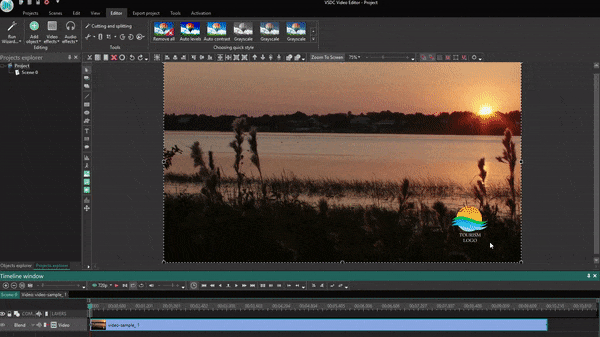
However, there is a couple of roundabout approaches that may be sufficient for you. First, you can quickly blur or pixelate a watermark using the DeLogo filter, so that it will practically get invisible. We’ve demonstrated this method in the video above.
Second, to remove a watermark from a video – if it’s placed in the corner or close to the edge – you can simply crop the borders. This will inevitably change the size of your footage though, you should be aware of that.
In this tutorial, we’ll show you both techniques performed in VSDC. It’s a free video editing software for Windows, and if you haven’t done it yet, download it to your PC first.
How to remove a watermark from a video for free using VSDC DeLogo filter
This method literally takes less than a minute and it’s an easy way to get rid of video watermarks, logos, GPS coordinates, car numbers, time or date digits embedded to a video.
Here is the entire process broken into steps:
- Import your video file to VSDC Free Video Editor.
- Open the Video Effects tab and proceed to Filters from the dropdown menu. Choose DeLogo.
- Notice, a pixelated rectangle-shaped area appearing in the center of the scene. Meanwhile, on the timeline, there will be a new tab opened with the DeLogo filter placed on it. Check the illustration below to get a clearer idea of where to look.
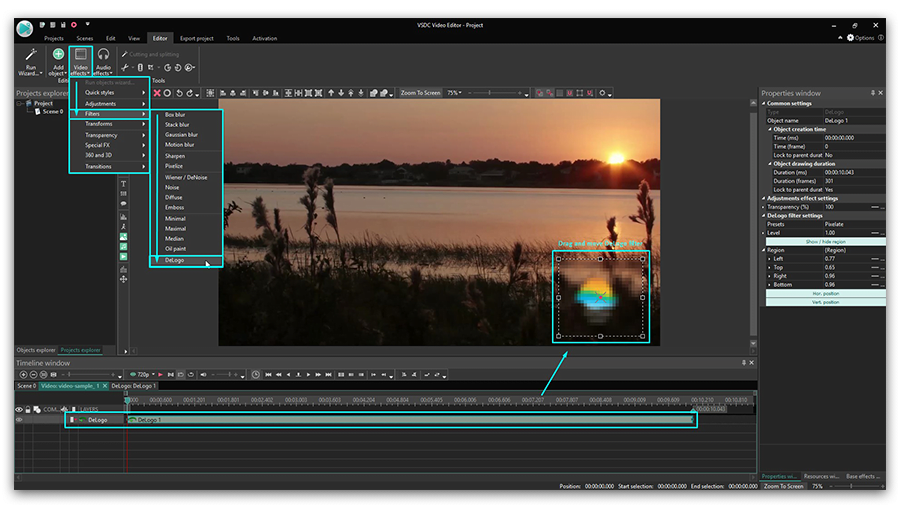
- Once you click on the filter object, you’ll be able to resize it and move it around the scene.
Now, you might want to adjust the filter by making it more intense or less visible. Again, depending on your original video, you may prefer to switch from pixels to blur or mosaic. Here is how to do it:
- Open the Properties window on the right side of VSDC interface. If you can’t see it, click on the DeLogo object with the right mouse button and choose Properties.
- Find DeLogo filter settings and choose any preset. There are 5 of them: Pixelate, Box blur, Les blur, Mosaic, and Gaussian blur.
- In the field below, adjust the level of intensiveness to achieve the desired look.
Once you’re satisfied with the way your video looks, go to the Export project tab and save the video to your PC using one of the preconfigured export profiles.
And since we sometimes receive queries on whether VSDC itself places a watermark on exported videos, we wanted to let you know in advance that it doesn’t. VSDC is absolutely free, it has no trial periods or format limitations, let alone watermarks. Otherwise, it would be slightly unfair to create the “How to remove a watermark from a video tutorial”, right?
Moving on. Sometimes you can make do even without a filter. When a watermark is placed right at the edge of a video, and you can sacrifice a bit of recorded space, cropping is the way to go.
How to remove a watermark from your video by cropping its borders
We already have a detailed tutorial on how to crop video borders using different methods, so here is a brief guide for your case:
- Import your video to VSDC.
- Find the Cutting and Splitting Tools section in the top menu. The Crop borders icon is #3 from the left. Click on it to crop a custom region.
- In the new window that will pop up, grab the dashed line of the edge you need to cut and drag it inwards until the watermark is left out the frame.
- Click OK to close the cropping window.
You may notice that the size of the video has changed, and thin black borders have appeared on the sides of the video (either left and right, ot top and bottom - depending on where the watermark was placed).
So, if those black borders are an issue for you, you can remove them by tailoring the size of the project to the new size of the video. Here is how.
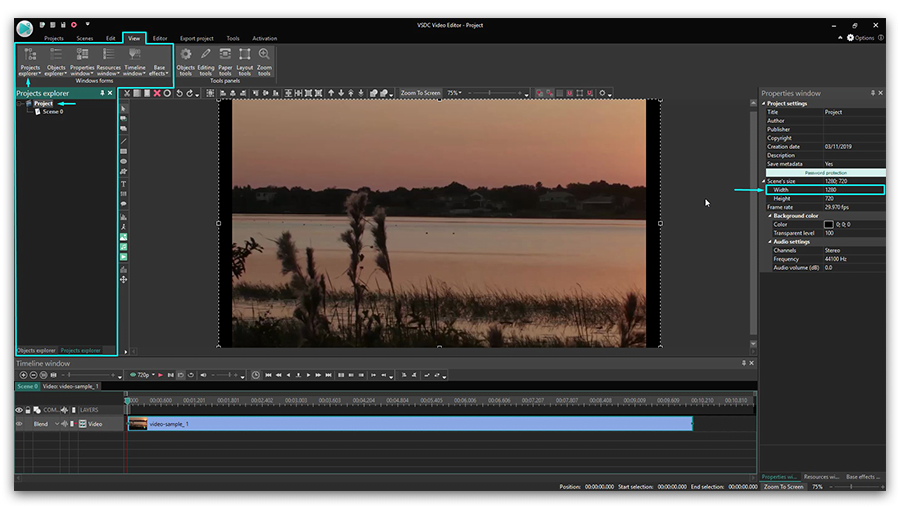
When you crop the side that contains a watermark, you’ll notice that the width (or the height) parameter will change too. Pay attention to the new number because you’ll need it in a second.
![]()
When you’re done cropping, go to the View tab (top menu), proceed to the Projects explorer, click on the Project 1 and notice the Properties window sliding in from the right. In the Properties window, change the required parameter. In our example, we’ve reduced the width.
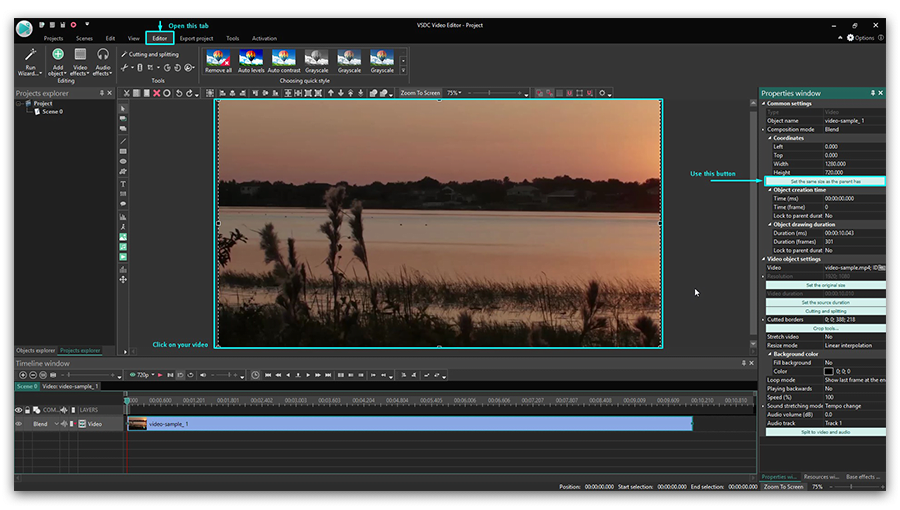
The black border may not disappear right away, but bare with us. Close the Projects explorer window on the left, go back to the Editor tab (top menu) and click on your video. You’ll notice that the Properties window will display new set of parameters. Click the green “Set the same size as the parent has” button to make the video fit the scene size perfectly. See the illustration below.
Technically, this is it, and you can now export the project following the steps described above. Should you have any questions, don’t hesitate to message us on Facebook.
Afterword
Please be advised that sometimes a watermark on a video indicates that its owner wanted to prevent their file from being copied, modified, and distributed. Naturally, we don’t recommend to remove watermarks from the videos that are a subject of copyright, unless you’re the copyright holder or you know that it won’t violate the rights of the original video creator.
Now that you know you can use VSDC DeLogo as a watermark remover, here are 5 more tutorials that may pique your interest:
- How to create a picture-in-picture effect
- How to remove green background from a video
- How to blur faces on a video
- How to add text to a video
- How to reduce audio noise in your footage
Subscribe to VSDC YouTube channel to receive instant notifications about new tutorials published.
Watch us on YouTube
 / @VSDCFreeVideoEditor
© 2011-2026, www.videosoftdev.com, FLASH-INTEGRO LLC. Privacy policy | Terms of use | About us
All trademarks referenced herein are the sole property of their respective owners.
Copying any materials from this site allowed only with written consent of Site Administration.