 User Help Manual
  Learn FAQ
  Send us feedback
 ")


- Published by Amy Shao on March 11, 2026 What is the best gift for...
- published Amy Shao 11/19/25 Meet the long-awaited VSDC 10.2 update: a new ve...
- Hi, I'm Mattea Wharton, a travel videographer from Seattle. For three years I ba...
- published Amy Shao 6/10/25 The wait for something new and unusual is finally...
Create beautiful video overlay effects in VSDC
Video overlays are the best. We love this trick so much because it unlocks unlimited creativity in video editing.
Now you can discover this magic yourself. With this technique, you have the power to:
- overlay videos, pictures, texts or other elements on another video and vice versa;
- mix two or more pieces of footage into one composition;
- create an overlay for a selected area in a video.
And that's just scratching the surface! In this tutorial you’ll find out everything you need to master this fantastic feature and learn how to create beautiful video overlays in Video Editor.
Now, when it comes to the technical side of the process, video overlays are incredibly easy. You’ll be able to create one using practically any non-linear video editor. In this tutorial, we’ll show you how to do it using VSDC – a free video editing program for Windows. It’s free, it requires little space on your PC, and it offers tons of possibilities for creators.
Looking for a free video editor to create stunning overlays?
Download VSDC Free Video Editor
Below, we’ll briefly go over creating video overlays and show you a couple of ideas you might want to try on your own. So, let’s just dive right in.
What does “video overlay” mean?
Video overlays are directly related to the idea behind non-linear video editing. And if you’ve never worked in a non-linear video editor before, here is what you need to know. Unlike linear software that forces you to place media files one after another in a direct sequence (think Movie Maker), non-linear editors give you much more freedom. You can layer videos and images one over another, place them side by side or even diagonally on the same scene. You can also adjust the opacity level for each file, which means an image can serve as a half-transparent layer placed over a video – or vice versa. And that brings us to the main point…
When you add a layer with a media file (image or video) over your existing footage to blend them into one composition, you create an overlay.
There are many ways to do it, and based on your goals, you may have in mind any of the following:
- Light or color effect overlays (see the example above)
- A watermark placed on a video (half-transparent text object over footage)
- A picture-in-picture effect (video playing in a small window over another video)
Technically, all the above can be considered as an overlay but in the instruction below, we’ll focus on the first one.
If you need to create a cinemagraph, add a watermark to a video or create a picture-in-picture effect, just check out the links.
How do you overlay videos in VSDC?
There are several ways to add an overlay into your video. Here is the easiest one:
- Launch VSDC and use the “Import content” button to add your main creative: video or image.
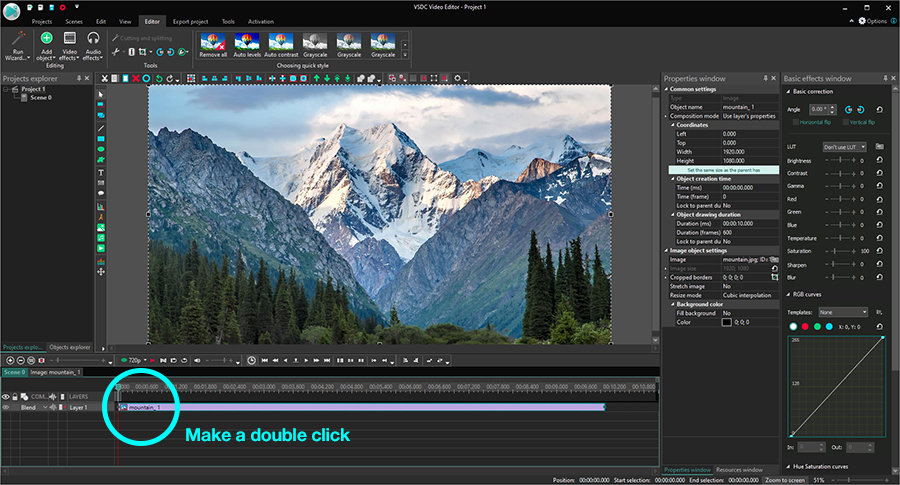
- Now that the file is on the timeline, make a double-click on it – a new tab will open.
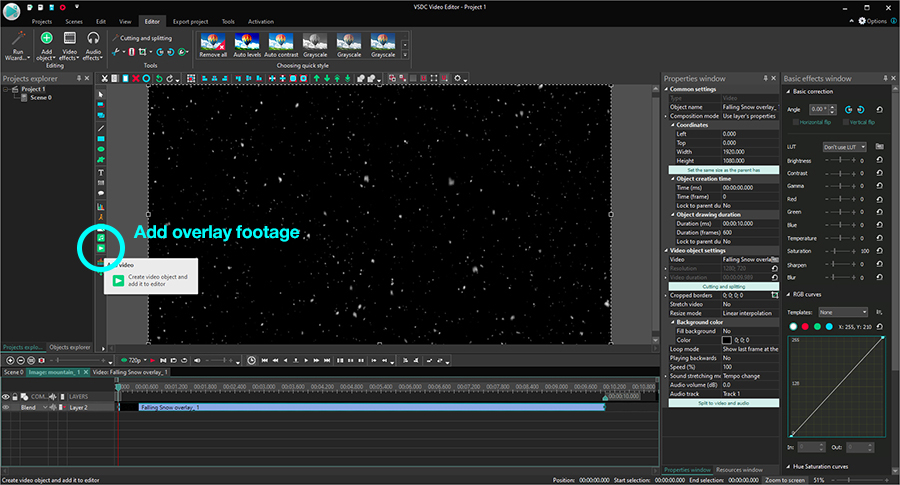
- The next step is to add your overlay video to the scene. Use the “Add object” button in the upper left corner, proceed to “Video” and upload the overlay you’ve chosen. There are several websites where you can download royalty-free overlay videos for your project. For this tutorial, we’ve used Videvo.
- Move to the left side of the timeline and open the “Blend” menu. Select “Screen” and watch how two files get blended.
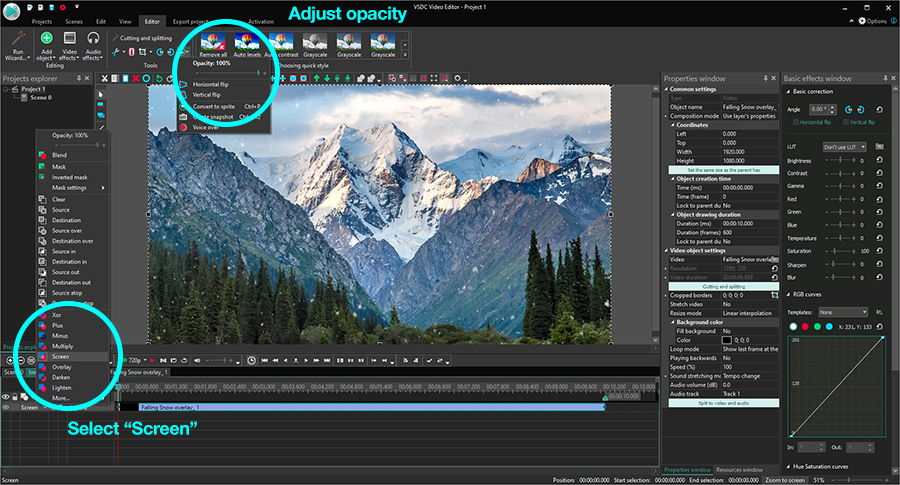
- Go to the “Tools” menu at the top and click on the wrench icon. Adjust the opacity level of the overlay if you want to make it more transparent.
- On a very basic level, this is it. You can go ahead and save your video to PC using the “Export project” tab.
At this point, you can set your creative spirit free and start playing with the settings. For example, you may want to layer the effect partially or make the overlay gradually disappear. You may also use blending modes to change the way your footage is blended. Here are three ideas for you to practice.
Create a photomotion effect
Photomotion is a popular effect that can help you bring still images to life. Using video overlays, you can add moving clouds to the sky area in the photo, make snow fall, or create water movement. It all depends on where your imagination leads you.
To create a photomotion, import a still image instead of a video as your main creative, make a double click on it and add an overlay. Resize the overlay by cropping the video, change its opacity, and place over the area you want to bring to life. Voila!
Use video overlays to create cinematic transitions
Video overlays are used to set the tone and add emotions. For instance, wedding videos often contain the famous light leaks overlay because it creates such a dreamy, romantic look.
Light leaks – and overlays in general – can also serve as a perfect, authentic transition between scenes. Learn how to apply a light leaks transition in VSDC from the tutorial below:
Practically any dynamic overlay video will make a good transition. Watch this video showing how to create a simple glitch transition if you need more ideas.
Create a double exposure effect
The last trick we’re about to show you is so impressive and sooo easy to replicate, you won’t believe your eyes.
If you aren’t familiar with the double exposure technique, it uses the same principles as a video overlay, although it’s applied to photos more often than to videos. The outcome is a composition of two or more images blended in a unique way. Here is a step-by-step guide to creating a double exposure video with a smoke overlay:
- Launch VSDC and use the “Import content” button to add your main video.
- Add the smoke overlay using the “Add object” button. You can find one on free stock video marketplaces like Videezy or Videvo.
- Select the overlay, go to the “Video effects” menu, proceed to “Adjustments” and select “Inverse”.
- Move to the left side of the timeline, open the “Blend” menu and select “Screen”.
- Adjust the opacity of the smoke level if needed using the “Tools” menu.
Here is a 1-minute long video guide to using smoke overlay:
Ready to put this into practice? Then go ahead – download VSDC, a few overlay videos to experiment with, and let your creativity take over.
Enjoy!
You can get more information about the program on Free Video Editor' description page.
Watch us on YouTube
 / @VSDCFreeVideoEditor
© 2011-2026, www.videosoftdev.com, FLASH-INTEGRO LLC. Privacy policy | Terms of use | About us
All trademarks referenced herein are the sole property of their respective owners.
Copying any materials from this site allowed only with written consent of Site Administration.