- published Amy Shao 6/10/25 The wait for something new and unusual is finally...
- This holiday season embraces new beginnings with the latest update of VSDC Video...
- Change is all about improvement, and this process wouldn't be possible without y...
- Intro In 2024 the options range for creating visual effects is incredibly dive...
How to Add Logo to Video on Windows PC
If you’re using your own videos to promote your business, stamping them with a logo might be a good idea. Not only does it help you increase brand recognition, but it’s also a surefire way to protect your content from being used by someone else.
In this tutorial, we’ll show you how to quickly add a logo to a video in VSDC, free video editing software for Windows. VSDC is a non-linear editor which means you can display several videos and images in the same scene by blending and overlaying them.
Before getting started, make sure you have your logo in high quality at hand. You’ll first learn how to overlay it on a video file, then we’ll go over the ways to make it monochrome and semi-transparent.
Here is how to add a logo to a video in VSDC
If your logo was created by a professional designer, you probably had it delivered in one of the following formats: AI, EPS, PDF, SVG, PNG, or JPG. For our purposes, a .PNG logo with a transparent background will be the best option. Such logos look more natural as if they were initially embedded in the video. However, if you don’t have a .PNG file, it’s not a problem. You’ll be able to place any image over a video in VSDC.
Step 1. Launch VSDC and upload your footage using the Import content button on the start screen.
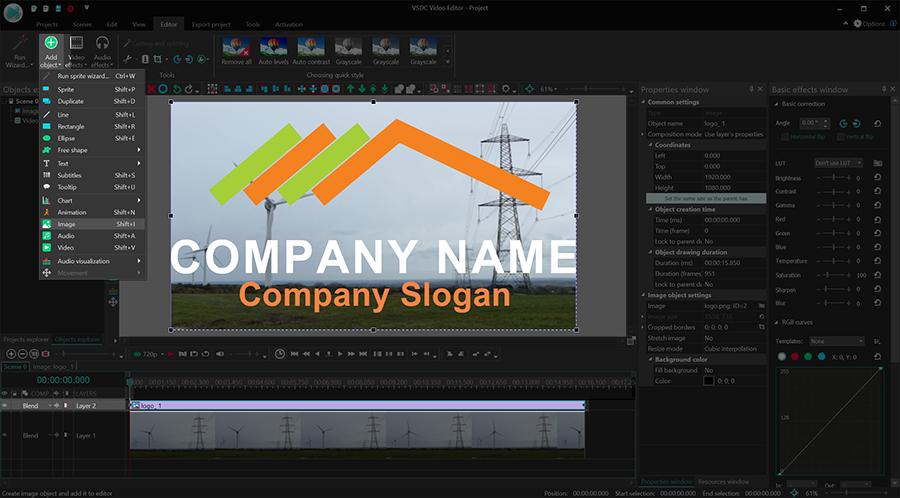
Step 2. Use the Add object menu and select Image. Then find the logo on your PC.
When you select the logo from your computer, the Object’s position settings window will pop up and prompt you to adjust the image position on the timeline. Make sure to select Add new layer. This way, the image will be placed one layer above the footage on the timeline, and it will be easier to tweak.

Step 3. Resize and place the logo wherever you want. For instance, you can place it in the corner or stretch it to the size of the scene and make it nearly transparent so it will look like a watermark.
Once you add the logo to the video, all you need is to make sure that the logo is visible throughout the entire clip. To achieve that, simply match the duration of the files in the scene. The easiest way to do that is by manually stretching the logo file on the timeline. If you want the logo to appear in the video for a short period of time, again, just manually shorten its duration and relocate the file on the timeline if needed. For example, sometimes, instead of displaying a logo non-stop, creators make it appear multiple times during the video.
How to make your logo semi-transparent or monochrome
To make the logo in your video semi-transparent, you need to decrease its opacity: it’s as easy as 1-2-3. Select the logo on the timeline and go to the quick Tools menu at the top. Next, select the wrench icon and toggle the Opacity control to achieve the desired effect.
You can also use color filters to adjust the logo or even make it monochrome by applying one of the quick styles from the menu.
No logo? Create a text watermark within seconds
Instead of a logo, you can add a text watermark to your video. Use this option to feature the name of your brand, your social media handle, or your website address.
Export your video with a logo
Once ready, open the Export project tab and select the desired format to export your video. Remember, you can change the video codec, quality, resolution, size, and other parameters before saving the file. You can also upload it directly to YouTube by selecting the Web >> For YouTube option.
Go ahead and try it for yourself! Download the latest version of VSDC to your PC and add a logo to your videos. VSDC is completely free, it reads all multimedia formats and places no unwanted watermarks on your video after export.
Planning to feature your brand in the video intro or outro? You can apply various effects to the logo and display it in a creative way! Check out this glitched logo intro tutorial as an example: