 User Help Manual
  Learn FAQ
  Send us feedback
 ")


- This holiday season embraces new beginnings with the latest update of VSDC Video...
- Change is all about improvement, and this process wouldn't be possible without y...
- Intro In 2024 the options range for creating visual effects is incredibly dive...
- Are you ready to explore new heights with the latest major VSDC update? Finally,...
How to use VSDC Free Video Editor to speed up your video
There are many reasons you might want to speed up a video. Be it for the sake of creativity, like in time-lapses of fast-motion effects, or for the sake of functionality – like when you need to show the many-hour process in a couple-minute clip – it’s a relatively easy task.
In this tutorial, we’ll show you how to speed up a video in a free editor named VSDC.
VSDC works on Windows PCs, so if you’re on Mac, head over to iTunes and download iMovie. iMovie is also free and feature-packed, and it’s a video speed editor that works on your OS.
Download VSDC Free Video Editor for Windows
How to speed up a video for free in VSDC
Once you’ve installed the software to your computer, the entire process will take you less than a couple of minutes. Follow these steps:
- Launch VSDC Free Video Editor. If you aren’t ready to upgrade to Pro, just ignore the popups by closing them or clicking “Continue”.
- Start a new project by importing your content. Only import one video file at a time.
- When the footage is on the timeline, you need to decide whether you want to speed up the video entirely or apply the fast-motion effect to a particular part. For the former, jump to step #5. For the latter, you’ll need to split the video first.
- Splitting the video is performed through the Split icon looking like a razor – you’ll find it in the top menu, “Cutting and splitting” section. Just place the timeline cursor where the fast-motion part should begin and split there. Repeat to split out the end of the fragment.
- Now, click on the video (or its separated fragment) you want to speed up and proceed to the Properties window. It’s a sticky tab on the right side of the program, but if you don’t see it, use a right mouse button to click on the video and choose Properties from the menu.
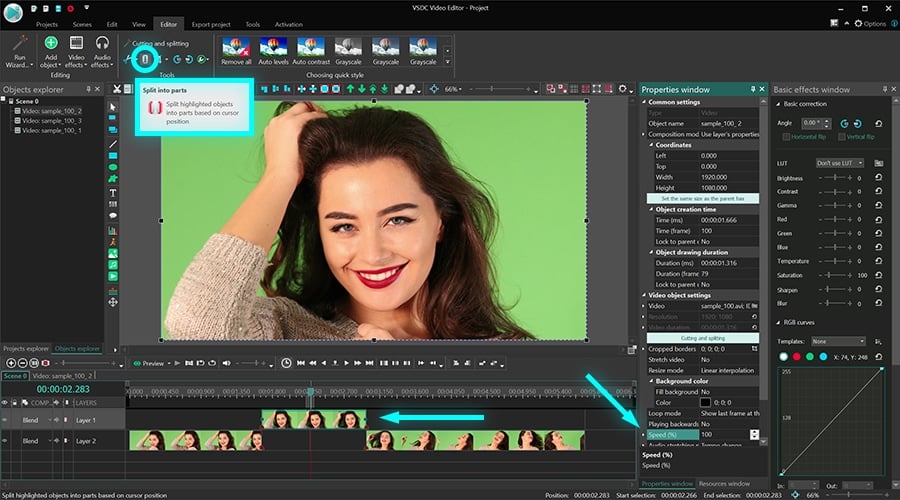
- Scroll down to the Speed (%) parameter and increase it until you’re happy with the result. To see how your actions change the playback speed, use the red Preview button.
Technically, if you put 200 instead of the original 100 (%), your clip will be played twice as fast as the original footage. Therefore, 1000% will give you a 10X increase.
Note that when you speed up a video, its sound will automatically follow the tempo. So, you may want to mute the original audio track (use the same Properties window, scroll down to Audio track and choose “Don’t use audio”). To create a music overlay for your fast-motion scene, use the green “Add object” button in the top menu and choose any audio file from your PC. Split it the same way as you would split a video and adjust its position on the timeline to synchronize with the right footage fragment.
Preview your movie before exporting to make sure it looks the way you wanted. If your original file is large, the preview may be lagging a bit. That’s because some computers struggle to process so much information instantly. Don’t worry, it won’t affect the output video in any way, however, you can change the preview quality to solve the issue. Use a little triangle icon right next to the Preview button to decrease preview quality up to 144p.
This is it! Now that you know how to speed up a video and create the famous fast-motion effect in just a couple of clicks, check other tutorials we have:
- How to create a perfect slow-motion video effect
- How to make your video play inside text (text mask)
- How to use audio spectrum visualizer
You can get more information about the program on Free Video Editor' description page.
© 2011-2025, www.videosoftdev.com, FLASH-INTEGRO LLC. Privacy policy | Terms of use | About us
All trademarks referenced herein are the sole property of their respective owners.
Copying any materials from this site allowed only with written consent of Site Administration.