")


Verwendung des Audio Spectrum Visualizer in VSDC Free Video Editor
Eine der beliebtesten Anfragen auf dem VSDC-YouTube-Kanal war lange Zeit ein Audio Spectrum Visualizer. Es ist ein praktisches Tool, mit dem Sie Ihren Soundtrack animieren können. Sie können es für Textvideos, Ihre Online-Radiosendungen oder andere musikbezogene Projekte verwenden.
Es ist ein paar Jahre her, seit wir das Audiospektrum zum VSDC-Toolset hinzugefügt haben, und hier ist, was Sie damit tun können:
- ein lineares Audiospektrum erstellen
- eine abstrakte Audiovisualisierung erstellen
- ein kreisförmiges Audiospektrum erstellen
Und da VSDC ein voll ausgestatteter Video-Editor ist, können Sie Titel, Texte und stilvolle Effekte wie Regentropfen und nebliges Glas hinzufügen. Außerdem stehen mehr als 500 hervorragende Voreinstellungen für den VSDC-Audiovisualisierer zur Verfügung. Sie können ein einzigartiges Musikvideo erstellen und die Animation an Ihre Bedürfnisse anpassen.
Laden Sie den kostenlosen Video-Editor von VSDC herunter
In diesem Beitrag finden Sie eine Anleitung zur Verwendung des VSDC-Audiospektrum-Visualisierers und zum Erstellen Ihrer ersten Soundanimation. Bleiben Sie dran!
Verwendung des Audiospektrum-Visualisierers in VSDC
Führen Sie die folgenden Schritte aus, um ein grundlegendes Audiospektrum zu erstellen.
- Importieren Sie die Datei in VSDC. Dies kann eine Videodatei mit Ton oder eine separate Audiodatei sein.
- Klicken Sie in der linken Symbolleiste auf das Audiovisualisierungssymbol (siehe Abbildung unten). Wählen Sie dann Spektrum.
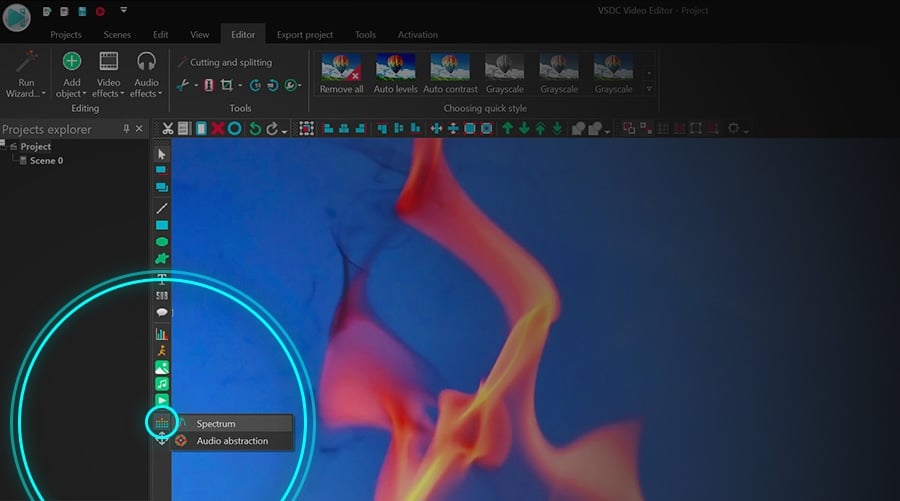
- Möchten Sie nun die Audiospur Ihrer Videodatei visualisieren? Wenn ja, schließen Sie einfach das Explorer-Fenster, das angezeigt wird, sobald Sie das Spektrum ausgewählt haben. Sie würden es verwenden, wenn Sie einen externen Soundtrack auf Ihrem PC visualisieren möchten. Wir werden später darauf zurückkommen.
- Im nächsten Fenster werden Sie nach der Objektposition gefragt. Entscheiden Sie, ob das Spektrum am Anfang des Videos oder an der Cursorposition angezeigt werden soll (falls es nicht am Anfang des Videos platziert ist), und klicken Sie dann auf "OK".
- Klicken Sie auf eine beliebige Stelle in der Szene und ziehen Sie die Maus, während Sie die linke Taste gedrückt halten, um das Audiospektrum in der Szene zu platzieren. Sie können es jederzeit verschieben und seine Größe ändern.

- Öffnen Sie als Nächstes das Eigenschaftenfenster auf der rechten Seite des Dashboards, scrollen Sie nach unten zu den Einstellungen für Audioobjekte und wählen Sie Audioquelle - Objekt in Szene. Wenn Sie das Eigenschaftenfenster nicht finden können, klicken Sie mit der rechten Maustaste auf das Audiospektrumobjekt und wählen Sie Eigenschaften.
- 7. Wählen Sie schließlich im Feld Audioobjekt unten die Datei aus, aus der Sie den Sound visualisieren möchten. Wenn es sich beispielsweise um den Ton des Videos handelt, wird der Name der Videodatei im Dropdown-Menü angezeigt.
Wenn Sie diese Aktionen ausgeführt haben, können Sie mithilfe der Vorschau-Schaltfläche sehen, wie der Audiospektrum-Visualisierer während der Wiedergabe aussehen wird. Beachten Sie, dass der Standardstil und die Standardfarben bereits vorkonfiguriert sind. Im Folgenden zeigen wir Ihnen, wie Sie Ihr Audiospektrum in einen Kreis oder eine Abstraktion verwandeln können. Wir werden auch über das Ändern des Stils und der Farben des Spektrums sprechen.
Wie ein Kreis-Audiospektrum zu erstellen
Nachdem Sie nun wissen, wie Sie ein grundlegendes Audiospektrum erstellen, können Sie es ein wenig ändern. Angenommen, Sie möchten daraus einen Kreis machen. So geht's:
- Befolgen Sie die Schritte 1 bis 7, um einen linearen Audiospektrum-Visualisierer zu erstellen.
- Stellen Sie sicher, dass das Spektrumobjekt noch in der Szene ausgewählt ist, und wechseln Sie zum Menü Videoeffekte. Wählen Sie Transformation -> Verzerrung.
- Finden Sie im Eigenschaftenfenster das Dropdown-Menü „Typ“ und wählen Sie Polarkoordinaten.
Sobald Sie ein Kreis-Audiospektrum erstellt haben, können Sie dessen Größe, Radius, Winkel und mehr ändern! Schauen Sie sich das Video-Tutorial unten an, um die verfügbaren Optionen zu sehen.
So ändern Sie den Stil und die Farben des Audiovisualisierers
Um das Spektrum zu ändern, egal ob es linear oder kreisförmig ist, kehren Sie zum Eigenschaftenfenster zurück. Wenn Sie es nicht finden können, klicken Sie mit der rechten Maustaste auf das Spektrumobjekt, wählen Sie "Eigenschaften" und führen Sie die folgenden Schritte aus:
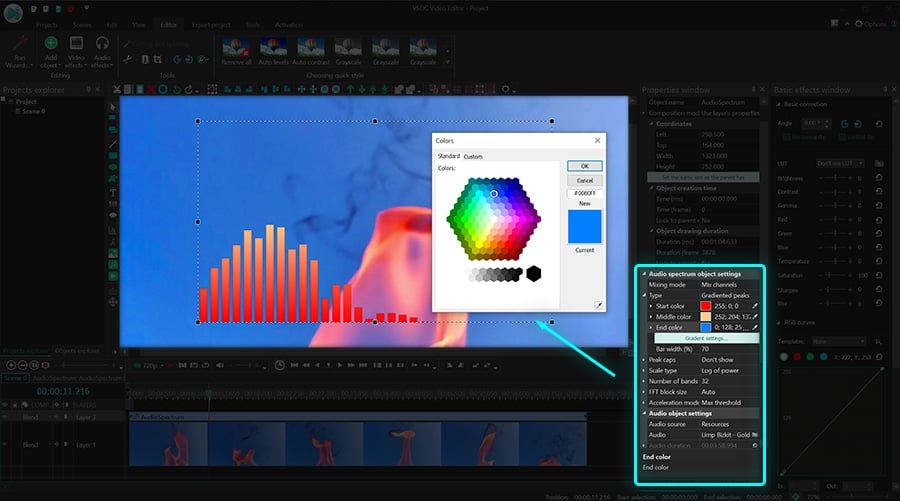
- Finden Sie das Menü Enstellungen des Audio-Spektrum-Objekts.
- Wählen Sie zwischen "Gradiente Peaks", "Anpassbare Spitzen", "Gradientenlinien" und "Gradientenlinien mit Unschärfe", um den Typ des Spektrums anzupassen.
- Klicken Sie auf das Dreipunktsymbol („…“) oder die Pipette vor jeder Farbe, um das Farbthema um zu ändern.
- Beachten Sie, dass Sie durch Doppelklicken auf die Farben Start, Mitte und Ende auch die Deckkraft ändern können. Je niedriger die Deckkraft ist, desto transparenter wird das Audiospektrum.
- Verwenden Sie die Schaltfläche Vorschau, um zu sehen, wie die Änderungen angewendet werden.
So erstellen Sie einen Audiovisualisierer im Abstraktionsstil
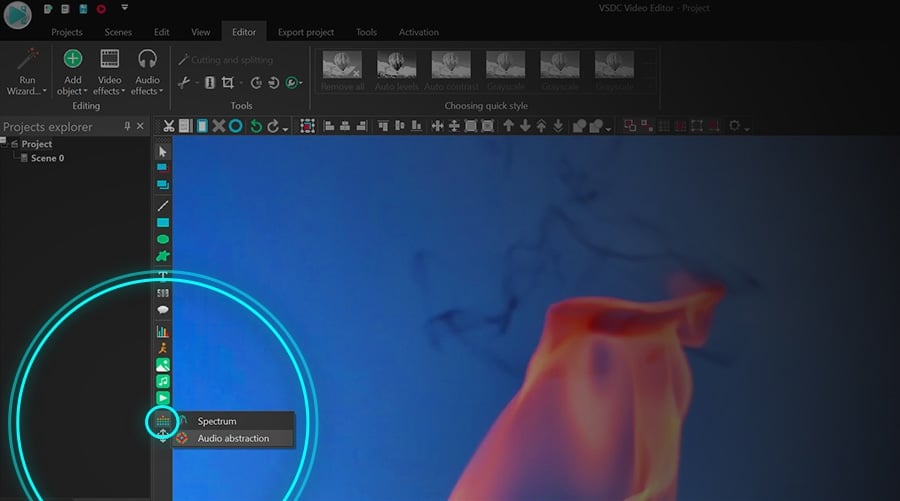
Neben dem Spektrum gibt es eine zweite Möglichkeit, eine Schallwelle zu visualisieren. Es wird "Audio-Abstraktion" genannt. Wiederholen Sie die Schritte 1 bis 5, die am Anfang dieses Artikels beschrieben wurden, um dieses Objekt zu erstellen. Der einzige Unterschied besteht darin, dass Sie auf der linken Symbolleiste auf das Symbol „Audiovisualisierung“ klicken und „Audioabstraktion“ wählen. Vergessen Sie aber nicht, die Audioquelle im Eigenschaftenfenster auf der rechten Seite auszuwählen und dann die Objektgröße an deine Bedürfnisse anzupassen.
So visualisieren Sie eine Audiospur eines Drittanbieters
Bisher haben wir Ihnen gezeigt, wie Sie die Töne aus der hochgeladenen Video- oder Audio-Datei auf deiner Timeline visualisieren können. Sie möchten jedoch möglicherweise ein Spektrum für eine Audiospur eines Drittanbieters erstellen und deinem Clip hinzufügen. Sie können es auch wie folgt tun.
Wenn Sie auf das Symbol „Audiovisualisierung“ klicken und die gewünschte Option - „Spektrum“ oder „Audio-Abstraktion“ - auswählen, verwenden Sie den Explorer, der angezeigt wird, um das Audio auf deinem PC auszuwählen, das Sie visualisieren möchten. Platzieren Sie dann die Spektrumbox mit der Maus auf der Szene und erweitern Sie sie auf die gewünschte Größe.
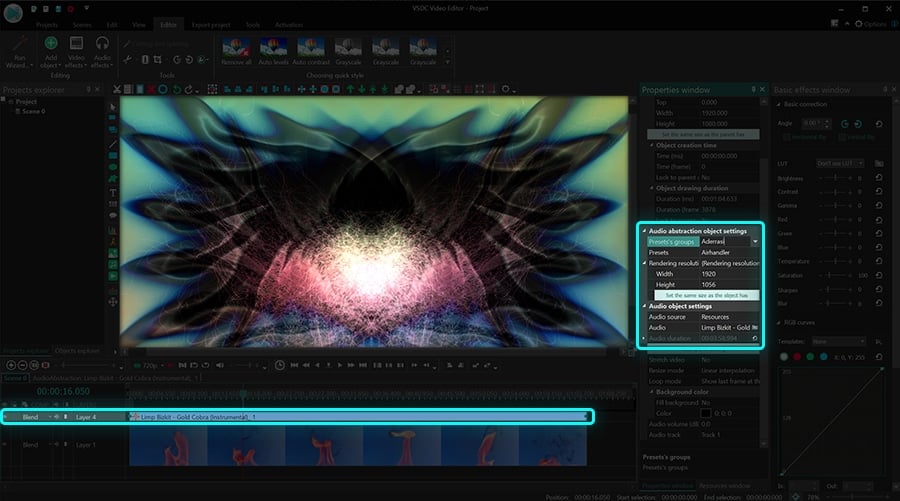
Um das Spektrum zu bearbeiten, können Sie den Animationstyp wie oben beschrieben auswählen. Zur Abstraktion stehen Hunderte von Voreinstellungen zur Verfügung. Um sie auszuchecken, gehen Sie zum „Eigenschaftenfenster“ und scrollen Sie nach unten zu den „Audio-Abstraktionsobjekteinstellungen“. Voreinstellungen und die Gruppen von denen finden Sie wie unten gezeigt.
Probieren Sie jetzt den neuen kostenlosen Audio-Visualizer in VSDC aus!
Hier sind drei weitere Tutorials, die sicherlich Ihr Interesse wecken:
So erstellen Sie eine Textmaske in maximal 3 Minuten
So entfernen Sie schnell den Videohintergrund
So schneiden Sie Videoränder zu
Weitere tolle Tutorials finden Sie auf unserem YouTube-Kanal.
Weitere Informationen zum Programm finden Sie auf der Beschreibungsseite des Free Video Editors
Sehen Sie uns
 / @VSDCFreeVideoEditor
© 2011-2026, www.videosoftdev.com, FLASH-INTEGRO LLC. Datenschutz | Nutzungsbedingungen | Uber uns
Alle hier genannten Warenzeichen sind das alleinige Eigentum ihrer jeweiligen Inhaber.
Kopieren von Materialien dieser Webseite ist nur mit schriftlicher Genehmigung der Webseite-Verwaltung gestattet.