Video Düzenleyici

Aile tebrik kartından şirket sunumuna kadar her türlü karmaşıklıkta videolar oluşturmak ve düzenlemek için ücretsiz video yazılımını kullanın. Video dosyalarını kesin, birleştirin, görsel ve ses efektleri uygulayın, filtreleme ve görüntü düzeltme kullanın, slayt gösterileri yapın ve uygun bir film müziği ekleyin. Videonuza profesyonel bir görünüm kazandırmak için çok renkli Renk anahtarı ve gelişmiş parametre ayarlarını kullanın. Tüm popüler video ve ses formatları desteklenir.

Video Düzenleyici hakkında daha fazla bilgi edinin...

Video Dönüştürücü

Bu program video dosyalarını bir biçimden diğerine dönüştürmek için tasarlanmıştır. Hemen hemen tüm popüler video biçimleri (hem okuma hem de kaydetme) desteklenir. Ayrıca iPhone, Huawei P30 Pro veya Samsung Galaxy gibi belirli multimedya cihazları için videolar oluşturmak da mümkündür. Programın kullanımı son derece kolaydır, modern bir arayüze ve gerekli tüm video işleme fonksiyonlarına sahiptir.

Video Dönüştürücü hakkında daha fazla bilgi edinin...

Ses Dönüştürücü

Bir ses dönüştürücü kullanarak ses dosyalarını bir biçimden diğerine dönüştürebilirsiniz. Tüm önemli ses biçimleri ve codec bileşenleri desteklenir. Program ayrıca çalma listelerini ve meta etiketlerini yönetmenize izin verir, ayrıca video dosyalarından sesi dışa aktarmak ve parçaları herhangi bir biçimde bilgisayarınıza kaydetmeniz de mümkündür.

Ses Dönüştürücü hakkında daha fazla bilgi edinin...

Ses CD’si Yakalayıcı

Bu ses aracı kompakt disklerden ses parçalarını kopyalamaz ve bunları seçtiğiniz herhangi bir biçimde bilgisayarınıza kaydetmek için tasarlanmıştır. Neredeyse tüm popüler ses biçimleri ve codec bileşenleri desteklenir. Program ayrıca dosyaları otomatik olarak yeniden adlandırma ve meta etiketleri güncelleme için parça ayrıntılarını FreeDB sunucusundan ayıklayabilir.

Ses CD’si Yakalayıcı hakkında daha fazla bilgi edinin...

Çok işlevsellik

Çok işlevsellik

Tek bir ücretsiz video yazılım paketinde çok çeşitli multimedya işleme araçları

Yüksek hız

Yüksek hız

Programlar hızlı, optimize edilmiş çok işlemcili algoritmalar kullanır.

Kullanılabilirlik

Kullanılabilirlik

VSDC video yazılımı, Windows işletim sistemi tabanlı tüm bilgisayarlarda ve cihazlarda ücretsiz olarak indirilebilir.

Metin Nasıl Hareket Ettirilir? (Mem Örneği)

Hareket yakalama videodaki herhangi bir nesnenin hareket yörüngesini, eklenen herhangi bir nesneye uygulamanıza yardımcı olan güçlü bir özelliktir: Bir görüntü, bir metin parçası, bir maske veya bir şekil olabilir. VSDC’de metni takip etmeyi (veya daha basit haliyle söyleyecek olursak hareket eden bir nesneye metin yapıştırma) uygulama hakkında birkaç soru aldık. Ve bu tekniği öğrenmenize yardımcı olmak için bu eğitimi yayınlamaya karar verdik.

VSDC’de Windows işletim sisteminde kullanabileceğiniz hafif ve bütçe dostu bir video düzenleyicidir. Bilgisayarınız yeterince güçlü olmadığı için veya herhangi bir nedenden dolayı Adobe aboneliğini karşılayamıyorsanız VSDC güvenebileceğiniz harika bir alternatiftir. Yılda 19.99 ABD Doları karşılığında kullanılabilir ve bilgisayarınızda yalnızca birkaç GB RAM gerektirir.

Bu eğitimde, bir videodaki metni nasıl hareket ettireceğinizi anlatacak ve ardından perspektif, gölge ve opaklık ekleyerek metnin nasıl daha iyi görüneceğini göstereceğiz.

VSDC Pro’da metin takip efekti nasıl uygulanır?

Başlamadan önce metnin videoda hangi nesneyi takip edeceği konusunda net bir fikre sahip olmanız gerekir. Yukarıdaki örnekte olduğu gibi bir kişiye bir metnin eklenmesini istediğinizi varsayalım. Bu durumda metnin hareket ederken kişinin vücudunun hangi bölümünü takip etmesi gerektiğine önceden karar vermeniz gerekir.

Öncelikle bu eğitimin video sürümünü izlemenizi ve ardından aşağıdaki metin kılavuzunu okumanızı öneririz.

İşte kılavuzun adım adım metin versiyonu:

  1. VSDC’yi başlatın ve ana videonuzu yükleyin.
  2. Videoya sağ tıklayın ve içerik menüsünden Hareket haritası oluştur seçeneğini seçin.
  3. Bu haritayı bilgisayarınıza kaydetmeniz istenecektir. Daha sonra hareket haritasını metne uygulamanız gerektiğinde, onu bilgisayarınızda kaydettiğiniz yerden sürükleyebilirsiniz.
  4. Takip çerçevesini hareketini izlemek istediğiniz noktanın etrafına yerleştirin. Bizim örneğimizde bu bir kişinin başıdır.
  5. Analizi başlat düğmesine basın ve işlem bitene kadar bekleyin.
  6. Hareket yörüngesi doğruysa Düzenlemeyi uygula seçeneğine tıklayın.
  7. Ana zaman çizelgesine dönün ve sol taraftaki araç çubuğunu kullanarak bir metin nesnesi ekleyin.
  8. En üstteki biçimlendirme menüsünü kullanarak metnin stilini ayarlayın. Ardından üzerine çift tıklayın.
  9. Nesne ekle menüsünü açın ve Hareket >> Hareket haritası seçeneğini seçin.
  10. Daha önce oluşturduğunuz haritayı seçmeniz istenecektir. Tamam’a tıklayın.

Ve video memi artık hazır! Her şeyin beklediğiniz gibi görünüp görünmediğini görmek için Ön izleme özelliğini kullanın. Aşağıda metnin daha profesyonel görünmesi için kullanabileceğiniz birkaç püf noktasını ele alacağız.

Hareket efekti ile metnin daha iyi görünmesini sağlama

Çoğu video memi kısa ve çok basit metin başlıkları içerir. Ancak aşağıdaki işlemlerden birini kullanarak çok daha iyi bir görünüm elde edebilirsiniz:

  • Metni vurgulama
  • Gölge ekleme
  • Opaklığı artırma
  • Perspektif ekleme
  • Ok ekleme

Bu ayarlamalarla metnin ne kadar farklı göründüğüne dikkat edin.

Sadece bir efekt uygulayabilir veya bazılarını birleştirebilirsiniz. Aşağıda size yardımcı olacak talimatlar bulunmaktadır.

Hareket efektli metni vurgulama

VSDC’de “Vurgulayıcı” efektine “Fırça” denir ve metin düzenleme menüsünde bulunur. Erişmek için ana zaman çizelgesi sekmesinde olduğunuzdan emin olun ve metin nesnesine bir kez tıklayın. Ardından Fırça rengini seçin ve Opaklık kontrolünü değiştirin.

Metne gölge ekleme

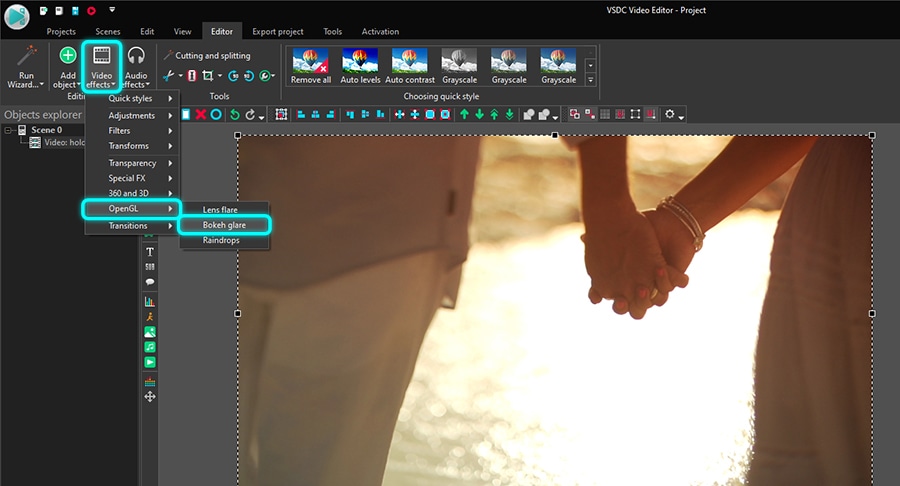
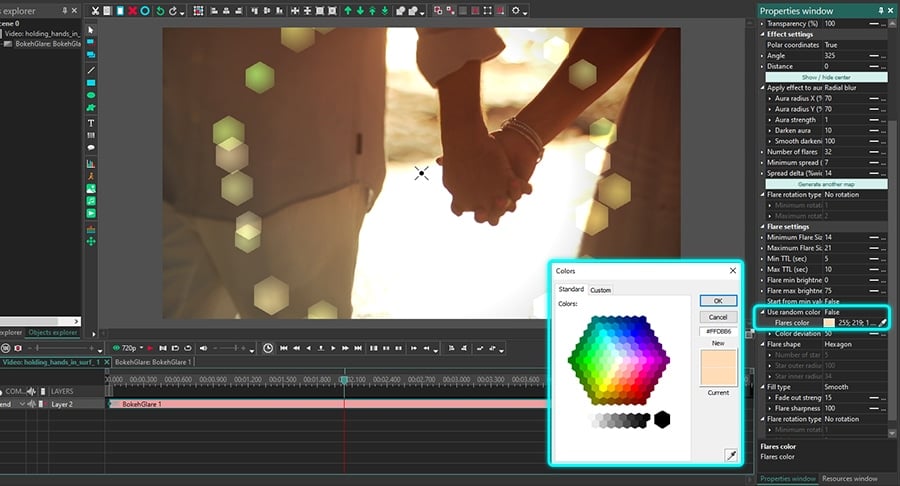
Gölge efekti metne hacim eklemenize olanak tanır. Uygulamak için metin nesnesine tıklayın, Video efektleri menüsünü açın, Özel efektler seçeneğine ilerleyin ve ardından Gölge’yi seçin.

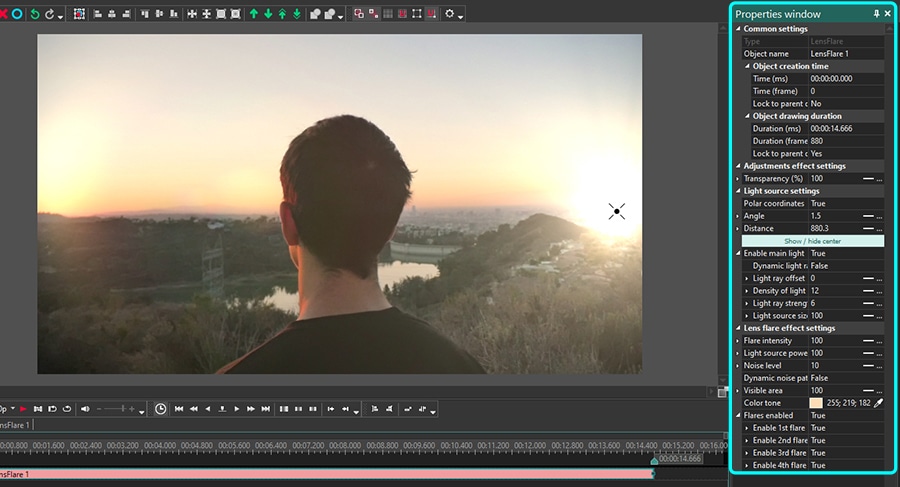
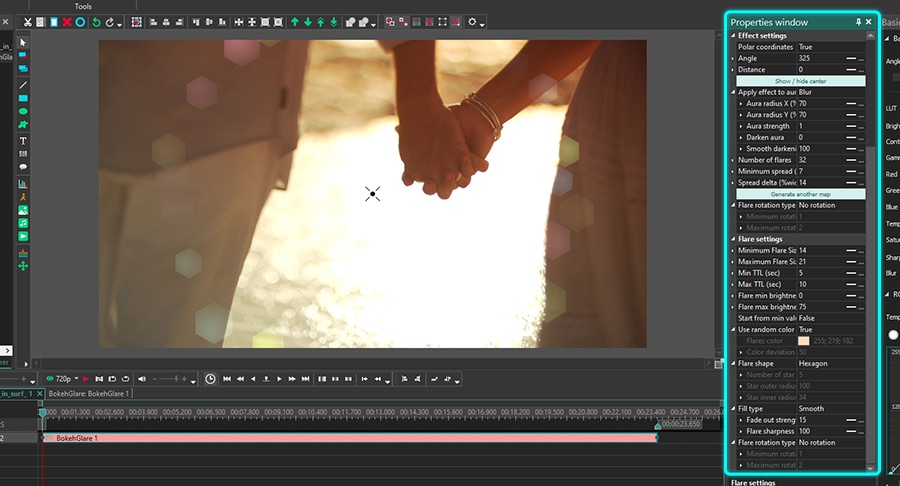
Özellikler penceresinin sağ taraftan açıldığına dikkat edin. Burada efekt ayarlarını (örneğin gölgenin boyutu, açısı ve rengi) yapabilirsiniz. Efekti daha belirgin hale getirmek için Uzun gölge seçeneğini de uygulayabilirsiniz.

Metnin opaklığını artırma veya azaltma

Alternatif olarak, metni daha az belirgin ve hatta opak hale getirebilirsiniz. Bunu yapmak için metin nesnesini seçin, üstteki biçimlendirme menüsüne gidin, Metin rengini açın ve Opaklık kontrolünü değiştirin.

Metne perspektif ekleme

Metne perspektif eklerken onu hafifçe döndürmeniz ve yatay veya dikey olarak sallamanız gerekir. Bu efekti uygulamak için metin nesnesine tıklayın, Video efektleri menüsünü açın, Dönüşümler’e gidin ve Perspektif'i seçin.

Ardından Özellikler penceresine gidin, dikey veya yatay bir perspektif seçin ve açıyı ayarlayın.

Metne ok ekleme

Son olarak metniniz küçük bir nesneye iliştirilmişse veya farklı nesnelere atanmış birden çok başlığınız varsa, bu nesnelere işaret eden ve metinle birlikte hareket eden oklar ekleyebilirsiniz. Bunu yapmanın en iyi yolu, sahneye saydam bir arka plana sahip bir .PNG ok görüntüsü eklemek ve daha önce metne atadığınız hareket haritasının aynısını atamaktır.

Artık pratik zamanı!

Artık animasyonlu metin ile çalışmanın tüm ayrıntılarına sahipsiniz. Devam edin ve kendiniz deneyin. Daha fazla ilhama ihtiyacınız varsa YouTube kanalımıza göz atmayı unutmayın.

VSDC hakkında herhangi bir sorunuz varsa bize Facebook’tan yazabilirsiniz.


Program hakkında daha fazla bilgiyi Ücretsiz Video Düzenleyici’nin açıklama sayfasından edinebilirsiniz.

How to Make a Tutorial Video for Free in VSDC

Since we’ve launched our YouTube channel, many of you asked us to share tips for making video tutorials. Although it might be challenging to write a one-size-fits-all guide, we’ve decided to describe our methods in the post below.

This guide will be helpful for those who want to produce software tutorials in a video format, but generally, the same sequence of steps will work for any other type of video tutorials.

To get started, you’ll need the following (all tools are free):

- Video editing software – we recommend VSDC Video Editor for PC and iMovie for Mac

- Desktop screen recorder – we recommend VSDC built-in screen grabber or OBS

- Webcam video recorder – we recommend Bandicam or a built-in camera app on your computer

Note that you’ll only need the web camera and webcam video recorder if you want to place a video of yourself in the corner using the picture-in-picture effect. If you’re not planning to make a public appearance, you can record voice commentaries or even make do with subtitles only.

Now, without further ado, let’s review the steps we take when we make video tutorials for our YouTube channel.


How to make a tutorial video, step by step

You may already have an idea of the tutorial you want to record. If you do, jump to Step 2. If you don’t, there are plenty of tools to help you with the research – we’ll mention some of them below.

This is what a typical process of video tutorial creation looks like:

  1. Search for the idea and inspiration
  2. Break down the scenario into steps
  3. Perform a rough rehearsal with that scenario
  4. Write the final script (below, we share the structure we use for video tutorials)
  5. Record the video tutorial
  6. Edit the video tutorial
  7. Add audio: music, voiceover, or your talking head
  8. Add intro and outro
  9. Save and publish your tutorial

Now that you have a general idea, let’s look at this process in detail.


Step 1. How to find an idea for a video tutorial

If you aren’t quite sure what your tutorial should be about, there are plenty of platforms to help you find inspiration.

Let’s suppose you want to make a video tutorial about using GIMP. Instead of creating a long generic overview of the program, it might be better to angle your tutorial and teach viewers something specific. But how do you find out what people want to learn?

First, YouTube search and Google search can be helpful. Just start typing “GIMP how to…” and read the autofill options suggested by the engine. The autofill options are generated based on the most frequent search queries, which means these topics are in demand. Next, when you select any of the suggested topics on Google, scroll down and see the “Searches related to…” section. It may also help you come up with ideas for your video tutorial.

Second, you can use keyword research tools like Keywords.io, Ubersuggest, and Answerthepublic to find the most popular search queries on any given topic.

How to find ideas for a video tutorial using keyword research tools

If you choose to use one of these tools, it’s always better to select the searches with a lower volume of queries because there will be less competition for your tutorial in search results after you publish it.

Finally, feel free to get inspired by other bloggers. If you know a better, more efficient way to remove background in GIMP – go for it! If you want to come up with a new angle – go for it! If you can produce a tutorial in another language – go for it!


Step 2, 3, 4. Why you need to prepare a scenario

Here is the thing. You can go ahead and start recording the tutorial right away. But if you want to avoid the “Oh, snap, I forgot that!” moments and minimize editing, we recommend starting with an outline and expanding it to a full-fledged scenario describing what you will be doing and what you will be saying in the video.

Now, what should a video tutorial scenario look like? From our experience, the following structure works well:

  1. Tell the viewers what this tutorial will be about
  2. Give them a sneak peek of the result or the process
  3. Show the tutorial including your commentaries
  4. Encourage them to subscribe and comment on the video

The sneak peek will help engage the viewers from the beginning of the video, and the call to action at the end of the video will encourage them to connect with you. Want to know more about optimizing videos and growing on YouTube? We recommend learning from Brian Dean and his video marketing hub.


Step 5. How to record a video tutorial

If you know your subject well and you’ve prepared a scenario, this step will be the easiest one. Make sure to mute notifications on your computer, then hit the Record button and start your video tutorial. Don’t worry about bloopers – you’ll be able to cut them out later.

Most screen video recorders allow you to set the desired quality and frame rate. For the best results, we recommend using the following video parameters: 1080p and 60fps.

Another feature most video recorders have is a drawing toolset. The drawing toolset typically includes a highlighter or a pencil and a few shapes or arrows for you to point at the objects you’re talking about in the video. Many beginners try to incorporate these tools while recording the tutorial, but there is no need to do that. When you’re a beginner, they will only slow you down and ruin the flow of the script. If you decide to highlight any object in the video, you’ll be able to do it faster when you start editing.

Note, if you’re planning to record yourself using a webcam, you should do that simultaneously. Place the camera in front of you, connect it to your webcam video grabber, and hit the Record button before you start the tutorial.


Step 6. Video tutorials need very little editing

Most times, editing a video tutorial means cutting out “bloopers” or those seconds when your mouse freezes because you don’t know what to do or what to say next. You also might need to add transitions if your tutorial consists of several parts. Finally, text captions and lines will make your tutorial more informative and easier to understand.

You can easily add these elements using VSDC Free Video Editor. As a non-linear video editor, it allows you to place any object over the main video and fine-tune its appearance precisely.


Step 7. Time to add narration to the tutorial

If you have recorded a voiceover for your tutorial, it’s time to add it and synchronize the narration with the video. You might need to trim or split some parts of the audio, but overall, it’s a relatively easy task even if you have zero experience.

If you have recorded a video of yourself while doing the tutorial, you’ll need to apply a picture-in-picture effect (or a video-in-video effect in that case). Simply import the video of yourself to the editor and place it one track above the main video on the timeline. Next, resize the video of yourself and drag it to the desired spot - usually, the bottom right corner.

Watch the tutorial below to see how it works.

How to make a 'video-in-video' or 'picture-in-picture' effect

Pro tip: if you record yourself in front of a green background, VSDC will help you remove the background from the video and leave it transparent. The result will look something like that:


Step 8. Intro and outro will make your video tutorial complete

Typically, when you make a video tutorial, you want minimum effects because showcasing your editing skills is not the purpose – you want to focus on the content. However, you definitely should add a short intro and an outro at the beginning and the end of the video.

Use intros to highlight the name of your tutorial and talk about the lesson. Your intro can be short and simple – watch the video below to find out how to create one in VSDC:

How to create slide-in text intro for free in VSDC

The outro is the best place to add your call to action. This is where you can insert your website address, display your social media handlers, and encourage viewers to subscribe. If you’re planning to make more video tutorials, it’s a good idea to tell viewers why they should subscribe to your channel and what else you’re planning to publish.

Here is a quick tutorial to adding an animated subscribe button – the essential part of an efficient outro:

How to add custom subscribe button with a bell to your video


Step 9. Save and publish your video tutorial

Once the tutorial is ready, all you need is to publish it on your YouTube channel. Here are some of the best practices to help your video get noticed:

  1. Include the keyword you’ve found during the research to the video title, the first lines of the description, and tags.
  2. Select a relevant video category in the More options tab after uploading the video to YouTube. In your case, it will most likely be the “Howto & Style” or the “Education” categories.
  3. Upload subtitles. You can insert the text from your own script or use the automatic speech recognition tool provided by YouTube. Even if you’re the one narrating, for some people, subtitles will be more convenient - keep that in mind.
  4. Create a thumbnail using a free tool like Canva. The thumbnail will help your video stand out in YouTube search, so it’s worth investing a few extra minutes to produce one.
  5. Share your tutorial on social media using hashtags. Even if only a few people – your friends and your mom, of course – watch the entire video, for YouTube it will mean that your content brings value and it’s worth recommending.
download window version iconDownload VSDC Video Editor


Have fun making your video tutorials!

Stressing out about your first video tutorial? We’ve been there. Looking at what you’ve created thinking you could have done it better? We’ve been there. Doubting anyone will ever watch your tutorial? We’ve been there, too! And guess, what? None of these reasons should discourage you.

Video tutorials are a great genre to dive in. People are looking for video tutorials all the time choosing this format over text tutorials. And if you have something you want to teach a bunch of strangers all over the world – now is probably the best time to do that.

So, have fun and enjoy creating!

Got any questions about the video editing part? Shoot us a message on Facebook.

If you want to use tutorials to grow your business, check out this video marketing guide.

Need inspiration? Subscribe to our YouTube channel. We publish short weekly tutorials for video creators of all levels of experience.

Lens Flare Video Effect in VSDC: Settings Overview

The Lens flare video effect is essential for imitating the sunlight, creating a dreamy atmosphere in a video, and highlighting particular areas or objects in the scene. When used right, it can help you achieve a perfect film look.

In this tutorial, we’ll show you how to apply the Lens flare effect using VSDC Free Video Editor.

Before you get started, download the latest version of VSDC for Windows.

How to add Lens flare effect to your footage in VSDC

VSDC brings quite a versatile feature set that allows you to tailor the Lens flare effect precisely to your needs. To ensure that it looks realistic, the developers have included two levels of settings: one - to imitate the desired light source, and another one - to customize the flares it produces.

Without further ado, let’s see what the effect looks like when applied to footage.

To get started, follow these simple steps:

  1. Launch VSDC on your computer and import your footage using the Import content button on the start screen.
  2. Place the cursor at the moment on the timeline when you want the effect to appear in the video.
  3. Left-click on the video and proceed to Video effects. Then select OpenGL - Lens flare
  4. In the Object’s position settings window, click OK.

This is the default version of the Lens flare video effect. Once applied, you’ll notice a little cross in the center of the effect. Use it to “grab” the flare and move it around the scene or even out of the frame to achieve the desired effect.

If you’re happy with how your video looks, you might want to leave the effect as is.

If you want to explore the customization possibilities though, keep on reading this tutorial. Below, we’ll show you how to change the size of the flare, its intensity, the light source angle, the color tones, and much more.

Lens flare effect settings overview

To get started, make a double-click on your footage and left-click on the flare effect layer. Select Properties from the context menu – the Properties window will slide-in from the right-hand side.

In that window, the effect settings are broken down into four groups:

  • Common settings
  • Adjustment effect settings
  • Light source settings
  • Effect settings

Let’s take a closer look at each group.

Lens flare effect: common settings

Common settings allow you to add a title to the effect layer, set the moment when the effect will appear in the video (by seconds or by frames), and the duration of the effect (in seconds or frames).

How to apply page turn effect in VSDC

Lens flare effect: adjustment effect settings

Adjustment effect settings enable you to choose the transparency level for the Lens flare effect. You can have the same level of transparency for the entire effect duration or you can have it gradually increase/decrease to the desired level.

For the latter, the Initial value and the Final value of the Transparency parameter should be different. For example, here is what the effect will look like if we set the Initial value at 100% (completely non-transparent) and the Final value at 10%:

Lens flare effect: light source settings

The Light source settings are applied to the artificially added source of light that produces flare we see in the video. The key parameter of this group is called Polar coordinates.

This parameter allows you to use the polar coordinate system to locate the light source more precisely. If you activate Polar coordinates (switch the parameter to True), the pole (point with coordinates 0;0) will be located in the center of the preview window, and you’ll be able to set the Light source angle and the Light source distance.

When you change the light source angle, the produced flares appear in a new location based on where the light comes from.

The Initial value for this parameter will define the angle for the beginning of the video, and the Final value – for the end of the video. That means if the Initial and the Final values are different, the light source angle will be gradually changing over time.

The light source distance defines how far the center of the light source will be shifted from the center of the scene. Note that the light source is shifted toward the angle you’ve set in the previous parameter. For example:

  • If the light source angle is 90, the light source will be moving down.
  • If the light source angle is 180, the light source will be moving to the left.
  • If the light source angle is 270, the light source will be moving up.
  • If the light source angle is 360, the light source will be moving to the right.

When the Light source distance parameter is equal to 0, the light source will always be located in the center of the scene.

If you switch Polar coordinates to False (deactivate the parameter), the 0;0 point will be located in the top left corner. In that case, you can set the location of the light source using the X and Y axis. Again, by adjusting the Initial and the Final values, you can set different light source locations for the beginning and the end of the video.

The following parameter is called Enable main light. It activates and deactivates the main light source in the video. If the parameter is enabled (set as True), the main light source will be visible. If you disable it, only flares will be visible in the scene.

In addition, when the main light source is enabled, it activates the following parameters:

  • Dynamic light ray offset
  • Light ray offset
  • Density of light rays
  • Light ray strength
  • Light source size

The Dynamic light ray offset and the Light ray offset allow for controlling the rotation of the rays around the light source. If you activate the former parameter, the rays will be rotating automatically. If you activate the latter parameter, you’ll be able to set the rotation manually.Light ray offset can only be enabled if the Dynamic light ray offset is switched to False.

Light ray offset maximum value is 100, and that equals to a 360-degree rotation, or full circle.

Density of light rays, as the name suggests, defines how dense the light rays will be spread around the source of light. The higher the value is, the thinner and denser the rays are. If you want the density to gradually change over time, use the Initial and the Final values.

Light ray strength defines how sharp the light rays are. The higher the value of this parameter is, the sharper the rays are.

Light source size allows you to control the size of the light source.

Lens flare effect: effect settings

Now that you know how to achieve the desired light source appearance and the ray movements, it’s time to see how you can adjust the flares. The fourth group of settings – Effect settings –  helps you do exactly that. Below are the parameters you can work with, reviewed.

The Flare intensity is the parameter you can use to change the visibility of the flares. If you want the flares to gradually become more visible or less visible over time, use the Initial and the Final values.

For instance, look at the flares becoming more visible during the playback with the Initial value set at 100, and the Final value set at 300.

Light source power defines how powerful the light source is. For instance, this is what happens when at the end of the video the light source becomes five times more powerful than at the beginning of the video.

Now, Noise level should sound self-explanatory and it affects both the look and the visibility of the effect. The higher the noise level is, the less visible the light source becomes, and the more grainy the effect looks. When the Noise level is equal to 100, the light source and the flares are completely invisible.

Dynamic noise pattern, similarly to the Dynamic light ray offset, allows you to set an automatic pattern that will be dynamically changing the noise level as the video progresses.

Visible area is a really interesting feature that helps you change the visibility of the footage. For instance, you may want to gradually increase the visibility of the scene as the size of the light source increases. Basically, it’s a perfect way to create an illusion of a video shot during the night!

In the example below, the Initial value is set at 10, and the Final value is set at 100. Notice how the scene visibility gradually increases.

Moving on to the next set of parameters related to the flare color tones. Sometimes, video creators specifically look for yellow, blue, green, and red lens flare effects or overlays. In VSDC, you can create any of these variations manually.

To do that, find the Color tone parameter in the Effect settings group and change the flare color to the desired one. Note that the selected tone will be applied to both the flares and the original footage.

To control the number of lens flares, use the parameter named Flares enabled located below the Color tone. The maximum number of flares you can have in the scene is 4, and they all are visible by default. You can select Flare 1, Flare 2, Flare 3, or Flare 4 to adjust their parameters individually or disable any of them.

Now, each flare includes three color components: red, green, and blue. You can set up each color component individually and adjust the following parameters:

  • Component intensity
  • Component distance
  • Component size

Component intensity is the parameter that controls the brightness of the selected color component. For example, you can reduce the red tone in the selected flare, and by doing that you’ll automatically increase the blue and green tones for it.

Component distance allows you to decide how far the color component will be shifted from the center of the scene to the selected lens flare. For example, if you set the value for this parameter at 0, the color component will remain in the center of the scene. And if the value equals 100, the color component will be located right over the center of the flare.

In the example below, we gradually relocate the color component for the Flare 1 from the center of the scene to the flare location. In other words, the Initial value for the component distance is 0, and the Final value is 100.

Finally, the parameter named Component size enables you to change the size of the selected color component for a particular flare.

How will you use the Lens flare effect?

There are lots of ideas for using the Lens flare effect. If you pay attention, you’ll notice it in space videos, footage of nature, and even memes!

Need ideas? Then join us on Facebook and subscribe to our YouTube channel for your weekly dose of inspiration.

Download VSDC Free Video Editor

Videoda Resim A Noktasından B Noktasına nasıl hareket ettirilir?

VSDC’nin ücretsiz sürümünde videoya eklenen herhangi bir görüntüyü, metni veya maskeyi aşağıdaki resimde gösterildiği gibi A noktasından B noktasına hareket ettirebilirsiniz. Bu efekti Hareket adlı bir araçla oluşturabilir, ayrıca bir nesnenin hareketinin hızını ayarlayarak hareket eden nesnenin kendisine dönüştürme efektleri de uygulayabilirsiniz.

Videolarınızda Hareket efektini yaratıcı bir şekilde kullanmanın birçok yolu vardır. Örneğin video için animasyonlu bir giriş hazırlayabilir veya bazı özel efektleri simüle edebilirsiniz.

Aşağıda bir .PNG görüntüsünü hareket ettireceğiz, bu efekti sahnedeki diğer herhangi bir medya dosyasına da uygulayabilirsiniz. Başlamadan önce VSDC Video Düzenleyici’nin ücretsiz sürümünü indirmeyi unutmayın.


Videodaki bir resme hareket efekti nasıl uygulanır

VSDC’yi başlatın ve arka plan olarak kullanılacak bir video veya görüntü yüklemek için İçeriği içe aktar düğmesini kullanın. Ardından hareket efektini uygulamak istediğiniz medya dosyasını yükleyin. Bir görüntü yüklüyorsanız >Ctrl + l klavye kısayolunu veya Nesne ekle menüsünü kullanın. Bizim durumumuzda bu saydam bir arka plana sahip .PNG görüntüsüdür.

Görüntüyü başlangıç noktasına (A noktası) yerleştirin ve ardından şu adımları izleyin:

  1. Görüntünün üzerine çift tıklayın
  2. Sol taraftaki menüde Hareket aracını seçin
  3. Açılan pencerede varsayılan ayarları bırakın ve Tamam’a basın
  4. Sahnede görüntünün hareket edeceği noktayı belirlemek için fareyi tıklayın

How to use the Movement feature in VSDC Free Video Editor

Sonucu görmek için Ön izleme düğmesini kullanın. Varsayılan olarak nesne video boyunca A noktasından B noktasına hareket edecektir.


Hareket eden bir nesneye özel efektler nasıl uygulanır?

Eğitimin bu bölümünde hareket eden bir nesneye doğrudan efekt eklemeyi ve hareket hızını değiştirmeyi göstereceğiz.

İlk olarak hareketin başladığı ve nesnenin sona ereceği anı manuel olarak değiştirebilirsiniz. Varsayılan olarak nesne video boyunca hareket edecektir, bu nedenle nesnenin hızı doğrudan videonun süresine bağlıdır. Bu paremetreleri değiştirmek için zaman çizelgesindeki kontrol noktalarını hareket ettirmeniz gerekir. Örneğin sarı kontrol noktasını sola hareket ettirerek nesnenin hareket süresini kısaltır ve hızını artırırsınız. Kontrol noktaları arasındaki mesafe ne kadar kısa olursa nesne A noktasından B noktasına o kadar hızlı hareket eder.

How to make an image move in a video faster by shortening the duration of the Movement effect

İkinci olarak normal bir videoya uygulayacağınız tüm efektler nesnenin kendisine de uygulanabilir. Örnek olarak Açılma ve Kararma geçiş efektlerini ele alalım. Bunları hareketli bir nesneye uygularsanız görüntü hareket yolunun başlangıcında yavaş yavaş açılır ve sonunda yavaş yavaş kararır.

Dönüşüm efektleri de burada iyi görünecektir. Örneğin aşağıdaki örnekte görüntüye Döndürme ve Ateş efektlerini kullandık. İmleci efektin zaman çizelgesinde görünmesini istediğiniz noktasına yerleştirin, Video efektleri menüsüne gidin ve Dönüşümler >> Döndürme’yi seçin. Ardından efektin süresini zaman çizelgesinde manuel olarak ayarlayın.


Daha fazla animasyon tekniğine mi ihtiyacınız var?

VSDC'nin ücretsiz sürümü yalnızca A noktasından B noktasına hareket efekti uygulamanıza olanak tanır. Üç veya daha fazla noktadan oluşan bir yörünge oluşturmak için düzenleyicinin yılda 19.99 ABD Doları karşılığında satışa sunulan gelişmiş bir sürümü olan VSDC Pro'yu temin edebilirsiniz. VSDC Pro sürümündeki Hareket aracıyla nasıl çalışılacağına ilişkin ayrıntılı talimatlara buradan ulaşabilirsiniz.

Eklenen görüntünün videodaki belirli bir nesnenin yörüngesinde hareket etmesini istiyorsanız bunu uygulamanın en iyi yolu hareket yakalama aracını kullanmaktır. Bu araç Pro sürümünde mevcuttur. Sadece birkaç tıklamayla sahneye eklenen herhangi bir nesneye seçilen yörüngeyi uygulamanıza izin verir.

Artık kendiniz denemeye hazır mısınız? O zaman VSDC Ücretsiz Video Düzenleyici’yi indirmenin ve ilk animasyonlu videonuzu oluşturmanın zamanı geldi!

How to work with the movement object in VSDC Free Video Editor?

How to turn Image to a moving object| image scrolling effect on VSDC free video editor

download window version iconİndir VSDC Video Düzenleyici

Program hakkında daha fazla bilgiyi Ücretsiz Video Düzenleyici’nin açıklama sayfasından edinebilirsiniz.

How to Apply Bokeh Effect to Your Photo or Video with VSDC

Bokeh is a stunning visual effect that requires a special shooting technique. To get the famous soft blurry background, you’ll need to use a particular lens and change your camera settings to make sure that the lights behind the object you’re shooting are out of focus.

Sounds easy? Well, for those with some experience (and a good camera) it’s doable. However, there are many situations when you might need to apply Bokeh effect after the shooting session is over. For instance, you might not find the right location with the right amount of flashing lights in the background. Or you may struggle to find the right camera lens. Or you may simply decide that you want to use the effect when the video has been already recorded.

Whatever the reason is, VSDC is here to the rescue! It allows you to quickly apply Bokeh glare effect to any video or image for free. Moreover, you’ll be able to customize the effect and change the shape, the size, the color, the density, and the movements of the flares. See it for yourself:

In the tutorial below, we’ll show you how to work with the Bokeh effect in VSDC to achieve the desired look.

Without further ado, let’s dive right in.

Download VSDC Free Video Editor for Windows

How to apply Bokeh effect to a video in VSDC

To get started, launch VSDC and import your footage using the Import content button on the start screen. Then, follow these steps:

  1. Make sure you’ve placed the cursor at the beginning of the timeline if you want the effect to appear from the beginning of the video.
  2. Left-click the video file and open the Video effects menu.
  3. Proceed to the OpenGL category and select Bokeh glare.
  4. In the Object’s position settings window, hit OK.

How to apply the Bokeh glare effect in VSDC Free Video Editor

You’ll notice light flares on the sides of the scene - that’s a default Bokeh effect applied (see the image below). It might not look as dense or as bright as you anticipated, but this is just a starting point.

Now, let’s see how you can modify the effect to achieve the desired look of the flares.

Properties window overview

To access the settings, make a left-click on the effect layer and select Properties. The Properties window will slide-in from the right-hand side.

There are four groups of settings available for this effect:

  1. Common settings
  2. Adjustment effect settings
  3. Effect settings
  4. Flare settings

Bokeh glare effect settings window

The first two groups of parameters are common for all effects in VSDC.

Common settings allow you to add a title to the effect layer, set the moment when the effect will appear in the video (by seconds or by frames), and the duration of the effect (in seconds or frames).

Adjustment effect settings enable you to choose the Transparency level for the Bokeh effect.

Note that you can set the same level of transparency for the entire effect duration or you can have it gradually increase/decrease to the desired level.

If you decide to go the second route, the Initial value and the Final value of the Transparency parameter should be different. Think of it as the fade-in and fade-out effects. For example, here is what it will look like if we set the Initial value at 100% (completely non-transparent) and the Final value at 10%:

The last two groups of settings in the Properties window allow you to work with the Bokeh elements directly. We’ll take a closer look at them.

Effect settings overview

Once you apply the effect, you’ll notice a cross in the center of the free zone (the area in the center of the effect that is free of flares). Grab this cross with a mouse and use it to manually change the position of the effect. If you, however, want to locate it more precisely, you can do it with the following parameters.

Polar coordinates is the first parameter in this group. It allows you to adjust the location of the Bokeh effect in the scene using the Polar coordinates system. Make sure it is switched to True before changing the settings and keep in mind that the pole (point with coordinates 0;0) will be located in the center of the scene. If you deactivate Polar coordinates (switch the mode to False), the pole will be located in the top left corner.

Using Polar coordinates, you’ll be able to adjust the parameters named Angle and Distance. In short, Angle defines the direction where you’d like to shift the free zone, and Distance defines how far it will be shifted.

Note that when the Distance equals to zero, the free zone will remain in the center of the scene, regardless of the angle. When the Distance parameter is more than zero, and you start changing the angle, the free zone will be moving clockwise.

For example:

  • If Angle = 90, the free zone will be shifting down
  • If Angle = 180, the free zone will be shifting to the left
  • If Angle = 270, the free zone will be shifting up
  • If Angle = 360, the free zone will be shifting to the right

You might want to use the X and Y axis to change the position of the effect in the scene. In that case, switch polar coordinates to False and use the parameters named Center X and Center Y.

The following parameter is titled Apply effect to aura. First of all, in case you didn’t know, “aura” is the area that starts with the circle of flares and spreads to the edges of the scene.

Although it doesn’t necessarily contain flares everywhere, it’s a part of the effect, and you have control over the way it looks. Specifically, VSDC allows you to change the radius and the appearance of the aura. For instance, you can choose one of the following options from the Apply aura effect dropdown menu:

  • Copy – every object in the footage that falls into the “aura” zone gets duplicated
  • Blur – everything in the “aura” zone is blurred
  • Radial blur – radial blur effect applied to the footage in the “aura” zone
  • None – there is no aura

You can also change the Aura radius and Aura strength. Aura radius controls the radius of the area inside the effect. By changing its size, you automatically change the radius of the aura.

Aura strength increases the effect you’ve selected one step earlier. For instance, if you’ve selected “Blur”, the higher the value of Aura strength is, the blurrier it will be.

Darken aura is a parameter that defines how dark the aura should be with 100 being the maximum value.

If you choose to darken the aura, the Smooth darkening option allows you to achieve a gradient effect that starts in the free zone and continues to the end of aura. The higher its value is, the smoother the gradient will be.

Number of flares is an aptly named parameter that controls the number of Bokeh flares in the video. It is typically used along with Minimum spread and Spread delta.

The Minimum spread parameter sets the minimum distance between the free zone and the glares. Notice how the flares move further from the free zone as we increase this value:

Meanwhile, the Spread delta parameter sets the possible range for the Minimum spread value. If the Spread delta is equal to 0, all flares will be located at the minimum spread distance from the free zone. In the example below, we gradually increase the value of Spread delta. Notice how the density of flares in the scene decreases.

Note that if you’d like to change the way flares are spread, you can also do that by hitting a green button named Generate another map.

The Flare rotation type parameter sets the rotation of flares around the free zone. There are four rotation types available to choose from:

  • No rotation
  • Rotate clockwise
  • Rotate counterclockwise
  • Random direction

Note that if you select any rotation type, you can also set Maximum and Minimum rotation speed.

Bokeh effect: flare settings

The last group of settings helps you customize the look of the flares. It includes a handful of parameters related to the size, shape, color, brightness, and flare movements. Most of them allow you to set the dynamic change of values by using the difference between the Initial value and the Final value.

You’ll also notice that many parameters include the minimum value and maximum value. The reason being the effect suggests that the flares displayed at any given moment should not look the same. As a result, the minimum and the maximum values are randomly assigned to flares, and that produces the illusion of sparkling lights in the background.

Now, let’s review your options one by one.

Minimum/maximum flare size – this parameter should sound self-explanatory. It allows you to set the minimum and maximum possible flare sizes. That means your Bokeh effect will include various flares, but none of them will be smaller than the former or larger than the latter.

Each flare in the effect has its limited lifespan. The parameter titled Min/Max TTL allows you to define the minimum and maximum possible duration of that lifespan for each flare. As flares reach their time limit, they disappear from the scene replaced by new flares.

Flare min/max brightness – this parameter is also self-explanatory. Along with the value you set, it is limited by the level of Transparency you selected in the previous group of settings.

If you want all the flares to start displaying at the minimum level brightness (as opposed to random brightness level), set True for the parameter named Start from min value.

Similarly, you can decide whether you want flares to be of the same color when they start displaying or of random colors. If you set Use random colors -> False, you’ll be able to choose the Flare color and set the Color deviation. The latter parameter defines how far the color can deviate from the original tone.

How to change the flare color for the Bokeh glare effect

If you don’t like the default hexagon flares, there are three more Flare shape options for you: a circle, a heart, and a star. The star shape is the most customizable one. If you choose this shape, you can also set the following parameters:

  • Number of star points
  • Star outer radius
  • Star inner radius

In addition to the color and shape, you can choose to fill the flares in different ways. There are four Fill types available: solid, smooth, center, and point.Just switch between the available fill types and check the results in the preview window.

Fade out strength is a scale from 0 to 100 that allows for applying a smooth fade-out effect to the flares. When equals to 0, the fade-out effect is absent. As you increase the value, the light source inside the flares moves from the center and creates a fading effect.

Finally, the last parameter is called Flare sharpness. By changing it, you can change the strength of the light source sharpness inside the flares. As a result, the higher the value is, the bigger the light radius becomes.

Bokeh glare effect is not just for romantic videos

Now that you know the ins and outs of applying the Bokeh effect to videos, keep in mind that it’s more versatile than you might have thought. Don’t limit yourself to the romantic genre.

For instance, although it’s traditionally considered an effect for nighttime shooting sessions, it can be a beautiful addition to a daytime video or photo. It’s also not just for backgrounds! Try reducing the flare brightness and use the effect as a foreground, too.

Let your creativity take over and experiment with the new tool. Need some inspiration? Check out our YouTube channel. We publish weekly tutorials for all levels of experience, and you’ll surely find lots of ideas.

News

New Transition Addition Methods, RAW/BRAW Files Support and Free Waveform

Moment gelmiştir: VSDC 9.1'ün merakla beklenen güncellemesini sunmaktan mutluluk duyuyoruz! Yeni sürümün geliştirilmiş işlevselliği, video montajını hızlandıracak ve düzenleme sürecini...

VSDC 8.3 - 100+ Yeni Şablon, Anahtar Düzenleyici Penceresi, AV1 ve Geliştirilmiş GUI

VSDC 8.3 güncellemesini size sunmaktan mutluluk duyarız! Ekibimiz yeni sürüm üzerinde aktif bir şekilde çalıştı ve şimdi VSDC'de çalışmayı daha kolay hale getirecek tüm değişiklikleri...

2023'te ücretsiz video düzenleme: Bankayı Bozulmadan Yaratıcılığınızın Kilidini Açın

Günümüzün dijital dünyasında yaratıcılık en üst düzeyde hüküm sürüyor. Bireylerin ve markaların izleyicileri büyülemesi ve kalıcı bir izlenim bırakması için sonsuz olanaklar sunar....

En İyi Çevrimiçi Video Düzenleyiciler 2023: Avantajlar ve Dezavantajlar

Şu anda video içeriğinin popülaritesi artıyor ve birçok kullanıcı kişisel ve profesyonel amaçlar için video klipler oluşturma ihtiyacıyla karşı karşıya kalıyor. Pazarda sunulan çeşitli...

VSDC 8.2 – Proxy File Support, Color Keyframes and Vectorscope

Merakla beklenen VSDC video editörü 8.2 güncellemesini açıklamaktan heyecan duyuyoruz. Ekibimiz, bu sürümün düzenleme deneyiminizi yükseltecek heyecan verici özellikler ve geliştirmelerle dolu...

VSDC 8.1 Sürümü Çoklu Kamera, Eğri Çizgi Nesnesi, Kayan Metin Efekti ve Daha Fazlasını İçerir

VSDC 8.1'i sunmaktan mutluluk duyuyoruz. Yeni sürüm, hem profesyonel kameramanları hem de grafik tasarımcıları ve profesyonel olmayan kullanıcıları hedefleyen çok çeşitli güncellemeler içeriyor....

VSDC 7.2 Renk Düzeltme Araç Setini Bir Sonraki Seviyeye Taşıyor (Diğer Güncellemeler)

VSDC ekibi için verimli birkaç ay daha oldu ve video düzenleme paketimizin yeni sürümü olan VSDC 7.2'nin piyasaya sürüldüğünü duyurmaktan heyecan duyuyoruz. Güncellemelerin çoğu renk düzeltme...

Video Renk Düzeltme için 5 Ücretsiz Yazılım

Bir video içerik üreticisiyseniz, renk düzeltmeyi öğrenmenin çok önemli olmasının üç nedeni vardır. İlk olarak, videolarınızı geliştirmenize ve profesyonel görünmelerini sağlamanıza...

VSDC 7.1 GUI ve LUT Düzenleyicisini Geliştirir, Yeni efektler ve Özel Klavye Kısayollar Ekler

VSDC'nin yeni sürümü iki yeni video efekti içerir, LUT düzenleyicisinin işlevselliğini genişletir ve geliştirilmiş bir arayüz, iyileştirilmiş zaman çizelgesi ve özel kısayollar getirerek...

Filigran İçermeyen En İyi 10 Ücretsiz Video Düzenleme Yazılımı

Saatlerce düzenleme yaptığınız bir videoda filigran görmek oldukça sinir bozucudur. Ancak bazı video düzenleme yazılımı geliştiricileri, ürünlerinin ücretsiz kullanımını sınırlamak...
 

Screen Recorder Box

Bu program ile masaüstünüzün video videosunu çekebilir ve bilgisayarınıza çeşitli biçimlerde kaydedebilirsiniz. Bir video düzenleyiciyle eşleştirilmiş program, sunumlar ve demolar oluşturmak için idealdir.

Ekran Kaydedici hakkında daha bilgi edinin...


Video Capture Box

Program, dış aygıtlardan video yakalar ve ücretsiz bir biçimde bilgisayara kaydeder. Video tarayıcılardan, web kameralardan, yakalama kartlarından ve diğer araçlardan da video kaydedebilirsiniz.

Video Yakalama hakkında daha fazla bilgi edinin…


İnceleyen


"VSDC Ücretsiz Video Düzenleyici her ne kadar alışılmadık bir video düzenleyici olsa da şaşırtıcı derecede güçlü"

- PC Advisor


"Bu video düzenleyici size tonlarca kontrol ve düzenleme gücü veriyor"

- CNet


"Bu video düzenleyici tüm popüler video formatlarını destekler ve çok çeşitli özelliklere sahiptir. Aydınlatma seviyesini değiştirebilir, videoları birleştirebilir, filtreler ve geçişler uygulayabilirsiniz"

- Digital Trends