")


Video Düzenleyici
Aile tebrik kartından şirket sunumuna kadar her türlü karmaşıklıkta videolar oluşturmak ve düzenlemek için ücretsiz video yazılımını kullanın. Video dosyalarını kesin, birleştirin, görsel ve ses efektleri uygulayın, filtreleme ve görüntü düzeltme kullanın, slayt gösterileri yapın ve uygun bir film müziği ekleyin. Videonuza profesyonel bir görünüm kazandırmak için çok renkli Renk anahtarı ve gelişmiş parametre ayarlarını kullanın. Tüm popüler video ve ses formatları desteklenir.
Video Dönüştürücü
Bu program video dosyalarını bir biçimden diğerine dönüştürmek için tasarlanmıştır. Hemen hemen tüm popüler video biçimleri (hem okuma hem de kaydetme) desteklenir. Ayrıca iPhone, Huawei P30 Pro veya Samsung Galaxy gibi belirli multimedya cihazları için videolar oluşturmak da mümkündür. Programın kullanımı son derece kolaydır, modern bir arayüze ve gerekli tüm video işleme fonksiyonlarına sahiptir.
Ses Dönüştürücü
Bir ses dönüştürücü kullanarak ses dosyalarını bir biçimden diğerine dönüştürebilirsiniz. Tüm önemli ses biçimleri ve codec bileşenleri desteklenir. Program ayrıca çalma listelerini ve meta etiketlerini yönetmenize izin verir, ayrıca video dosyalarından sesi dışa aktarmak ve parçaları herhangi bir biçimde bilgisayarınıza kaydetmeniz de mümkündür.
Ses CD’si Yakalayıcı
Bu ses aracı kompakt disklerden ses parçalarını kopyalamaz ve bunları seçtiğiniz herhangi bir biçimde bilgisayarınıza kaydetmek için tasarlanmıştır. Neredeyse tüm popüler ses biçimleri ve codec bileşenleri desteklenir. Program ayrıca dosyaları otomatik olarak yeniden adlandırma ve meta etiketleri güncelleme için parça ayrıntılarını FreeDB sunucusundan ayıklayabilir.
 Video Editor
 Video Dönüştürücü
 Ses Dönüştürücü
 Ses CD’si Yakalayıcı

Çok işlevsellik
Tek bir ücretsiz video yazılım paketinde çok çeşitli multimedya işleme araçları

Yüksek hız
Programlar hızlı, optimize edilmiş çok işlemcili algoritmalar kullanır.

Kullanılabilirlik
VSDC video yazılımı, Windows işletim sistemi tabanlı tüm bilgisayarlarda ve cihazlarda ücretsiz olarak indirilebilir.
News:
- published Amy Shao 6/10/25 Yeni ve sıradışı bir şey için bekleyiş nihayet sona...
- Bu tatil sezonu, VSDC Video Editörü'nün en son güncellemesiyle yeni başlangıçlar...
- Değişim, gelişim demektir ve bu süreç sizlerin geri bildirimleri olmadan mümkün ...
- Giriş 2024 yılında görsel efekt oluşturma seçenekleri son derece çeşitli ve en...
VSDC'de Video Üzerindeki Filigranları ve Logoları Kaldırma
Günümüzün dijital dünyasında filigranlar ve logolar, yetkisiz kullanımı engelleme ve marka kimliğini belirtme gibi çift fonksiyonludur. Bununla birlikte, estetik kaygılar, içeriğin tekrar kullanımı ya da yerleşik reklamlardan sakınma gibi geçerli sebeplerle videodan filigranları kaldırma veya logoları gizleme ihtiyacı doğabilir. Dolayısıyla, filigranları etkili bir şekilde silmek ya da gizlemek konusunda bilgi sahibi olmak büyük önem taşır. İşte bu noktada, VSDC Free Video Editor bu konudaki mükemmel bir yardımcınız olacaktır. Bu yazı, bu izleri VSDC ile nasıl başarılı bir şekilde ele alabileceğinize dair yöntemleri sunmaktadır. Bu beceriyi mükemmelleştirmek ve video düzenleme yeteneklerinizi bir üst seviyeye taşımak için hemen başlayın!
 VSDC'nin en güncel sürümünü şimdi indirin.
DeLogo Filtresi
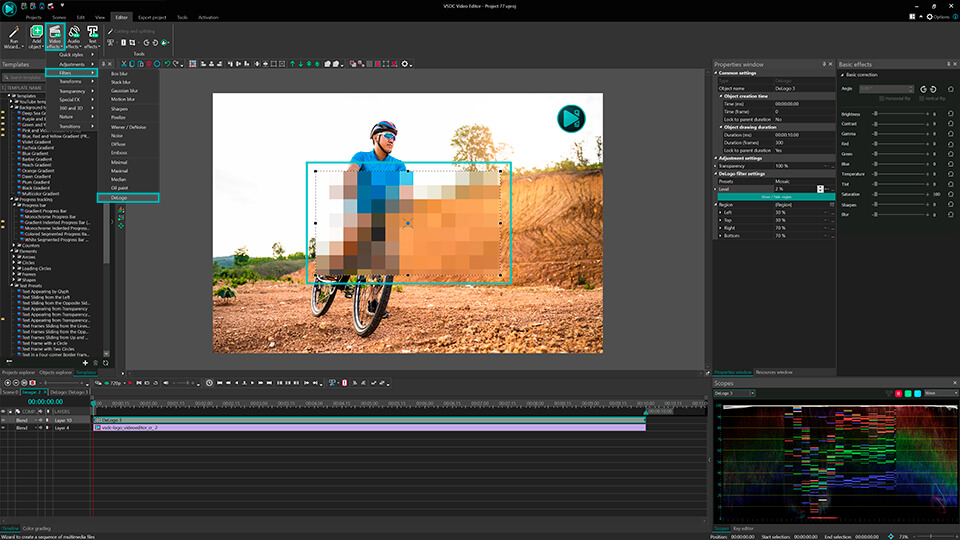
VSDC'nin ücretsiz sürümünde sunulan DeLogo filtresi, videolardan filigranları kaldırmak, istenmeyen logoları veya diğer üst katman grafiklerini bulanıklaştırmak için basit bir yöntem sunar. Aşağıdaki şekilde uygulanabilir:
- VSDC Free Video Editor'ü başlatarak başlayın. Kendi projenizi oluşturmak için Boş proje düğmesine tıklayın.
- Ardından dosya gezgininde bir dosya seçin, onu sahneye sürükleyin ve fare düğmesini bırakın. Eğer VSDC'ye yeni başlıyorsanız ve VSDC ile nasıl başlayacağınız hakkında daha fazla bilgi almak istiyorsanız, kapsamlı video rehberimizi izlemenizi öneririz.
- DeLogo filtresine erişmek için, zaman çizelgesindeki video dosyanızın seçili olduğundan emin olun. Daha sonra Şerit üzerinde bulunan Video Efektleri sekmesine gidin, açılır menüden Filtreleri seçin ve DeLogo seçeneğini seçin.
- Bir nesneyi seçtikten sonra, etkinin ne zaman görünür olması ve ne zaman kaybolması gerektiğini belirtmenizi sağlayan bir açılır pencere belirecektir. Yapılandırmalardan memnun kaldığınızda, değişiklikleri onaylamak için "Tamam"ı tıklayın. Ardından videoyun merkezinde pikselleşmiş bir dikdörtgen gözlemleyeceksiniz. Aynı zamanda, DeLogo filtresi zaman çizelgesinde belirecektir.
Varsayılan ayarlar ideal değilse:
- Zaman çizelgesindeki DeLogo filtresine tıklayın ve sahnenin sağ tarafındaki Özellikler penceresine gidin. Hemen görünmüyorsa, DeLogo filtresine sağ tıklayın ve Özellikler'i seçin. Özellikler penceresinde pikselleşmiş dikdörtgenin boyutunu ve konumunu ayarlayabilir, bu sayede filigranı veya logoyu etkili bir şekilde kapsadığından emin olabilirsiniz.
- Ayarlar içerisinde, beş hazır ayar seçeneğiniz bulunmaktadır: Pixelate, Box blur, Lens blur, Mosaic, and Gaussian blur. İhtiyaçlarınıza en uygun olanı seçin.
- Aşağıda, görünümü ince ayarlamak için yoğunluk seviyesini ayarlama seçeneği bulunmaktadır.
Şimdi logo, bulanık bir dikdörtgen tarafından kapatılmış ve videonuzdan başarıyla gizlenmiştir. Sonuçtan memnun kaldıysanız, projenizi dışa aktarın. Bu şekilde, filigranları, logoları, GPS detaylarını, araç plaka numaralarını ve daha fazlasını kolayca kaldırabilirsiniz. Dolayısıyla, DeLogo filtresinin oldukça kullanışlı olduğunu görebilirsiniz, farklı görevleri gerçekleştirmenize olanak tanır. Ancak, daha da rafine bir görünüm arıyorsanız, Telea modu tam size göre.
Telea Modu
üksek derecede gizli ve sofistike bir filigran gizleme tekniği arayanlar için Telea modu cevaptır. Görünür izler bırakabilecek temel bulanıklaştırma veya pikselleştirme yöntemlerinin aksine, Telea yöntemi, çevresindeki pikselleri analiz ederek ve taklit ederek istenmeyen bölgeyi dolduran bir algoritma temellidir, bu da daha bütünsel ve gizli bir kaldırma olanağı sunar. Ancak, bu özellik VSDC Pro'ya yükseltme gerektirir, bu da gelişmiş video düzenleme yeteneklerinin kapılarını açar. İşte Telea modunu nasıl kullanacağınız:
- Tekrar, videonuzu VSDC Free Video Editor'a yükleyerek başlayın. Bunu yapmak için yukarıda açıklanan adımları izleyin.
- Sahnede soldaki dikey sekmeye gidin ve Dikdörtgen aracını seçin.
- Bu aracı, gizlemek istediğiniz nesnenin boyutuna uygun bir dikdörtgen oluşturmak için kullanın ve onu uygun bir şekilde konumlandırın.
- Zaman çizelgesindeki Dikdörtgeni seçin ve zaman çizelgesinin solundaki Karıştır menüsüne gidin.
- Karıştır menüsünde, açılır menüden Gelişmiş Modlar >> Telea düzeltmeyi bulun ve üzerine tıklayın. İşte bu kadar!
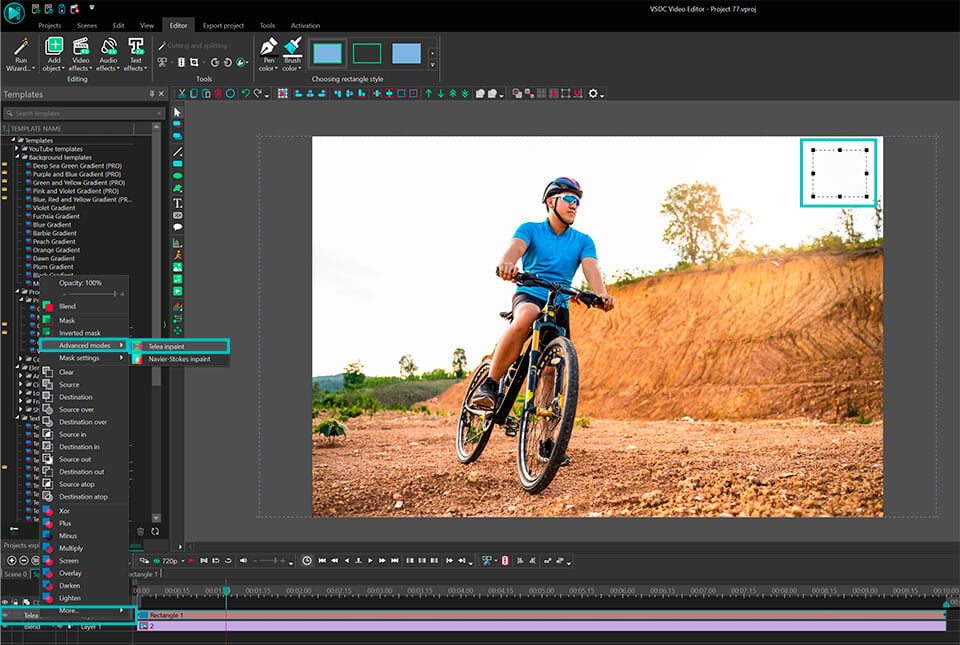
Sonuç olarak, Telea modu, videonuzun mevcut kısımlarıyla yer değiştirerek filigranı kaldırmıştır. Bu nedenle, alanın kenarları neredeyse görünmez ve DeLogo filtresiyle kıyasla biraz daha sade görünmektedir.
Lütfen, bir video düzenleyicide Telea modunu uyguladığınızda ve önizlemeyi başlattığınızda bir yavaşlama fark edebileceğinizi unutmayın. Bu, hem video hem de maske aynı anda işlendiği için meydana gelir. Düzenleme sürecini optimize etmek ve bu tür gecikmeleri önlemek için, orijinal videoyu bir proxy formatına dönüştürmenizi öneririz.
Sonuçlandırma
Filigranları ve logoları kaldırmak veya gizlemek zorlu bir görev olabilir. VSDC Free Video Editor, bu amaç için etkili bir araç olduğunu kanıtlamıştır. İster basit bir şekilde DeLogo filtresini ister daha rafine Telea Modunu seçin, bu araçları sorumlu ve etik bir şekilde kullanmanın, her zaman orijinal içerik yaratıcılarının haklarına ve fikri mülkiyetine saygı göstermenin önemli olduğunu unutmayın.
Video düzenleme yolculuğunuza devam ederken, yayınlanan yeni eğitim videoları hakkında anında bildirim almak için VSDC YouTube kanalına abone olun. Ve herhangi bir sorunuz varsa veya yardıma ihtiyacınız varsa, destek ekibimize Bu e-Posta adresi istenmeyen posta engelleyicileri tarafından korunuyor. Görüntülemek için JavaScript etkinleştirilmelidir. adresinden e-posta yoluyla veya Facebook ve Twitter üzerinden ulaşabilirsiniz.


Bu program ile masaüstünüzün video videosunu çekebilir ve bilgisayarınıza çeşitli biçimlerde kaydedebilirsiniz. Bir video düzenleyiciyle eşleştirilmiş program, sunumlar ve demolar oluşturmak için idealdir.

Program, dış aygıtlardan video yakalar ve ücretsiz bir biçimde bilgisayara kaydeder. Video tarayıcılardan, web kameralardan, yakalama kartlarından ve diğer araçlardan da video kaydedebilirsiniz.

"VSDC Ücretsiz Video Düzenleyici her ne kadar alışılmadık bir video düzenleyici olsa da şaşırtıcı derecede güçlü"
- PC Advisor

"Bu video düzenleyici size tonlarca kontrol ve düzenleme gücü veriyor"
- CNet

"Bu video düzenleyici tüm popüler video formatlarını destekler ve çok çeşitli özelliklere sahiptir. Aydınlatma seviyesini değiştirebilir, videoları birleştirebilir, filtreler ve geçişler uygulayabilirsiniz"
- Digital Trends
© 2011-2025, www.videosoftdev.com, FLASH-INTEGRO LLC. Gizlilik politikası | Kullanım koşulları | Hakkımızda
Burada atıfta bulunulan tüm ticari markalar, ilgili sahiplerinin mülkiyetindedir.
Bu siteden herhangi bir materyalin kopyalanmasına yalnızca Site Yönetiminin yazılı onayı ile izin verilir.