VSDCでテキストを変換してアニメーションさせる方法
もしタイトルに視覚的なインパクトを加えて注目を集めたいなら、この記事がぴったりです。VSDC 9.3で初めて導入されたテキスト変換ツールを使って、印象的な結果を得る方法をご紹介します。この強力な機能を活用すれば、文字のモーフィング、テキストの出現、ストロークエフェクト、ライトアニメーションなど、さまざまなテキストアニメーションをデザインできます。可能性は無限大で、あなたの創造力と設定の調整次第です。もっと簡単な方法をお探しですか?それなら、プリセットを試して、調整なしで素早く仕上げましょう。
詳しく知りたい方は、このまま読み進めて詳細な説明をご覧ください。
最新バージョンのVSDC Video Editorをインストールしていることを確認してください!
はじめに
まず、VSDC Video Editor を起動し、スタートページで「空のプロジェクト」オプションを選択するか、上部の水平メニューから「新規プロジェクト」を選択して、新しいプロジェクトを作成します。
ポップアップウィンドウが表示され、希望の解像度やフレームレートを設定できます。また、必要に応じてプロジェクトの名前を変更することも可能です。すべての設定を完了したら、「終了」をクリックし、テキストオブジェクトを追加しましょう。
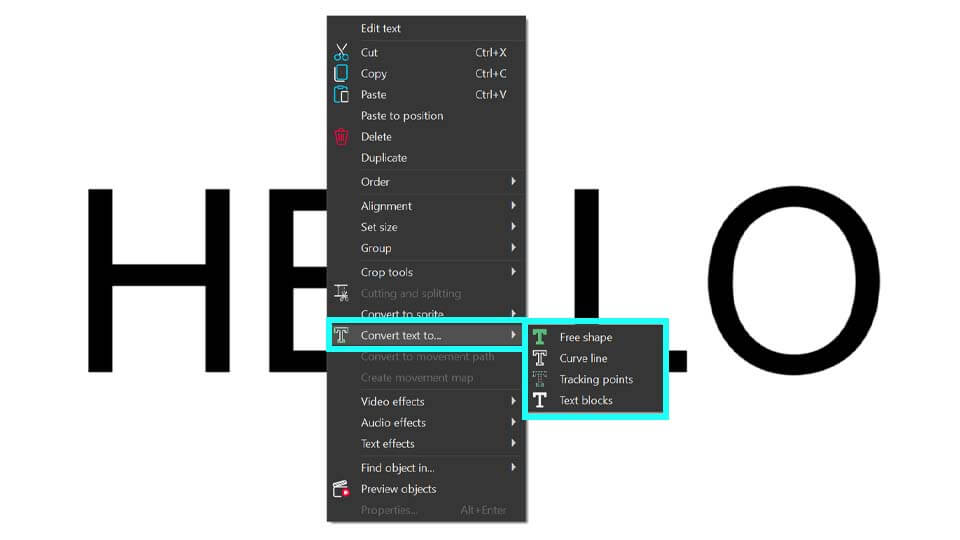
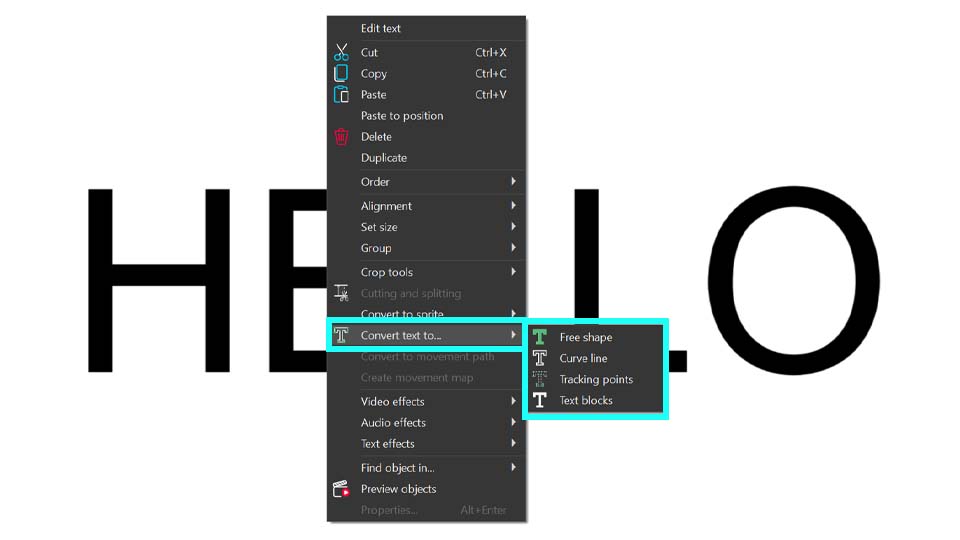
ESCキーを押して点滅しているテキストカーソルを消してから、シーン上かタイムライン上でテキストを右クリックし、「テキストを変換する... 」に移動します。ここに4つの変換オプションがあります:
- カスタムシェイプ
- 曲線
- トラッキングポイント
- テキストブロック
希望の変換モードを選択すると、そのモードに対応した設定ウィンドウが表示されます。このウィンドウの詳細については、次の段落で説明します。
テキスト変換ツールウィンドウ
テキスト変換ツールのインターフェースを見ていきましょう。選択したモードによって特定の設定は異なりますが、レイアウトはほぼ同じです。たとえば、「テキストブロック」モードを見てみましょう。これを開くには、テキストオブジェクトを右クリックし(点滅するカーソルがないことを確認してください。必要であれば ESC を押してください)、「テキストを変換する...」に移動して「テキストブロック」を選択します。すると、設定ウィンドウが開き、そのインターフェースが表示されます。
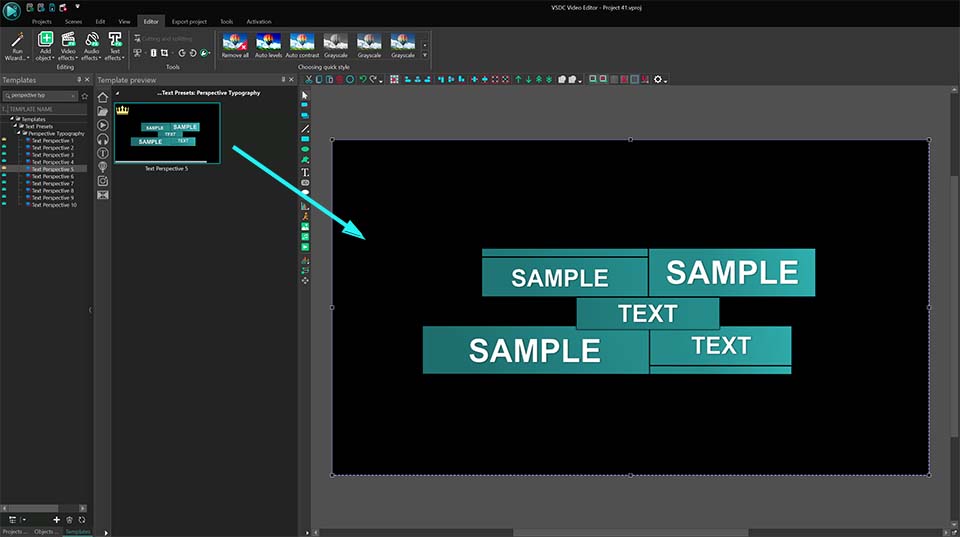
中央には、テキストエフェクトに必要なすべての設定が表示されます。これらの設定の使い方については、次の段落で詳しく説明します。左側にはテンプレートウィンドウがあり、テキストに適用できるテンプレートが一覧表示されます。なお、テンプレートウィンドウは「テキストブロック」と「カスタムシェイプ」のみで利用可能 であることを覚えておいてください。
右側にはプレビューウィンドウがあり、テキストアニメーションやテンプレートウィンドウのテンプレートがどのように機能するかを確認できます。テンプレートウィンドウからテンプレートを選択すると、自動的にプレビューに表示されます。テンプレートと設定を適用したテキストは、中央ウィンドウの左隅にある「プリセット」ボタンをクリックした後にのみ表示されます。このボタンは、誤ってプレビューエリアを閉じてしまった場合にも使用できます。クリックするだけで、プレビューエリアが再び表示されます。
注意: よく使用するテンプレートに素早くアクセスするには、お気に入りリストに追加できます。追加するには、好みのテンプレートを右クリックし、メインのテンプレートウィンドウで「お気に入りのテンプレート」オプションを選択してください。すると、右上の「お気に入り」セクションに表示され、星のアイコンでマークされます。
テキスト変換ウィンドウ内の同じ星のアイコンをクリックすると、選択したテンプレート(エフェクトやトランジション)が表示され、テキストに適用できるようになります。
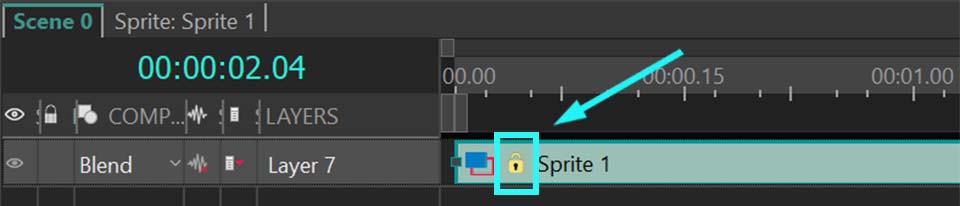
「プリセット」オプションの隣には、3つのボタンがあります。1つ目のボタン「スプライトに移動」は、変換時に作成されたすべてのオブジェクトを自動的に1つのスプライトにグループ化します。これは、大量のテキストを扱う際に便利で、新しいオブジェクトがタイムライン上でスペースを取りすぎるのを防ぎます。また、「Ok」をクリックすると、設定を確定して変換を適用できます。テキストを変換しない場合は、3つ目のボタン「キャンセル」をクリックするか、ウィンドウを閉じてください。
もう1つ重要なオプションが「テキストを後で非表示にする」チェックボックスです。チェックを入れると、「Ok」または「スプライトに移動」をクリックして変換を完了した後、元のテキストレイヤーが非表示になります。表示を維持したい場合は、このオプションのチェックを外してください。設定ウィンドウを閉じた後に変更したい場合は、タイムラインの左側にある「目」のアイコンをクリックすると、非表示にしたレイヤーを再び表示できます。
では、各モードの具体的な設定について詳しく見ていきましょう。設定プロセスを案内し、シンプルなテキストアニメーションの作成方法を実演します。
「テキストブロック」モードによるテキストリベール
前のセクションで「テキストブロック」モードを選択したので、そのまま作業を続けます。このモードの設定ウィンドウはすでに開いているため、それぞれのオプションの目的を見ていきましょう。
最初のオプションは「プリセット」機能です。これは、多くの設定を調整せずに手軽に使いたいユーザー向けに設計されています。オプションの横にある矢印をクリックしてプリセットを選択するだけで適用できます。例えば、ドロップダウンメニューから「Paint Brush - Words」を選んでみましょう。
すべてのプリセットを順番に確認したい場合は、「自動プレビューの有効化」チェックボックスを有効にしてください。これにより、毎回「プリセット」ボタンをクリックしなくても、各プリセットのプレビューを自動で表示できます。
結果に満足したら、タイムライン上のオブジェクトの整理方法に応じて「スプライトに移動」または「Ok」を選択してください。
オリジナルのテキストアニメーションを作成したい場合は、各設定の仕組みを理解することが重要です。これらの設定を習得すれば、数千種類のユニークなテキストアニメーションを作成できます。その中でも人気のある「Typewriter effect」は、このウィンドウ内の「分割方法」と「フェードイン」の2つのパラメーターを調整するだけで実現できます。
以前にプリセットを試した場合、自分の設定を入力するには、自動適用された値をクリアする必要があります。テキスト変換ウィンドウを一度閉じて再度開いてください。
「プリセット」の下にある「分割方法」オプションを見てみましょう。このオプションでは、テキストオブジェクトを分割する要素を指定できます。
- 文字: テキストを文字に分割します。
- 単語: テキストを単語に分割します。
- 文: テキストを文に分割します。
例えば、「文字」を選択すると、各文字がタイムライン上で個別のテキストオブジェクトに変換され、それぞれの位置を調整したり、個別にエフェクトを適用したりすることができます。タイムライン上のオブジェクトの配置を確認するには、「Ok」をクリックしてテキスト変換ウィンドウを閉じてください。
他の設定と組み合わせることで、より良い結果を得ることができます。例えば、「フェードイン」オプションを使うと、テキストブロックのシーン上での出現方法を設定できます。以下のいくつかのバリエーションがあります:
- 使用しない: フェードイン効果は適用されません。
- 一度にすべて: すべてのテキストブロックが同時に表示されます。
- 一人ずつ: テキストブロックが最初から最後まで順番に表示されます。
- 逆順に一つずつ: テキストブロックが最後から最初まで順番に表示されます。
- 順不同: テキストブロックがランダムな順序で表示されます。
「一人ずつ」を選択して結果を見てみましょう。テキストオブジェクトは自動的にタイムライン上に配置され、1文字ずつ順番に表示されるようになります。Typewriter effect に似た結果になっていませんか?
フェードインが速すぎるようであれば、すべてのテキストブロックが表示される時間間隔を設定する 「フェードインの持続時誾」 オプションで改善できます。この設定は、「一人ずつ」、「逆順に一つずつ」、または 「順不同 」フェードイン値が 設定されているときに有効にすることができます。
例えば、「フェードイン 」を「一人ずつ」に設定し、「フェードインの持続時誾 」を3000ミリ秒(3秒)に設定すると、すべてのテキストブロックは3秒以内に1つずつ表示されます。タイムラインは自動的に各テキストブロックの出現時間をずらし、このような結果が得られます:
最初の文字をすぐに画面に表示せず、ビデオの開始の1秒後など、少し遅れて表示させたい場合は、タイムライン上のすべてのテキストブロックの表示開始を同時にずらすことができるオプション「フェードインの重なり」を使用します。このパラメータは フェ ー・ドインの持続時誾と一緒に機能します 。
- フェードインの重なり」を 0より大きい値に設定 すると、すべてのテキストブロックはタイムライン上で左にシフトし、より早く現れ始めることを意味する。
- もし、フェードインの重なり方を 0より小さい値に設定 すると、すべてのテキストブロックはタイムライン上で右にシフトし、つまり、後から現れ始めます。
テキストの表示を少し遅らせたい場合は、このパラメーターを0未満に設定して、開始を遅らせ、右にシフトさせる必要があります。ここでは**-1000 msに設定し、テキストが動画開始から1秒後**に表示されるようにしましょう。「プレビュー」をクリックして、タイムライン上でどのように見えるか確認してください。
このプロセスのハイライトはフェードイン効果であり、テキストを美しく際立たせます。テンプレートはドロップダウンリストから選択するか、テンプレートウィンドウから専用のセル「テンプレートをここ ドラッグ&ドロップしてください」にドラッグ&ドロップすることで適用できます(この機能は「カスタムシェイプ」および「テキストブロック」のみ利用可能です)。テンプレートウィンドウでテンプレートを選択すると、テキスト変換ウィンドウの左側に自動的にプレビューが表示されます。このトランジションがテキストにどのように適用されるか確認するには、「プレビュー」ボタンをクリックしてください。
例えば、「Paint Brush: Top-Right Corner」エフェクトを選んでみましょう。結果は…素晴らしいですね!
テキストの表示が速すぎると感じた場合は、「フェードイン効果の持続時間」を調整して、表示タイミングをコントロールできます。例えば、3000 msに設定すると、アニメーションがよりスムーズで自然な動きになります。
フェードイン設定を確認したので、次はフェードアウトのパラメーターに進みましょう。
フェードアウトはフェードインパラメータと似ているが、テキストブロックの消滅(表示終了)を制御する
- 使用しない: フェードアウト効果はありません。
- 一度にすべて: すべてのテキストブロックが同時に消えます。
- 一人ずつ: 最初のブロックから順番に消えます。
- 逆順に一つずつ: 逆順に一つずつ消える。
- 順不同: テキストブロックはランダムに消える。
ビデオでは、「逆順に一つずつ 」オプションとこれまでの設定値の組み合わせの効果を見ることができます。テキストのすべての文字がすぐに消えます。
「フェードアウトの持続時間」に「フェードインの持続時間」と同様の値を設定すると、テキストブロックがシーンから消える時間間隔を調整でき、よりスムーズな消え方になります。
例えば、「フェードアウト」を「逆順に一つずつ」、「フェードアウトの持続時間」を2000 msに設定すると、再生終了までの2秒間で全てのテキストブロックが順番に消えていきます。
次に設定ウィンドウのオプション、フェードアウトの重なりに移りましょう。これはフェードインの重なりと似ていますが、タイムライン上のすべてのテキストブロックの消失を同時にずらす時間を調整します。このパラメータはフェードアウトの持続時間と連動して動作します。
- このパラメータの値が 0 より大きい場合、タイムラインの終わりに向かって右にシフトします。
- 0 より小さい場合、タイムラインの始めに向かって左にシフトします。
「フェードアウト効果」を追加することは、視聴者を引きつける確実な方法です!「フェードイン効果」と同じエフェクトを適用するには、「フェードインからコピー」をクリックするだけで簡単に設定できます。また、ドロップダウンリストから別のエフェクトを選択するか、テンプレートウィンドウから新しいエフェクトをドラッグ&ドロップすることもできます。こうすることで、テキストに独自の仕上げを加えることができます。
今回は例として「Paint Brush: Top-Right Corner」のトランジションを使用しますが、ご希望の演出に合った別のトランジションを自由に選んでください。
テキストが速く消えすぎる場合は、「フェードアウト効果の持続時間」を調整して、消える時間を延ばすことができます。バランスの取れたアニメーションを作成するには、「フェードイン効果の持続時間」と同じ3000 msに設定してみてください。
この例では、ブラシストロークで表示されたテキストが、同じようにフェードアウトする印象的な演出を実現しています。豊富なオプションを試すことで、エフェクトを組み合わせ、1000種類以上のユニークなテキストアニメーションを作り出すことができます!
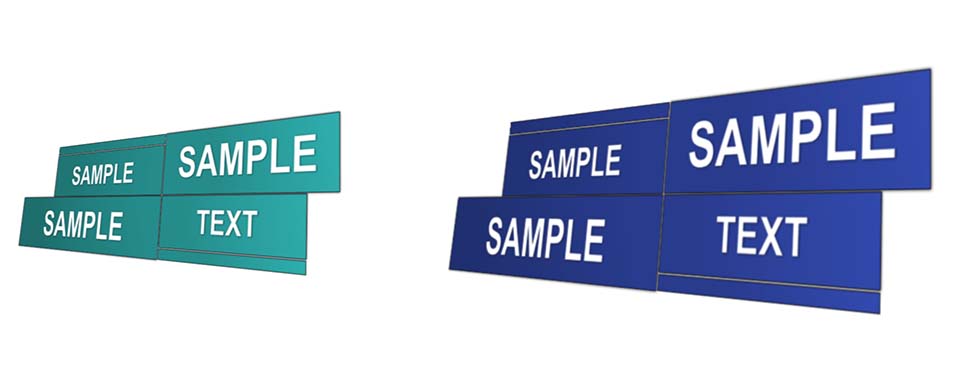
「カスタムシェイプ」モードによるテキストモーフィング
「テキストを変換する...」オプションで「カスタムシェイプ」モードを有効にすると、シーンに追加したテキストオブジェクトが自由形状のグループに変換されます。このタイプの変換は、文字の形が任意の形からモーフィングするアニメーションの作成に特に便利です。また、各文字を個別の自由形状オブジェクトとして扱うことができるため、色のグラデーションを調整したり、キーフレームを使って色の変化を設定したりと、各文字の色をより詳細に編集することが可能になります。
他のモードと同様に、テキストオブジェクトを右クリックして「テキストを変換する...」に進み、「カスタムシェイプ」を選択します。その後に表示される設定ウィンドウには、テキストブロックに関して説明したのと同じ設定が含まれています。ここで次の値を選択しましょう。
結果として、文字が燃えるように表示され、同じように消えていくバーニングテキストリビール効果が得られます。.
しかし、テキストをカスタムシェイプに変換することで、さまざまな操作が可能になります。例えば、Morph Text アニメーションを作成することができます。「分割方法」パラメータを「文字」、フェードインを「一人ずつ」に設定し、希望のフェードインの持続時間とフェードインの重なりを選択します(それぞれ3000 msと-1000 msに設定しています)。
このウィンドウでの作業を完了するには、「スプライトに移行」をクリックすることをお勧めします。「カスタムシェイプ」モードでは、タイムライン上に多くのオブジェクトが作成されることが多いため、それらを一箇所に整理するのが理想的です。
文字のモーフィングアニメーションを実現するには、タイムライン上で各自由形状の複製を作成し、それらを徐々に調整して、時間の経過とともに認識可能な文字へと変形させます。つまり、各文字に対して複数の自由形状を作成し、それらをタイムライン上の異なる位置に配置することで、形が徐々に文字へと変化していくようにします。この方法によって、フレームごとに形状から文字へと変化するアニメーションを作成できます。
さらに、自由形状を使用することで、印象的なアニメーション付きのグラデーションロゴやテキストをデザインできます。詳しい作成方法やプロパティウィンドウ内のさまざまな設定を探求してテキストを工夫する方法については、チュートリアル動画をご覧ください。
「曲線」モードによるストロークテキスト
「テキストを変換する...」オプションで「曲線」モードを有効にすると、シーンに追加したテキストオブジェクトが曲線のグループに変換されます。この変換は、文字の輪郭を描くようなアニメーションを作成するのに最適です。
変換設定ウィンドウには、以前に説明したものとは異なるパラメータが表示されます。これらの設定を分析する前に、各文字が複数の曲線で構成されている場合があることに注意してください。その曲線の数はフォントによって異なり、フォントの制作者によって決定されており、ビデオエディタによるものではありません。
このウィンドウを開くと、前の2つのモードとは異なり、テンプレートウィンドウが表示されていないことにすぐ気付くでしょう。そのため、「フェードイン」と「フェードアウト」のエフェクトの欄にはトランジションが表示されません。これはこのモードおよび次の「トラッキングポイント」モードでは利用できないためです。そのため、これらのオプションを操作する際にトランジションが表示されなくても、驚かないでください。
この変換タイプの設定ウィンドウに進みましょう。まずは「プリセット」パラメーターから見ていきます。ここでは、このモード専用のテンプレートが用意されており、前の2つのモードとは異なるオプションが選択できます。例えば、ストロークアニメーションのオプションがあり、文字の表示方法(一文字ずつ、ランダム、一斉表示)や、エフェクトの速度(遅い、普通、速い)を自由に調整できます。
独自のテキストエフェクトを作成したい場合は、ここで利用できるオプションを活用してください。新しいオプションとして、「モード」パラメーターが追加されていることに気付くでしょう。これは、前の2つのモードでは利用できなかった設定です。この設定では、どのカーブを編集するかを指定できます。
- 両方: 元のテキストオブジェクト内の各文字のすべての曲線を操作します。
- 偶数: 各文字の偶数番目の曲線のみを編集します。
- 奇数: 各文字の奇数番目の曲線に焦点を当てて編集します。
テキスト全体を編集したい場合は、「両方」が最適なオプションです。これにより、文字のすべての曲線が表示されます。「偶数」や「奇数」を選択すると一部の曲線のみが表示され、文字を完全には表現しません。
各文字を一つずつ画面に表示させるスムーズなアニメーションを追加することができます。これを実現するには、「フェードイン」を「一人ずつ」に設定し、フェードイン効果に「継続時間」を選択します。フェードインおよびフェードイン効果の持続時間のタイミングは、テキスト全体が表示されるまでの時間に応じて設定します。今回は、どちらも3000 msに設定しました。
見てください!3つの設定を調整するだけで、ストロークテキストアニメーションが完成です!
トラッキングポイントモードによるライトテキストアニメーション
4番目の変換タイプであるトラッキングポイントは、文字の輪郭に沿ってライトが走るようなアニメーション(例: ランニングライト効果)を作成するために使用されます。
エフェクトをお見せする前に、他の変換タイプとは異なる点に注意してください。このモードの変換オブジェクトは、タイムライン上の元のテキスト内に作成され、テキストオブジェクト自体は非表示になりません。そのため、「スプライトに移行」および「テキストを後で非表示にする」のオプションは無効になっています。
このモードの設定は若干異なります。「フェードアウト」、「フェードアウトの持続時間」、「フェードアウトのオーバーラップ」など、オブジェクトのフェードアウトに関連するパラメーターは無効になっています。さらに、「フェードイン」の「一度にすべて」オプションも利用できません。また、「フェードイン効果」やその関連設定、「フェードアウト効果」に関する設定も表示されません。「プリセット」も無効になっています。これらの変更は、このモード特有の機能を際立たせるものです。
ここでは、前のセクションと同様にカーブラインが重要になります。カーブの数がテキストに適用されるエフェクトの数を決定するため、「モード」パラメーターを適切に設定することが重要です。この「モード」パラメーターには、前のセクションと同様に、以下のオプションが含まれています。
- 両方: 元のテキストオブジェクト内の各文字のすべての曲線を使用して、ハイライト効果を作成します。
- 偶数: 各文字の偶数番目の曲線のみがハイライトされます。
- 奇数: 各文字の奇数番目の曲線のみがハイライトされます。
この変換タイプのみで効果パラメータがアクティブになり、文字の輪郭をハイライトするために使用される効果を決定します。利用可能なオプションは以下の通りです:
- なし: 効果は適用されません。
- レンズフレア: 太陽のグレア効果を適用し、文字の輪郭を強調します。
- ボケグレア: ボケのグレア効果を使用して文字の輪郭を強調します。
これらの設定をすべて調整することで、完璧なライトアニメーションが得られます。
例えば、「モード」を「両方」、「効果」を「レンズフレア」、「フェードイン」を「一人ずつ」、「フェードインの持続時間」を 10000 ms に設定します。この持続時間の高い値は、以下の例文がかなり長いため、アニメーションが十分に再生される時間を確保するために必要です。これを低い値に設定すると、アニメーションが速くなりすぎてしまいます。
その結果、次のようなアニメーションが得られます。
より神秘的なアニメーションを実現するには、テキストオブジェクト内のレンズフレア効果のパラメータをプロパティウィンドウで変更することができます。タイムライン上でそれらすべてを選択し、プロパティウィンドウに移動してください。ここで、フレア強度、光源パワー、色調、可視な領域などを調整して、視覚的なインパクトを高めることができます。
「可視な領域」オプションの値を減少させることで、暗闇の中で輝くように強調されたテキストを作成できます。
これは、このツールでできることのほんの一部に過ぎません!
ぜひこれらのモードやプロパティウィンドウを探求して、さまざまな追加のアニメーションやエフェクトを発見してみてください。
この記事がお役に立ち、リンクされたリソースをすべて活用してこの新しいツールを十分に理解していただけたなら幸いです。さらに多くの可能性を発見するために、ぜひYouTubeチャンネルのチュートリアル動画もご覧ください。
まだご質問がありますか?
お気軽にメール(このメールアドレスはスパムボットから保護されています。閲覧するにはJavaScriptを有効にする必要があります。)でお問い合わせいただくか、Facebook、X、Reddit、DiscordなどのSNSで私たちにご連絡ください。
")


 動画編集
動画編集 ビデオ変換器
 オーディオ変換器
 オーディオCDグラバー


 Download Video Editor 10