 User Help Manual
 ")


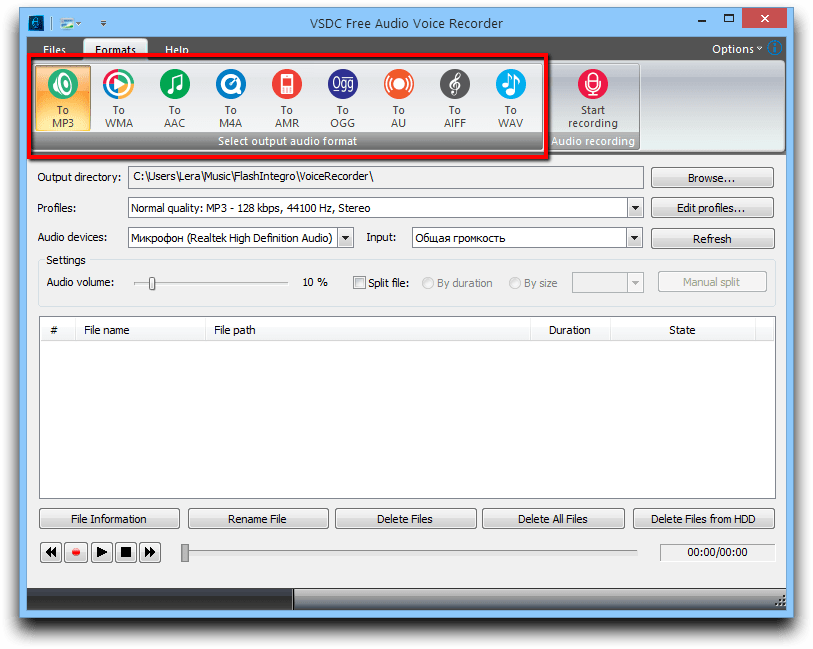
Editor Video
L'editor video consente di modificare file e creare video di qualsiasi complessità. Potete applicare effetti video e audio effects ad oggetti modificati, trasformarli, applicare filtri e correzioni d'immagini. Tutti i popolari formati video e audio sono supportati (sia lettura che salvataggio).
Convertitore Video
Questo programma serve a convertire video file da un formato ad un altro. Quasi tutti i popolari formati video sono supportati. Inoltre, il programma semplifica drasticamente il compito di convertire video da riprodurre su determinati dispositivi multimedia quali iPhone, Microsoft Zune oppure Archos. Il programma è semplicissimo da usare, dispone di una moderna interfaccia e di tutte le necessarie funzioni per processare i video.
Convertitore Audio
Il convertitore audio vi aiuterà a convertire file audio da un formato ad un altro. Tutti i formati audio e codec chiavi sono supportati. Il programma vi consente inoltre di gestire playlist e meta tags, di estrarre audio dai file video e di salvare queste tracce sul vostro computer in qualsiasi formato.
Audiograbber
Questo strumento audio serve a catturare tracce audio dai CD e di salvarle nel computer dell'utente in qualsiasi formato. Quasi tutti i popolari formati e codec sono supportati. Il programma è inoltre in grado di estrarre dettagli di tracce dal server FreeDB al fine di rinominare automaticamente il file e di aggiornare i meta tag.
 Editor Video
 Convertitore Video
 Convertitore Audio
 Audiograbber

Versatilità
Più strumenti contemporaneamente per elaborare file video e audio in una singola applicazione.

Alta velocità
I nostri programmi
impiegano rapidi algoritmi di alta qualità per processori singoli a multipli.

Accessibilità
I nostri prodotti sono disponibili per essere scaricati gratuitamente su tutti i computer e dispositivi che supportano i sistemi operativi Windows.
Notizie:
- È giunto il momento: siamo felici di presentarvi l'attesissimo aggiornamento VSD...
- Benvenuti all'ultimo aggiornamento di VSDC, la versione 8.3! Abbiamo lavorato so...
- Oggi la popolarità dei contenuti video sta guadagnando terreno e molti utenti si...
- Nel mondo digitale di oggi la creatività regna sovrana. Offre infinite possibili...
Come sfocare le facce in un video usando VSDC editor video gratis: 2 metodi da provare
Sfocare una parte di un video è un compito comune. Forse dovete farlo per tenere l’identità di una persona anonima, assicurarvi che i coordinati GPS o il numero della macchina rimangono invisibili o solo coprire un oggetto che è apparito nella scena accidentalmente ma non è previsto. Però 3 volte su 5 la cosa che dovete sfocare è le facce in un video.
VSDC editor video offre due modi da farlo gratis. Il primo letteralmente prende un paio di secondi e crea una «maschera sfocata» istantanea nella forma di un rettangolo. È anche ideale se solo dovete sfocare le parti di un video come logo, filigrane, numeri e altri oggetti piccoli. Il secondo modo soddisfa quelli che devono nascondere accuratamente un oggetto di forma strana - diciamo, una macchina o una persona - senza sfocare l’area circostante. Prende un po’ più di tempo però fornisce la copertura precisa di qualsiasi oggetto nel video:
Cercate un modo per sfocare una faccia in un video gratis?
Scaricate VSDC per Windows
Come sfocare le parti con due clic
Per quelli che cercano come censurare un video rapidamente, c’è un filtro integrato chiamato DeLogo. Tecnicamente è un rettangolo sfocato già pronto da usare che postato sull’oggetto scelto. Ecco come usarlo.
- Aggiungete un video alla scena.
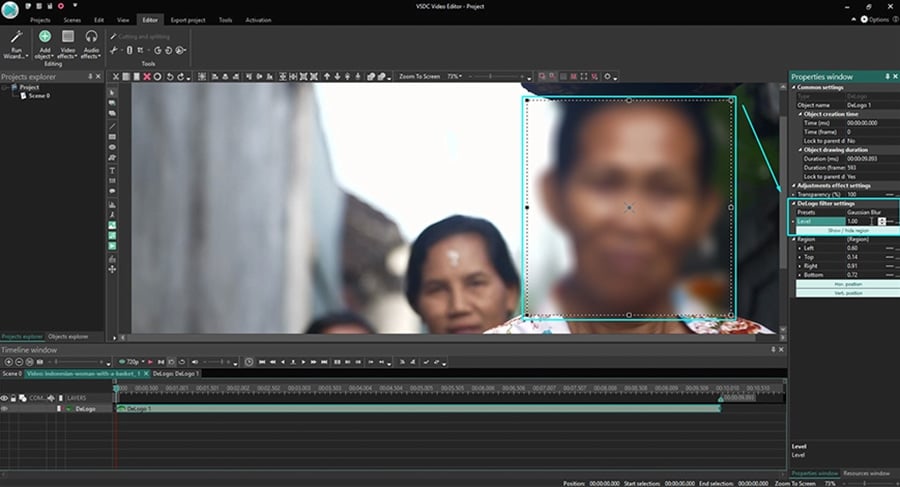
- Andate a Effetti video, passate a Filtri e scegliete «DeLogo». Avrete subito un’area sfocata nel video e una tabella nuova sulla cronologia con il filtro DeLogo - solo come è illustrato sotto.
- Fate un clic sull’oggetto del DeLogo sulla cronologia e noterete il contorno del filtro sfocato.
- Muovete o ridimensionate il filtro usando i suoi angoli o il punto centrale.
![]()
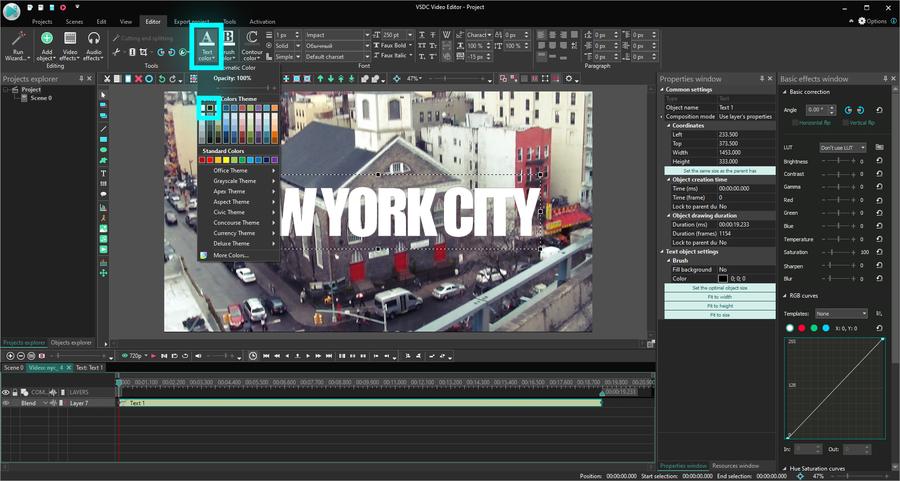
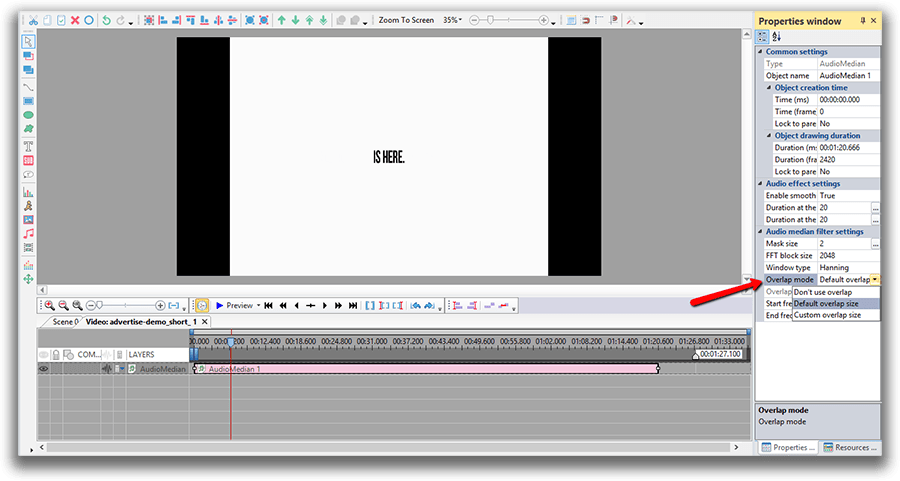
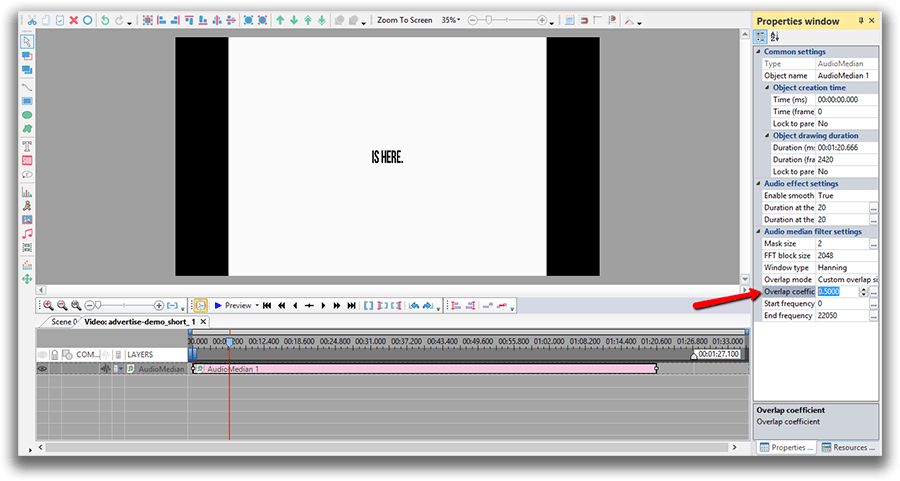
Se volete cambiare il modo in quale il filtro è - ad esempio, vorreste cambiare la sfocatura ai pixel o il mosaico - potete farlo nella finestra Proprietà.
La finestra Proprietà è situata al lato destro. Se non potete vederla, usate il pulsante destro del mouse e fate un clic sullo strato del DoLogo sulla cronologia e scegliete «Proprietà» - una finestra scivolerà. Scorrete fino a «Impostazioni del filtro DeLogo». Scegliete il mosaico, i pixel o qualsiasi tipo della sfocatura tra i filtri predefiniti e regolate il livello dell’intensità secondo i vostri bisogni. Vedete l’illustrazione sotto.
È tutto. Andate alla tabella Esportare progetto e salvate il video al vostro computer nel formato richiesto. Sotto parleremo come sfocare le facce in un video precisamente seguendo la forma dell’oggetto che deve essere coperta.
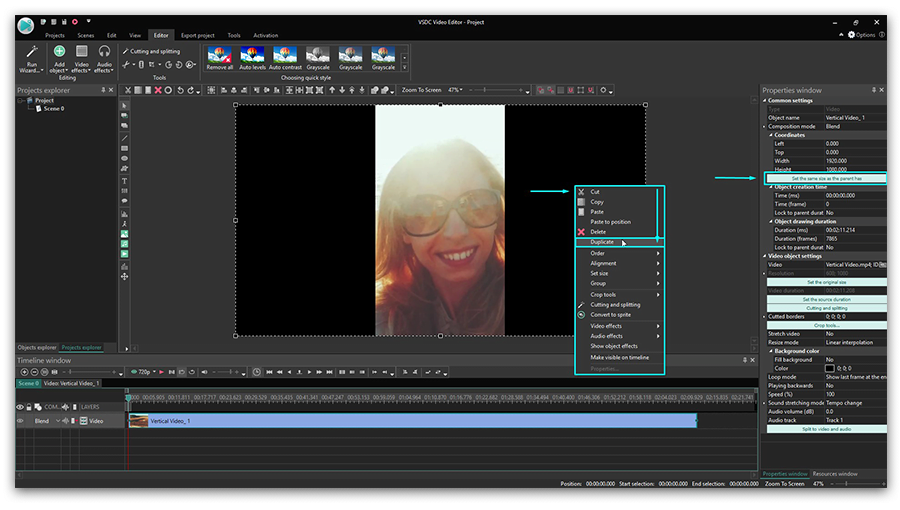
Come sfocare oggetti usando lo strumento di forma libera
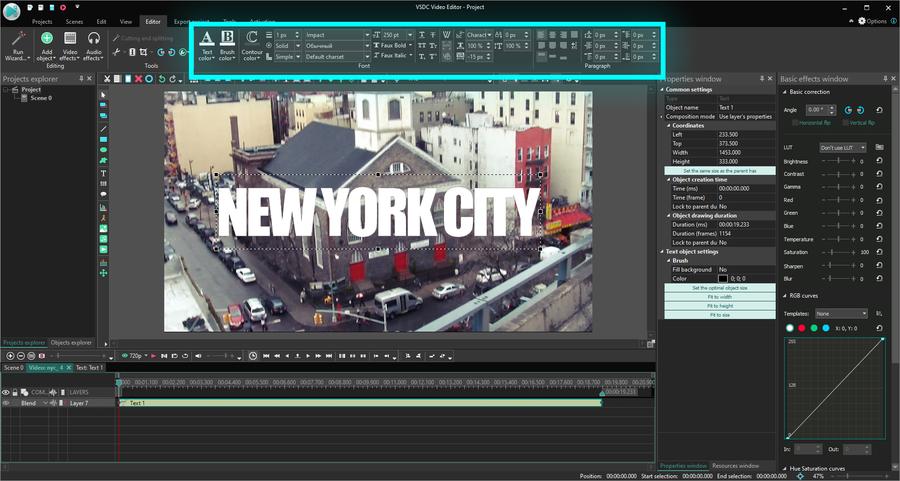
Il filtro di Delogo di che abbiamo parlato sopra ha una forma di rettangolo pre-progettata che non potete cambiare. Se volete sfocare un area con la forma personalizzata, dovrete usare uno strumento chiamato Forma libera. Essenzialmente lo strumento della Forma libera vi permette di creare qualsiasi forma manualmente usando la tecnica da disegnare vettore. Quando finite di disegnare sarete capaci di applicare il filtro pixellato alla forma che avete creato e usarlo come una maschera.
Ecco qui come funziona
- Aggiungete un video alla scena.
- Scegliete la Forma libera dal menù al lato sinistro.
- Cominciate a delineare l’oggetto che volete sfocare postando i punti sui suoi confini fino ad avete una forma desiderata. Notate che potete trascinare i punti di controllo intorno e regolare la forma a ogni momento.
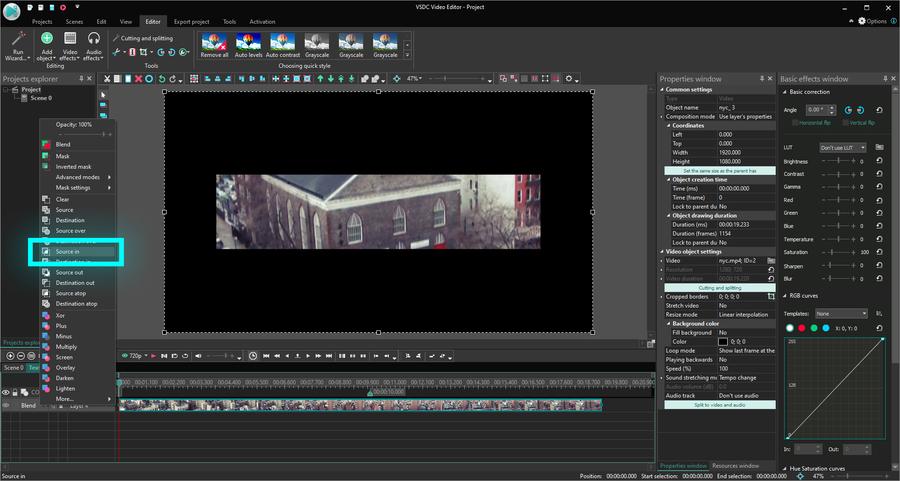
- Quando finite, tornate alla tabella Scena 0 sulla cronologia. Usate il pulsante destro del mouse per fare un clic sullo strato del video originale e scegliete «Copiare». Poi fate un doppio clic sullo strato della Forma libera ed incollate il video nella tabella della Forma libera.
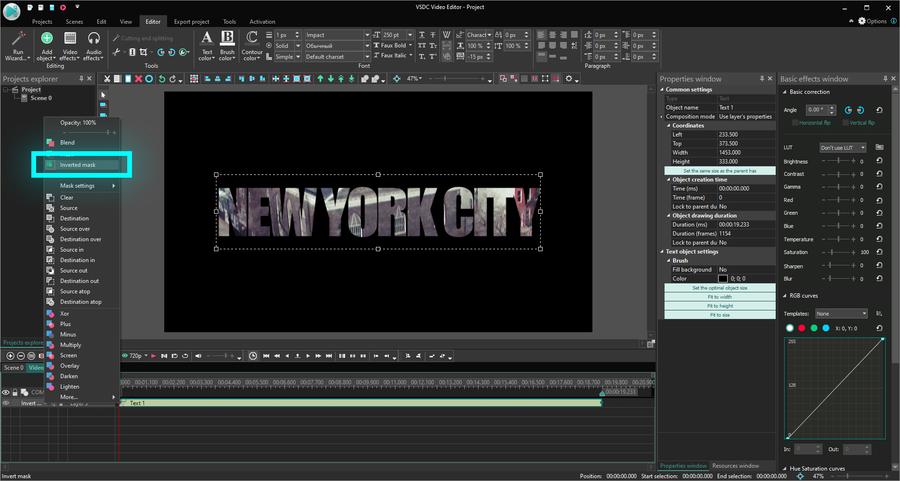
- Aprite il menù Modalità di miscelazione per il video che avete incollato e scegliete «Fonte in» - come è illustrato sotto.
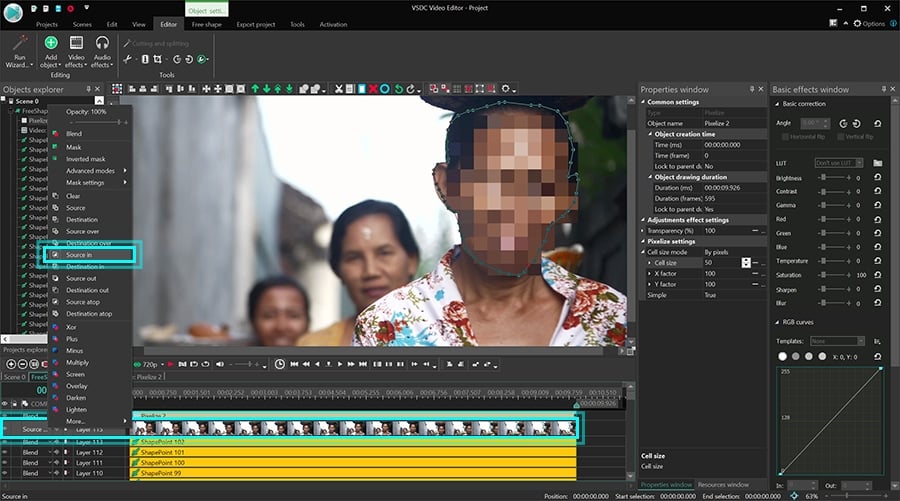
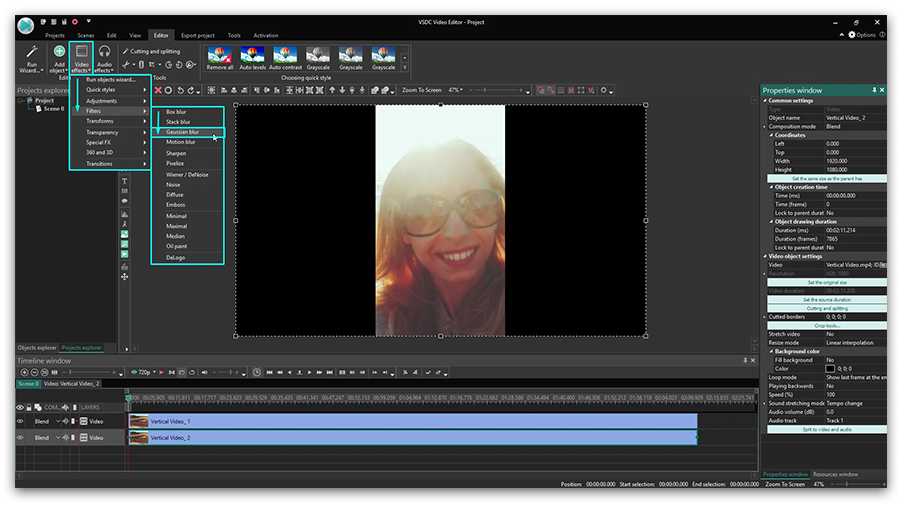
Auguri avete creato una maschera invertita. Ora dovete applicare il filtro per sfocare la faccia nel video per quale avete creato la maschera.
Per farlo aprite il menù Effetti video, passate a Filtri e scegliete Trasformane in pixel. Fate un clic su «Ok» nella finestra che spunta per confermare che volete applicare l’effetto al file video scelto. Vedrete il risultato subito.
Però se una persona nel video muove e volete che la maschera di sfocatura segua i suoi movimenti durante la faccia è nascosta dovrete applicare il tracciamento del movimento. Il tracciamento del movimento è una parte della versione Pro di VSDC disponibile per 19.90$ all’anno. Per creare una maschera video tracciata, seguite le istruzioni da questo tutorial.
Come sfocare lo sfondo di un video con VSDC Video Editor
Ora sapete come sfocare una faccia in un video usando il software gratis, forse volete guardare altri tutorial del montaggio:


Con questo programma è possibile registrare i video dal desktop e salvarli sul computer in diversi formati. Insieme al video editor è ideale per creare presentazioni e demo.

Il programma serve per catturare video da dispositivi esterni e e per registrarli sul computer in qualsiasi formato video. Potete salvare il video da sintonizzatori video, webcam, schede di acquisizione e vari dispositivi.

"VSDC Free Video Editor is a surprisingly powerful, if unconventional video editor"
- PC Advisor

"This video editor gives you tons of control and editing power"
- CNet

"The editor handles many common formats and boasts a good deal of capabilities when it comes time to alter lighting, splice video, and apply filters and transitions in post production"
- Digital Trends
© 2011-2024, www.videosoftdev.com, FLASH-INTEGRO LLC. Tutela della privacy | Condizioni di utilizzo | Chi siamo
Tutti i marchi citati nel presente documento sono di proprieta esclusiva dei rispettivi proprietari.
La copia di qualsiasi materiale da questo sito e consentita solo con il consenso scritto dell'amministrazione sito.