Editor Video

L'editor video consente di modificare file e creare video di qualsiasi complessità. Potete applicare effetti video e audio effects ad oggetti modificati, trasformarli, applicare filtri e correzioni d'immagini. Tutti i popolari formati video e audio sono supportati (sia lettura che salvataggio).

Read more about Video Editor...

Convertitore Video

Questo programma serve a convertire video file da un formato ad un altro. Quasi tutti i popolari formati video sono supportati. Inoltre, il programma semplifica drasticamente il compito di convertire video da riprodurre su determinati dispositivi multimedia quali iPhone, Microsoft Zune oppure Archos. Il programma è semplicissimo da usare, dispone di una moderna interfaccia e di tutte le necessarie funzioni per processare i video.

Read more about Video Converter...

Convertitore Audio

Il convertitore audio vi aiuterà a convertire file audio da un formato ad un altro. Tutti i formati audio e codec chiavi sono supportati. Il programma vi consente inoltre di gestire playlist e meta tags, di estrarre audio dai file video e di salvare queste tracce sul vostro computer in qualsiasi formato.

Read more about Audio Converter...

Audiograbber

Questo strumento audio serve a catturare tracce audio dai CD e di salvarle nel computer dell'utente in qualsiasi formato. Quasi tutti i popolari formati e codec sono supportati. Il programma è inoltre in grado di estrarre dettagli di tracce dal server FreeDB al fine di rinominare automaticamente il file e di aggiornare i meta tag.

Read more about Audio CD Grabber...

Versatilità

Versatilità

Più strumenti contemporaneamente per elaborare file video e audio in una singola applicazione.

Alta velocità

Alta velocità

I nostri programmi
impiegano rapidi algoritmi di alta qualità per processori singoli a multipli.

Accessibilità

Accessibilità

I nostri prodotti sono disponibili per essere scaricati gratuitamente su tutti i computer e dispositivi che supportano i sistemi operativi Windows.

How to create a voice over, using video editing software

Many videos require voice commentaries. Educational clips, how-tos, game walkthroughs, video blogs - all are typically produced with use of voice over software. There are various solutions to record your voice and add it to the footage. In fact, there are even 3-rd party tools for voice recording and processing audio on a professional level. Those are used in professional audio recording studios, for example. Yet, some video editors also have embedded tools for recording voice commentaries. VSDC Video Editor is one of them.

There are two ways to use VSDC as a voice over software. The first one belongs to the free version of VSDC video editor, and the second - a more advanced way - is available in VSDC Pro version. Below we'll take a close look at both ways, and explain how you can make use of the audio recording feature for your videos.

In both cases you'll need a microphone which is either embedded or connected to your computer. The biggest difference between the two, is the sequence of steps required from a user:

  • In VSDC free version, you can create an audio commentary using an embedded Voice Recorder. Once you record an audio piece, you'll be able to add it to you project and apply to the required video fragment.
  • In VSDC Pro version, you'll use a Voice Over software feature. That means, the voice recording is carried out along with the video preview in one and the same window. It allows for adding audio comments at required parts of the movie easier and more precisely.

Method #1. How to use VSDC as a free voice over software

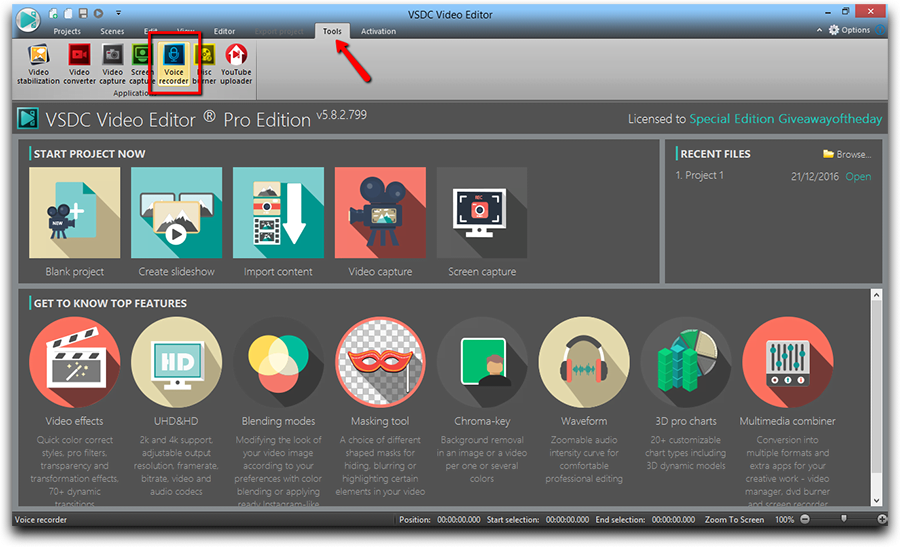
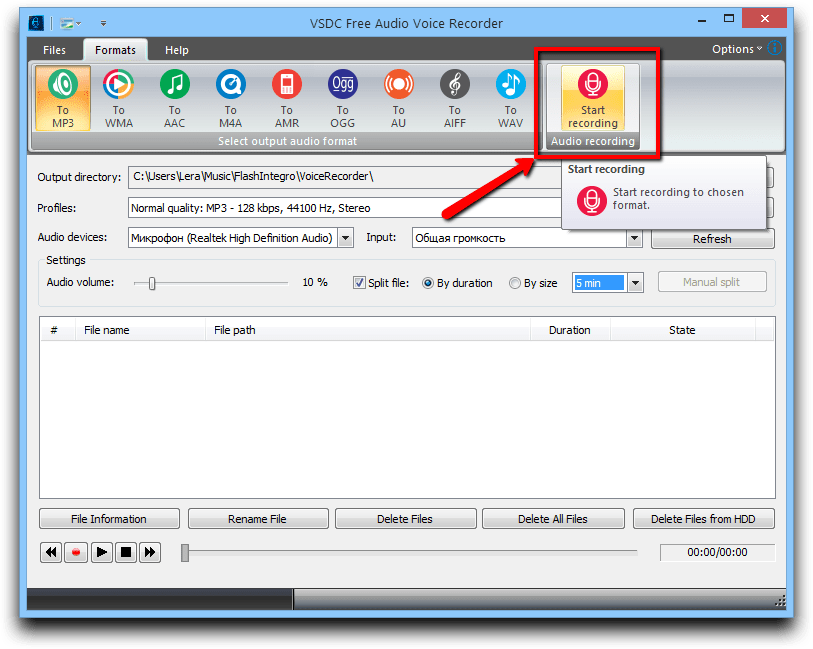
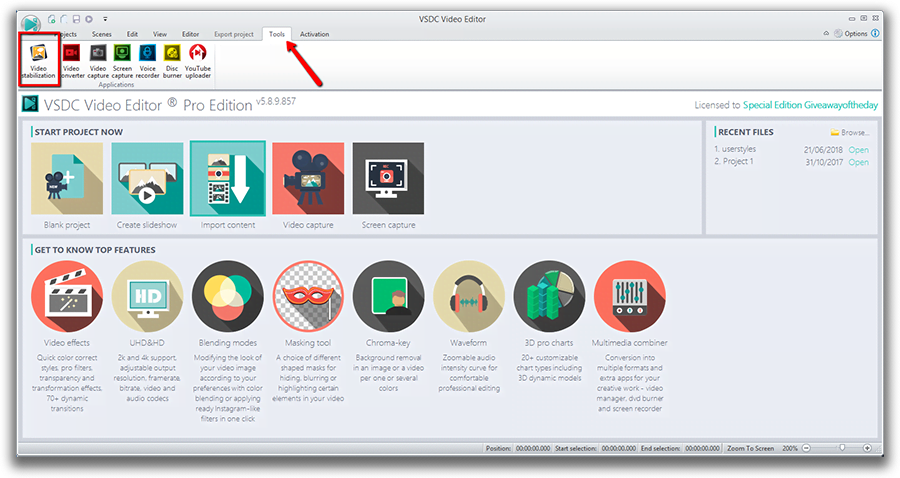
  • Open the editor, go to the ‘Tool’ tab and select ‘Voice Recorder’

    The embedded Voice Recorder is located in the 'Tool' tab

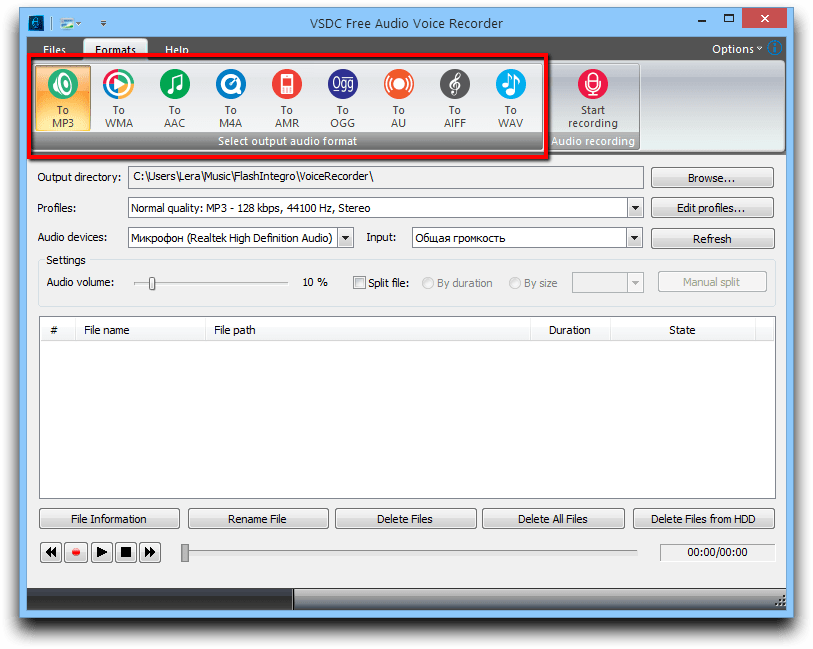
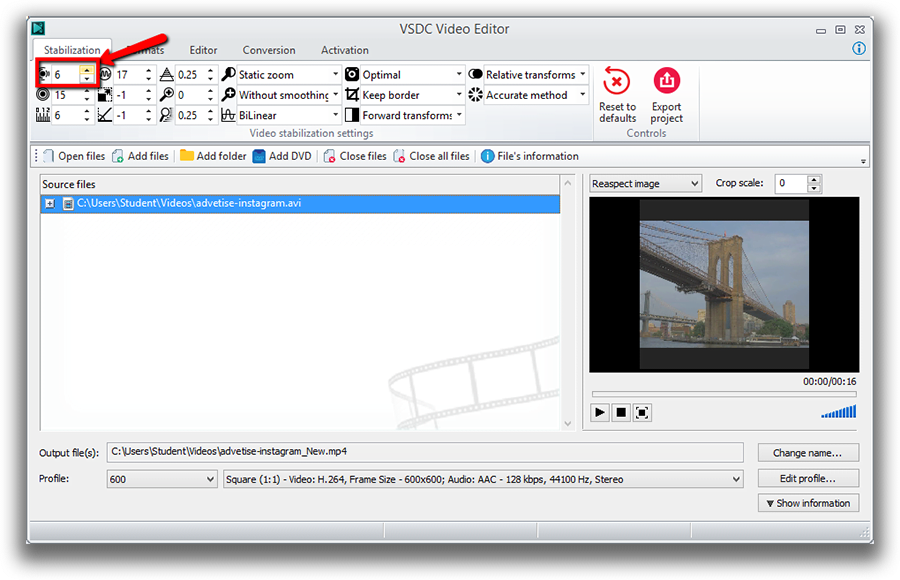
  • If you need the audio to be recorded in a prticular format, first you should choose it. VSDC voice recorded offers a lot of popular audio formats such as MP3, AAC, WAV and etc.

    There are plenty of available audio formats such as MP3, AAC, WAV and etc

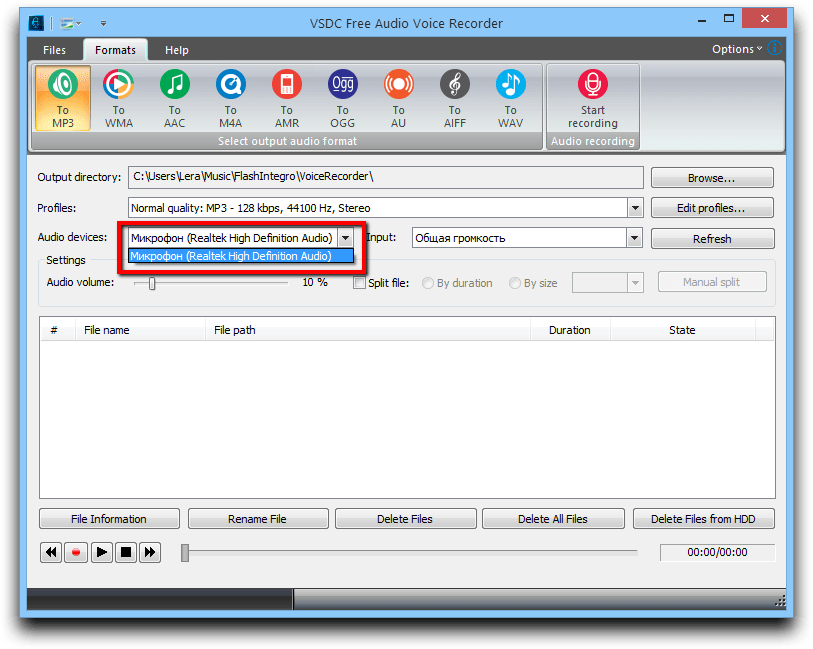
  • Second, select the audio device you're going to use for recording.

    Select an appropriate audio device for recording

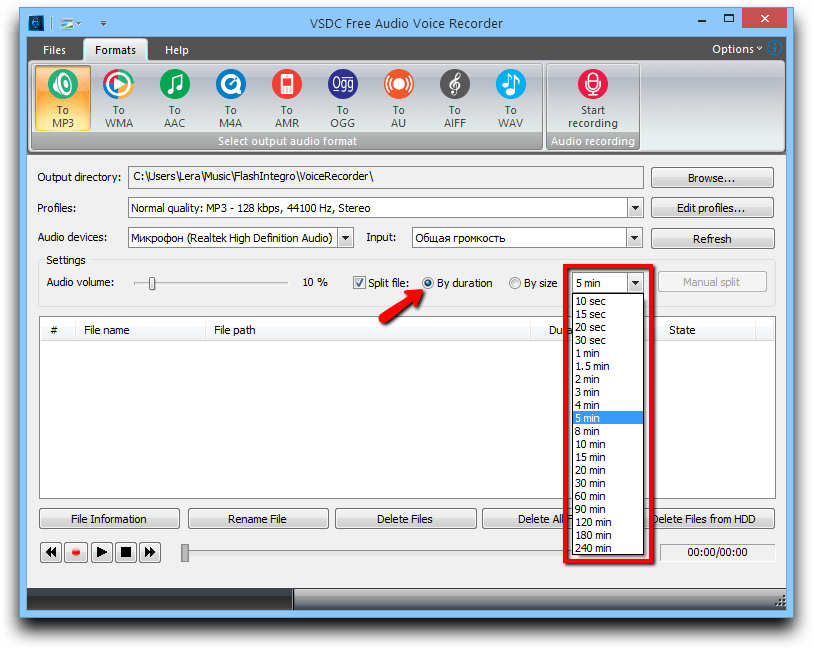
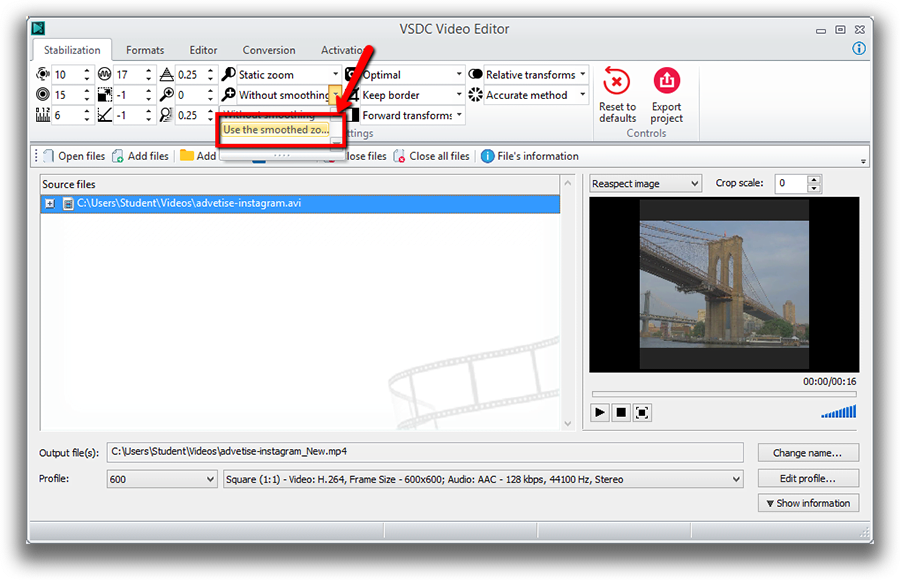
  • If necessary, you can check the option to split your recordings by their duration or by size.

    This option splits your recording by its duration or by size automatically

  • To start recording your voice, click the corresponding button.

    The corresponding button that starts recording is here

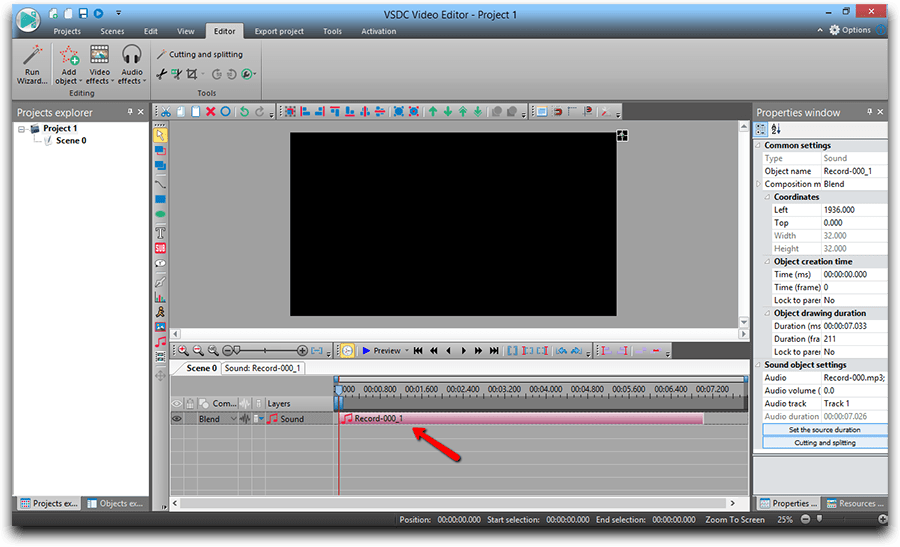
  • When your voice comments are ready, go to your project and add the audio files to the timeline - precisely where it needs to be added.

    Add recorded audio files to the project

Method #2 How to use VSDC Pro as a more advanced voice over software

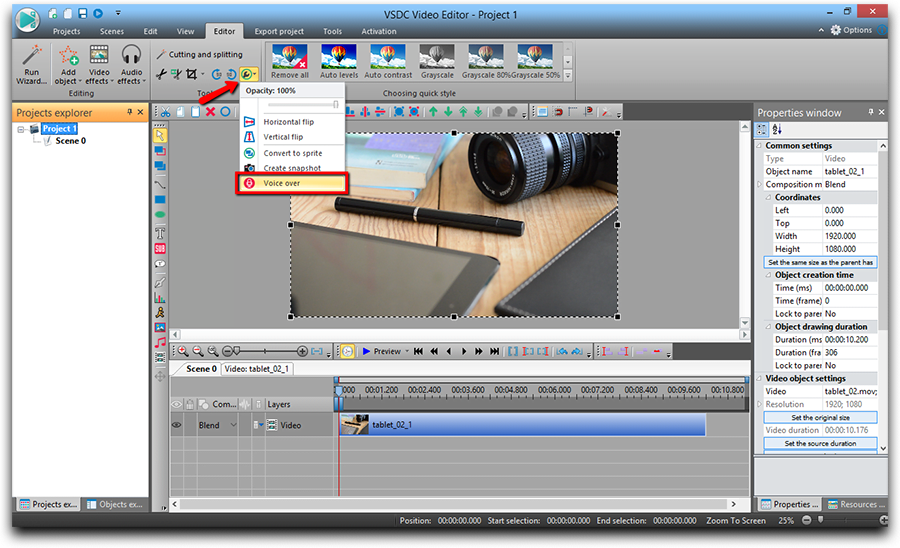
  • Add your video where you want to add your voice.
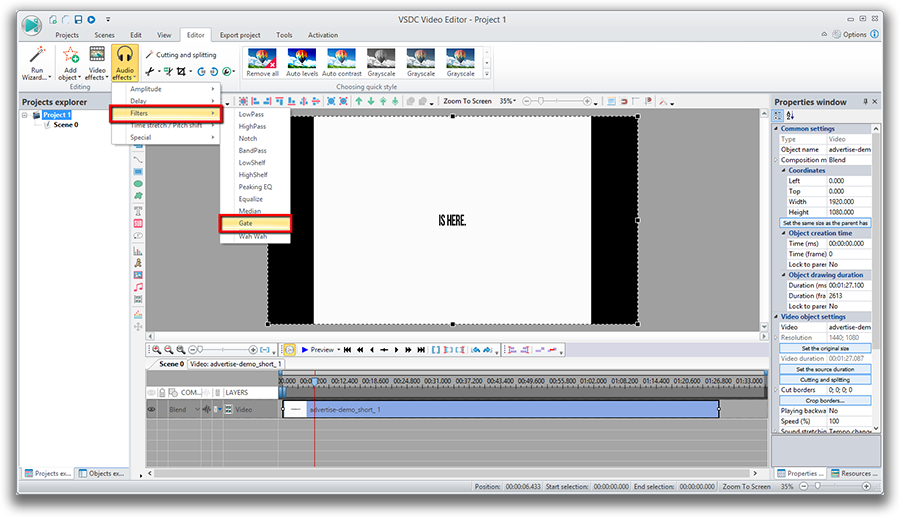
  • Click the ‘More Tool’ button on the panel above the scene and select ‘Voice Over’.

    'Voice Over' can be found in the 'More Tool' menu on the panel above the scene

  • Preview the video and decide where you’d like to add your comments.
  • Move the cursor to the moment of the video where the recording is supposed to start.
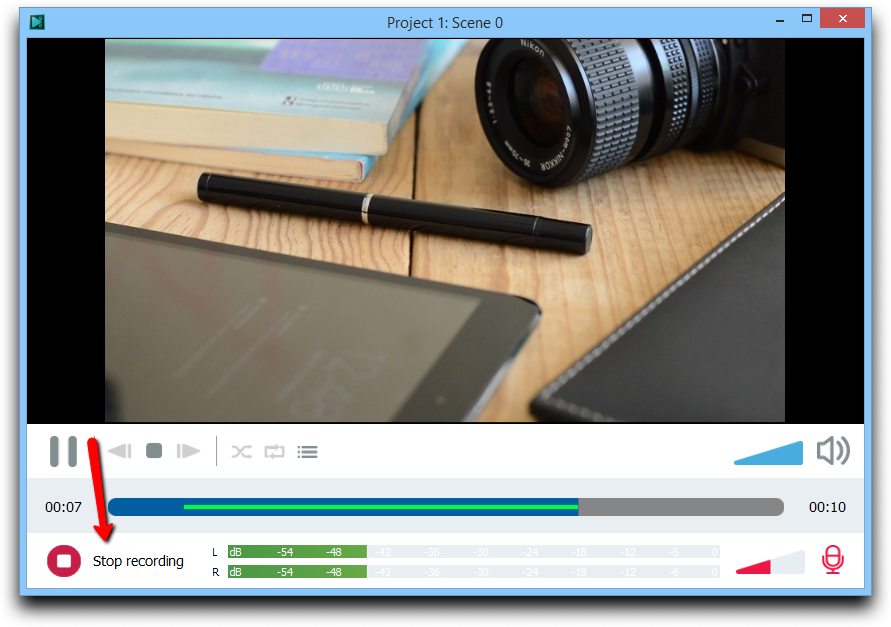
  • Click the ‘Start Recording’ button.

    Click the ‘Start Recording’ button to record your voice

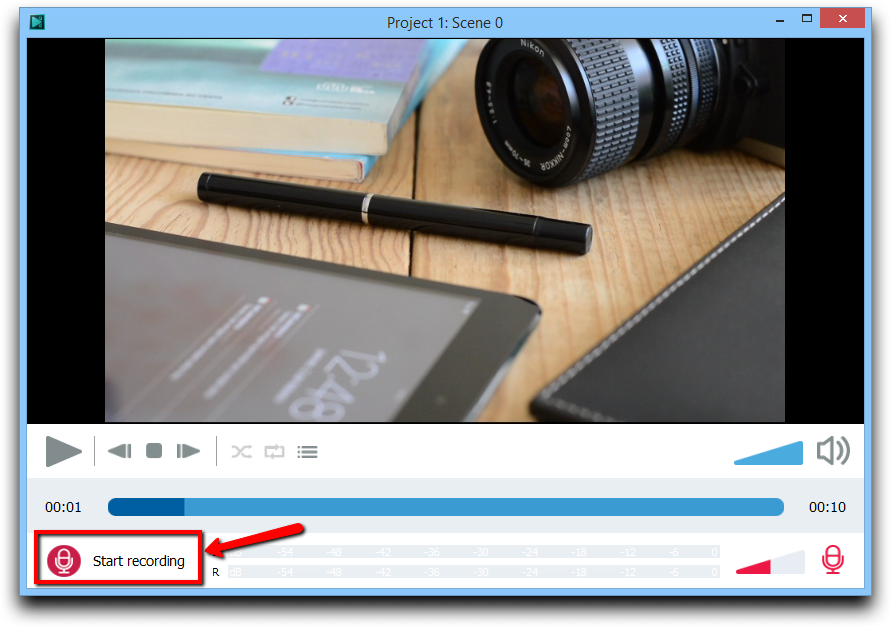
  • Record your voice using the microphone.
  • At the end of recording click ‘Stop recording’.

    To finish your commentary click ‘Stop recording’

  • Click on the ‘Playlist’ button to see the list of recordings.

    The 'Playlist' button shows the list of recordings

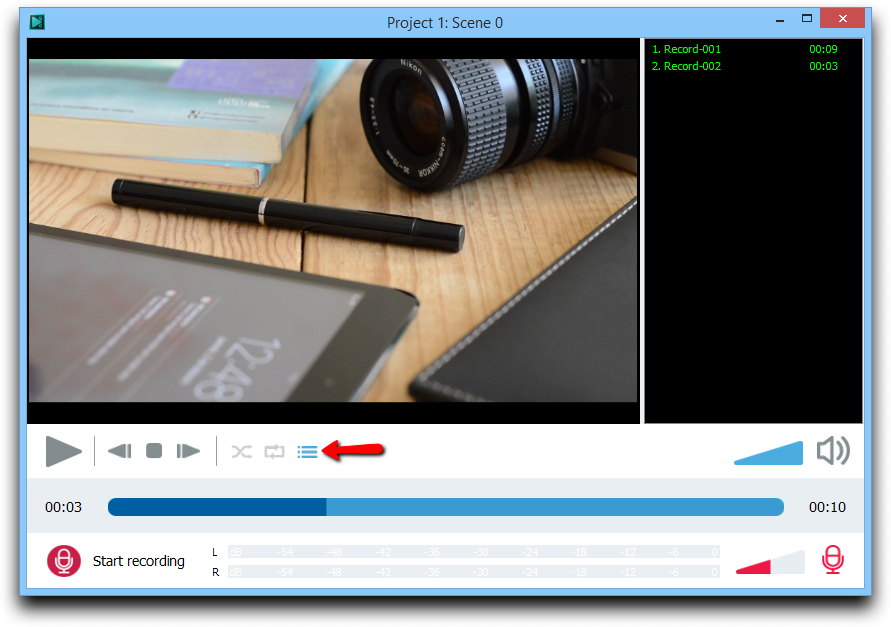
  • Close the voice over window.
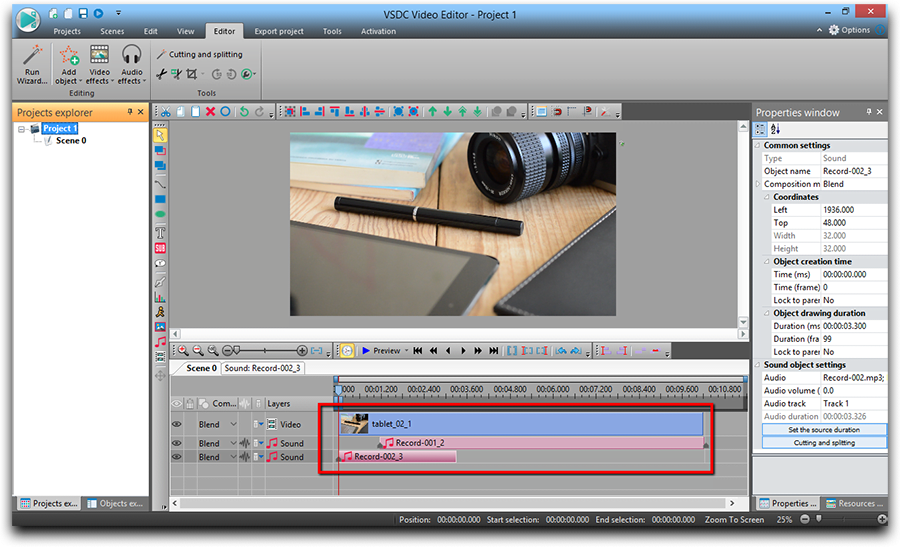
  • Your recording will appear on the timeline automatically.

    Your recording will appear on the timeline automatically

Even though both ways help you get the job done, VSDC Pro version makes a more precise voice over software, saving your time and effort. So, if audio recording is not a one time job, but rather a regular task you 'll have to deal with frequently, you should probably consider it as a more convenient tool.

If you're looking for using voice over software in your video production process, you can also check out our YouTube channel to see how quickly and easily you can utilize VSDC for that purpose.


You can get more information about the program on Free Video Editor' description page.


How to Reduce Audio Noise with VSDC Free Video Editor

Sometimes footage may sound “noisy” simply because there were too many background sounds when you were recording it. Don’t rush to hit the “Delete” button, though. In most cases, you can easily fix it.

In this instruction, we’ll show you how to reduce audio noise from your recording using VSDC Free Video Editor. If you don’t have the tool yet, you can download it from the official page.

VSDC Free Video Editor provides two powerful Audio Denoise filters: Median filter and Audio gate.

Audio gate is one of the most commonly used techniques in audio production post-processing. This filter comes in especially handy when you work with live recordings trying to remove the unwanted sounds between passages, because it is so efficient at recognizing steady noise sources – such as rumble, hiss, and hum – and reducing them to the minimum.

Technically, when you apply Audio gating, you control when and to what degree audio passes through a channel. In other words, you create a gate to filter the sounds in the video.

Audio Gate feature

You may want to apply gating for three reasons:

  1. To reduce the unwanted external sounds
  2. To reduce some natural channel noise
  3. To use Audio gate as a special effect

Here is how it works. Gates are controlled by setting several parameters:

  • Threshold. Decibel level in which the gate opens or closes. The higher the threshold, the louder the sound (stronger the signal) must be to open the gate.

    Threshold settings

  • Attack. Controls the speed of the gate opening and consider very fast attack time for percussive instruments. Slower times (10 ms or more) for everything else.

    Attack settings

  • Release. The release time is key to a natural sounding audio decay. For noise elimination with an electric guitar, set the parameter much higher.

    Release settings

  • Reduction. Sets the amount of signal reduction.

    Reduction settings

  • Ratio. It determines how much compression is applied. For example, if the ratio is set to 4:1, every 4dB of signal that crosses the threshold will be compressed down to 1dB.

    Ratio settings

  • Knee. Determines how the compressor responds once the signal crosses the threshold. A hard knee clamps down right away, while a soft knee causes the compressor to gradually kick in as the signal gets further past the threshold.

    Knee settings

  • Make-up gain. A control that raises the level of the signal, once it has been processed, to the desired level for the next stage of the signal.

    Make-up gain settings

Now that we’ve walked through the process of applying Audio gate, let’s take a look at how Median filter works.

Median filter helps you eliminate impulse noise in your footage. In a nutshell, this can be ideal for removing unwanted, frequent sharp sounds like clicks and pops.

Median Denoise filter

  • FFT block size. FFT (Fast Fourier Transform) is an important measurement method which converts a signal into individual spectral components and thereby provides frequency information about the signal.

    FFT block size parameter

  • Window type. There are several different types of windows used to reduce spectral leakage when performing a Fourier Transform on time data and converting it into the frequency domain.

    Window type parameter

  • Overlap mode. The setting determines what percentage of the FFT size block of data points is re-used for the next trace. Overlap processing can be used to provide high resolution in both the frequency and time axis.

    Overlap mode parameter

  • Overlap coefficient. High overlap percentages and low FFT block sizes provide the highest time resolution but take longer to process the data file.

    Overlap coefficient parameter

Hopefully, this was helpful. Even though it may sound (or look) overwhelming, once you start – you’ll see how fast and easy audio noise reduction really is. Now go and try it yourself!

To download VSDC Free Video Editor, please, proceed here - www.videosoftdev.com/free-video-editor/download.

Find more awesome tutorials on our YouTube channel - www.youtube.com/user/FlashIntegro/videos.


You can get more information about the program on Free Video Editor' description page.


Come usare il visualizzatore spettrale in editor video VSDC gratis

Una delle richieste più popolari sul canale su YouTube di VSDC è stata il visualizzatore audio spettrale. È uno strumento utile che vi aiuta di animare la vostra colonna sonora e potete usarlo per i video dei testi di una canzone, la vostra radiotrasmissione online o qualsiasi altro progetto legato alla musica.

Ora alcuni anni sono passati fin a quando abbiamo aggiunto lo spettro audio al set degli strumenti di VSDC ed ecco qui che cosa sarete capaci di fare:

  • Creare uno spettro audio lineare
  • Creare la visualizzazione audio astratto
  • Creare uno spettro audio circolare

E perché VSDC è un editor video ricco di funzionalità, sarete capaci di aggiungere i titoli, il testo di canzone e gli effetti stilosi come le gocce d’acqua e gli occhiali appannati. Più ci sono più di 500 preimpostazioni fantastiche disponibili per il visualizzatore audio di VSDC. Sarete capaci di creare un video musicale unico e personalizzare l’animazione ai vostri bisogni.

Scaricare VSDC editor video gratis

In questo post troverete una guida come usare il visualizzatore dello spettro audio e creare la vostra animazione sonora. Rimanete sintonizzati!

Come usare visualizzatore audio spettrale in VSDC

Per creare uno spettro audio basilare, seguite i passi sotto.

  1. Importate il vostro file a VSDC. Può essere un file video con il suono o un file audio separato.
  2. Nella barra degli strumenti a sinistra trovate l’icona Visualizzazione audio e fate un clic (guardate l’immagine sotto). Poi scegliete Spettro.Spectrum
  3. Ora volete visualizzare la traccia audio del vostro file video? Se è così, solo chiudete la finestra di Explorer che spunterà quando scegliete lo Spettro. La usereste se voleste visualizzare la traccia sonora esterna situata sul vostro computer. Arriviamo a questo più tardi.
  4. Nella finestra prossima, sarete chiamati della posizione dell’oggetto. Decidete se volete che lo spettro apparisca dall’inizio del video o dalla posizione del cursore (se non è postato all’inizio del video), poi fate un clic su Ok.
  5. Fate un clic sulla scena e trascinate il mouse quando tenete il pulsante sinistro premuto al posto dello spettro audio sulla scena. Potete muoverlo e ridimensionarlo in qualsiasi momento.audio spectrum on the scene
  6. Poi aprite la tabella Finestra proprietà a destra della tastiera, scorrete fino alle Impostazioni dell’oggetto audio e scegliete Risorse -> Oggetto nella scena. Se non potete trovare la Finestra proprietà, fate un clic destro sull’oggetto dello spettro audio e scegliete Proprietà.
  7. Finalmente nel campo Audio situato sotto scegliete il file da quale volete visualizzare il suono. Ad esempio, se è il suono dal video, il nome del file video si presenterà dal menù a discesa.

Quando avete fatto queste azioni, usate il pulsante Anteprima per vedere come il visualizzatore dello spettro audio sarà durante la riproduzione. Notate che lo stile e i colori predefiniti sono già pre-configurati. Sotto vi mostreremo come trasformare il vostro spettro audio in un circolo o un’astrazione. Più parleremo come cambiare lo stile e i colori dello spettro.

Come creare uno spettro audio circolare

Ora sapete come creare uno spettro audio basilare, aggiungiamo una svolta. Diciamo, volete trasformarlo in un circolo. Ecco qui come farlo:

  1. Seguite i passi 1-7 per creare un visualizzatore dello spettro audio lineare.
  2. Assicuratevi che l’oggetto dello spettro è ancora scelto nella scena e andate al menù Effetti video. Scegliete Effetti di trasformazione - Distorcere.
  3. Nella finestra Proprietà troverete il menù a discesa intitolato Tipo e scegliete i Coordinati polari.

Quando create uno spettro audio circolare, sarete capaci di cambiare la sua dimensione, l’angolo e altro ancora! Offriamo di guardare il tutorial video sotto per vedere le opzioni disponibili.

Come cambiare lo stile e i colori del visualizzatore audio

Per modificare lo spettro se è lineare o circolare, tornate alla Finestra proprietà con le impostazioni dello spettro audio. Se non potete trovarlo, fate un clic destro sull’oggetto dello spettro e scegliete Proprietà, poi seguite questi passi:

  1. Trovate il menù le Impostazioni dell’oggetto dello spettro audio.
  2. Regolate i tipo del vostro petto scegliendo tra i picchi del gradiente, i trattini, le linee e le linee con la sfocatura.
  3. Cambiate il tema del colore facendo un clic sull’icona con tre punti («…») o lo strumento di contagocce davanti a ogni colore.
  4. Notate che potete anche cambiare il livello dell’opacità facendo un doppio clic sui colori iniziali, medi e finali. Quando il livello dell’opacità è basso, lo spettro audio è più trasparente.
  5. Usate il pulsante Anteprima per vedere come i cambi sono applicati.

visualize the sound from

Come creare il visualizzatore audio con lo stile dell’astrazione

Oltre lo spettro c’è un modo secondo per visualizzare l’onda del suono. È chiamato Astrazione audio. Per creare questo oggetto ripetete passi 1-5 dall’inizio di questo articolo. L’unica differenza è quando fate un clic sull’icona Visualizzazione audio al lato sinistro della barra degli strumenti, scegliete Astrazione audio. Non dimenticate di scegliere la fonte d’audio nella finestra di Proprietà a destra e poi regolate la dimensione dell’oggetto secondo i vostri bisogni.

select the audio source

Come usare il creatore dello spettro audio per visualizzare la traccia audio da terza parte

Per ora abbiamo mostrato come visualizzare i suoni dal file video caricato (o audio) sulla vostra cronologia. Però forse volete creare uno spettro per la traccia audio da terza parte e aggiungerla al vostro clip. Potete fare anche questo ed ecco come.

Quando fate un clic dell’icona Visualizzazione audio e scegliete l’opzione richiesta - Spettro o Astrazione audio - usate l’esploratore che spunterà per scegliere l’audio sul vostro computer che vorreste visualizzare. Poi postate casella dello spettro nella scena usando il mouse e la estendete alla dimensione desiderata.

Per lo spettro potete scegliere l’animazione come è descritto sopra. Per l’astrazione ci sono centinaia di preset disponibili. Per provarli passate alla finestra Proprietà e scorrete fino alle Impostazioni dell’astrazione dell’oggetto audio. Troverete i preset e i gruppi di preset come è illustrato sotto.

Audio abstraction

Ora andate avanti e provate il visualizzatore audio nuovo gratuito in VSDC!

Qui ci sono 3 manuali che sicuramente attirano il vostro interesso:

Come creare una maschera di testo in 3 minuti o meno

Come rimuovere lo sfondo del video rapidamente

Come ritagliare le frontiere del video

Trovate più manuali fantastici al nostro canale su YouTube.


You can get more information about the program on Free Video Editor description page.

How to Stabilize Video in VSDC Video Editor – Guide on Setting Up the Best Parameters

So, you got a shaky footage, and now you’re looking for the way to fix it? You’re on the right page then. Watch this guide and read the instruction below to see how to quickly stabilize your video using VSDC Video Editor.

Truth be told, most videos shot on the go without special equipment (camera stabilizer mount) come out shaky – just in a varying degree. That happens when you’re holding a camera and your hands start making sporadic movements, or when it’s attached to a drone or a vehicle so that you’re shooting and moving at the same time. Yes, action camera owners, that is especially relevant for you.

Gladly, there is a way to easily remove jittering and achieve a perfectly stable image in the process of post-production. In fact, the Video Stabilization tool is among the most demanded features of VSDC video editing suite. And if you’re curious about how it works, the secret is in the ability to shift video frames. It allows for excluding the shaky effect while any gaps created in the process are being filled with the information from the previous frames.

In our inbox, we often see questions from users on what the best stabilization settings are. So, we decided to address this in a separate tutorial. Below, you’ll see a guide compiled with help one of our dear users who submitted the parameters that worked best for his footage. After being tested, they appeared to be efficient for most shaky videos, so we’re happy to share the secret setup with you.

The parameters used in this tutorial are 'Shakiness' and 'Smooth zoom'. Here is a step-by-step breakdown of the process:

Open VSDC Video Editor and proceed to ‘Tools’. Select ‘Video stabilization’.

Find 'Video stabilization' among available tools

Click ‘Open file’ to add the footage you’re willing to stabilize.

Click Open file to add shaky footage

Find ‘Shakiness’ among available settings. This parameter detects how shaky a video is and how quickly your camera changes positions and takes control of these movements. Set the Shakiness rate to the maximum using the arrows.

Set the Shakiness rate to the maximum

Once you’ve done that, find the ‘Smooth zoom’ dropdown menu in the upper toolbar. This setting allows you for smoothly zooming in the footage.

Select 'Use the smoothed zoom' as shown on the screenshot below.

Select 'Use the smoothed zoom' for smoothly zooming in the footage

After performing these actions, you should get a stabilized video, no matter how shaky the original was. So, if there is nothing else you’d like to change in it, just proceed to the ‘Formats’ tab and choose the most appropriate output format. Remember that in VSDC, you can change export profile settings – format, codec, resolution, quality, width, and height - when necessary. If this is the case, click on the “Edit profile” button at the bottom right corner.

A wide range of output formats is available at the 'Format' tab

Once you’re done, click on the red ‘Export project’ sign.

To download VSDC Free Video Editor, please, proceed here - http://www.videosoftdev.com/free-video-editor/download

To subscribe for VSDC Pro annual license, please, place your order.

Got any questions? Drop us a line at Questo indirizzo email è protetto dagli spambots. È necessario abilitare JavaScript per vederlo. or send us a message via Facebook!

Find more awesome tutorials on our YouTube channel - https://www.youtube.com/user/FlashIntegro/videos


You can get more information about the program on Free Video Editor' description page.


VSDC Troubleshooting | Frequent Questions About the Performance - Answered

 Troubleshooting VSDC PRO

The program suddenly freezes or crashes, please send us a bug report

Contact us at Questo indirizzo email è protetto dagli spambots. È necessario abilitare JavaScript per vederlo. and tell what email address you used so that our developers can examine it.

I get the “Settings are invalid” error message when I try to use Screen Capture or Video Capture

Please install the MPEG4 codec for your OS manually and try again. You can find the codec here.

I fail to open an existing project

Please have a look at our tutorial how to open a backup copy of a project.

I experience lagging during the preview

Sometimes a preview window may lag. Lagging is resulted from the fact that the editor is processing all changes made. It doesn’t affect the resulted video. Please, watch our tutorial how you can change the preview quality - ‘How to change preview settings in VSDC Free Video Editor’. You can preview a video on the timeline using arrow keys.

I came across ‘Can’t transmit data’ error or after accepting the key the program is still free version

Please disable your firewall, run the program as administrator and try to insert your activation key again.

I face an error trying to import a GoPro video

Please, download codec CineForm for your system and try again.

My file doesn’t seem to be supported

Please try to add a file using the ‘Import Content’ option in the main menu.

 'Import content' button

If you select a hardware accelerated profile and get an error

Please, make sure that your graphics card is powerful enough for export with hardware acceleration, it should be at least Nvidia GeForce GTX 950.

I can’t add ‘Audio abstraction' because the option is disabled.

Please, download the file - support.microsoft.com/en-us/help/4019990/update-for-the-d3dcompiler-47-dll-component-on-windows.

I need instructions on how to get started

Find a lot of tutorials on our YouTube channel - www.youtube.com/user/FlashIntegro/videos

If you prefer text instruction, please have a look at our how-to section.

My problem wasn’t mentioned

Please, drop us a letter at Questo indirizzo email è protetto dagli spambots. È necessario abilitare JavaScript per vederlo..


You can get more information about the program on Free Video Editor' description page.


Notizie

Nuovi modi per aggiungere transizioni, supporto per i file RAW e BRAW e visualizzazione audio gratuita

È giunto il momento: siamo felici di presentarvi l'attesissimo aggiornamento VSDC 9.1! Le funzionalità migliorate della nuova versione accelereranno il montaggio video e renderanno il processo di editing...

VSDC 8.3 - Oltre 100 nuovi modelli, finestra dell'editor di chiavi, AV1 e interfaccia grafica migliorata

Benvenuti all'ultimo aggiornamento di VSDC, la versione 8.3! Abbiamo lavorato sodo e siamo pronti a presentarvi una release ricca di funzioni per farvi scoprire un'entusiasmante serie di oltre 100 nuovi...

I 5 migliori editor video gratuiti del 2023: Liberate la vostra creatività senza spendere troppo

Nel mondo digitale di oggi la creatività regna sovrana. Offre infinite possibilità a individui e marchi di catturare il pubblico e lasciare un'impressione duratura. Con le piattaforme dei social media...

Migliori editor video online 2023: vantaggi e svantaggi

Oggi la popolarità dei contenuti video sta guadagnando terreno e molti utenti si trovano a dover creare video per scopi sia personali che professionali. Nella scelta di un editor video adatto tra le varie...

VSDC 8.2 - Supporto per file proxy, fotogrammi chiave e vettorscopio

Siamo entusiasti di svelare l'atteso aggiornamento 8.2 dell'editor video VSDC. Il nostro team ha lavorato intensamente per garantire che questa versione sia ricca di funzionalità emozionanti e miglioramenti...
 

Screen Recorder gratis

Con questo programma è possibile registrare i video dal desktop e salvarli sul computer in diversi formati. Insieme al video editor è ideale per creare presentazioni e demo.

Read more about Screen Recorder...


VSDC Free Video Capture programma

Il programma serve per catturare video da dispositivi esterni e e per registrarli sul computer in qualsiasi formato video. Potete salvare il video da sintonizzatori video, webcam, schede di acquisizione e vari dispositivi.

Read more about Video Capture...


Reviewed by


"VSDC Free Video Editor is a surprisingly powerful, if unconventional video editor"

- PC Advisor


"This video editor gives you tons of control and editing power"

- CNet


"The editor handles many common formats and boasts a good deal of capabilities when it comes time to alter lighting, splice video, and apply filters and transitions in post production"

- Digital Trends