Editor Video
L'editor video consente di modificare file e creare video di qualsiasi complessità. Potete applicare effetti video e audio effects ad oggetti modificati, trasformarli, applicare filtri e correzioni d'immagini. Tutti i popolari formati video e audio sono supportati (sia lettura che salvataggio).
Convertitore Video
Questo programma serve a convertire video file da un formato ad un altro. Quasi tutti i popolari formati video sono supportati. Inoltre, il programma semplifica drasticamente il compito di convertire video da riprodurre su determinati dispositivi multimedia quali iPhone, Microsoft Zune oppure Archos. Il programma è semplicissimo da usare, dispone di una moderna interfaccia e di tutte le necessarie funzioni per processare i video.
Convertitore Audio
Il convertitore audio vi aiuterà a convertire file audio da un formato ad un altro. Tutti i formati audio e codec chiavi sono supportati. Il programma vi consente inoltre di gestire playlist e meta tags, di estrarre audio dai file video e di salvare queste tracce sul vostro computer in qualsiasi formato.
Audiograbber
Questo strumento audio serve a catturare tracce audio dai CD e di salvarle nel computer dell'utente in qualsiasi formato. Quasi tutti i popolari formati e codec sono supportati. Il programma è inoltre in grado di estrarre dettagli di tracce dal server FreeDB al fine di rinominare automaticamente il file e di aggiornare i meta tag.
Editor Video
Convertitore Video
Convertitore Audio
Audiograbber

Versatilità
Più strumenti contemporaneamente per elaborare file video e audio in una singola applicazione.

Alta velocità
I nostri programmi
impiegano rapidi algoritmi di alta qualità per processori singoli a multipli.

Accessibilità
I nostri prodotti sono disponibili per essere scaricati gratuitamente su tutti i computer e dispositivi che supportano i sistemi operativi Windows.
- published Amy Shao 6/10/25 L'attesa per qualcosa di nuovo e straordinario è ...
- Questa stagione festiva inaugura nuovi inizi con l'ultimo aggiornamento di VSDC ...
- Il cambiamento è sinonimo di miglioramento, e questo processo non sarebbe possib...
- Introduzione Nel 2024 la gamma di opzioni per creare effetti visivi è incredib...
VSDC rilascia Chroma Key avanzato - qui come usarlo
La versione nuova di VSDC porta qualche sorpresa e il set di strumenti di Chroma Key aggiornato è una di loro. Non possiamo essere più contenti con il modo con quale è uscito e siamo sicuri che anche a voi piacerà. La precisione di chroma key e la qualità del risultato è solo eccezionale, anche se vi non piaceva eliminare gli sfondi prima, probabilmente tutto cambierà quando vedete come funziona.
Suggeriamo di cominciare con questo tutorial video dello spazio di colore HSL - la funzione più eccitante nel set di Chroma Key. Poi potete leggere le istruzioni che coprono il resto delle proprietà della rimozione di sfondo.
Se non avete già scaricato VSDC 6.6 potete farlo qui.
VSDC Come applicare Chroma Key in VSDC
Per cominciare importate il vostro filmato a VSDC, poi aprite il menù Effetti video e scegliete Trasparenza - Rimozione di sfondo. La finestra Impostazioni della posizione dell’oggetto spunterà per indicare il punto dove l’effetto di Chroma key deve essere applicato al filmato. Automaticamente l’effetto è applicato dalla posizione del cursore alla parte restante del file; se volete cambiarlo - scegliete l’opzione desiderata e fate un clic su OK.
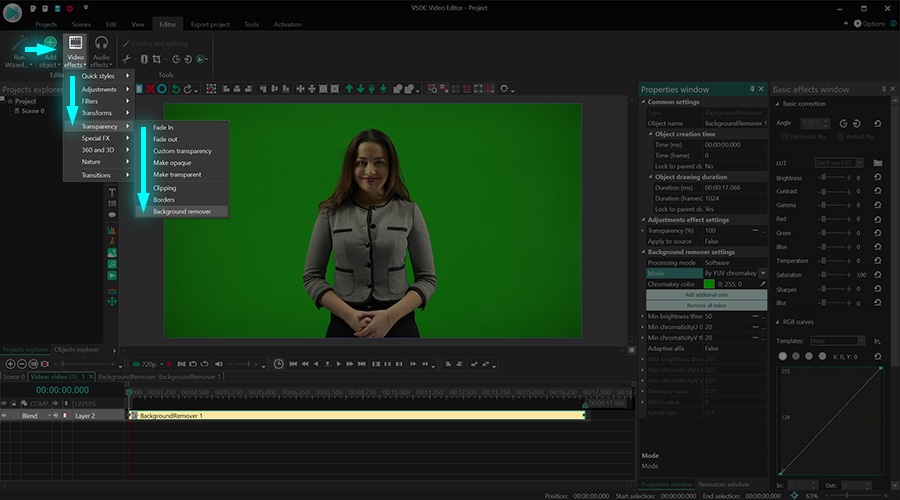
Notate che quando applicate l’effetto sarete portati alla tabella diversa sulla cronologia dove lo strato dell’effetto è situato. La finestra Proprietà scivolerà dal lato destro - dove le impostazioni di Chroma Key sono situate. Se non potete trovare la finestra Proprietà fate un clic destro sullo strato dell’effetto e scegliete Proprietà dal menù contestuale.
La finestra Proprietà contiene tre gruppi delle impostazioni:
- Impostazioni comuni.
- Impostazioni per regolare effetto.
- Impostazioni della rimozione dello sfondo.
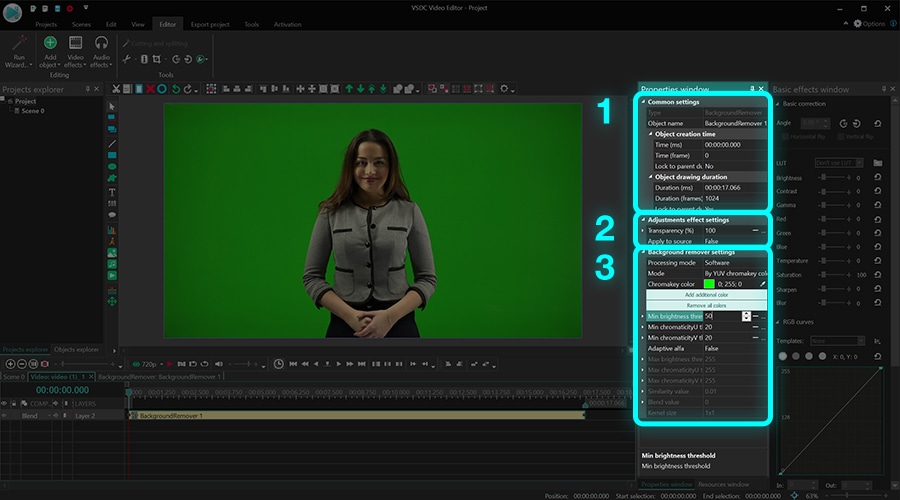
Le impostazioni comuni vi permettono di aggiungere un titolo allo strato dell’effetto, cambiare il movimento quando l’effetto apparisce nel video (da secondi e da fotogrammi) e la durata dell’effetto (in secondi o in fotogrammi).
Impostazioni per regolare effetto vi permettono di mettere il livello della trasparenza per l’inizio e la fine dell’effetto. Questo significa che potete mettere il valore della trasparenza costante per l’effetto di Chroma Key o potete farlo gradualmente crescere/diminuire nel corso del tempo. Per mettere il cambio graduale del livello della trasparenza, userete il Valore iniziale e il Valore finale. Tenete a mente che 100% significa la trasparenza completa e 0% significa non c’è trasparenza.
Ad esempio, ecco qui come sarà l’effetto di Chroma Key se mettete il valore iniziale a 100% e il valore finale a 10%.
Inoltre noterete che molti parametri di Chroma Key forniscono anche con l’opzione di mettere il Valore iniziale e il Valore finale. Questo significa che se volete mettere un effetto di rimozione dello sfondo dinamico, potete fare anche questo. La funzione arriva specialmente utile se il tono o il colore dello sfondo cambia durante la riproduzione.
Notate che la linea seconda in questo gruppo delle impostazioni è intitolata Applicare alla fonte. «Applicare alla fonte» significa che i cambi saranno applicati direttamente al file originale che avete caricato - alias la fonte. Automaticamente questa opzione è disattivata per accelerare il rendering. Se è disattivata, il software applica l’effetto di Chroma Key a una copia ridimensionata del video. Però dovete capire che a volte il ridimensionamento può portare alla corruzione dell’immagine minore - specialmente se il file originale non è della qualità alta. Per questo raccomandiamo sempre di usare il filmato con la qualità alta o se avete un computer potente, solo cambiate questo parametro a «Vero» e dimenticate del ridimensionamento.
L’ultimo gruppo delle impostazioni è chiamato Impostazioni della rimozione dello sfondo e vi permette di perfezionare i parametri dell’effetto di Chroma Key. Diamo un’occhiata da vicino.
Come perfezionare l’effetto di Chroma Key in VSDC
In questa parte del tutorial rivediamo i parametri fondamentali uno dopo l’altro e vi mostriamo quale è la differenza tra loro nel video.
Il primo parametro a che volete guardare è chiamato Modalità. La modalità vi permette di scegliere lo spazio del colore con che volete lavorare.
In VSDC avete tre opzioni:
- Da colore di chromakey YUV - disponibile nella versione gratis di VSDC
- Da colore di chromakey HSL - disponibile nella versione Pro di VSDC
- Da maschera di chromakey - disponibile nella versione gratis di VSDC
Le prime modalità vi permettono di lavorare nei due spazi di colori diversi: YUV e HSL. La terza modalità chiamata «Da maschera chromakey» è diversa. Vi permette di caricare un immagine a VSDC e usarlo come una maschera per eliminare tutti i colori mostrati nell’immagine dal vostro video. Parleremo più di ogni modalità in un attimo.
Se scegliete la modalità HSL potete anche cambiare la Produzione. Dovete sempre usare la modalità della produzione «Composizione» quando usate Chroma key per creare una maschera. In questo caso cambiate a «Canale alfa».
Il parametro prossimo, Colore di Chromakey, vi permette di scegliere il colore per la rimozione. Raccomandiamo sempre di usare lo strumento contagocce e scegliere il tono manualmente perché il colore verde chiaro automatico non può coincidere con il colore del vostro sfondo.
Notate che nella modalità YUV potete Aggiungere il colore aggiuntivo se avete bisogno di eliminare più di un colore dal video.
Il resto delle impostazioni della rimozione di sfondo è mostrato a base della modalità che avete scelto: YUV, HLS o «Da maschera di chromakey». Diamo un’occhiata da vicino a ogni modalità sotto.
Spazio del colore YUV
Probabilmente avete sentito dello spazio di colore RGB e il sistema di codifica. YUV è un tipo diverso del sistema di codifica che definisce uno spazio di colore in termini di tre componenti: una luminosità (Y) e due crominanze (U e V).
Quando scegliete la modalità dello spazio del colore YUV, potete cambiare i valori di questi componenti usando i parametri seguenti:
- La soglia della luminosità minima/massima (Y)
- La soglia della crominanza minima/massima (U)
- La soglia della crominanza minima/massima (V)
Questi parametri somo abbastanza auto-esplicativi e vi aiuteranno di eliminare le ombre verdi restanti dal video se ci sono alcune di loro. Ogni definisce la soglia per il suo componente. Ad esempio, i toni di colore che sono meno chiari della soglia di luminosità minima sono eliminati dal video. In modo simile la soglia della crominanza minima/massima U definisce la soglia per i toni del colore blu; la soglia della crominanza minima/massima V definisce la soglia per i toni del colore rosso.
Per visualizzare lo spazio del colore YUV in questo contesto, immaginate il cubo con tre strati dove i valori minimi formano lo strato più profondo - il cubo più piccolo rosso. I colori che cadono nello spazio del cubo rosso saranno eliminati dal video. I valori massimi formano lo strato esterno e i valori del colore che cadono in questo spazio rimarranno invariati. Finalmente i valori del colore tra il minimo e il massimo sono mostrati come uno spettro dei toni basati sull’effetto del livello della trasparenza che avete messo prima.
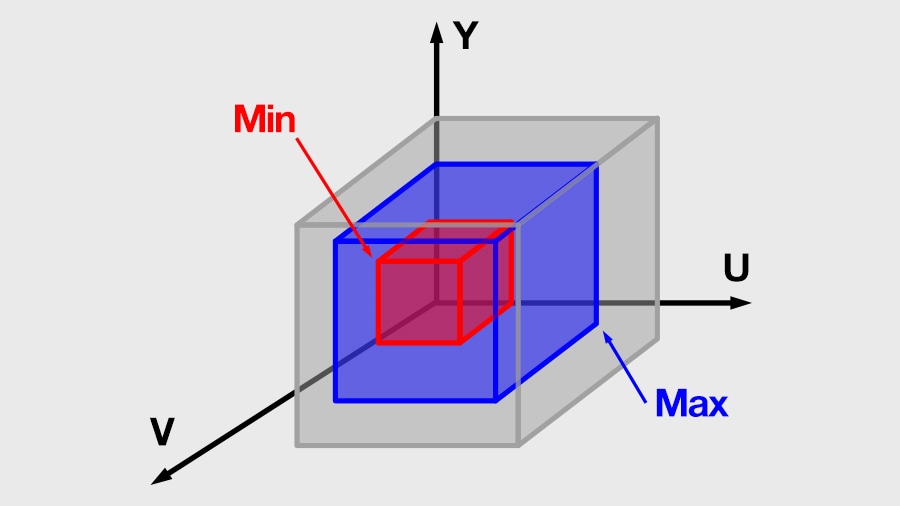
Se tutti i tre componenti (Y, U, V) sono uguali a 0, l’effetto di chroma key non sarà applicato al video. Se tutti i tre componenti sono messi al massimo. Vedrete uno schermo nero perché tutti i valori dei colori saranno eliminati.
Notate che se cambiate Alfa adattivo dal Falso a Vero attiverete i parametri aggiuntivi che vi aiuteranno di raggiungere i risultati più migliori:
- Il valore della somiglianza - questo parametro mette le deviazioni dei toni del colore possibili. Se è uguale a 0, il software eliminerà solo il tono che avete scelto con il contagocce. Se crescete il valore il software eliminerà i toni che sono vicini al tono scelto.
- Il valore di miscelazione - questo parametro vi aiuta di lisciare il confine dell’oggetto quando lo sfondo è stato eliminato. Il valore più alto causa il confine più liscio.
- Dimensione del kernel - questo parametro vi aiuta anche di fare il confine dell’oggetto più liscio. Con il valore più alto la zona del confine più grande sarà montata.
Spazio del colore HSL
HSL rappresenta Tonalità, Saturazione e Luminanza (o Luminosità). Questo spazio del colore è la funzione del livello Pro ed è più efficace per eliminare gli sondi dal video. Quando eliminate il colore dello sfondo usando il contagocce i parametri HSL vi aiuteranno di raggiungere i risultati anche più migliori. Vediamo come i suoi parametri sono diversi dalla modalità YUV.
Tonalità delta/ Tonalità delta massima - è un paio dei parametri che mettono una gamma delle variazioni dei toni di colore di chroma key basati ai loro valori della Tonalità. Il modo corretto di lavorare con questi parametri è mettere la Tonalità delta a 0 e cominciare a crescerla lentamente fino a quando vedete che la parte maggiore dello sfondo è eliminata. Poi dovete cominciare a crescere la Tonalità delta massima a un valore approssimativamente due volte più alto come la Tonalità delta quindi siete sicuri che state eliminando i colori che volete.
Luminosità delta/ Luminosità delta massima - allo stesso modo questo parametro mette una gamma delle variazioni dei toni del colore di chroma key a base dei loro valori della Luminosità.
Saturazione delta/ Saturazione delta massima mette una gamma delle variazioni dei toni del colore di chroma key a base dei loro valori della Saturazione.
Ridurre il contrasto vi permette di cambiare il livello del contrasto del colore di chroma key (che è il colore dello sfondo eliminato). È conveniente se volete vedere la differenza creata dall’effetto, però il valore di questo parametro non influenza il video risultante.
Il modo in quale Chroma Key funziona nello spazio del colore HSL è diverso dal modo in quale funziona in YUV. Essenzialmente quando applicate HLS, create una maschera escludendo il colore dello sfondo scelto e facendo questo spazio nel video trasparente. Per vedere «la maschera» cambiate Produzione a Canale alfa. La maschera sarà come un immagine in bianco e nero dove lo spazio nero è lo sfondo eliminato.
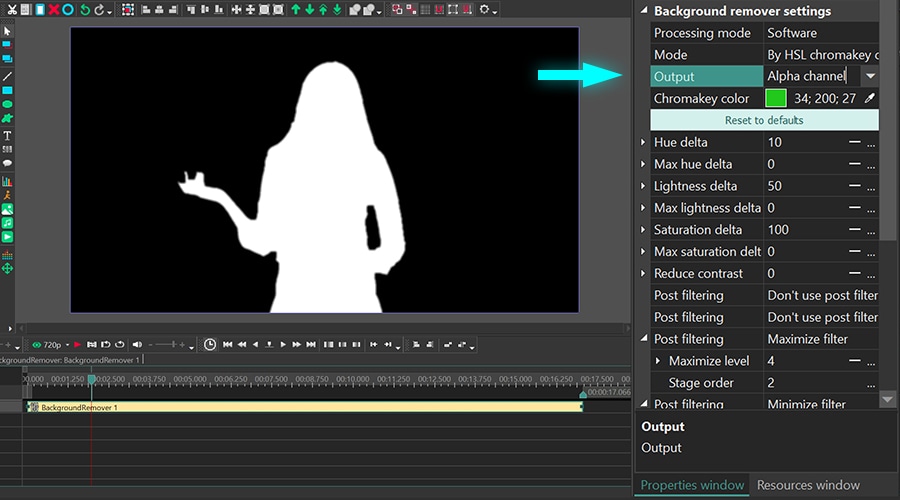
Diamo un’occhiata da vicino ai confini della maschera: spesso sono ruvidi e disomogenei. Per questo il video può sembrare poco professionale quando sostituite lo sfondo con un altro immagine e il filmato. Per sistemarlo potete applicare fino a 6 filtri di post-elaborazione progettati per lisciare il confine.
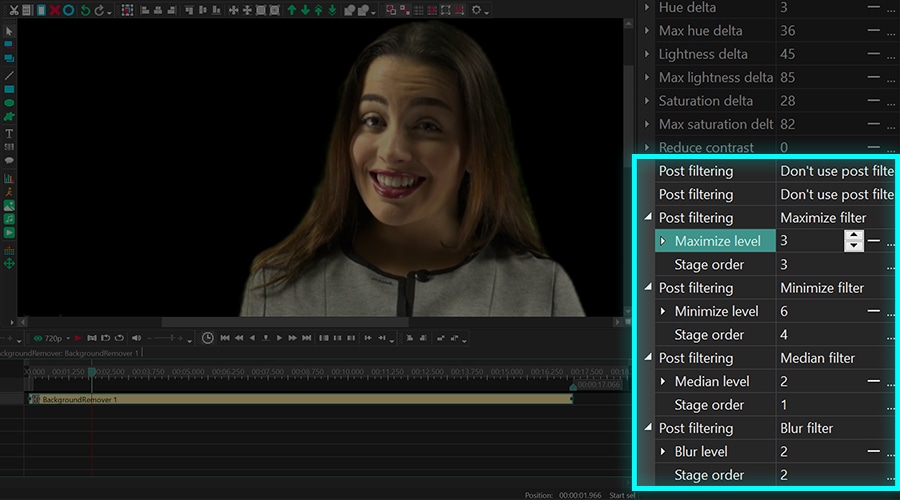
I filtri sono personalizzabili. Questo significa che potete scegliere le loro modalità manualmente a base di che cosa state cercando di raggiungere. Ecco qui sono le modalità disponibili per ogni filtro:
- Massimizzare filtro - questo filtro analizza la zona intorno ogni pixel e applica il valore massimo.
- Minimizzare filtro - questo filtro analizza la zona intorno ogni pixel e applica il valore minimo.
- Filtro mediano - questo filtro analizza la zona intorno ogni pixel e applica il valore mediano.
- Filtro di sfocatura - questo filtro applica il valore mediano ai pixel formando il confine della maschera.
Ogni filtro ha due parametri: Livello (la dimensione della zona analizzata) e l’ordine di scena (l’ordine in quale i filtri sono applicati).
Anche se tutti i filtri hanno lo stesso valore solo cambiando il loro ordine potete raggiungere i risultati drasticamente diversi:
Da maschera di chromakey
La terza modalità di Chroma Key in VSDC è chiamata «Da maschera di chromakey» ed è significativamente diversa dalle due modalità precedenti. In questa modalità caricate manualmente un immagine che contiene i colori che volete eliminare dal video; il software rileva i colori dell’immagine e li esclude.
Ecco qui come funziona:
- Andate a «Modalità della maschera di chromakey».
- Caricate una «Maschera di chromakey» - un immagine che contiene i colori che devono essere eliminati dal video.
- Ora il software confronta l’immagine e il video e elimina tutti i colori che coincidono dal video.
Quando fate questo potete andare avanti e modificare i parametri per raggiungere i risultati migliori. Alcuni parametri sono simili a quelli nella modalità YUV. Quindi diamo un’occhiata da vicino solo ai parametri unici:
Fattore del ridimensionamento della maschera - questo parametro permette di ridurre la dimensione dell’immagine caricato per accelerare l’analisi. Però dovete capire che quando l’immagine è più piccolo l’analisi sarà meno precisa e questo può influenzare la qualità della rimozione del colore.
Modalità del ridimensionamento - questo parametro vi permette di scegliere uno delle 5 modalità per ridimensionare immagine:
- Interpolazione del prossimo più vicino
- Interpolazione lineare
- Interpolazione cubica
- Interpolazione di supercampionamento
- Interpolazione di Lanczos
È ora di aggiungere uno sfondo nuovo
Qualsiasi approccio scegliete per eliminare lo sfondo dal video, la parte più eccitante è probabilmente aggiungere uno sfondo nuovo che può essere entrambi un video o un immagine. Ritornate alla tabella principale della cronologia ed usate il menù Aggiungere oggetto in alto dell’interfaccia per scegliere il file desiderato dal vostro computer. Poi manualmente postate lo sfondo nuovo uno strato sotto della maschera di chroma key come è illustrato sotto.
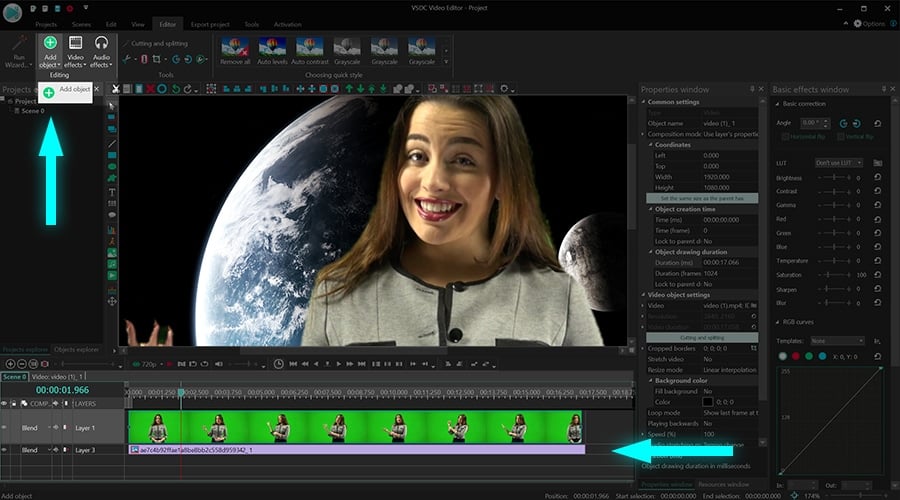
Usate la funzione dell’anteprima per assicuratevi che tutto è bello. Ricordatevi che potete ritornare alle impostazioni di Chroma Key in ogni momento se avete bisogno di fare regolazioni. Fate solo un doppio clic sul video con lo schermo verde per avere accesso allo strato dell’effetto di rimozione dello sfondo e usate la finestra Proprietà.
Andate avanti e provatelo da soli! Ricordate di iscrivervi al nostro canale su YouTube per ricevere una notifica quando pubblichiamo i tutorial video nuovi.

Con questo programma è possibile registrare i video dal desktop e salvarli sul computer in diversi formati. Insieme al video editor è ideale per creare presentazioni e demo.

Il programma serve per catturare video da dispositivi esterni e e per registrarli sul computer in qualsiasi formato video. Potete salvare il video da sintonizzatori video, webcam, schede di acquisizione e vari dispositivi.

"VSDC Free Video Editor is a surprisingly powerful, if unconventional video editor"
- PC Advisor

"This video editor gives you tons of control and editing power"
- CNet

"The editor handles many common formats and boasts a good deal of capabilities when it comes time to alter lighting, splice video, and apply filters and transitions in post production"
- Digital Trends

