 User Help Manual
  Learn FAQ
  Send us feedback
 ")


- Published by Amy Shao on June 30, 2026 Meet the new major update ...
- Published by Amy Shao on March 11, 2026 What is the best gift for...
- published Amy Shao 11/19/25 Meet the long-awaited VSDC 10.2 update: a new ve...
- Hi, I'm Mattea Wharton, a travel videographer from Seattle. For three years I ba...
How to Create the Old Film Effect in a Video
So you want to learn how to make the old film effect in a video. While we’re all familiar with the quick Instagram-style filters, to achieve a more authentic look, it’s good to know what else contributes to the vintage look of old movies.
In this tutorial, we’ll show you the color correction effects, framerate settings, overlays, and aspect ratio hacks used to achieve the old film effect. You can select just one effect or use multiple tricks on the same video. Before getting started, download VSDC, the free video editor for Windows we’ll be using in this tutorial.
5 Easy tricks to achieve the old film effect in VSDC
To get started, launch VSDC on your computer and use the Import content button to upload your footage. By using this option, you preserve the original footage properties, such as the size of the video, its aspect ratio and resolution.
1. Try pre-designed Old Film styles
If you’re here for a quick solution, the pre-designed styles are your best friends. In VSDC, there are 3 pre-designed Old Film styles. To apply them, click on the video you’ve uploaded, then open the Quick style menu at the top, and select one of the Old Film options.
To unselect a style, make another click on its icon in the menu. Keep in mind that there are more vintage-looking styles and Instagram filters in the menu, and you can apply more than one to the same video.
2. Use a vintage film look overlay
The second relatively easy way to achieve the old film effect is by using a ready-made overlay from one of the stock video marketplaces.
Overlays are videos that you blend with the main footage to achieve the desired atmosphere. They typically have a monochrome background and contain particles, flares, or other visual components such as smoke stripes or water droplets. If you want to learn more, read our brief guide to working with overlays.
Vintage film look overlays aren’t different. They may contain film dust, flashes, scratches, light leaks, letterboxes, and other “attributes” of an old movie. Here is an example of an old film overlay:
Now, if you want to try this technique on your video, go to one of the free stock video marketplaces, such as Videezy, Pexels, or Pixabay, and search for an “old film look overlay” or a “vintage film overlay”. Once you find the video to your taste, download it and drag it to the scene where your main footage is. Place the overlay above the main footage, then go to the quick access menu at the top and decrease the Opacity level of the overlay.
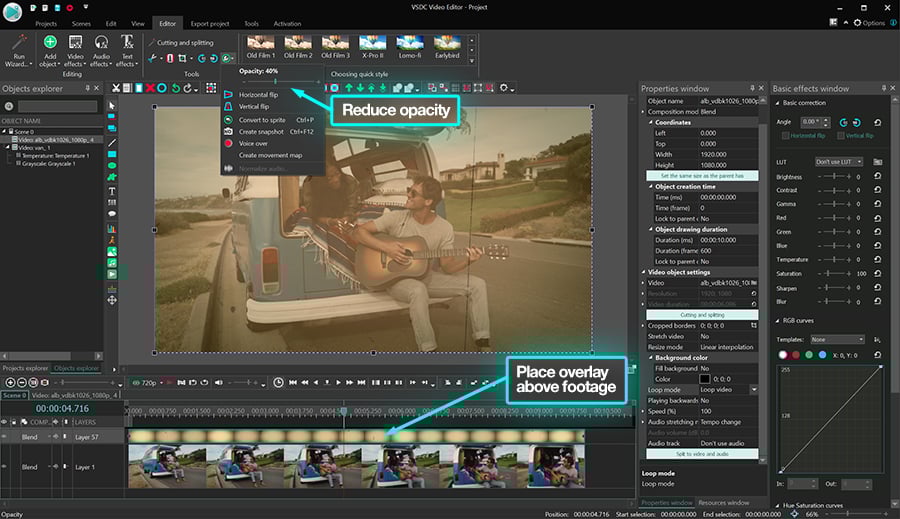
As a result, the overlay will become semi-transparent while maintaining its distinguishing color tone and the particles.
3. Add the grainy look
Ever noticed that some old movies look grainy? This effect is also easy to replicate. Once you’ve added your footage to the scene, open the Video effects menu, proceed to Filters, then select Noise.
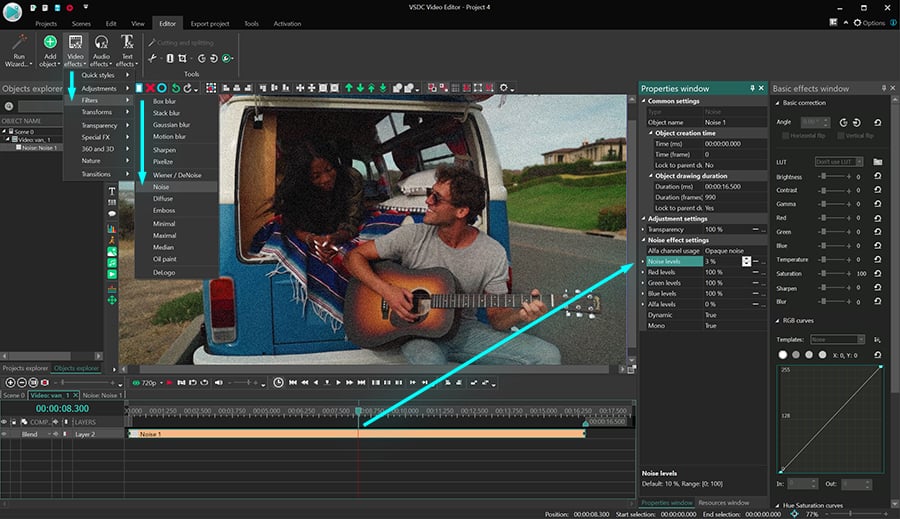
If you want to make the video look less grainy, make a right mouse-click on the filter layer and select Properties. Then use the Properties window on the right-hand side to reduce the noise and transparency levels.
4. Apply the grayscale effect
Now that we’re approaching the end of the tutorial, it’s time to talk about good old black and white videos. If this is what you’re trying to achieve, just open the Video effects menu, proceed to Adjustments and select Grayscale.
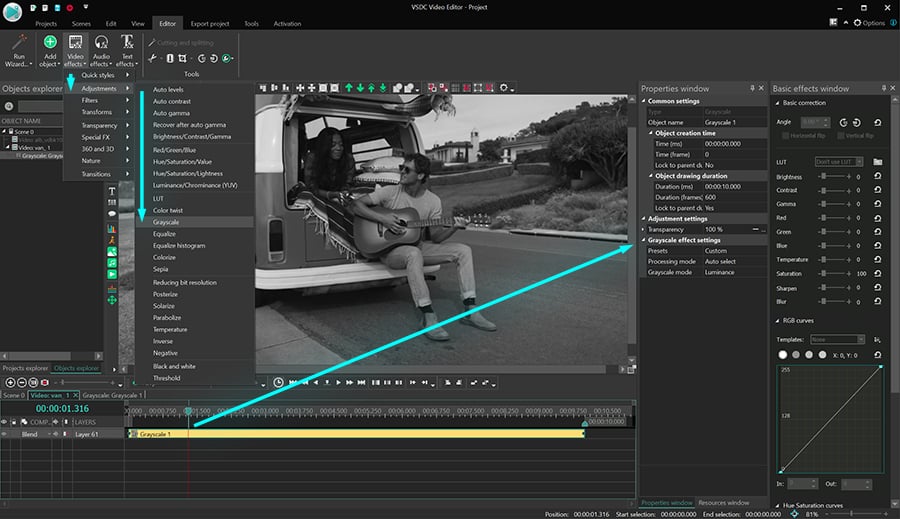
Since old-school videos also tend to have a brighter and less contrasting look, we also recommend toggling the controls in the Basic effects window on the right-hand side to see what works for your footage. But most importantly – and this is a lesser-known tip – old movies had a lower framerate and a 4:3 aspect ratio. Once you apply these two settings, it will be hard to tell whether your video was recorded yesterday or in the 1920s. We’ll show you how to go about it in the following section.
5. Change the framerate and resolution of your footage
The fastest way to set the desired framerate and resolution is by creating a new project with the said properties. This means that instead of importing your video with the original properties, you’ll need to set the properties that will be applied to the video you’ll be working with.
Once you launch VSDC, hit Blank project. Then select the 4:3 aspect ratio in the Resolution menu, and the desired framerate in the corresponding menu below.
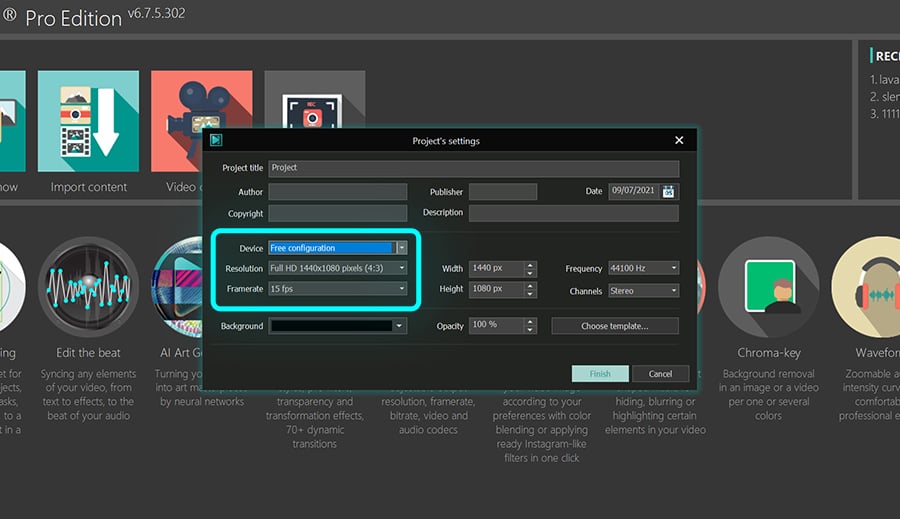
To imitate a movie recorded on an old-school camera, you can choose anything between 10 and 15 frames per second. The lower the framerate is, the more noticeable the transition between the frames will be.
Now, when you create a 4:3 project and import your footage, chances are, the video will not fit the scene properly – that’s because the vast majority of modern videos have a 16:9 aspect ratio. The ideal solution will be to crop your footage and make it fit the 4:3 project. This is not the most elegant solution since some of the footage will get cropped out, however, this is the only way to achieve the authentic old film effect.
To crop the video, click on the Crop icon at the top and proceed to Auto cropping. The footage will be automatically cropped to fit the scene.
Once you’re ready, go ahead and save your video. Open the Export project tab, select the final destination of the video, and proceed to Export.
Want to achieve a more artistic old film look? Consider the VHS effect
There are many ways to achieve the old film effect. If you’re ready for a more advanced post-production technique, check out this guide to replicating a stylish VHS look.
Got any questions? DM us on Facebook or leave a comment on our YouTube channel.
Watch us on YouTube
 / @VSDCFreeVideoEditor
© 2011-2026, www.videosoftdev.com, FLASH-INTEGRO LLC. Privacy policy | Terms of use | About us
All trademarks referenced herein are the sole property of their respective owners.
Copying any materials from this site allowed only with written consent of Site Administration.