How to Create Your Own LUTs in VSDC
Of all color correction tools, LUTs are everyone’s favorite. They’re a quick, easy, and versatile way to make an average image or video look cinematic. That’s why we’re so thrilled to announce that starting version 6.9, VSDC includes a built-in LUT editor. Not only can you apply imported LUTs to your videos – but you can also edit them and even create your own custom LUTs.
But most importantly, if you’re using VSDC Pro, you’ll be able to export LUTs you’ve created and use them in 3rd-party photo and video editors.
In this tutorial, we’re going to show you how the LUT editor works in VSDC. But before we get started, let’s answer one important question.
What is a LUT, exactly?
LUT, or a Look Up Table, is a set of values defining how the color tones should be modified. You can think of a LUT as a pre-configured color correction template.
Each LUT contains a table with information on what hue, saturation, and lightness values should be for each color tone. When you apply a LUT to an image, it compares the original values with the table values and changes the original accordingly.
LUTs are insanely popular because they can help you compensate the lack of proper lighting during the shooting, replace one color with another, and achieve a cinematic look.
How to create a new LUT in VSDC
To get started, import your image or video to the scene. From there, you can do the following:
- apply one of the built-in LUTs from the VSDC menu
- apply any 3rd-party LUT you’ve found on the Internet
- create your own LUT and tailor it to your needs
For the purpose of this tutorial, we’re going with the third option.
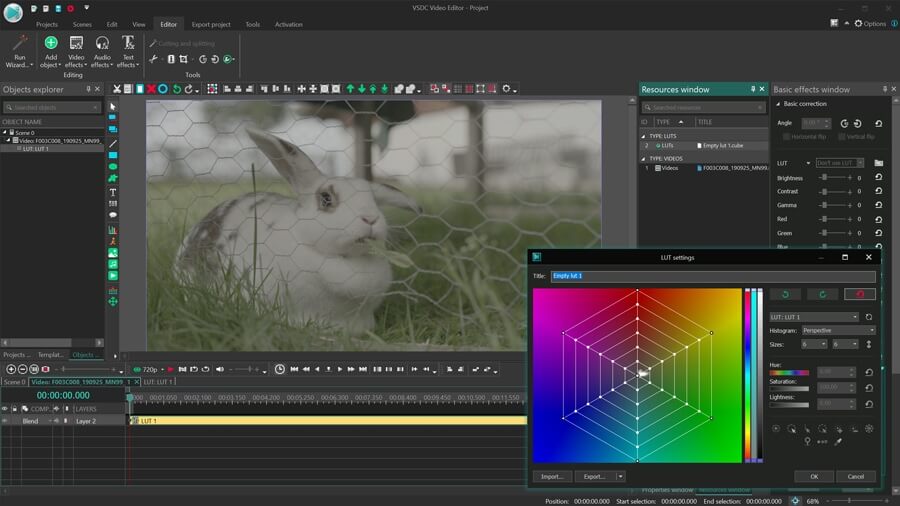
To create a new LUT, you need to open the Resources window (if you can’t find it, click View in the menu at the top and select Resources window). Then click with the right mouse button anywhere in the Resources window and proceed to Add resources -> Create LUT.
Your new LUT will be added to the list of resources and named “Empty lut 1.cube.” Double-click the image or video to open it and drag the LUT from the Resources window to the scene. Keep in mind that by default, the LUT will be added from the playhead position on the timeline, so you may want to adjust it.
Now that you’ve created an empty LUT and applied it to the footage, double-click its icon in the Resources window to open the LUT editor.

The editor looks like a pop-up window featuring an HSL histogram and a compact menu on the right side. In the following section, we’ll explain what each option means and how you can fine-tune your video with this toolset.
How to change LUT settings
Let’s start with a quick overview of the LUT editor window.
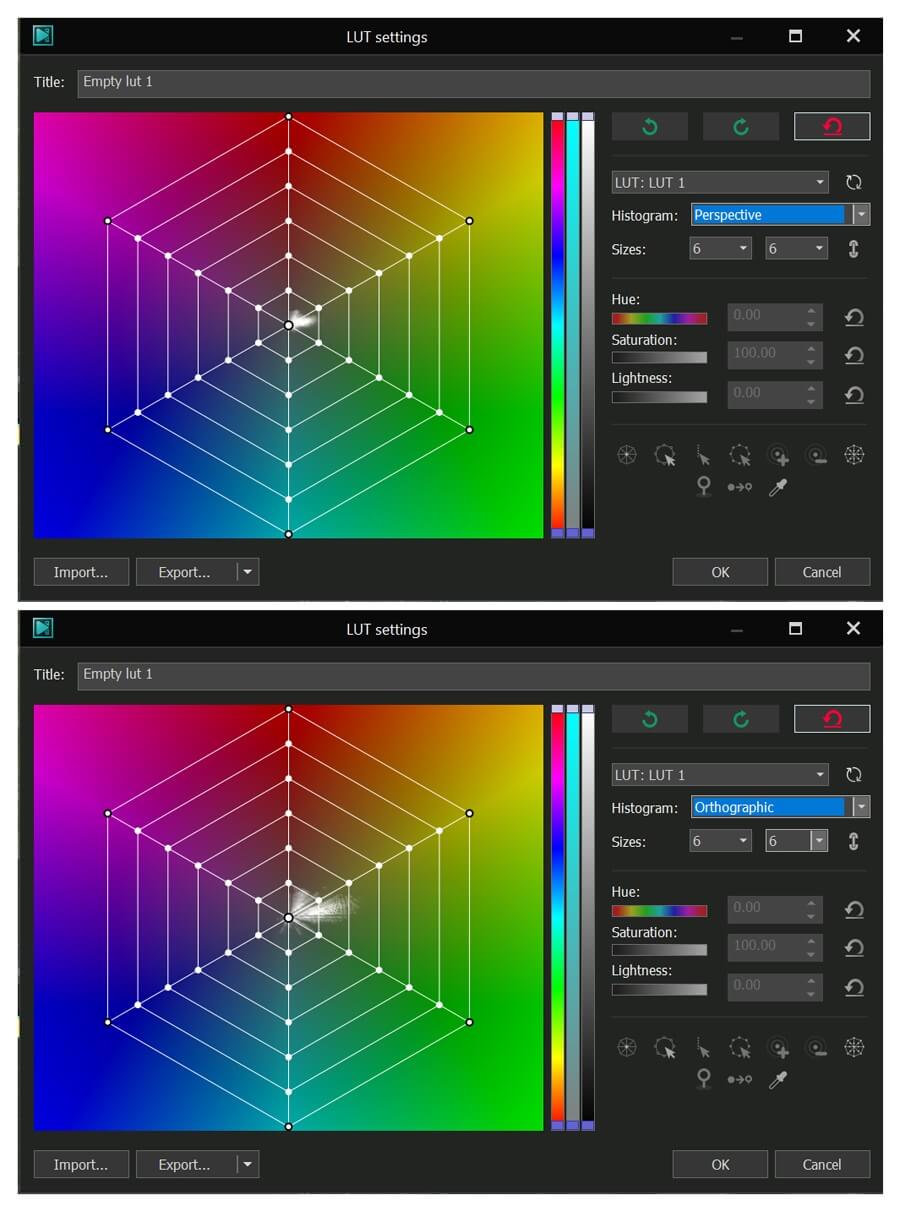
The white spots on the histogram help you identify which color tones are used in the video. Predominant color tones produce more saturated white spot areas.
If you switch between two types of histograms – perspective and orthographic – you’ll notice that the white spot pattern changes as well.

The reason why the color tones are reflected differently is that the perspective histogram includes lightness values, meanwhile, the orthographic histogram excludes them. Essentially, this means you should use the perspective histogram if you’re trying to correct overexposed or underexposed footage – because you’ll want to see the lightness values on the gradient before adjusting them.
Once you’ve selected the histogram type, you can also adjust the number of rays. The more rays there are, the more control points the histogram grid will have – and the more precisely you’ll be able to correct color tones.
Control points on the grid are interactive. Go ahead and select any of them to see their Hue, Saturation, Lightness values on the right. You can also toggle the HSL sliders or just grab any control point and drag it around to get an idea of how things work.
Now that you’re familiar with the histogram and control points, let’s see how moving them in different directions can change the look of your footage.
Saturation control settings
On the histogram, less saturated colors are located in the center, so the closer to the edges we get, the higher saturation is. For example, if you’re working with raw footage, its color tones are typically unsaturated. That’s why the white spots on the histogram will be located primarily in the center.
To increase saturation for all color tones in the video at once, select the circle of control points that includes all the white spots (which means all the color tones in the video) and expand it by toggling the saturation slider on the right side.
Similarly, if you want to increase or decrease saturation for a particular color tone, you can select control points in that color tone section and drag them closer to the center or closer to the edge.
Hue control settings
Hue values change when we move points around the histogram. Essentially, you can replace any color with another one by changing its hue. Suppose you want to replace all green color tones in the video with blue or red. To do that, select all control points in the green section and drag them to the replacement color section.
Notice that as we’re changing the hue, the white spots are migrating as well because the overall color scheme of the video is rewritten. Video creators use this trick to switch cool tones to warm tones, or vice versa, adjust the look of certain objects, or even enhance skin tones.
Quick tip. If you need to select a particular color tone in the video, but you’re unsure how to identify it on the histogram, use the eyedropper tool from the right-side menu. Click the eyedropper icon and head to the preview window to find the color tone you want to work with. As you move the eyedropper around, you’ll notice two little squares on the histogram: purple and green.
The purple square shows which part of the histogram contains the color the eyedropper is currently pointing at. The green square shows the nearest control point on the grid; to select it, click the color.
Lightness control settings
Finally, let’s have a look at the Lightness control. What it does should be self-explanatory: it allows you to make the color tones in the video darker or brighter. The cool part is that you can adjust brightness for all color tones or selected color tones only. For example, suppose you want to make green tones brighter. This is what it will look like:
However, if you want to brighten or darken all color tones in the video, you’ll need to select the corresponding circles on the grid. For instance, let’s make all color tones in the video a bit darker, and then darken the less saturated ones even more.
Now that we’ve covered the basics of working with Hue, Saturation, and Lightness controls, let’s have a look at the rest of the toolset.
Quick control point selection
As you may have noticed from the video examples above, you can select individual control points by clicking them directly. You can also select multiple control points by either clicking them one by one or selecting the area on the grid where they’re located. However, you can also use the point selection tools right under the HSL sliders:
- Select central point – use this option to select the central point only
- Select outer circle – use this option to select all the control points in the outer circle
- Select ray – use this option to select a ray of points (indicate the desired ray by selecting at least one control point in it)
- Select circle – use this option to select a circle of points (similarly, you’ll need to indicate the desired circle first by selecting at least one point in it)
- Increase/Decrease selection – use this option to increase or decrease the number of selected points based on the initial selection. For instance, if you’ve selected a single point, this option will select or unselect neighboring points. If you’ve selected a circle of points, this option will select or unselect neighboring circles.
- Select all – use this option to select all the control points on the grid.
If you need to prevent a specific control point, a ray, or a circle of points from moving, use the Pin button.
Similarly, you can use the Pin nearest button to lock the neighboring points.
How to export your LUT from VSDC
Once you’ve finished working on the LUT, go up to the Title field and give it a name. To export the LUT from VSDC and use it in 3rd-party editors, simply click Export in the bottom left corner and select the output folder on your PC. Keep in mind that LUT export is only available in VSDC Pro.
Ready to create your first LUT?
By now, you should have a clear idea of how to create a new, custom LUT for your needs. Although we’ve covered the process of creating a LUT from scratch, keep in mind that you can follow the same steps to edit an existing LUT. Simply apply any LUT from the library and open the Resources to find that LUT in the list of resources and access the editor window.
You can craft LUTs to replicate the color grading of virtually any movie and replicate its visual style. We've even crafted our own custom LUT for the Oppenheimer movie, which you can download (VSDC-oppenheimer-lut.cube) and utilize in your projects to achieve this distinctive aesthetic.
Have any questions? Feel free to email us at This email address is being protected from spambots. You need JavaScript enabled to view it. or DM us on Facebook.
You can get more information about the program on Free Video Editor description page.