 User Help Manual
  Learn FAQ
  Send us feedback
 ")


- This holiday season embraces new beginnings with the latest update of VSDC Video...
- Change is all about improvement, and this process wouldn't be possible without y...
- Intro In 2024 the options range for creating visual effects is incredibly dive...
- Are you ready to explore new heights with the latest major VSDC update? Finally,...
How to Create a Motion Tracked Face Mask Using Face Landmarks
Starting from version 6.6, VSDC includes a new feature called Face Landmarks. Face Landmarks allow you to quickly place stylized masks on the face of a person in a video. You can select mask templates from the VSDC collection or upload your own image and use it as a mask. And yes, the mask will stay on the face and will be moving along, just like in Instagram or Snapchat.
In this quick tutorial, we’ll show you how to use Face Landmarks. Feel free to watch the video before reading the text version.
How to apply the Face Landmarks effect
The new feature is available under the Special FX menu, so to apply it, you’ll need to open Video effects, proceed to Special FX, and select Face Landmarks. By default, the effect will be applied from the current cursor position. If you want to apply it from the beginning of the scene, select the corresponding option in the pop-up “Object position settings” window.
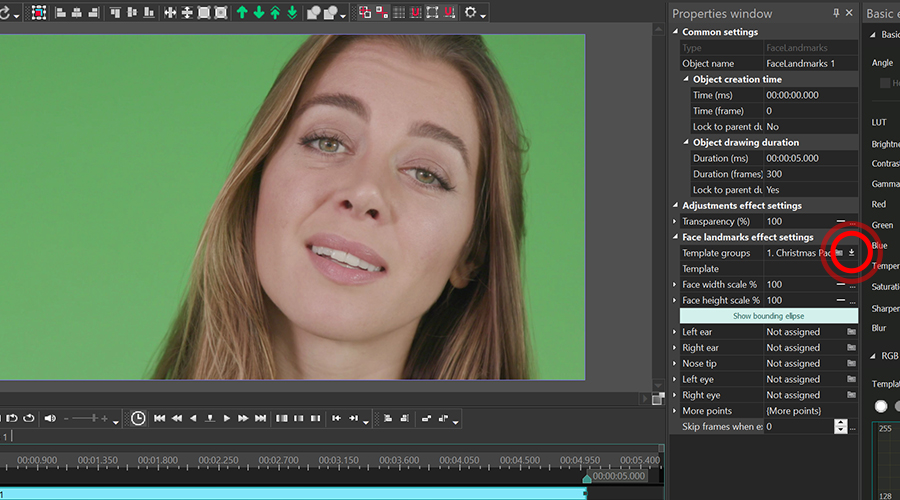
Once you’ve applied the effect, it will appear in the new tab on the timeline; its settings will be available in the Properties window on the right-hand side. If you can’t find the Properties window, right-click on the effect layer and select “Properties”.
You can download mask templates directly from the VSDC gallery. Alternatively, hit “Download” to access the gallery from the program and get the desired collection of templates.
Keep in mind that the Face Landmarks effect is powered by neural networks, so there is little you can customize. Essentially, all you can do is slightly adjust AI face detection, the sizing and the position of the mask.
Face Landmarks: effect settings overview
In the Properties window, find Face landmark settings. From there, you’ll be able to select a template, adjust the detected face oval scale, and correct mask position for each control point. Let’s overview these parameters, one by one.
Template group. If you have already downloaded the template collection to your PC, use the Browse icon to upload it to the editor. Then, select the desired template group using the dropdown menu.
Apply template. Each template group contains several templates. Use this dropdown menu to select the template you want to use in the video.
Face width scale and Face height scale allow you to correct the detected face oval based on the original dimensions.
Notice that the last two parameters allow you to set the Initial value and the Final value. This means you can change face oval width or height scale over time, and the mask will adjust accordingly. This might be useful if the face size in the video changes during the playback.
To display the face oval detected by the app, make a click on the Show bounding ellipse button.
The next set of parameters is dedicated to control points, a.k.a. face landmarks. By default, you can set up the following points:
- Left ear
- Right ear
- Nose tip
- Left eye
- Right eye
On some occasions, you might need additional points to place the mask more precisely. Such additional points include:
- Between eyes
- Head top
- Under nose
- Face bottom
- Under left eye
- Under right eye
The default point detection works well most times. However, if you need to adjust the mask in any particular spot, you can do that. Simply click on the little triangle next to the point name to expand the set of available parameters.
Let’s take a closer look at these parameters to see how they affect the result when you tweak the settings.
Point settings
Use Rotation angle if you need to rotate the mask around the selected point, clockwise or counterclockwise.
Position angle helps you change the position of points located on the ellipse border.
Distance scale defines the distance between the point and the ellipse border. This parameter value is calculated based on the distance between the center of the face and the selected point.
Width means mask width.
Scale height allows you to correct the mask height.
The Transparency parameter allows you to make the mask less visible.
The Mirror image option flips the mask around the selected point.
Compensate face motion is the mode you want to apply when you need the mask to adjust its position based on face movements.
Similarly, if the face is jittering or shaking, you should use Jitter compensation.
Go ahead and test the new feature
Despite the lengthy description, using Face Landmarks is easy and straightforward. Download the new version of VSDC to your computer and try it for yourself. Remember to subscribe to VSDC YouTube channel if you want to stay tuned with the updates and learn new video editing tricks.
© 2011-2025, www.videosoftdev.com, FLASH-INTEGRO LLC. Privacy policy | Terms of use | About us
All trademarks referenced herein are the sole property of their respective owners.
Copying any materials from this site allowed only with written consent of Site Administration.