- 作者:Amy Shao 发布时间:2026年3月11日 对于富有创意的人来说,最好的礼物是什么?当然是新的可能性。VSDC 团队很...
- 作者:Amy Shao 2025年11月19日发布 欢迎了解期待已久的VSDC 10.2更新:这个新版本包含了令人难以置信的功能和重大改进,旨在为从爱好...
- 你好,我是Mattea Wharton,來自西雅圖的旅行影片創作者。整整三年,我一直在與那些會在我影片上加上難看浮水印的編輯軟體鬥爭,直到我發現了VSDC。這款...
- published Amy Shao 6/10/25 等待全新非凡体验的日子终于结束了!这次更新不只是又一个版本——而是VSDC 10.1! V...
How to Apply test
The Paint Brush transition is a popular effect that imitates brush strokes. You can use it to gradually move from one scene to another by either covering the video with a paint brush stroke by stroke, or revealing the next image from under a coat of paint. Here is what it looks like:
From this tutorial, you’ll find out how to apply this effect in your videos and tailor it to your vision. The Paint Brush effect is available in VSDC starting version 6.8, so make sure to download it before moving one with the tutorial.
How to apply Paint Brush transition in VSDC
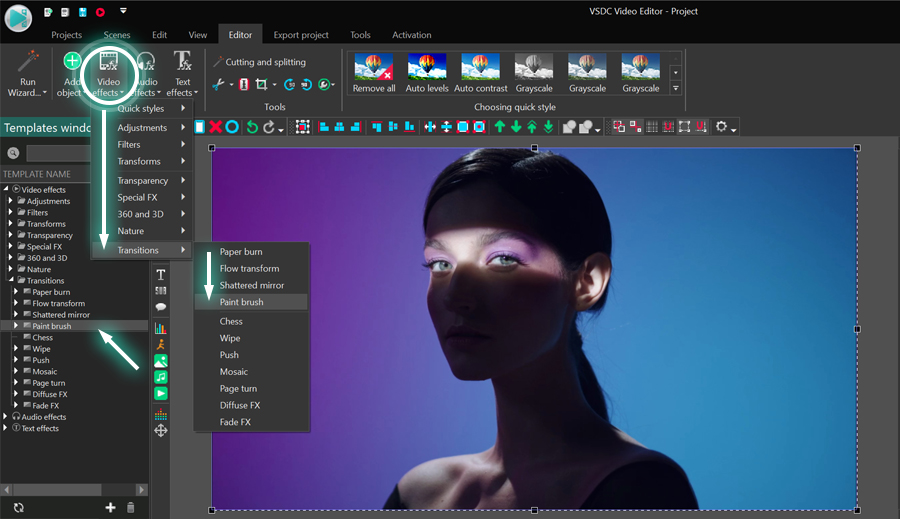
Once you download VSDC, launch it on your computer and import your footage. We recommend using the Import content button unless you want to apply custom parameters to the project. Next, select the video you want to apply the transition to, open the Video effects menu, proceed to Transitions and select Paint Brush.

The Object position settings window will pop up indicating that the transition will be added to the end of the scene. Click OK to proceed and preview the result. Notice that if you want to stretch the duration of the transition, you’ll be able to do it manually. We’ll talk more about it in the following section.
How to access Paint Brush transition settings
To open the effect settings, first make a double-click on the video you’ve applied the effect to. You’ll find yourself in a new tab with the effect layer named PaintEffect. Make a right click on it and select Properties. The Properties window will slide-in from the right.
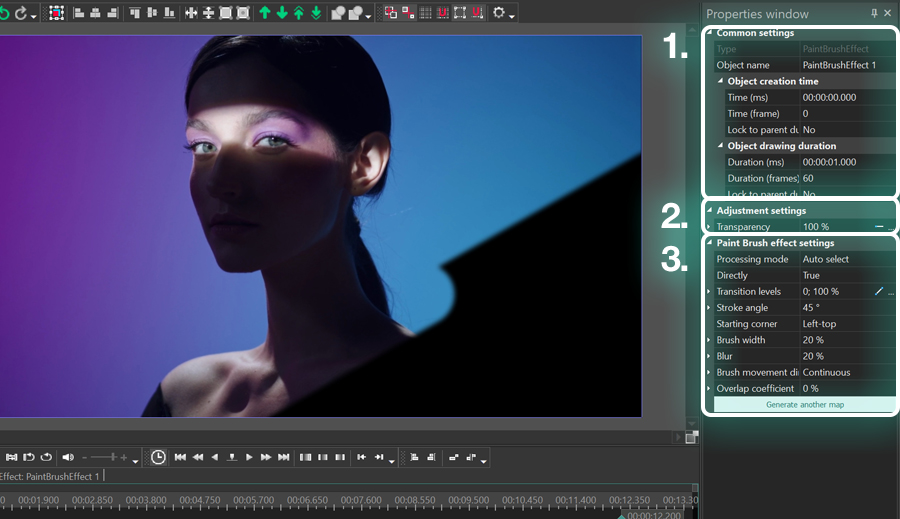
The Properties window for the Paint Brush transition includes 3 groups of settings:
- Common settings
- Adjustment settings
- Chess settings - Paint Brush effect settings

Let’s go over each group of settings and see what they do.
Common settings
The settings in the first group allow you to rename the transition effect layer, type the exact moment when the transition should begin (in seconds or in frames) and set its duration (in seconds or in frames). Keep in mind that you can also manually move and stretch the effect layer right on the timeline using the handlers.
Adjustment settings
The Adjustment settings consist of a single parameter, named Transparency. Transparency enables you to adjust the opacity level for the paint strokes. For example, if you leave the default value (100%), the paint will be completely non-transparent. However, if you decrease the value, you’ll start getting the see-through effect.
If you expand the Transparency parameter, you can access the Initial and Final values. These values enable you to set the opacity level for the beginning of the Paint Brush effect and the end of it, thus creating a smoother transition between scenes.
Paint Brush effect settings
The settings in the third group allow you to tailor the effect to your needs. For instance, you can change the direction and angle of the brush strokes, choose the brush width, and more.
Directly
The first parameter in this group is named Directly, and it refers to the direction of transition. If you leave this parameter deactivated, the paint brush will gradually cover your footage, stroke by stroke. If you activate this parameter, the transition will work in the opposite way and gradually uncover video from a coat of paint.
Stroke angle
The following parameter allows you to change the brush stroke angle. By default, the brush moves under a 45-degree angle, however, you can change this value to your taste. For example, in the illustration below, you can see how the strokes will look if you use a 90-degree and a 30-degree angles.
In addition to the Stroke angle, you can activate the option called Opposite side and change the side where the brush starts moving. For example, by default, the paint brush moves from right to left. In this case, the opposite side direction will be from left to right.
Starting corner
This parameter defines the corner where the effect starts. There are 4 self-explanatory options you can choose from: left-top, right-top, left-bottom, and right-bottom.
Brush width
Brush width is rather self-explanatory as well. This parameter defines how wide and thick brush strokes are, and you can leave its value consistent or make it dynamic. For example, if you set the Initial value at 10% and the Final value at 50%, each subsequent brush stroke will be thicker.
Blur
This parameter adds blur to the paint and makes brush strokes less defined. The higher the value, the more blurred the strokes will be. As a matter of fact, if you type 100%, the effect will resemble spray paint.
Brush movement direction
Brush movement direction is the brush movement pattern defining the order in which brush strokes are applied. The are 5 options you can choose from:
- Non-continuous – each subsequent brush stroke will start on the same side of the scene.
- Continuous – each subsequent brush stroke starts on the opposite side of the scene.
- Area-based – the scene gets divided into several areas, and each area gets covered with paint
- Random (same angle) – each brush stroke appears in a random place on the scene under the same angle.
- Random (random angle) – each brush stroke appears in a random place on the scene under a random angle.
Overlap coefficient
Overlap coefficient defines the percentage of brush strokes that appear on the scene at the same time. For example, if the total number of brush strokes required to cover the scene entirely is 12, and the overlap coefficient equals 30%, at any given moment, you’ll be seeing 4 brush strokes instead of just one.
Try the Paint Brush transition for free
The new Paint Brush transition effect is available in the free version of VSDC Video Editor, so if you liked this tutorial, go ahead and download VSDC from the official website.
Feel free to message us on Facebook and make sure to subscribe to our YouTube channel for a weekly doze of video editing inspiration.