- Hi, I'm Mattea Wharton, a travel videographer from Seattle. For three years I ba...
- published Amy Shao 6/10/25 The wait for something new and unusual is finally...
- This holiday season embraces new beginnings with the latest update of VSDC Video...
- Change is all about improvement, and this process wouldn't be possible without y...
How to Place Two (or More) Videos Side by Side
Most non-linear video editors allow you to place two videos side by side. This effect is also known as a “split screen” effect. Depending on what you’re trying to achieve, you can have the same video or two different videos play side by side. And once you get the hang of the technique, you’ll be able to use as many videos as you want.
In this tutorial, we’ll show you how to place videos side by side using VSDC Free Video Editor. It’s a lightweight non-linear video editor for Windows PC, and it’s perfect for this task because you can resize and adjust video files directly in the scene. Before getting started, you need to download VSDC from the official website.
Step 1. Import and resize your footage
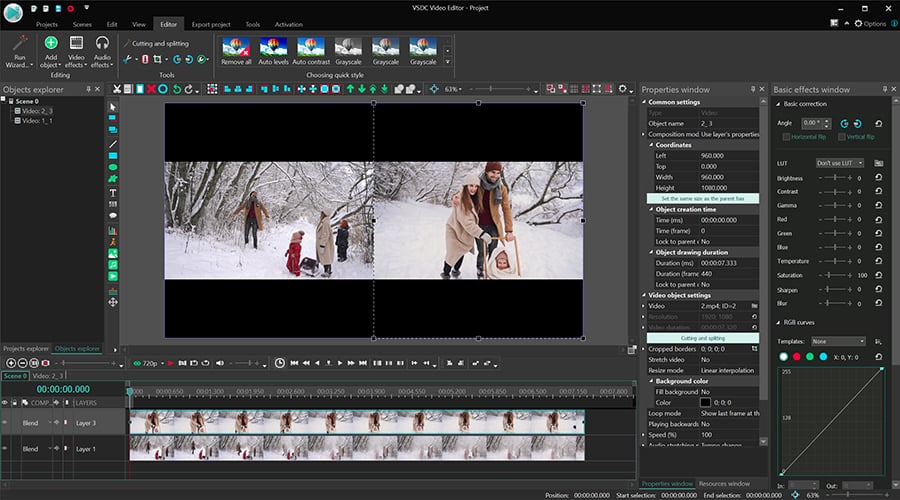
Launch VSDC on your computer and import your video file. You can also just drag and drop it to the scene. Right-click on the video and select Properties - the Properties window will slide-in from the right-hand side. Find Common settings → Coordinates → Width.
Then halve the value of the frame width and manually type the new number. For example, if the original frame width was 1920, type 960.
Step 2. Prepare the second video
If you want to duplicate the original video, you can use Ctrl+C and Ctrl+V right on the working area. Alternatively, you can right-click on the original video, select Duplicate, and then paste the copy to the timeline. Since the created copy will have the same frame width, all you need is to drag it to the right and place the videos side by side.
Another option is to use two different videos in the scene. In this case, you want to make sure that both videos have the same size and quality. Otherwise, the difference will be noticeable and you’ll get a poor looking effect.
If you decide to go this route, drag the second video to the timeline and resize it the same way you resized the first video: go to the Properties window and halve the value in Coordinates → Width. Then, drag the video to the right side of the scene.

Keep in mind: on the timeline the two videos should be placed strictly one under another. That is, if you want them to play simultaneously. If you want one video to start with a delay, drag it to the right on the timeline. You can also have videos change on one side or another. For that, place videos on the same level on the timeline - one by one.
And your side by side video is ready now. Go to the Export project tab and save it to your PC in the required format.
Get inspired for your next split screen video
Side-by-side videos are great for promo clips, presentations, vlogs, and before-and-after comparisons. The split screen effect has also been used in movies since the middle of the 20th century. You can see split screens in such classic movies as Pillow Talk (1959) and Dressed to Kill (1980).
Split screen is an efficient way to show things happening at the same time in two different places, just like in Kill Bill vol.1.
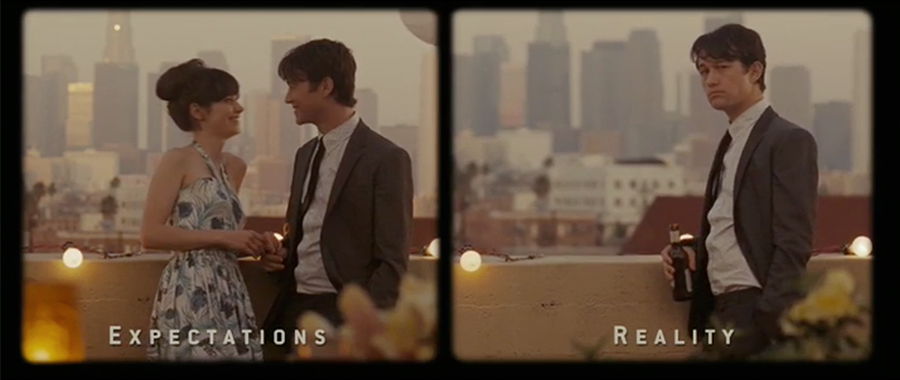
It works well for showing different perspectives of the same object - or the same event. For instance, you may want to incorporate the “Expectations and reality” comparison, like the creators of 500 Days of Summer.

Once you get the concept, you’ll be able to create horizontal split screens (just change the height of a video file instead of its width) or make multiple videos play side by side.
Whether it's for comparative or creative reasons, placing videos side by side is quite an easy task even though it might look complicated at first. You’ll be able to recreate this effect within a couple of minutes even if you’re a complete newbie.
Feeling like trying something mode advanced? Check out this video tutorial for creating a diagonal split screen in VSDC Pro:
You may be interested in the previous lesson place two videos side by side.