- published Amy Shao 11/19/25 Meet the long-awaited VSDC 10.2 update: a new ve...
- Hi, I'm Mattea Wharton, a travel videographer from Seattle. For three years I ba...
- published Amy Shao 6/10/25 The wait for something new and unusual is finally...
- This holiday season embraces new beginnings with the latest update of VSDC Video...
New Chroma Key Toolset in VSDC: Free and Pro Feature Overview
The new version of VSDC brings quite a few surprises, the updated Chroma Key toolset being one of them. We can’t be happier with the way it came out, and we’re sure you’ll love it too. The precision of chroma keying and the quality of the result is just outstanding, so even if you weren’t keen on removing backgrounds before, you probably will be after seeing how it works.
We suggest starting with this video tutorial about the HSL color space – the most exciting new feature in the Chroma Key toolset. Next, you can read the instructions covering the rest of the background removal properties.
If you haven’t downloaded VSDC 6.6 yet, you can do it here.
How to apply Chroma Key in VSDC
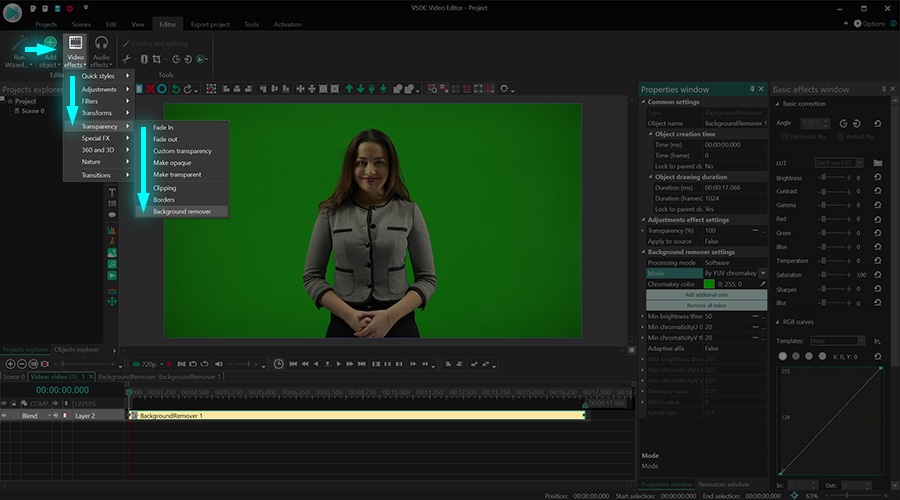
To get started, import your footage to VSDC, then open the Video effects menu and select Transparency - Background remover. The Object’s position settings window will pop up to indicate the point at which the Chroma Key effect should be applied to the footage. By default, the effect is applied from the cursor position to the remaining part of the file; if you’d like to change that – select the desired option and click OK.
Notice that once you apply the effect, you’ll be taken to a different tab on the timeline where the effect layer is located. The Properties window will slide-in from the right side – that’s where Chroma Key settings are located. If you can’t find the Properties window, right-click on the effect layer and select Properties from the context menu.
The Properties window contains three groups of settings:
- Common settings
- Adjustment effect settings
- Background remover settings
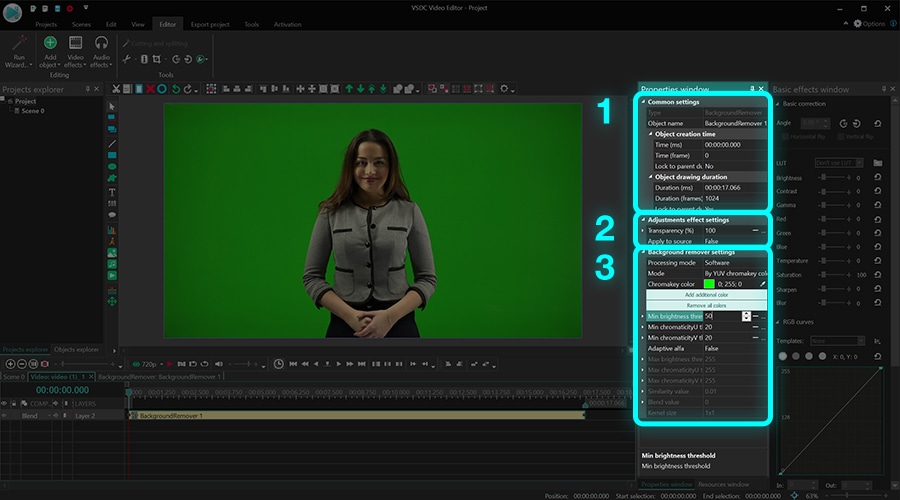
Common settings allow you to add a title to the effect layer, change the moment when the effect appears in the video (by seconds or by frames), and the duration of the effect (in seconds or in frames).
Adjustment effect settings allow you to set the transparency level for the beginning and the end of the effect. This means you can either set a constant transparency value for the Chroma Key effect or you can have it gradually increase/decrease over time. To set the gradual change of the transparency level, you’ll be using the Initial value and the Final value. Keep in mind that 100% means full transparency and 0% means non-transparency.
For example, this is what the Chroma Key effect will look like if you set its Initial value at 100%, and the Final value at 10%:
Moreover, you’ll notice that many Chroma Key parameters provide you with the option to set the Initial value and the Final value as well. This means that if you want to set a dynamic background removal effect, you can do that, too. This feature comes in especially handy if the tone or the color of the background is changing during the playback.
Notice that the second line in this group of settings is titled Apply to source. “Apply to source” means that the changes will be applied directly to the original file you’ve uploaded – aka the source. By default, this option is deactivated to speed up rendering. If it’s deactivated, the software applies the chroma key effect to a scaled-down copy of the video. You should understand, however, that sometimes, scaling may lead to minor image corruption – especially, if the original file is not of the best quality. That’s why we always recommend using high-quality footage or, if you have a powerful PC, just switch this parameter to “True” and forget about scaling.
The last group of settings is called Background remover settings, and it allows you to fine-tune the Chroma Key effect parameters. We’ll take a close look at it below.
How to fine-tune Chroma Key effect in VSDC
In this part of the tutorial, we’ll go over the key parameters one by one and show you what difference each of them makes in the video.
The first parameter you want to look at is called Mode. Mode allows you to select the color space you want to work in.
In VSDC, you have three options:
- By YUV chromakey color – available in the free version of VSDC
- By HSL chromakey color – available in the Pro version of VSDC
- By chromakey mask – available in the free version of VSDC
The first two modes enable you to work in two different color spaces: YUV and HSL. The third mode named “By chromakey mask” is different. It enables you to upload an image to VSDC and use it as a mask to remove all the colors displayed in the image from your video. We’ll talk more about each mode in a moment.
If you select the HSL mode, you can also change Output. You should always use the “Composite” output mode unless you’re using Chroma Key to create a mask. In that case, switch to “Alpha-channel”.
The next parameter, Chromakey color, allows you to select the color for removal. We always recommend using the eyedropper tool and selecting the tone manually because the default bright green color may not coincide with the color of your background.
Notice that in the YUV mode, you can Add additional color if you need to remove more than one color from the video.
The rest of the background remover settings are displayed based on the mode you’ve selected: YUV, HSL, or “By chromakey mask”. Let’s take a closer look at each mode below.
YUV color space
You’ve probably heard of the RGB color space or encoding system. YUV is another tyfpe of encoding system which defines a color space in terms of three components: one luminance (Y) and two chrominances (U and V).
When you select the YUV color space mode, you can change the values of these components using the following parameters:
- Min/Max brightness (Y) threshold
- Min/Max chromaticity U threshold
- Min/Max chromaticity V threshold
These parameters are quite self-explanatory and they will help you remove the remaining green shades from the video if there are any. Each one defines the threshold for its own component. For instance, the color tones that are less bright than the minimum brightness threshold are removed from the video. In a similar way, the Min/Max chromaticity U threshold defines the threshold for blue color tones; the Min/Max chromaticity V threshold defines the threshold for the red color tones.
To visualize YUV color space in this context, imagine a three-layer cube where the minimum values form the deepest layer – the smallest red cube. Colors that fall into the space of the red cube will be removed from the video. The maximum values form the outer layer and the color values falling into this space will remain unchanged. Finally, the color values between the minimum and maximum are displayed as a spectrum of tones based on the effect transparency level you set up earlier.
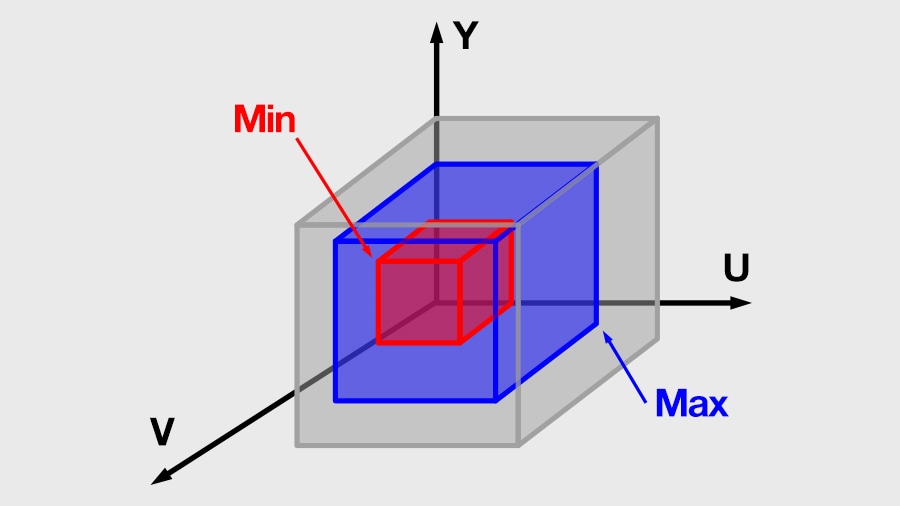
If all three components (Y, U, V) are equal to 0, no chroma key effect will be applied to the video. If all three components are set to maximum, you’ll see a black screen because all color values will be removed.
Note that if you switch Adaptive alpha from 'False' to 'True', you’ll activate additional parameters that will help you achieve better results:
- Similarity value – this parameter sets possible color tone deviations. If it equals 0, the software will only remove the tone you’ve selected with the eyedropper. If you increase the value, the software will remove the tones that are close to the selected one.
- Blend value – this parameter helps you smooth the border of the object after the background has been removed. The higher the value is, the smoother the border will be.
- Kernel size – this parameter also helps you make the border of the object look smoother. The higher its value is, the larger border area will be edited.
HSL color space
HSL stands for Hue, Saturation, and Luminance (or Lightness). This color space is a Pro-level feature and it’s much more efficient at removing video backgrounds. Once you remove the background color using the eyedropper, the HSL parameters will help you achieve even better results. Let’s see how its parameters are different from the YUV mode.
Hue delta/Max Hue delta is a pair of parameters that sets a range of chroma key color tone variations based on their Hue values. The correct way to work with these parameters is to set Hue delta at 0 and start slowly increasing it until you see that most of the background is removed. Next, you should start increasing Max Hue delta to a value approximately twice as high as Hue delta making sure that you’re only removing the colors you want.
Lightness delta/ Мах Lightness delta – similarly, this parameter sets a range of chroma key color tone variations based on their Lightness values.
Saturation delta/ Max saturation delta sets a range of chroma key color tone variations based on their Saturation values.
Reduce contrast allows you to change the contrast level of the chroma key color (which is the color of the removed background). It’s convenient if you want to see the difference created by the effect, however, the value of this parameter doesn’t affect the resulting video.
The way Chroma Key works in the HSL color space is different from the way it works in YUV. Essentially, when you apply HSL, you create a mask by keying out the selected background color and making that space in the video transparent. To see the “mask”, switch Output to Alpha channel. The mask will look like a black-and-white image where the black space is the removed background.
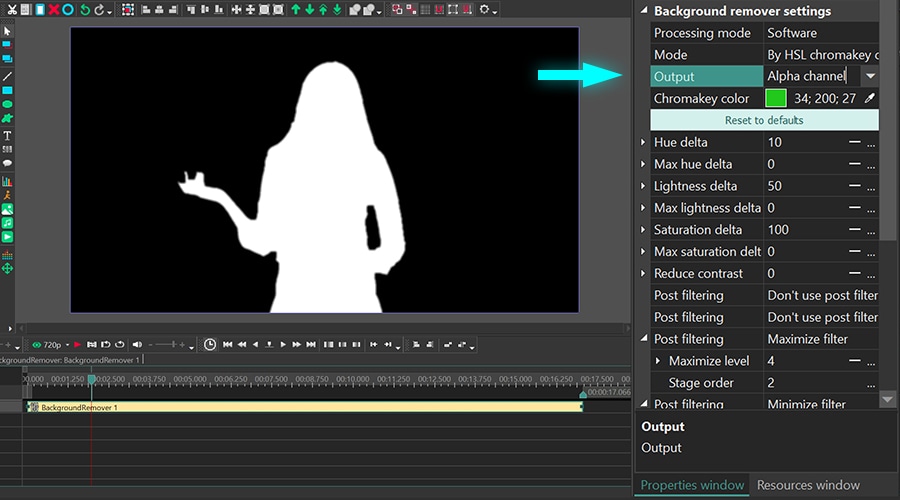
Take a closer look at the borders of the mask: it’s usually rough and uneven. Because of this, the video may look unprofessional when you replace the background with another image or footage. To fix it, you can apply up to 6 chromakey post-processing filters designed to smooth the border.
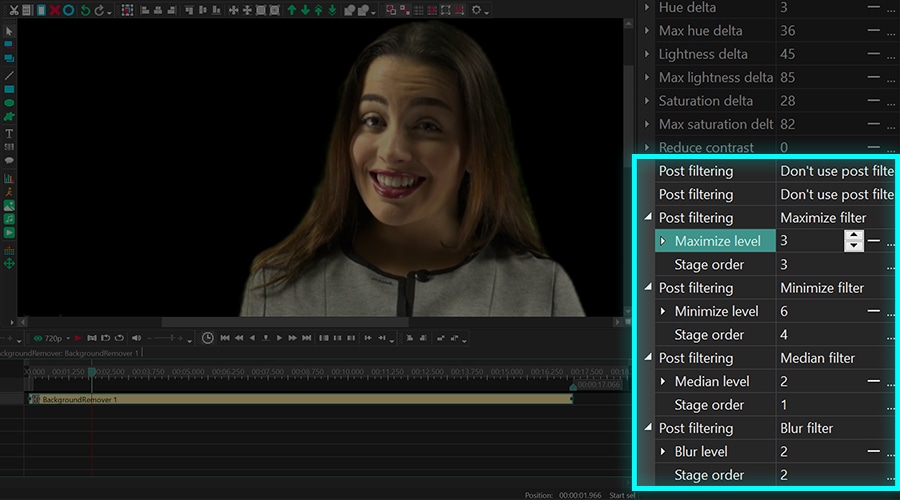
The filters are customizable. That means you can select their modes manually based on what you’re trying to achieve. Here are the modes available for each filter:
- Maximize filter – this filter analyzes the area around each pixel and applies the maximum value to it.
- Minimize filter – this filter analyzes the area around each pixel and applies the minimum value to it.
- Median filter – this filter analyzes the area around each pixel and applies the median value to it.
- Blur filter – this filter applies the median value to the pixels forming the border of the mask.
Each filter has two more parameters: Level (the size of the analyzed area) and Stage order (the order in which filters are applied).
Even with all filters having the same value, just by changing their order, you can achieve drastically different results:
By chromakey mask
The third Chroma Key mode in VSDC is called “By chromakey mask”, and it’s significantly different from the previous two modes. In this mode, you manually upload an image containing the colors you want to remove from the video; the software detects the image colors and keys them out.
Here is how it works:
- Switch to “By chromakey mask mode”.
- Upload a “Chromakey mask” – an image containing the colors that need to be removed from the video.
- Now, the software will compare the image and the video and remove all the coinciding colors from the video.
Once you do that, you can go ahead and tweak the parameters to achieve better results. Some parameters are similar to those in the YUV mode. So we’ll take a look at the unique parameters only:
Mask resize factor – this parameter allows for reducing the size of the uploaded image to speed up analysis. The higher its value, the smaller the image size is (which means there are fewer pixels to analyze). However, you should understand that the smaller the image is, the less precise the analysis will be, and that may affect the quality of color removal.
Resize mode – this parameter enables you to select one of the 5 image resizing modes:
- Nearest neighbor interpolation
- Linear interpolation
- Cubic interpolation
- Supersampling interpolation
- Lanczos interpolation
Time to add a new background
Whichever approach you choose to remove the background from your video, the most existing part is probably adding a new background which can be both a video or an image. Go back to the main timeline tab and use the Add object menu from the top of the interface to select the desired file from your computer. Then manually place the new background one layer below the chroma key mask as illustrated below.
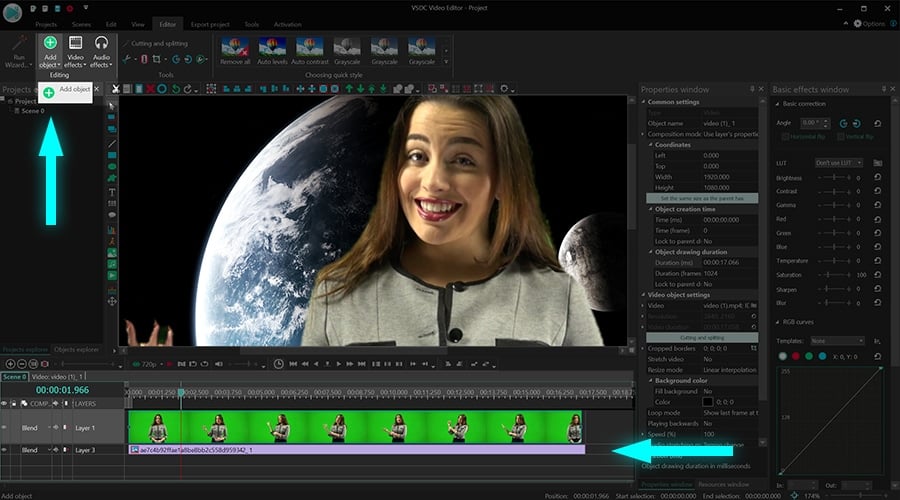
Use the preview feature to make sure everything looks good. Remember that you can go back to the Chroma Key settings at any moment if you need to make adjustments. Just double-click on the green screen video to access the background remover effect layer and use the Properties window.
Go ahead and try it for yourself! Remember to subscribe to our YouTube channel to get notified whenever we publish new video tutorials.