 User Help Manual
  Learn FAQ
  Send us feedback
 ")


Guide to Lift, Gamma, and Gain Color Wheels in VSDC
The Lift, Gamma, and Gain color wheels are designed to help video creators perform professional-level color correction. Starting version 7.2, Lift, Gamma, and Gain have become available in VSDC Video Editor, so in this tutorial, we’ll talk about their purpose and show you how to use them, step by step.
What is Lift, Gamma, Gain?
Lift, Gamma, Gain is a set of color wheels designed for primary color correction. Unlike secondary color correction, which involves working with isolated colors, primary color correction helps you change the entire color tone composition of the video. This means fine-tuning dark tones (Lift), midtones (Gamma), bright tones (Gain), or the entire image altogether (Offset).
The tricky part is that by using either of these controls, you aren’t only correcting shadows, highlights, or midtones: the changes made with the Lift, Gamma, and Gain wheels affect the entire spectrum of tones. Feel free to watch this video explanation before continuing.
 Download VSDC Free Video Editor
How to access Lift, Gamma, Gain wheels in VSDC
When speaking about color correction, a picture is always worth a thousand words, so below, we’ll have a detailed visual walkthrough of the new tool.
First of all, switch to the Color grading panel in the bottom left corner to access the Lift, Gamma, Gain color wheels.
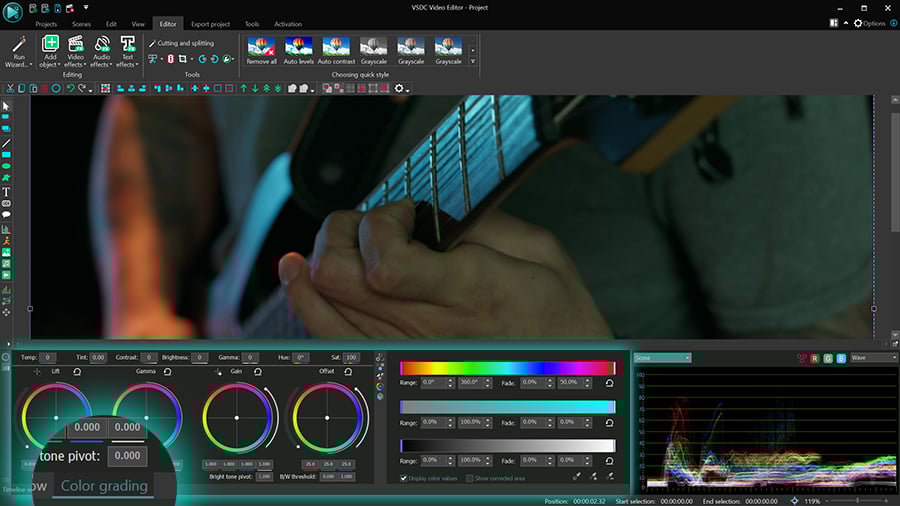
Each wheel controls a range of tones. Lift primarily adjusts dark tones; Gamma primarily adjusts midtones; Gain primarily adjusts bright tones, and Offset adjusts the entire image.
Changing color values for dark tones, bright tones, and midtones
To correct colors for a selected range of tones, use the control point in the center of the wheel. By dragging it towards a certain color range of the spectrum, you can change the temperature or overall aesthetics of the video.
For example, here is what happens when you make changes in the Lift color wheel: the lightest areas remain almost unchanged, while the dark areas change depending on where on the color spectrum you’re moving the control.
Notice that as you’re moving the control point of the selected wheel, the RGB color values under that wheel are automatically changing, too. If you’re more comfortable changing color values manually, feel free to do so by either typing them or using the Up and Down arrow keys on your keyboard.
Now, what’s the difference between applying changes to dark tones, bright tones, and midtones? To help you answer this question, we’ve prepared a visual comparison. Here’s what the blue color increase looks like for dark tones, midtones, bright tones, and the entire range of tones:
Although it’s the same color component, the results vary significantly because the changes apply to different ranges of tones. Again, you should notice that bright tones are barely affected when you’re working with Lift; dark tones are barely affected when you’re working with Gain, and both bright and dark tones are barely affected when you’re working with Gamma.
Pro tip: the little tumbler in the bottom left corner is called Maintain luma level, and it keeps the overall level of brightness, regardless of the changes you make. We recommend keeping this mode on because it makes color adjustments smoother and more gradual.
Dark tone pivot, bright tone pivot, and B/W threshold
In addition to color values, you can change the brightness and contrast values in the video using the following sliders:
- Dark tone
- Bright tone
- Black & white (B/W) threshold
Here is how they work. When you toggle the dark tone slider, all the dark tones below the selected value become darker. Naturally, when you push this control to the maximum, everything except for the brightest areas in the video becomes dark.
Similarly, the bright tone pivot dims all the color tones and reduces the number of bright tones in the video, until the image becomes completely dark.
Finally, the black & white threshold sliders decrease the level of contrast and saturation in the video. The slider on the left dims dark tones until the image becomes white, while the slider on the right decreases the contrast until the image becomes black.
Keep in mind that you can always undo changes by using the Reset buttons above each wheel.
Black point & White point
The next important part of the toolset is the Black point and White point. These controls can help you quickly fix overexposed and underexposed videos.
For example, if you have an overexposed image, it usually means that all colors are too bright, and there’s a lack of contrast. To fix that, select Black point from the panel and click on the object or area that’s supposed to be black. The program will apply black color to the selected area and recalculate the rest of the color tones accordingly:
Similarly, if your video is way too dark, select White point and click on the area that’s supposed to be white to rearrange all values.
Correcting isolated areas
If you need to perform color correction for an isolated area in the video or image, you can use the eyedropper tool in the bottom right corner of the Color ranges menu.
Click on the eyedropper icon and select the area you’d like to work on. To make sure the program has selected the right area, tick the Show corrected area box at the bottom.
You can start applying changes right away or use additional tools to expand or contract tone selection, in case the original selection was slightly incorrect.
Notice that by default, the eyedropper selects a range of tones, not an exact color (the long white extension tails on the Hue graph visualize exactly that). If you want to do the opposite and select a specific color with no range, press and hold the Ctrl key while using the eyedropper. In that case, the Hue graph will have no white extensions:
You can increase, decrease, or shift the selected range of colors by manually typing the desired values or using the handles as illustrated above.
Time to practice color correction
If you want to master the art of color correction, it’s crucial to have the right tools to practice. With the Lift, Gamma, Gain color wheels being added to VSDC, you now have everything you might need to perform both primary and secondary color correction. But most importantly, this toolset is available in the free version of VSDC and it works even on computers with limited processing power. Our team remains determined to make video editing available and affordable to anyone.
Got any questions? Email us at This email address is being protected from spambots. You need JavaScript enabled to view it. or send us a direct message on our Meta page.
Watch us on YouTube
 / @VSDCFreeVideoEditor
© 2011-2026, www.videosoftdev.com, FLASH-INTEGRO LLC. Privacy policy | Terms of use | About us
All trademarks referenced herein are the sole property of their respective owners.
Copying any materials from this site allowed only with written consent of Site Administration.