 User Help Manual
  Learn FAQ
  Send us feedback
 ")


- Published by Amy Shao on March 11, 2026 What is the best gift for...
- published Amy Shao 11/19/25 Meet the long-awaited VSDC 10.2 update: a new ve...
- Hi, I'm Mattea Wharton, a travel videographer from Seattle. For three years I ba...
- published Amy Shao 6/10/25 The wait for something new and unusual is finally...
How to Make a Video Grid by Using Multi-Layer Editing
We’ve talked about the advantages of using non-linear video editors a lot in our guides. One of their biggest benefits for creators is the ability to place several pieces of footage in the same scene and edit them simultaneously. The video grid effect is an excellent example of that.
Since VSDC’s timeline provides an unlimited number of video tracks, you can easily make a video grid that consists of 4, 9, 16 – or any other number of sections. In this tutorial, we’ll show you exactly how to make a video grid for your project, step by step. This effect is also commonly known as a video wall or a video collage. Feel free to watch the video tutorial first and then jump to the text version.
Step 1. Create a project of the required size
Launch VSDC Video Editor on your PC and use the Blank project option to create a new project. For a 2x2 or a 3x3 video grid, we recommend using the following project settings: Full HD 1080p or UHD 4K resolution and 16:9 aspect ratio.
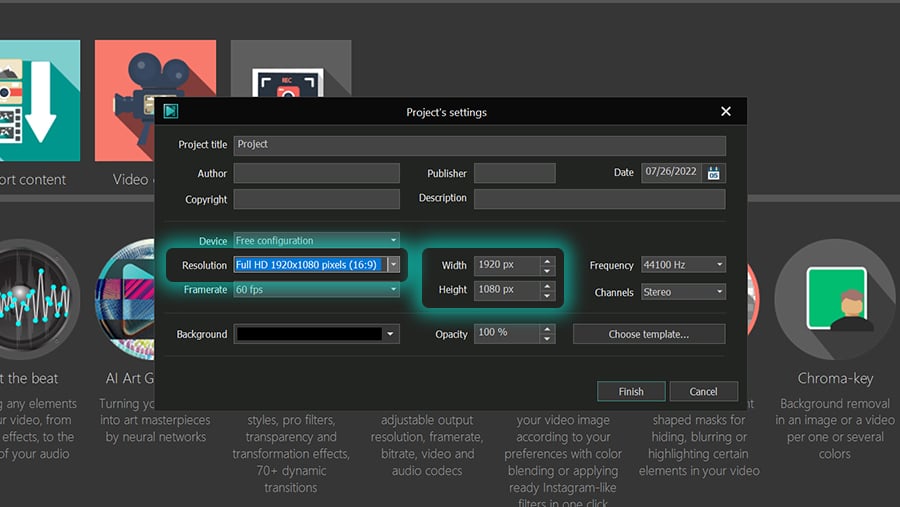
The footage you’ll import at the following step will automatically stretch to the aspect ratio you’ve just set up, although, ideally, you want to have videos recorded with the same settings. If most of your footage is of different aspect ratios – for example, if you have vertical videos – and you want to maintain it, feel free to use different settings for the project. Just keep in mind that your grid size calculations will differ from our example.
Step 2. Place all your footage on the timeline
The next step is to import all the footage – ideally, 4 or 9 files – to the editor. You can add it to the Resources window first or just drag everything directly to the timeline. Once ready, place video files on different tracks, one after another, and align them to the left side.

Step 3. Adjust video duration (optional)
To set the same duration for all videos in the grid, select them all on the timeline and either manually type the desired duration in the Properties window, or place the playhead at the right moment, make a cut using the razor tool at the top, and delete the unwanted parts.
Quick tip: Another bulk adjustment you can make use of is color filters. For example, if you want all the videos in the grid to be black-and-white, select them on the timeline, make a right mouse-click, and select Quick styles >> Grayscale.
Step 4. Apply the required size to videos
It’s time to start forming the grid.
Select all the videos on the timeline and head to the Properties window. Find Coordinates → Width. For a 2x2 video grid, type 960; for a 3x3 video grid, type 640. Then make a right mouse-click on the video stack right on the timeline and select Set Size → Set height in accordance with the image’s aspect ratio. Finally, drag each video to its position on the scene using mouse or arrow keyboard keys.
You might be wondering how we calculated the width of the videos for the grid. It’s simple! All you need to do is divide the scene width into the number of videos you’ll have lined up horizontally. For example, if you have 4 videos, that’ll be 2; if you have 9 videos, that’ll be 3; if you have 16 videos, that’ll be 4, and so on.
Our scene width is 1920 pixels, so 1920/2 = 960 pixels. If you have a different scene width, you’ll need to recalculate accordingly.
Quick tip. Even if some of your videos have a different resolution or aspect ratio originally, they’ll stretch to the default size of the scene when you add them to the timeline. However, if you notice that some videos have black lines on the sides, make a right mouse-click on those files and select Crop tools → Auto cropping to fix that.
Step 5. Add the outline effect (optional)
To make videos within the grid pop, consider adding a contrasting border outline. To create borders, click on any video, then open the Video effects menu, and proceed to Transparency → Borders. Next, go to the Properties window and select the following settings:
- Mode → Solid
- Position →All rect
- Border size → 3px (you can choose a smaller or a higher value, depending on how thick you want the outline to be)
- Color → White

If you’re happy with how the outline looks, copy the Border effect’s layer, double-click on the next video in the grid, and paste the effect. Repeat these steps for all the videos in the grid.
Step 6. Export your project
When you’re done editing, go to the Export project tab. If the video is intended to be watched on PCs, select PC and the desired format; if you’re planning to publish it online, select Web and the social media platform.

If you need to change the codec, resolution, framerate, or any other parameters, use the Edit profile menu under the preview window. Otherwise, leave the settings unchanged and hit Export project.
Wrapping up
Video grid is a popular effect used in music videos, TV shows, commercials, and vlogs. With a bit of imagination, you can make it look even more interesting by applying color filters, distortion effects, or by delaying the appearance or disappearance of some of the videos.
Got any questions? Email us at This email address is being protected from spambots. You need JavaScript enabled to view it., DM us on Facebook, or leave a comment on YouTube.
Watch us on YouTube
 / @VSDCFreeVideoEditor
© 2011-2026, www.videosoftdev.com, FLASH-INTEGRO LLC. Privacy policy | Terms of use | About us
All trademarks referenced herein are the sole property of their respective owners.
Copying any materials from this site allowed only with written consent of Site Administration.