How to Add Matrix Falling Code Effect to Video
If you’re a fan of the Matrix trilogy, like us, you’ll be thrilled to hear that the falling code effect is now available in the premium version of VSDC Video Editor. Unlike ready-made overlays, the effect is easily customizable, so you can adjust the look to your needs. For example, you can switch from letters to runes, change the color of the code, the size and speed of falling symbols, and even the depth at which they’re falling.
In this tutorial, we’ll show you how to add the Matrix effect to your video within minutes — no need for video editing or coding experience. Feel free to check the video tutorial first and jump to the text version below for a more detailed settings description.
Step 1. Import your footage to the scene
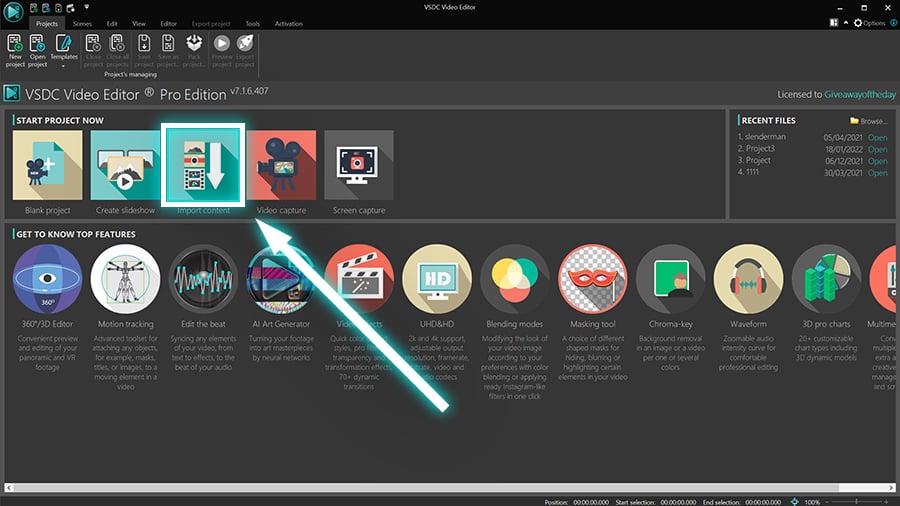
If you’re new to VSDC, the best way to import your footage to the scene is by using the Import content button on the start screen and following the pop-up helping prompts.

This way, the editor will create a project with the same size, aspect ratio, and fps rate as in your video. Once you import the file, the video will automatically appear on the timeline, so you can start editing right away.
Step 2. Add the falling code effect to your video
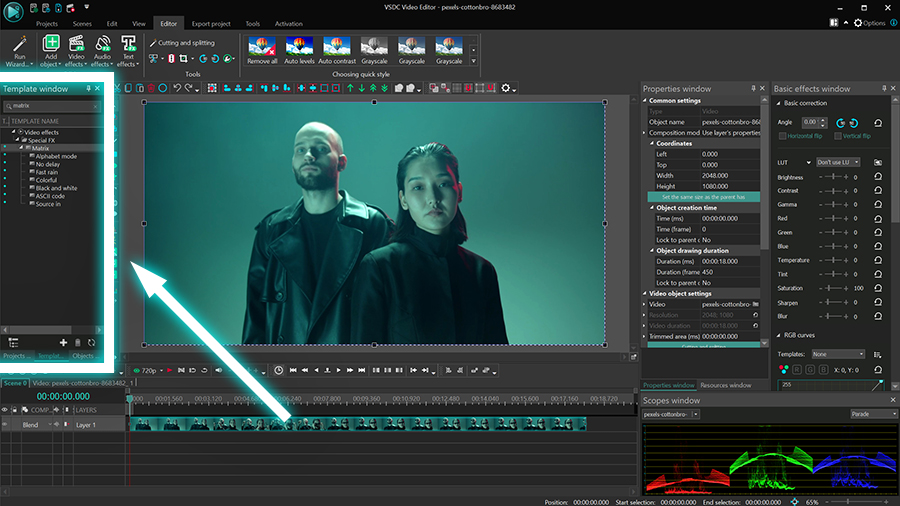
To add the Matrix effect to your video, go to the Template window and type “Matrix”. Although the effect comes with several presets, for the purpose of this tutorial, we’ll use the default configuration and show you how to switch between presets later.

Drag the Matrix effect to the scene and preview the result. This is the default version of the falling code effect, and if it works for you, feel free to leave it as-is and proceed to export. Note that you can apply the same effect to a video, an image, a shape, or a piece of text.
In the following sections, we’ll show you the falling code presets and customization options.
Step 3. Customize the effect
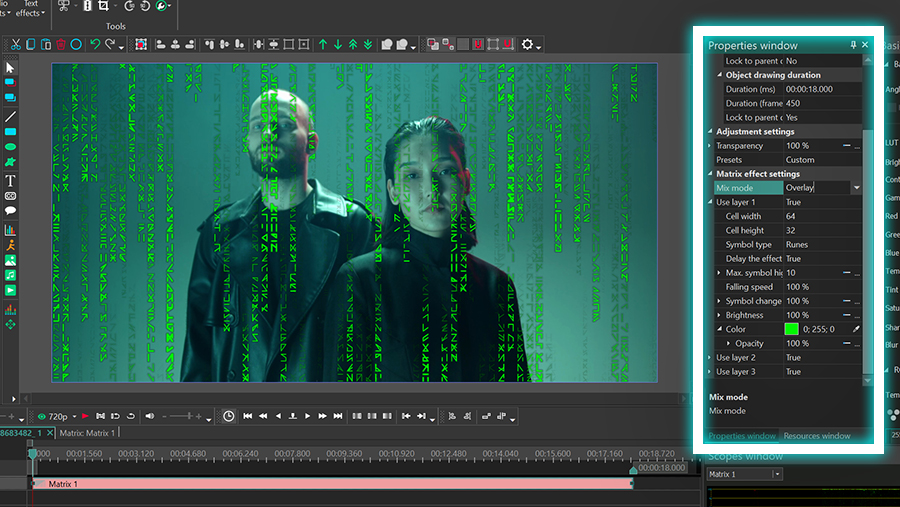
To open the effect settings menu, double-click the footage on the timeline; then select the layer with the effect (it’s called “Matrix”) and proceed to the Properties window on the right side.

If you can’t find the Properties window, make a right-mouse-click on the effect layer and select Properties from the context menu. From there, you’ll have plenty of tools to experiment with. Some of the parameters allow you to change the overall look of the effect; others allow you to customize the look of the symbols. We’ll start with the former group of settings.
Try different presets
Effect presets come in handy if you want to quickly try different styles. For example, you may want the falling code to be black-and-white or paint it rainbow colors. Presets are available under a dropdown menu in the Properties window. Feel free to just switch between them to see how they look.
Regardless of the preset you decide to go with, you’ll be able to customize the size of the symbols, their falling and changing speed, color and brightness. We’ll have a look at each parameter in a few moments.
Adjust effect opacity
Apart from the preset menu, Adjustment settings include an important parameter called Transparency. This parameter helps you change the visibility of the effect. By default, it is set to 100% which is the maximum visibility. When you decrease the value, the lines of falling code become less opaque – as simple as that.
The cool thing about VSDC is that you can set a constant Transparency value or make it gradually change over time by using the Initial value and Final value options. For example, if we set the Initial value at 0% and leave the Final value at 100%, the effect will gradually go from being completely transparent to visible:
Keep in mind that many other effect parameters in VSDC allow you to set the initial and final values. The way they work will be the same every time: the former defines the parameter value at the beginning of the effect, and the latter defines the parameter value at the end of the effect.
Switch between Mix modes
The last parameter that changes the overall look of the effect is called Mix mode, and it’s located directly in the Matrix effect group of settings. Mix modes define how the falling code will be blended with the video or image. For example, by default, the falling code effect works as an overlay. However, if you switch to Source in, the symbols will work as a mask shaping the original image as they fall.
To preview all modes, open the dropdown menu and select them one by one:
Now, before we start talking about ways to modify symbols directly, let’s talk about the way they are layered in this effect.
Understanding layers
You may not have noticed it yet, but some lines of code are falling in the foreground (layer 1), middle ground (layer 2), and background (layer 3) of the scene. You can dissect these layers and customize the falling symbols on the layer of your choice – or even remove them from any of the layers entirely.
For example, this is what the effect looks like if we gradually remove the falling code from the background and middle ground:
Layers can help you achieve depth – especially if you’re willing to go the extra mile and adjust symbols differently on each layer.
For the purpose of this tutorial, we’ll only be working with layer 1, but keep in mind that the parameters for all three layers are identical.
Cell height and width
When you expand the Use layer 1 menu, the first two parameters are called Cell width and Cell height. Essentially, the values of these parameters define the number of symbol cells placed horizontally (width) and vertically (height). The higher the value is, the more cells there will be – and the smaller the symbols will appear.
Here is an example of what the effect looks like when you increase or decrease cell width and height values.
The smallest value you can put for these parameters is 1; the biggest value is 1024.
Symbol type
The following parameter is called symbol type, and it allows you to switch between alphabet letters and runes. In the illustrations above, we’ve used both options, so you probably got the idea by now.
Delay the effect
This option is set to True by default, and that means that the falling code effect will start appearing gradually from the top – as in the original movie intro. If you switch this option to False, code lines will be visible right away.
Max. symbol highlighting
This parameter defines how many pieces of falling code are simultaneously highlighted. The minimum value here is 0, and the maximum value is 1024. Obviously, when you choose the value for this parameter, you should keep the number of symbols(defined by cell width and height), in mind.
Here is what the effect looks like if we gradually increase the number of highlighted symbols, starting from zero:
Notice that without highlighting (if you put 0 as the value), the symbols are invisible. You can also gradually increase or decrease highlighting over time by using the initial and final values.
Falling speed
If you want to slow down or speed up the lines of code, simply tweak this parameter, as it’s pretty self-explanatory. The default value here is 100%, but you can put any value from 10% to 10000%.
Symbol change rate
Symbol change rate defines how fast symbols change within a cell. This parameter defaults to 100%, and you can use the initial and final values to make the effect more dynamic.
Brightness
Use the Brightness parameter to make code symbols brighter or darker. Values for this parameter range from -1000 to 1000, and you can make them change dynamically during the playback.
Color and opacity
Finally, it’s possible to change the color of the falling code for the selected layer and adjust the opacity of symbols as well. Just choose the desired color from the palette or use the eyedropper tool to select a color from the video.
If you’re happy with the result, head over to the Export tab and proceed to Export project. From there, you can select the social media platform your video is intended for, and adjust the quality settings if needed.
Get creative with the Matrix effect in your videos
If you’re using VSDC version 7.1 or later, the Matrix effect is already available in your video effects menu. Go ahead and try it for yourself. Remember that you can apply the falling code to the entire scene or a separate object, such as an image, a title, or even a mask. Use it for creating unique cinemagraphs, spectacular transitions, and creative overlays.
Have any questions? Feel free to email us at This email address is being protected from spambots. You need JavaScript enabled to view it. or DM us on Facebook.
You can get more information about the program on Free Video Editor description page.