 User Help Manual
  Learn FAQ
  Send us feedback
 ")


- This holiday season embraces new beginnings with the latest update of VSDC Video...
- Change is all about improvement, and this process wouldn't be possible without y...
- Intro In 2024 the options range for creating visual effects is incredibly dive...
- Are you ready to explore new heights with the latest major VSDC update? Finally,...
How to stabilize a video in VSDC Video Editor
Footage stabilization is one of the most popular features in video editing. It is demanded by various audiences: from extreme sports adepts literally glued to their action cameras - to sentimental mothers with their hands shaking during the filming of their daughters’ wedding ceremonies. Whatever the case is, the outcome is often the same – a jittering video spoiling the overall impression and impossible to refilm at the same time.
Modern problems require modern solutions, right? One of the easiest ways to smoothen your unstable footage is to download VSDC Video Editor that comes with an embedded video stabilizer tool for your purposes. Here is a brief video tutorial on how to use this tool.
Please note: the tool is not available in the free version of the software. You will need to get a PRO version to use this feature. It’s only $19.99 per year though.
How to use a video stabilizer in VSDC
A step-by-step process for footage stabilization is as follows:
- Open VSDC Video Editor.
- Proceed to the top menu and select the “Tools” tab.
- Click “Video Stabilization” tool at the top left corner of the screen. A new window will open.
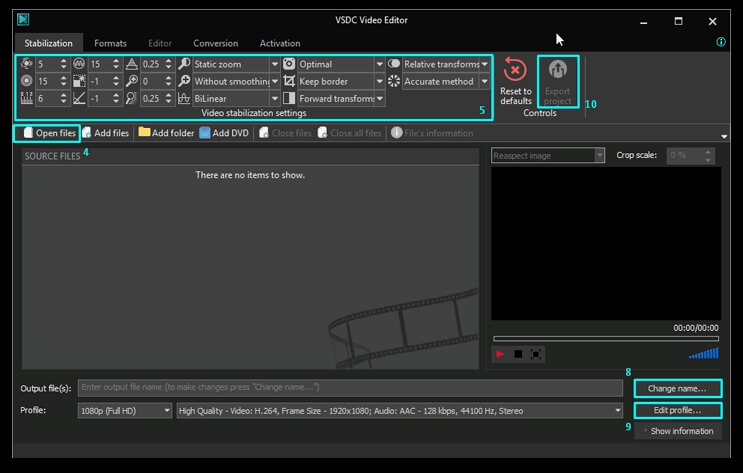
- Select the “Open files” option and choose unstable footage from your computer.
- Proceed to the “Stabilization” tab. Select the settings suitable for your purposes:
-
Shakiness
Shakiness correction is the most vital setting in our review. We suggest choosing its value depending on how shaky your video is on a scale from 1 to 10. The “shakier” the video, the bigger the value.
-
Smoothing
Smoothing is a feature that allows you to choose the number of frames VSDC is going to use for correction effects. Going for bigger value here would be especially suitable for videos where the operator was moving around. With many frames to work with VSDC will better disguise the operator’s movement.
Note: hover over other settings in the “Stabilization” tab to see their brief descriptions.
-
- Proceed to the “formats” tab. Here you can select a specific format for the output video. If you are not sure about the format, you can always refer to the social media channel the video is intended for. VSDC has predefined settings for output videos that include YouTube, Instagram, and Facebook.
- If you want to cut your video, go to the “Editor” tab. Click the timeline exactly where you want to start making the cut. Press the “Start selection” box above for VSDC to memorize the start of the cut. Then click the timeline at the end of the desired cut-out fragment. Press the “End selection” box above and then click the “Cut region” box. Proceed to the bottom right corner of the screen to the “Apply changes” button that will save your edits and take you back to the Video Stabilization window. Please note that within the Video Stabilization tool you will not be able to preview the changes that you made. They will only be available in the output file.
- Choose the output file name and destination at the bottom of the window.
- Go to the “Profile” section below to select the quality of the output format. Opt for lower quality only if you are looking for faster conversion and lower output file size.
- Complete the process by clicking the “Export Project” button in the “Stabilization” tab. Check out the final result.
That’s it! You have just turned your shaky footage into a stable clip. If you are interested in more advanced features of the editor, feel free to sift through our how-to section that covers the basics of video editing for amateurs from cutting and rotating a video to creating stunning cinemagraphs.
You can get more information about the program on Free Video Editor' description page.
© 2011-2025, www.videosoftdev.com, FLASH-INTEGRO LLC. Privacy policy | Terms of use | About us
All trademarks referenced herein are the sole property of their respective owners.
Copying any materials from this site allowed only with written consent of Site Administration.