 User Help Manual
  Learn FAQ
  Send us feedback
 ")


- Published by Amy Shao on March 11, 2026 What is the best gift for...
- published Amy Shao 11/19/25 Meet the long-awaited VSDC 10.2 update: a new ve...
- Hi, I'm Mattea Wharton, a travel videographer from Seattle. For three years I ba...
- published Amy Shao 6/10/25 The wait for something new and unusual is finally...
How to Create Drop Shadow Effect for Text and Objects in Video
As we continue our series of tutorials for those who want to master the art of post-production on a budget, it’s time to talk about the famous drop shadow effect.
The drop shadow effect allows you to create a natural-looking shadow for any object you add to the scene – including moving objects.
If you’re serious about video editing, you will want to have this effect in your arsenal. Just look at the difference a drop shadow makes to the moving text title! It practically creates a 3D effect without you having to deal with 3D.
From the tutorial below, you’ll learn how to add a perfect drop shadow to a text title using the free version of VSDC Video Editor for Windows. In the last part of the tutorial, we’ll quickly show you how to add a shadow to a moving object in a video using VSDC Pro.
You’ll find out how to achieve the result that will look as natural as possible by adjusting:
- the size of the drop shadow,
- its distance from the text,
- the color and intensity,
- and even the light angle.
Basically, we’ll show you how to create a shadow that makes a text object look like it belongs to the scene. Of course, you’ll be able to later apply this knowledge to add a drop shadow to any other clipart used in a video including images, icons, and graphic objects.
Sounds exciting? Then download VSDC Free Video Editor and let’s get started.
How to add drop shadow to text in a video
Once you launch VSDC and import your video, add a text object to the scene using the left-hand side menu or the “Add object” button at the top.
To add a drop shadow to the text, take the following steps:
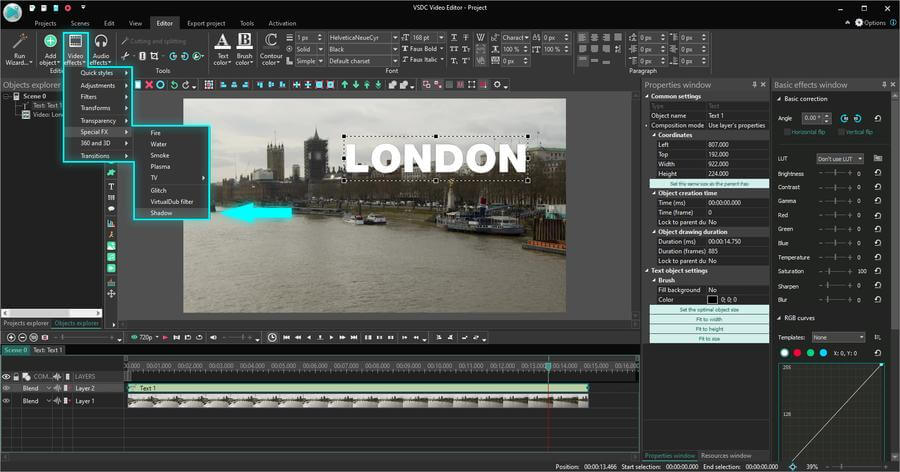
- Make a click on the text object on the timeline to select it.
- Open the Video Effects menu at the top, proceed to “Special FX” and select “Shadow”.
- In the «Object’s position settings» pop-up window, you can select the position of the shadow on the timeline. The default “From cursor position” option means that the shadow effect will appear from the moment currently defined by the cursor. If you aren’t planning to change that, just click “Ok”.
Useful tip. Note that the “Position locking to parent duration” section can help you automatically lock the effect to the beginning or the end of the text appearance in the scene.
How to set up the drop shadow effect in VSDC
Now that we have added the drop shadow to the text, let’s go over the settings to see how to make it look exactly the way you want.
To open the Shadow effect settings, make a double-click on the text layer on the timeline – then right-click on the Shadow effect layer and select “Properties” from the context menu.
The Properties window for the Shadow effect includes 3 sections:
- Common settings.
- Effect adjustment settings.
- Shadow effect settings.
The Common settings section allows you to create a title for the shadow layer, set the moment when it should appear in the scene and its exact duration.
The Effect adjustment settings allow you to fine-tune the shadow transparency level. Moreover, by using the fields titled “initial value” and “final value”, you can set different levels of transparency for the beginning and the end of the effect. That means the drop shadow will gradually become more transparent or lose transparency during the playback – depending on the values you choose.
To see this in action, let’s set the following transparency parameters:
- Initial value – 100%. That means the shadow will be absolutely non-transparent when it first appears in the scene.
- Final value – 20%. At the end of the effect appearance in the scene, the level of transparency will only be 20%.
As a result, the drop shadow will be gradually fading out in a video:
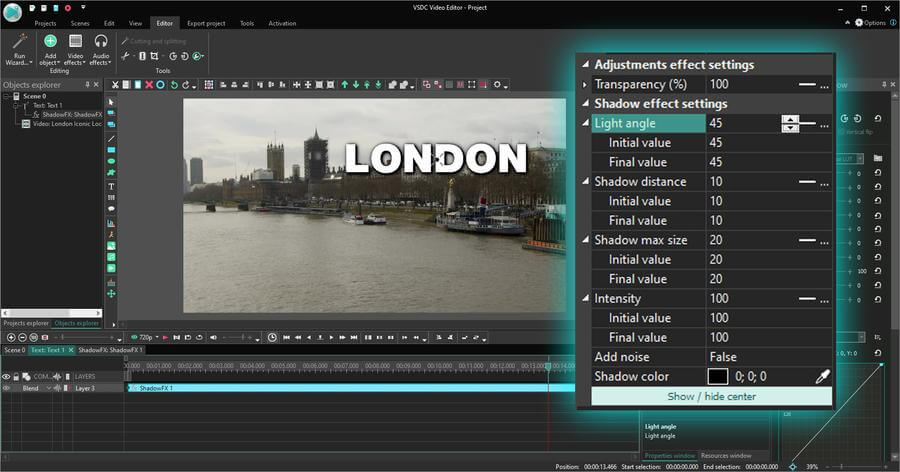
Finally, the Shadow effect settings are the most exciting section because this is where you turn your shadow into perfection. You’ll be able to adjust the light angle, the distance between the object and the shadow, the intensity, the noise – and a gradual change of all these features over time. Below, we’ll have a closer look at each parameter and show you what you can achieve by changing them.
1. Light angle
The “Light angle” parameter allows you to change (you guessed it!) the light angle so that the drop shadow would look more natural in a video with a clear location of the source of light. If you need to set different light angles for the beginning and the end of the shadow appearance in the scene, the initial and the final values should be set up respectively.
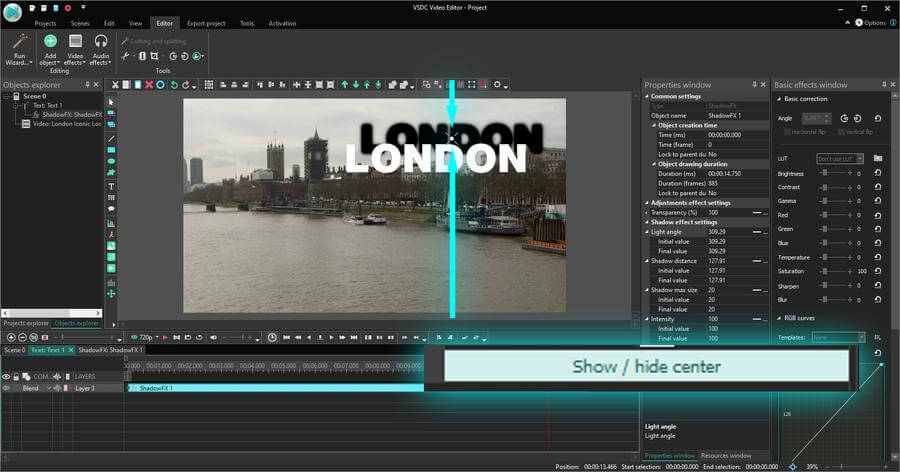
In the example below, the shadow is gradually moving around the object from the initial angle (set at 45 degrees) to the final angle (set at 225 degrees).
2. Shadow distance
By changing the “Shadow distance” parameter, you can control the distance between the object and the shadow. Again, you can set it as a permanent value, or you can add a bit of dynamic to the effect by playing with the initial/final value parameters.
For example, if the source of light in your video is moving, the shadow distance is expected to be gradually changing too.
Useful tip. You can manually move the shadow around the scene by grabbing it in the center and dragging while holding the left mouse button pressed. If you can’t see the center of the shadow, use the “Show/hide center” button in the Properties window.
3. Shadow max size
If you’d like the shadow to appear blurrier, simply increase the “Shadow max size” parameter. The higher its value is, the bigger and less sharp the shadow becomes. Note that if the shadow max size value is equal to 0, the shadow is completely absent from the scene.
4. Intensity
This parameter helps you control the intensity of the shadow color. The higher the value is, the more visible the shadow appears. Under the Intensity menu section, you can also change the color of the shadow and add noise. The latter makes the shadow look grainy and textured.
If you want to add noise to the drop shadow, open the dropdown menu and make the switch: False >> True. Next, you’ll be able to set the noise level (strength) and select the dynamic noise type if you want the noise to be constantly changing during the playback.
How to add a drop shadow to a moving object in a video
Now that you know how to create a perfect drop shadow effect, let’s do a quick recap of our motion tracking tutorial and see how to make both the object and the shadow move along the desired motion path using VSDC Pro.
This is what the result might look like.
Once you’ve added the shadow to your text, go back to the main scene on the timeline and follow these steps:
- Make a left mouse click on the video layer and select “Create movement map”.
- Next, place the tracking frame over the object you want to track in the video.
- Create the movement map and save it on your PC as suggested by the program.
- Make a double-click on the text layer on the timeline to open it.
- You’ll notice that the Shadow effect is already applied to the text. All we need to do now is to apply motion.
- Use the “Add object” button located at the top. Proceed to Movement >> Movement map.
- Select the map you’ve just created and preview the result.
Adding a drop shadow effect to a moving object is barely any different from using this effect on a still object. As you can see, both effects are applied in the same tab on the timeline where you can manually adjust their starting points or duration if needed.
Ready to take your videos to professional level?
Now that you’ve learned another mind-blowing post-production trick, go ahead and try it for yourself! Make sure to check our roundup of motion tracking ideas and download the latest version of VSDC from the official website.
Whether you’ll be using the free or the Pro version - you get plenty of tools to visualize your ideas.
Watch us on YouTube
 / @VSDCFreeVideoEditor
© 2011-2026, www.videosoftdev.com, FLASH-INTEGRO LLC. Privacy policy | Terms of use | About us
All trademarks referenced herein are the sole property of their respective owners.
Copying any materials from this site allowed only with written consent of Site Administration.