 User Help Manual
  Learn FAQ
  Send us feedback
 ")


- published Amy Shao 11/19/25 Meet the long-awaited VSDC 10.2 update: a new ve...
- Hi, I'm Mattea Wharton, a travel videographer from Seattle. For three years I ba...
- published Amy Shao 6/10/25 The wait for something new and unusual is finally...
- This holiday season embraces new beginnings with the latest update of VSDC Video...
How to Apply Bokeh Effect to Your Photo or Video with VSDC
Bokeh is a stunning visual effect that requires a special shooting technique. To get the famous soft blurry background, you’ll need to use a particular lens and change your camera settings to make sure that the lights behind the object you’re shooting are out of focus.
Sounds easy? Well, for those with some experience (and a good camera) it’s doable. However, there are many situations when you might need to apply Bokeh effect after the shooting session is over. For instance, you might not find the right location with the right amount of flashing lights in the background. Or you may struggle to find the right camera lens. Or you may simply decide that you want to use the effect when the video has been already recorded.
Whatever the reason is, VSDC is here to the rescue! It allows you to quickly apply Bokeh glare effect to any video or image for free. Moreover, you’ll be able to customize the effect and change the shape, the size, the color, the density, and the movements of the flares. See it for yourself:
In the tutorial below, we’ll show you how to work with the Bokeh effect in VSDC to achieve the desired look.
Without further ado, let’s dive right in.
Download VSDC Free Video Editor for Windows
How to apply Bokeh effect to a video in VSDC
To get started, launch VSDC and import your footage using the Import content button on the start screen. Then, follow these steps:
- Make sure you’ve placed the cursor at the beginning of the timeline if you want the effect to appear from the beginning of the video.
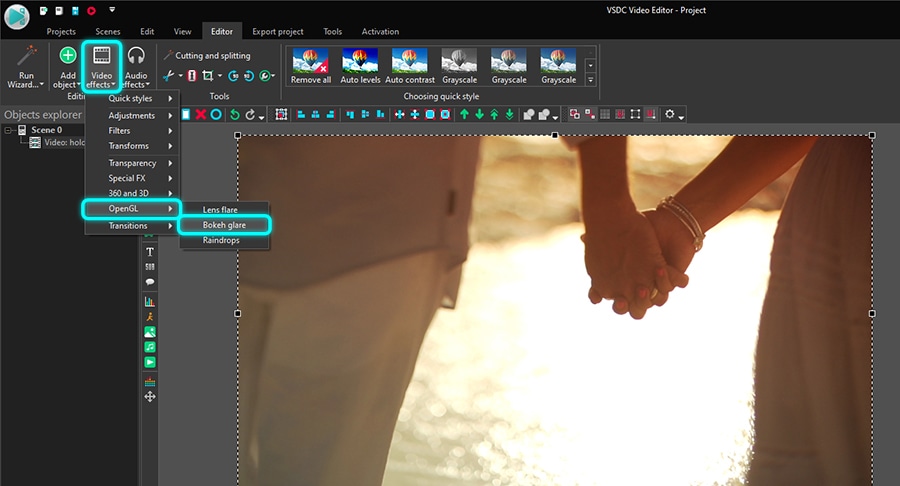
- Left-click the video file and open the Video effects menu.
- Proceed to the OpenGL category and select Bokeh glare.
- In the Object’s position settings window, hit OK.
You’ll notice light flares on the sides of the scene - that’s a default Bokeh effect applied (see the image below). It might not look as dense or as bright as you anticipated, but this is just a starting point.
Now, let’s see how you can modify the effect to achieve the desired look of the flares.
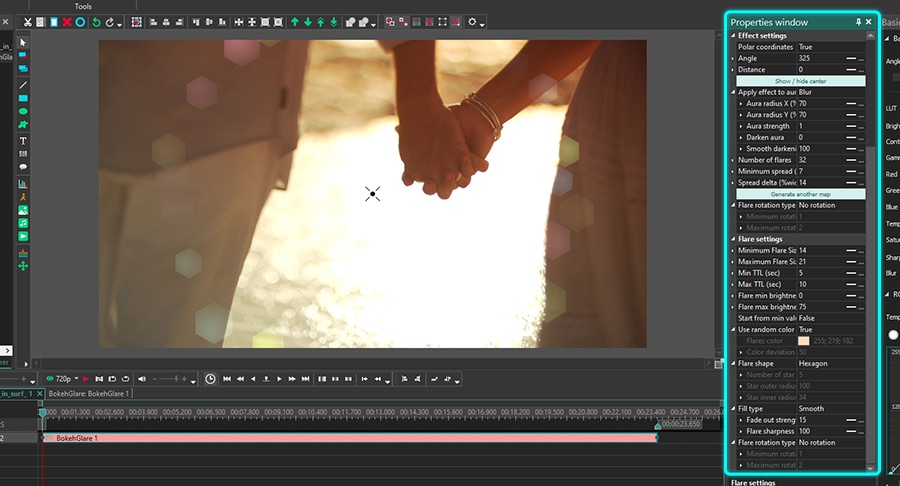
Properties window overview
To access the settings, make a left-click on the effect layer and select Properties. The Properties window will slide-in from the right-hand side.
There are four groups of settings available for this effect:
- Common settings
- Adjustment effect settings
- Effect settings
- Flare settings
The first two groups of parameters are common for all effects in VSDC.
Common settings allow you to add a title to the effect layer, set the moment when the effect will appear in the video (by seconds or by frames), and the duration of the effect (in seconds or frames).
Adjustment effect settings enable you to choose the Transparency level for the Bokeh effect.
Note that you can set the same level of transparency for the entire effect duration or you can have it gradually increase/decrease to the desired level.
If you decide to go the second route, the Initial value and the Final value of the Transparency parameter should be different. Think of it as the fade-in and fade-out effects. For example, here is what it will look like if we set the Initial value at 100% (completely non-transparent) and the Final value at 10%:
The last two groups of settings in the Properties window allow you to work with the Bokeh elements directly. We’ll take a closer look at them.
Effect settings overview
Once you apply the effect, you’ll notice a cross in the center of the free zone (the area in the center of the effect that is free of flares). Grab this cross with a mouse and use it to manually change the position of the effect. If you, however, want to locate it more precisely, you can do it with the following parameters.
Polar coordinates is the first parameter in this group. It allows you to adjust the location of the Bokeh effect in the scene using the Polar coordinates system. Make sure it is switched to True before changing the settings and keep in mind that the pole (point with coordinates 0;0) will be located in the center of the scene. If you deactivate Polar coordinates (switch the mode to False), the pole will be located in the top left corner.
Using Polar coordinates, you’ll be able to adjust the parameters named Angle and Distance. In short, Angle defines the direction where you’d like to shift the free zone, and Distance defines how far it will be shifted.
Note that when the Distance equals to zero, the free zone will remain in the center of the scene, regardless of the angle. When the Distance parameter is more than zero, and you start changing the angle, the free zone will be moving clockwise.
For example:
- If Angle = 90, the free zone will be shifting down
- If Angle = 180, the free zone will be shifting to the left
- If Angle = 270, the free zone will be shifting up
- If Angle = 360, the free zone will be shifting to the right
You might want to use the X and Y axis to change the position of the effect in the scene. In that case, switch polar coordinates to False and use the parameters named Center X and Center Y.
The following parameter is titled Apply effect to aura. First of all, in case you didn’t know, “aura” is the area that starts with the circle of flares and spreads to the edges of the scene.
Although it doesn’t necessarily contain flares everywhere, it’s a part of the effect, and you have control over the way it looks. Specifically, VSDC allows you to change the radius and the appearance of the aura. For instance, you can choose one of the following options from the Apply aura effect dropdown menu:
- Copy – every object in the footage that falls into the “aura” zone gets duplicated
- Blur – everything in the “aura” zone is blurred
- Radial blur – radial blur effect applied to the footage in the “aura” zone
- None – there is no aura
You can also change the Aura radius and Aura strength. Aura radius controls the radius of the area inside the effect. By changing its size, you automatically change the radius of the aura.
Aura strength increases the effect you’ve selected one step earlier. For instance, if you’ve selected “Blur”, the higher the value of Aura strength is, the blurrier it will be.
Darken aura is a parameter that defines how dark the aura should be with 100 being the maximum value.
If you choose to darken the aura, the Smooth darkening option allows you to achieve a gradient effect that starts in the free zone and continues to the end of aura. The higher its value is, the smoother the gradient will be.
Number of flares is an aptly named parameter that controls the number of Bokeh flares in the video. It is typically used along with Minimum spread and Spread delta.
The Minimum spread parameter sets the minimum distance between the free zone and the glares. Notice how the flares move further from the free zone as we increase this value:
Meanwhile, the Spread delta parameter sets the possible range for the Minimum spread value. If the Spread delta is equal to 0, all flares will be located at the minimum spread distance from the free zone. In the example below, we gradually increase the value of Spread delta. Notice how the density of flares in the scene decreases.
Note that if you’d like to change the way flares are spread, you can also do that by hitting a green button named Generate another map.
The Flare rotation type parameter sets the rotation of flares around the free zone. There are four rotation types available to choose from:
- No rotation
- Rotate clockwise
- Rotate counterclockwise
- Random direction
Note that if you select any rotation type, you can also set Maximum and Minimum rotation speed.
Bokeh effect: flare settings
The last group of settings helps you customize the look of the flares. It includes a handful of parameters related to the size, shape, color, brightness, and flare movements. Most of them allow you to set the dynamic change of values by using the difference between the Initial value and the Final value.
You’ll also notice that many parameters include the minimum value and maximum value. The reason being the effect suggests that the flares displayed at any given moment should not look the same. As a result, the minimum and the maximum values are randomly assigned to flares, and that produces the illusion of sparkling lights in the background.
Now, let’s review your options one by one.
Minimum/maximum flare size – this parameter should sound self-explanatory. It allows you to set the minimum and maximum possible flare sizes. That means your Bokeh effect will include various flares, but none of them will be smaller than the former or larger than the latter.
Each flare in the effect has its limited lifespan. The parameter titled Min/Max TTL allows you to define the minimum and maximum possible duration of that lifespan for each flare. As flares reach their time limit, they disappear from the scene replaced by new flares.
Flare min/max brightness – this parameter is also self-explanatory. Along with the value you set, it is limited by the level of Transparency you selected in the previous group of settings.
If you want all the flares to start displaying at the minimum level brightness (as opposed to random brightness level), set True for the parameter named Start from min value.
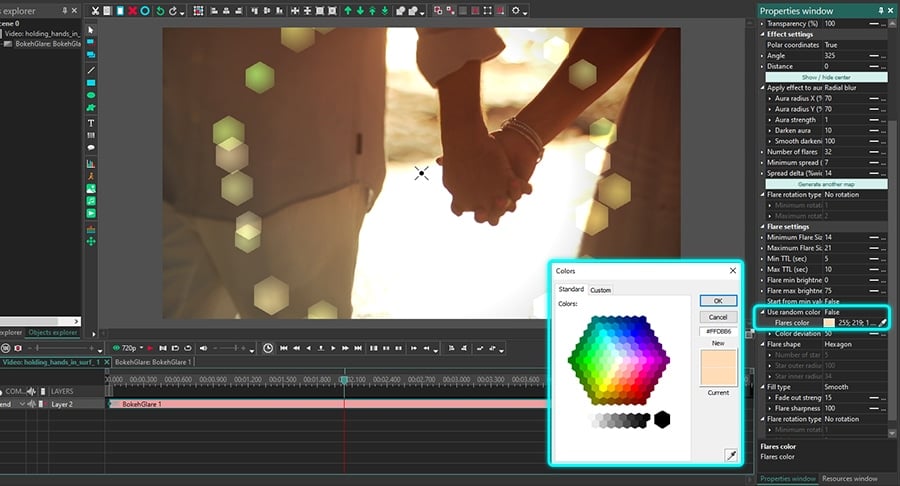
Similarly, you can decide whether you want flares to be of the same color when they start displaying or of random colors. If you set Use random colors -> False, you’ll be able to choose the Flare color and set the Color deviation. The latter parameter defines how far the color can deviate from the original tone.
If you don’t like the default hexagon flares, there are three more Flare shape options for you: a circle, a heart, and a star. The star shape is the most customizable one. If you choose this shape, you can also set the following parameters:
- Number of star points
- Star outer radius
- Star inner radius
In addition to the color and shape, you can choose to fill the flares in different ways. There are four Fill types available: solid, smooth, center, and point.Just switch between the available fill types and check the results in the preview window.
Fade out strength is a scale from 0 to 100 that allows for applying a smooth fade-out effect to the flares. When equals to 0, the fade-out effect is absent. As you increase the value, the light source inside the flares moves from the center and creates a fading effect.
Finally, the last parameter is called Flare sharpness. By changing it, you can change the strength of the light source sharpness inside the flares. As a result, the higher the value is, the bigger the light radius becomes.
Bokeh glare effect is not just for romantic videos
Now that you know the ins and outs of applying the Bokeh effect to videos, keep in mind that it’s more versatile than you might have thought. Don’t limit yourself to the romantic genre.
For instance, although it’s traditionally considered an effect for nighttime shooting sessions, it can be a beautiful addition to a daytime video or photo. It’s also not just for backgrounds! Try reducing the flare brightness and use the effect as a foreground, too.
Let your creativity take over and experiment with the new tool. Need some inspiration? Check out our YouTube channel. We publish weekly tutorials for all levels of experience, and you’ll surely find lots of ideas.
Watch us on YouTube
 / @VSDCFreeVideoEditor
© 2011-2026, www.videosoftdev.com, FLASH-INTEGRO LLC. Privacy policy | Terms of use | About us
All trademarks referenced herein are the sole property of their respective owners.
Copying any materials from this site allowed only with written consent of Site Administration.