- This holiday season embraces new beginnings with the latest update of VSDC Video...
- Change is all about improvement, and this process wouldn't be possible without y...
- Intro In 2024 the options range for creating visual effects is incredibly dive...
- Are you ready to explore new heights with the latest major VSDC update? Finally,...
Master Page Turn Transition Effect with VSDC Free Video Editor
You may think that the page turn transition isn’t the most mind-blowing effect, especially given that it’s available in every slideshow creator. Well, get ready, because you’re about to change your mind.
It’s true that the page turn effect, in its basic version, has been around for a while. But guess what? Even such a simple transition can be taken to a whole new level if you have the right tools at hand. For instance, when you use the page turn effect in VSDC, you can get really geeky about the angle, the curl, the shadows, and other little details.
Now, you may be wondering if that can create a real difference. Fair question. See it for yourself.
In the tutorial below, we’ll show you how to achieve a similar result using completely free video editing software for Windows, named VSDC. Before starting, make sure to download it here.
How to quickly apply a basic Page Turn effect in VSDC
The page turn transition can be created within a couple of clicks. Then, using the advanced settings, you’ll be able to make it look like a post-production masterpiece.
So, let’s start with the basics. To quickly add the page turn transition, do the following:
- Import your footage and place a cursor at the moment where you want to start the transition.
- Select the file you want to apply the transition to with a left-click. Further in the tutorial, we’ll be referring to this file as a “turning page” or “page”.
- Go to the Video Effects menu at the top, proceed to Transitions and select Page turn.
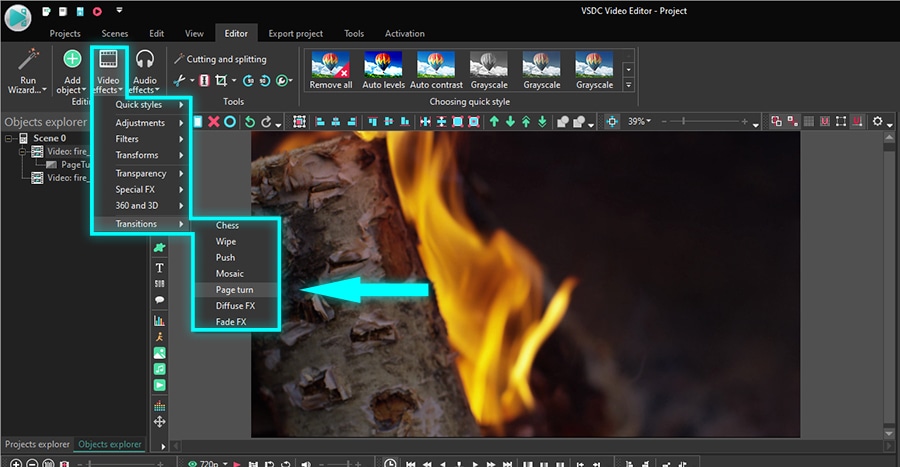
And this is it. The basic version of the page turn effect is ready. Use the video preview feature to see how it looks.
In the following paragraphs, we’ll show you how to tweak the settings and make the effect look exactly the way you want.
Page turn effect settings
First, go ahead and make a double-click on the video you’ve applied the transition to. When you do that, you’ll see the Page turn effect layer. Right-click on the layer and select Properties from the menu. The Properties window will slide in from the right-hand side, and that’s where all the major settings are located.
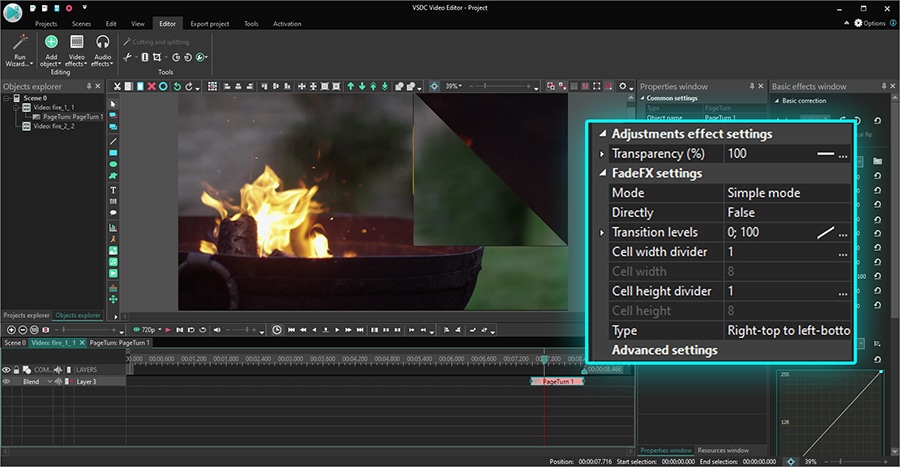
The Properties window includes 4 sections:
- Common settings
- Effect adjustment settings
- FadeFX settings
- Advanced settings
Let’s take a closer look at each set of parameters.
The Common settings section allows you to create a title for the effect layer, manually set the moment when it should appear and the exact duration of the transition.
The Effect adjustment settings allow you to change the transition transparency level of the footage you apply the effect to.
The lower the transparency value is, the darker (more transparent) the footage gets. By applying this parameter, you can control how soon the following scene will be entirely visible to the viewers.
The transparency level can be set up to change gradually as the transition progresses. In other words, at the beginning of the page turn transition, the page can be completely non-transparent, and at the end of the turn, the page will fade out.
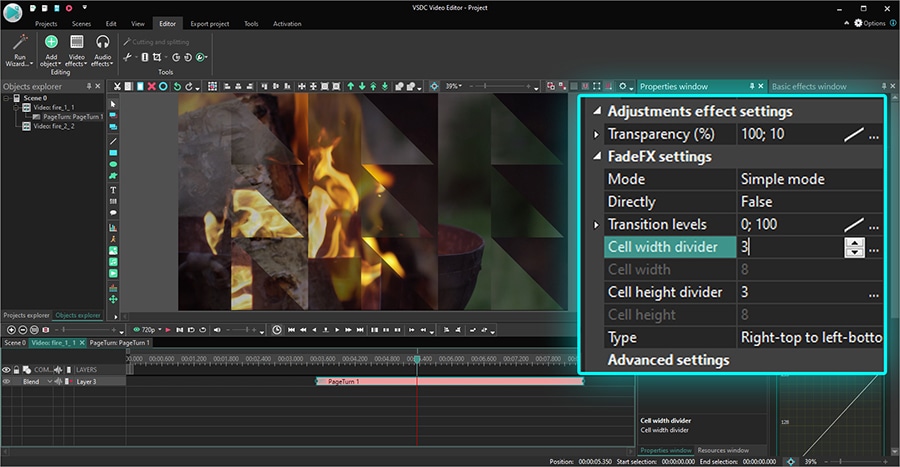
To see what it looks like, let’s open the transparency level dropdown menu, set the initial value at 100% and the final value at 10%.
Initial value – 100%. The footage is absolutely non-transparent when the page turn transition kicks in.
Final value – 10%. At the end of the transition, the level of transparency will only be 10%, and you’ll start seeing the following image entirely even before the transition is over.
The FadeFX settings bring two modes: simple and advanced. When the Simple mode is selected, it allows you to choose:
- whether the page should be folding or unfolding (“Directly”: False or True)
- whether the page will fold completely by the end of the transition (“Transition levels”)
- from which corner the page starts to fold (Parameter named “Type”)
- how many folding cells the page will be divided into (“Cell width divider” and “Cell height divider”).
Finally, the Advanced settings menu allows you to set the shadow from the turned page and adjust its intensity.
Once you switch the Mode in the FadeFX settings menu to “Advanced”, additional parameters will appear. Let’s review them in detail.
Page turn effect in VSDC: Advanced mode
The key advantage of the advanced mode is the ability to precisely change the appearance of the effect: the page turn angle, antialiasing, and shadows. All these parameters allow you to achieve a more realistic illusion of a turning page.
For instance, the Page angle settings allow you to change the angle at which the page will fold over. If the Page turn value is equal to 00, the page will be folded vertically. If you set the Page angle value at 900 – it will fold horizontally.
If you want to create the effect of uneven folding, you can set different values for the beginning and the end of the transition.
For the illustration below, we’ve set the following values:
- Page angle, initial value: 10
- Page angle, final value: 125
The next parameter is called Antialiasing, and it helps you smooth the edges and curves of the object during the transition. There are three options in the Antialiasing menu:
- None – nothing will be applied.
- Vertical – only the vertical lines will be smoothed.
- Full – edges and curves of the entire object including its shadows will be smoothed.
Page turn advanced settings overview
When the FadeFX settings mode is switched to the Advanced mode, the Advanced settings menu at the bottom of the Properties window gets a plethora of new controls you can play with. We’re going to review each one and explain what happens when you change their values.
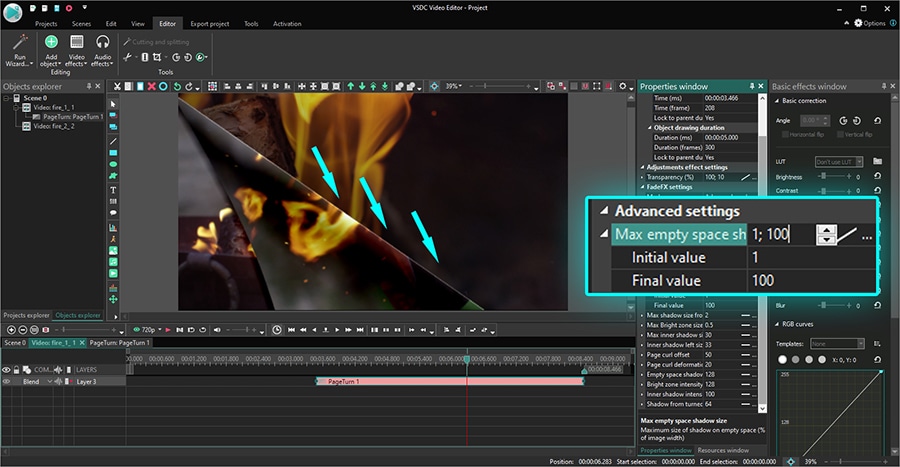
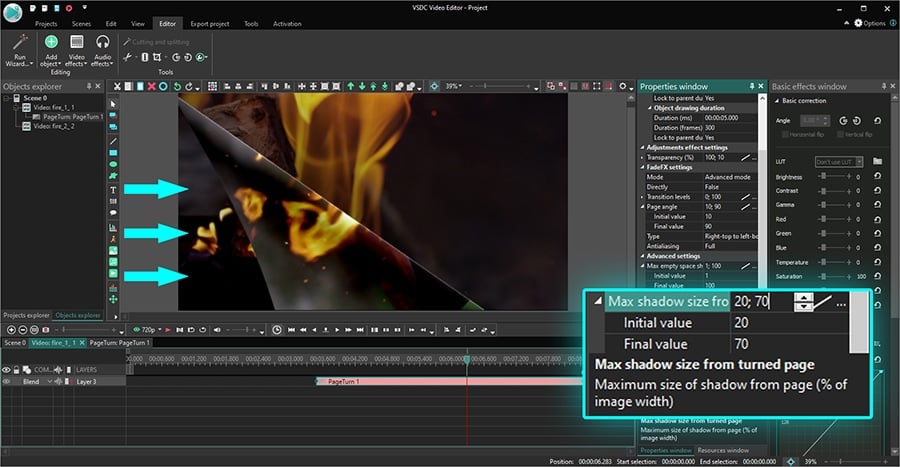
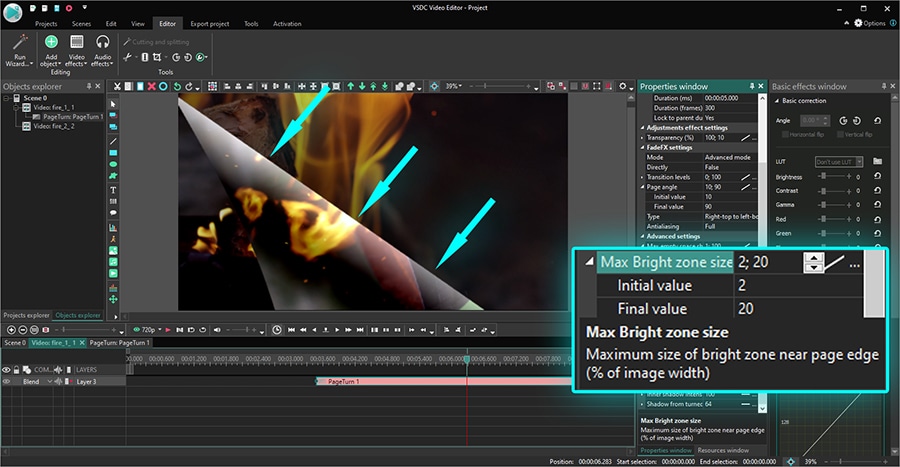
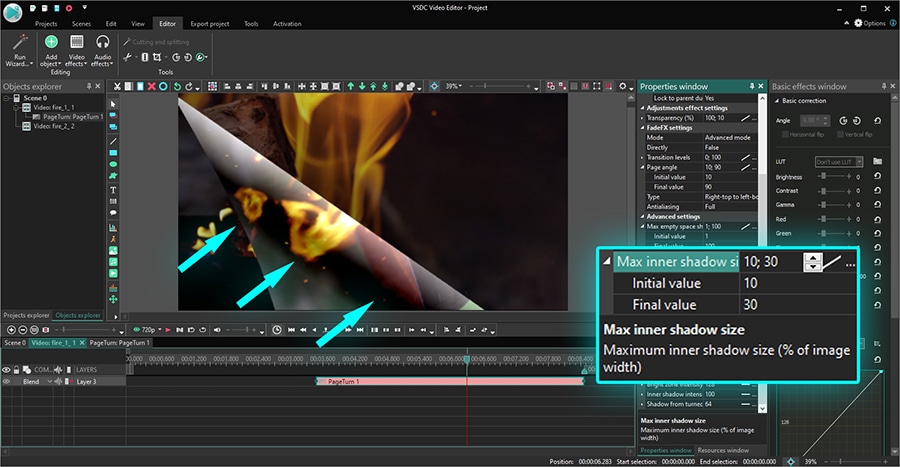
The following four parameters define the size of the shadow produced by the page fold. Their values are calculated as a percentage of the file width, and you can set different values for the beginning of the transition and the end of it by adjusting the “Initial value” and the “Final value”.
Max empty space shadow size
This parameter allows you to change the size of the shadow that appears under the page because of the fold.
Max shadow size from turned page
Unlike the previous parameter, this one helps you adjust the size of the shadow that appears on the video you’re applying the transition to.
Max bright area size
The bright area is the most prominent zone of the fold that is typically brighter than the rest of the page because light hits it. And yes, you can change the size of it, too!
Max inner shadow size
The inner shadow is the shadow on the outer side of the fold right next to the bright zone.
Inner shadow left size
Now, if you look at the inner shadow – the parameter we’ve just described above – you’ll see that it is essentially a gradient. And you have control over the left-hand side of that gradient – specifically, the area that goes from the light zone to the darkest zone. The value here is calculated based on the inner shadow size.
Page curl offset
How strong should the page curl be? By changing this parameter, you can imitate a more dramatic curl as well as a barely noticeable one.
Page curl deformation
The page curl deformation parameter is paired with the curl offset to help you achieve a more prominent, realistic page curl. Its value determines where the maximum page curl offset is located on the page fold.
Empty space shadow intensity
We talked about the empty space shadow a few paragraphs earlier. It’s the shadow on the area under the page that’s being folded. By changing its intensity, you can make it lighter or darker.
For instance, if its value is equal to 255, you’ll get the darkest shadow possible. If the value is equal to 0, there will be no shadow visible at all. To get a better idea, check out the illustration below.
Bright area intensity
Similarly, the bright area intensity defines how bright the edge of the fold will be.
For example, if the bright area intensity equals 255, that’s the maximum brightness you can achieve. If the value is 0, there will be no bright area.
Inner shadow intensity
Need to darken that shadow next to the bright zone? This is the parameter you need.
If you set the inner shadow intensity at 255, the shadow will be the darkest possible. At the value equal to zero, there will be no inner shadow visible.
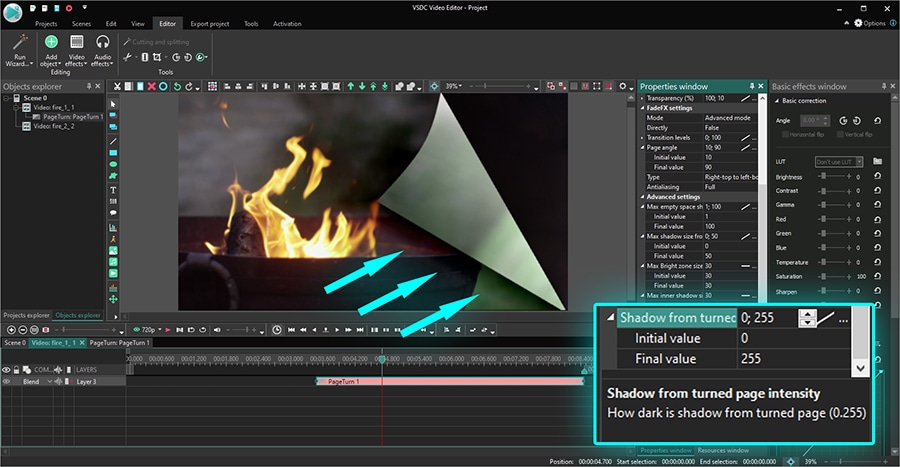
Turned page shadow intensity
The last shadow in this menu is the one displayed on the page under the fold, and you can decide how visible it will be. Check the illustration above to get a better idea of where it’s located. Again, 255 is the maximum value that will produce the darkest shadow possible, and 0 will remove that shadow completely.
Ready to create the most sophisticated page turn effect possible?
Chances are, you won’t need to use all these settings when working on your page turn transition effect. However, being able to fine-tune them at such a high level certainly opens a lot of possibilities for you as a creator!
There is a way to visualize a slow, smooth page turn, and there’s a way to create a harsh, impulsive page turn. By playing with the shadows and the bright zone, you can imitate pages being turned in a dark room or a well-lighted place.
Which one will be the best option for your video? That’s up to you. The VSDC tools are absolutely free, so make sure to use them to your advantage.