")


動画編集
家族のグリーティングカードから会社のプレゼンテーションまでのどんな複雑性でも動画を作成できるように、動画編集 フリーウェアを使用しています。 カットをはじめて、動画ファイルの併合、視覚効果や効果音やフィルターや画像修正などの適用、適当なサウンドトラックの追加、スライドショーを作成できます 。動画がプロフェツショナルに見えるように、クロマキーおよび詳細設定を使用してください。 全ての人気の動画形式/音声フォーマットをサポートしています。
ビデオ変換器
このプログラムは他のフォーマットにビデオを変換することに志向されます。人気のビデオフォーマットの大半をサポートしています。(読込みと保存)その上、プログラムは特定のマルチメディア装置で、例えばiPhone、 Microsoft ZuneまたはArchos、再生するためにビデオを変換するタスクを大幅な簡素化します。プログラムは非常に簡単で使用するし、モダンインターフェースがあるし、必要なビデオ処理の機能があります。
オーディオ変換器
オーディオ変換器は他のフォーマットにオーディオファイルを変換します。基本的なオーディオフォーマットとコーデックをサポートしています。プログラムはプレイリストとメタタグを管理し、ビデオファイルからオーディオを抜き出して、パソコンでどんなフォーマットでもこのトラックを保存させます。
オーディオCDグラバ
このオーディオツールはオーディオトラックをグラブし、ユーザーのパソコンでどんなフォーマットでも保存するように使えます。人気のビデオフォーマットとコーデックの大半をサポートしています。プログラムはまた自動のファイルのリネームし、メタタグを更新のためにFreeDBからトラックの詳細を抜き出すことができます。
 動画編集
動画編集 ビデオ変換器
 オーディオ変換器
 オーディオCDグラバー

多機能性
1つのビデオソフトウェアのスイートではマルチメディア処理ツールの広い配列があります。

高速度
シングルコアやマルチコアのCPUに最適化した高品質と高速なアルゴリズムを使用します。

費用を負担できること
VSDCはWindows OSベースのPCとラップトップに無料でダウンロードできます。
News:
- 時が来ました: VSDC 9.1の待望のアップデートをご紹介できることを嬉しく思います!新バージョンの改善された機能は、ビデオ編集を加速し、編集プロセスをさらに...
- VSDC最新バージョン8.3へようこそ!100種類以上の新鮮な無料ビデオテンプレート、待望のキーフレーム編集用のキーエディタウィンドウ、AV1エンコーディング、...
- 現在、ビデオコンテンツの人気は高まっており、多くのユーザーが個人的およびプロの目的でビデオクリップを作成する必要に直面しています。市場が提供する多くの選択肢から...
- 今日のデジタル世界では、 創造性が最高の地位を占めています。 個人やブランドが視聴者を魅了し、 永続的な印象を残す無限の可能性を提供します。 ソーシャル メ...
How to Make Transitions Smoother Using Bezier Curves
Bezier curves have many uses in video editing, one of which we already explored in our quick guide to drawing shapes. This time, we’ll show you how to use Bezier curves in so-called “easing curves” – the tool allowing you to control how long it takes a transition to kick in or fade out.
Please note that editing transitions along Bezier curves is only available in the Pro version of VSDC.
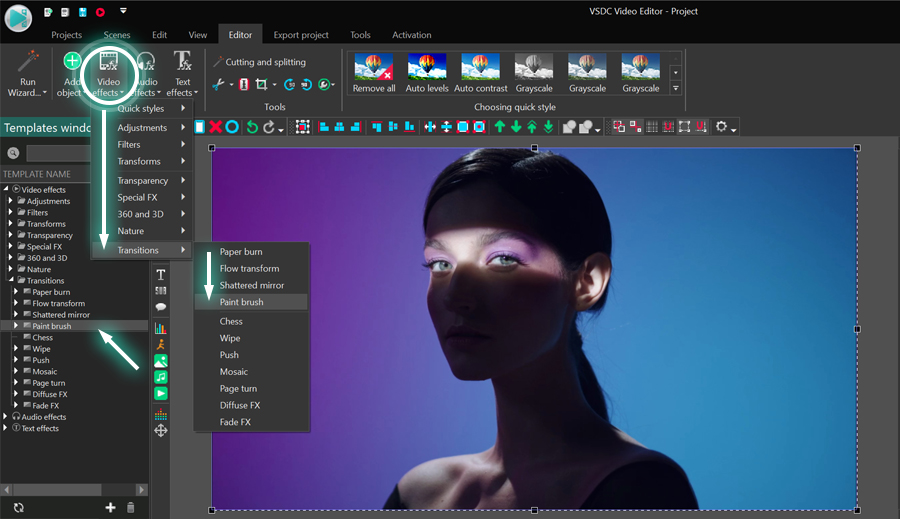
Step 1: Import your footage and add a transition
Making smooth transitions with the Bezier curve is a simple process. First, import your video file to the project. If you already have a blank project opened, you can just drag the video file onto the timeline. Next, add a transition. For this tutorial, we will be using the Wipe transition, but you can choose any of the ones available in the Templates window.
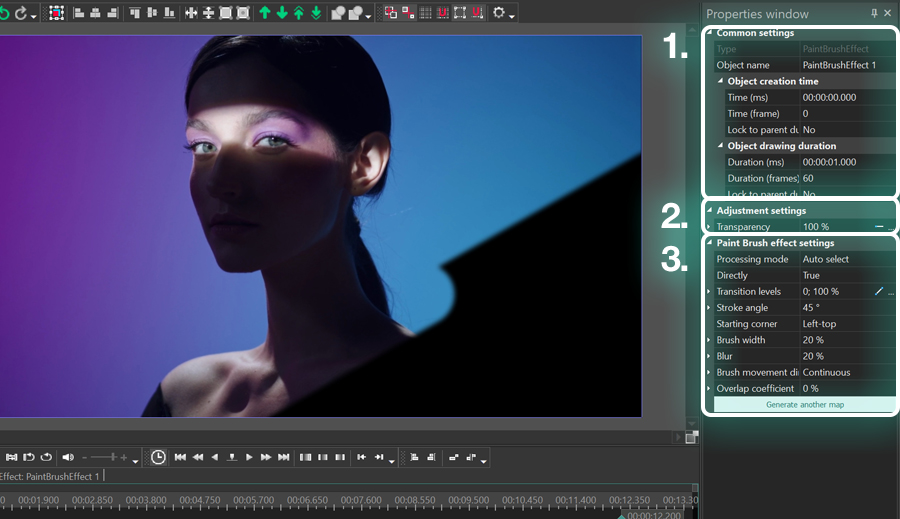
Step 2: Apply transition curve template
Right-click on the transition effect to open the Properties window. For our example, we’ll be working with Transition levels – the parameter setting the speed of the transition. Right-click on the tiny Parameter change icon next to Transition levels and hover over Templates. Then select “Quad Out.”

There are over a dozen options available in the menu; however, for our example, we need to use a template ending with “Out” because the transition is at the end of the video. Had we placed the transition at the beginning of the video, we would have selected a template ending with “In.”
Step 3: Configure Bezier curve
Once you apply the template, the timeline window will display a graph. The curve on the graph is based on the Transition level values, therefore, by changing this curve, you will be adjusting the pace of the transition.
To get started, find the two control points: one at the beginning of the graph and one at the end of it. These are called “keyframes.” Click on either of the keyframes, and you’ll see a vector. Grab the end of the vector and drag it around: both the length and the angle of the vector change the curve and, thus, the pace of the transition.
To adjust the transition at any specific moment, you can create additional keyframes by double-clicking on the graph. The smoother the curve is, the smoother the transition. The opposite is true: if you create a sharp curve, the pace of the transition will spike accordingly.
Create custom video effects using Bezier curves
Customizing transitions with Bezier curves is easy. You can apply them to any parameter that includes values changing along a curve and achieve outstanding video effects. Furthermore, after creating your ideal transition, you can save it as a template and use it later. Check out a quick tutorial on how to do it.


このプログラムは、あなたのデスクトップのビデオをキャプチャし、パソコンで様々なフォーマットでも動画を保存できます。プログラムは、動画編集と結合して、プレゼンテーションの作成や、チュートリアルや、デモビデオのためにすごいツールです。

このプログラムは外部の装置からビデオをキャプチャーし、自由なフォーマットでパソコンに記録します。ビデオチューナーや、ウェブカメラや、キャプチャカードなどからビデオを保存できます。

"VSDC Free Video Editor is a surprisingly powerful, if unconventional video editor"
- PC Advisor

"This video editor gives you tons of control and editing power"
- CNet

"The editor handles many common formats and boasts a good deal of capabilities when it comes time to alter lighting, splice video, and apply filters and transitions in post production"
- Digital Trends
© 2011-2024, www.videosoftdev.com, FLASH-INTEGRO LLC. Privacy policy | Terms of use | About us
本サイトに表示されている全ての商標はそれぞれの所有者の財産です。
書面による許可のない限り、本サイトからの情報および資料をコピーすることを認められません。