 User Help Manual
  Learn FAQ
  Send us feedback
 ")


- Welcome to the next level of video editing with VSDC's latest release, Version 9...
- Welcome to the latest VSDC update, Version 8.3! We've been working hard and we’r...
- In today’s digital landscape, the popularity of video content is gaining momentu...
- In today's digital world creativity reigns supreme. It offers endless possibilit...
Apply professional-level color correction with Hue & Saturation curves
Have you ever noticed that the same picture may look absolutely differently if processed in opposite colors? The same is true for videos: cool colors are often used to create an atmosphere of anxiety, meanwhile, warm colors are good for creating the spirit of joy, comfort, and romance. Both – photographers and videographers use this approach to transmit the desired emotion to the viewers.
From a technical standpoint, you can achieve these effects by shifting the color balance of a picture, and in this article, we’ll show you exactly how to do that using VSDC Free Video Editor.
Being able to correct color balance through working with Hue and Saturation parameters will come in handy for any video editing enthusiast, not just professionals. In fact, that’s sometimes the only way to “save” a video recorded with wrong white balance settings, make a photo more vivid, or create a popular effect through desaturating one or several colors in the picture.
Below, we’ll show you what a Hue&Saturation color wheel is, and how to use it. If you’re interested in exploring other video color correction techniques, we also suggest you check our guide on working with RGB curves to balance out the brightness and contrast of your picture.
Before you start, make sure to download and install VSDC Free Video Editor to your PC.
How to open the Hue & Saturation color wheel in VSDC
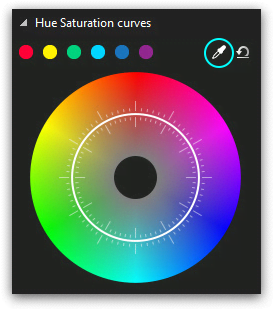
Once you’ve installed and launched the program, import the file you’re planning to work on. It can be an image or a video. Then click on the file and go to the View tab in the top menu. Choose the Basic effects icon – that will open the Basic effects window on the right-hand side of the editor. Scroll down a bit and you’ll see the “Hue and Saturation curves” dropdown menu. That’s exactly where you’ll find the right color wheel.
How to work with the Hue and Saturation curves - the basic principles
The idea behind working with the color wheel is based on creating control points on the inner circle of the wheel (it’s a white circle illustrated below) and moving them closer to the wheel edge or to its center.
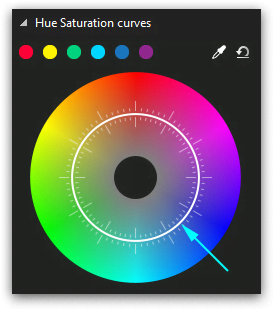
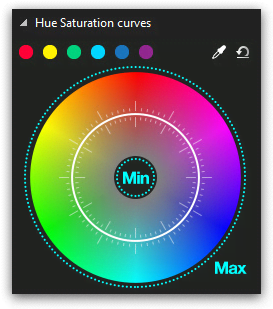
To create a control point, you need to make a double-click in the color area you’re planning to work with. In other words, if you’re planning to correct red tones in the picture, you’ll need to make a double-click on the inner (white) circle exactly where red tones are located. This will be your control point, and by dragging it closer to the center or the edge you’ll be increasing or decreasing saturation of the chosen color. Note, the edge of the specter correlates with maximum contrast, and its center – the opposite.
If you move a control point around the circle, you’ll change the tones selected for correction. In other words, by moving a control point from one color sector to another, you change the tones that will be balanced but you’re not switching the colors in the video.
You can change the position of control points by:
- dragging them manually using the mouse
- using your keyboard arrows
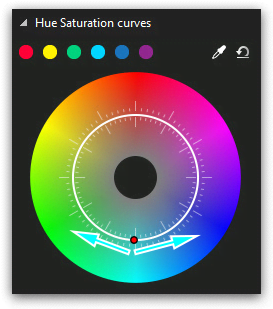
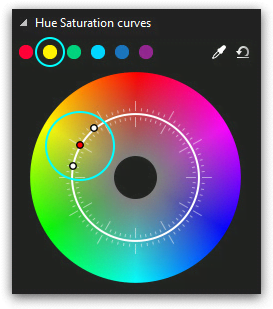
You might want to correct a specific color tone in the video without changing the rest of the tones. In this case, you’ll need to create three control points: one in the center of the color sector, and two more to the left and to the right from it. These additional points will separate the color area you’ll be working with on the wheel – see the illustration below.
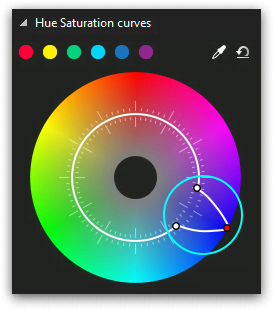
Note that in the upper side of the color wheel menu, there is a 6 color palette. Those are the main colors of the wheel: red, yellow, green, blue, dark blue, and purple. If you’re planning to correct any of these color tones in the video, click on it and you’ll get the three control point set automatically – just like illustrated below.
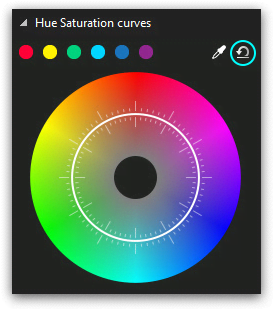
If there is a specific color in the video you’d like to correct and you can’t find it on the wheel, use the eyedropper tool. It’s located in the top right corner of the Hue and Saturation dialog window. Click the eyedropper icon and place the mouse over the color you’d like to correct. Click on the color, and it will be precisely chosen on the wheel by the three-point set.
In case after all the color correction manipulations you decide that the original picture looked better, just click the Undo icon in the top right corner of the dialog window. All the control point movements will be canceled and you’ll get the original video back.
How to correct video colors with the Hue and Saturation curves: examples
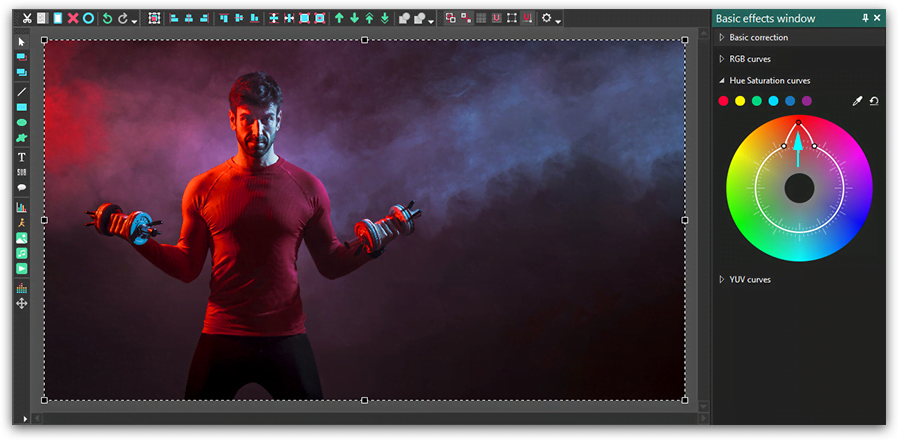
Let’s do some practice, shall we? To give you a better idea of how the Hue and Saturation curves work, we’ll show you few common manipulations applied to an image. In the illustration below, you see a photo we’ve uploaded to VSDC and the HS dialog window with the color wheel.

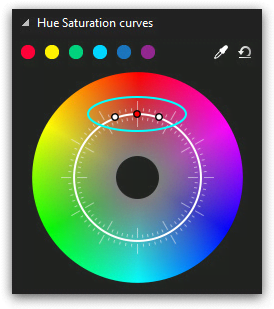
Imagine you need to correct red tones in this photo. To do that, we’ll create a control point in the red tones sector on the wheel. We’ll place two more points to separate the red tone area in the specter because we aren’t planning to change the rest of the tones in the photo.
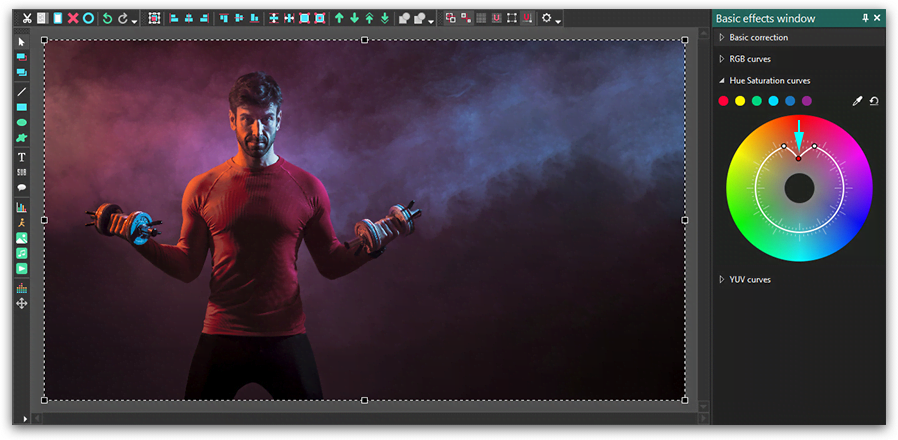
To make the red tones more saturated, we’ll need to drag the main control point closer to the edge of the color wheel – as illustrated below.
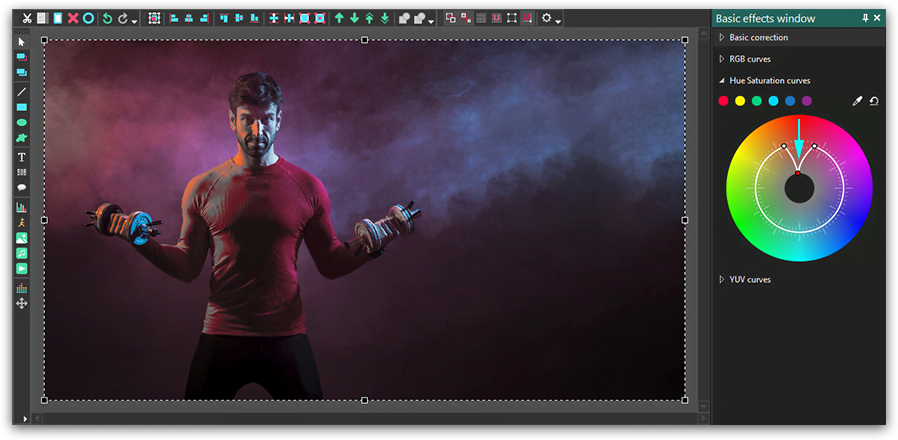
To lower saturation level of the red tones, you need to move the main control point closer to the center of the specter – as illustrated below.
If you want to completely desaturate the chosen color in the image or a video, you need to move the control point to the innermost position, as illustrated below.
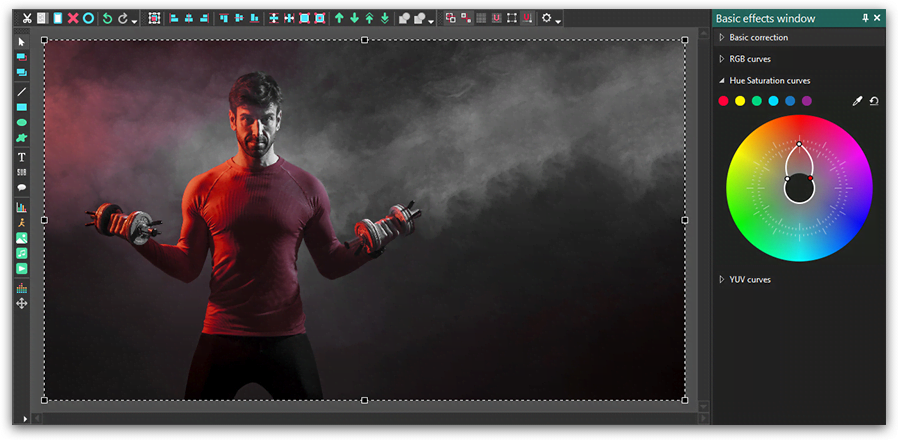
Finally, if you’d like to achieve the popular effect when the entire video is black and white with only one color saturated, you can do it too. Just leave the control point in the chosen color sector unchanged, while dragging the two side control points to the innermost position. The trick Is illustrated below, and the only saturated color in the photo is obviously red.
Working with the Hue and Saturation curves is much easier than it may seem at first sight. Even if you've never performed video color correction, you’ll be able to significantly enhance any photo or video if you just get used to the principle of control point movements.
Feel free to message us on Facebook and subscribe to our YouTube channel to stay tuned with new tutorials.
You can get more information about the program on Free Video Editor' description page.
© 2011-2024, www.videosoftdev.com, FLASH-INTEGRO LLC. Privacy policy | Terms of use | About us
All trademarks referenced herein are the sole property of their respective owners.
Copying any materials from this site allowed only with written consent of Site Administration.