 User Help Manual
  Learn FAQ
  Send us feedback
 ")


- Hi, I'm Mattea Wharton, a travel videographer from Seattle. For three years I ba...
- published Amy Shao 6/10/25 The wait for something new and unusual is finally...
- This holiday season embraces new beginnings with the latest update of VSDC Video...
- Change is all about improvement, and this process wouldn't be possible without y...
How to Reverse a Video with VSDC Free Video Editor
Video reversing has become a popular feature among both experienced and amateur video bloggers these days. There are many online applications designed for these purposes out there, but they don’t guarantee the security of your private content, have a very poor toolset and impose certain processing limitations that wouldn’t allow you to edit hefty high-quality videos.
This how-to guide is aimed to show you one of the fastest, easiest and yet reliable ways to impress your family and friends with this stunning effect.
First off, download free VSDC Video Editor. Unlike online editors, VSDC doesn’t require you to upload private content on the Internet. In addition, the free version of the editor doesn’t have those unpleasant limitations for video sizing, allowing you to work with high-quality videos shot with a GoPro for instance. Finally, the output video is free of any watermarks on it.
Once you are done with the installation process, launch the editor and click the “Import Content” button from the top menu.
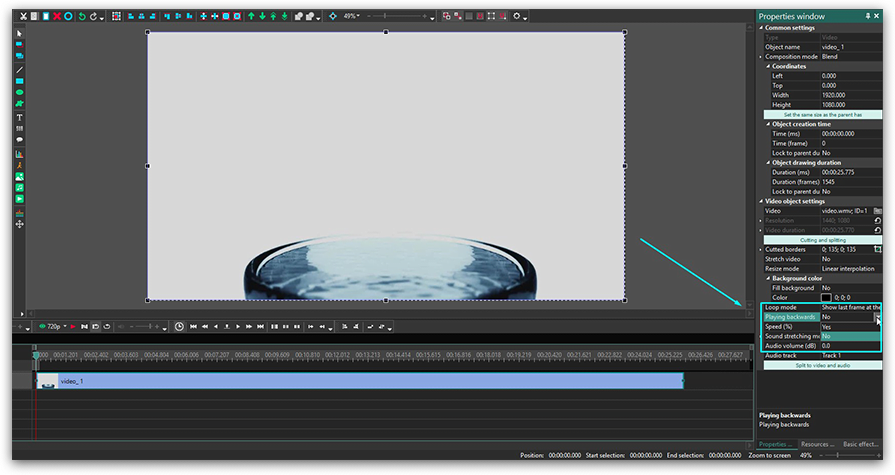
Select the desired video file from your computer with a double-click. Click “Finish” in the new window to complete the import. Now that you have imported the video, it is ready to be edited. Proceed to the side menu at the right corner of the screen (called Properties window). Find the “Playing backwards” section. You may have to scroll down to find it. By default, you will see a “no” to the right of this section indicating that the video hasn’t been reversed yet. Proceed to the dropdown section and select the “yes” value.
You are almost done. Now it’s time to save your video. Select the “Export project” tab at the top of your screen. Here you can choose the desired file format, the name for your video and the location where you want to save it. You may also choose the quality of the exported file in this menu.
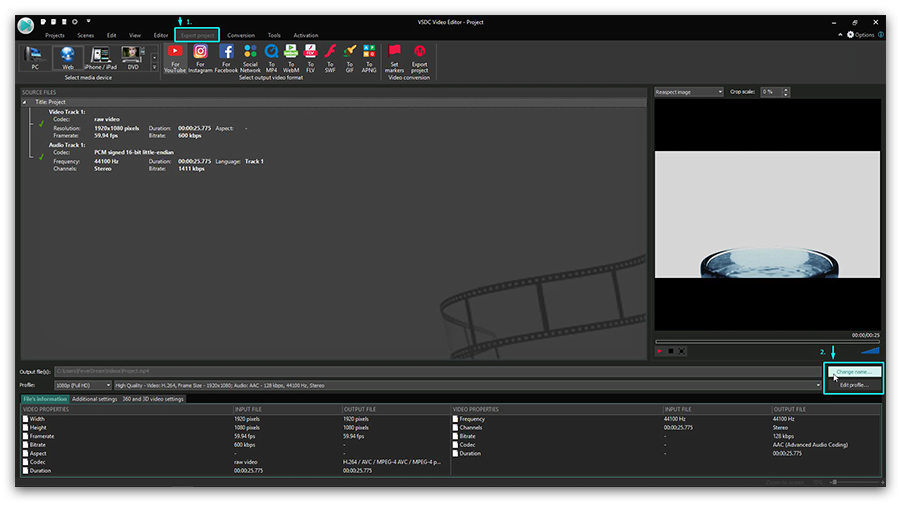
As soon as you are ready, click the “Export project” tab again and select the red “Export project” button right next to the red flag. Wait for a brief moment until the export is complete and – voila! Go ahead and share your video with friends.
Now let’s recap the whole process.
- Download free VSDC Video editor on your computer and install it.
- Import your video.
- Select the “Yes” value in the bottom right corner menu for the playing backwards section.
- Export the video on your computer.
Additional Tips and Tricks
Reversing a video is presumably not the only feature you might need when editing your clip. Cutting and splitting the video before export may also come in handy. For this matter, select the imported video on a timeline and go to the “Editor” tab at the top of your screen. Choose the necessary cutting and splitting tools to crop your video.
Another important feature is video speed adjustment. Remember the part of the menu with the “Playing backwards” section? Well, that’s exactly where the speed adjustment options are located. You will find the speed percentage indicator right under the “Playing backwards” setting.
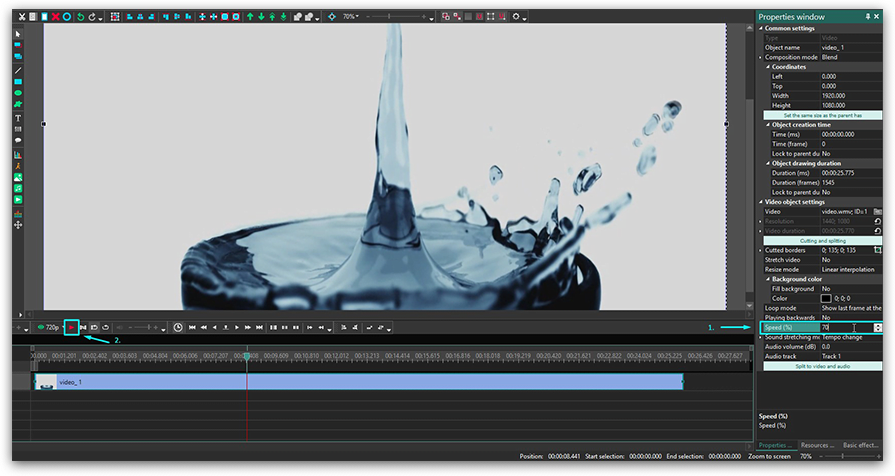
Type in the desired speed value and make sure you preview the altered speed video to see if you like the result. Here you will find more detailed guides on how to slow down or speed up your videos.
The last feature that we will cover in this tutorial is sound adjustment. Let’s be honest – reversed audio is rarely as good as a video. Luckily we don’t have to dig deep to find sound control options with VSDC Editor. We will return to the very same Properties window we used for the initial reverse and speed adjustments.
- Select the video on a timeline, scroll down the right-hand menu to the very bottom and you will see the “Audio track” setting.
- Choose the “Don’t use audio” option from the dropdown list and enjoy the silence.
- Alternatively, you may add a different soundtrack to it. To import new content, go to the top menu and select the “Editor” tab. Click the “Add an object” button and select “Audio” from the dropdown list. Choose the audio file you want to import and press “ok”.
- Adjust the length of your audio file with the same tools you used for cutting and splitting your video.
- Don’t forget to preview your work before exporting the clip.
You may learn more about working with the volume of video files in this tutorial.
Well, now you are armed and ready to reverse your video. If something remains unclear, feel free to refer to this brief video instruction to visualize the whole process.
You can get more information about the program on Free Video Editor' description page.
Watch us on YouTube
 / @VSDCFreeVideoEditor
© 2011-2025, www.videosoftdev.com, FLASH-INTEGRO LLC. Privacy policy | Terms of use | About us
All trademarks referenced herein are the sole property of their respective owners.
Copying any materials from this site allowed only with written consent of Site Administration.