 User Help Manual
  Learn FAQ
  Send us feedback
 ")


- Welcome to the next level of video editing with VSDC's latest release, Version 9...
- Welcome to the latest VSDC update, Version 8.3! We've been working hard and we’r...
- In today’s digital landscape, the popularity of video content is gaining momentu...
- In today's digital world creativity reigns supreme. It offers endless possibilit...
How to Make Realistic Paper Burn Transition in VSDC Pro
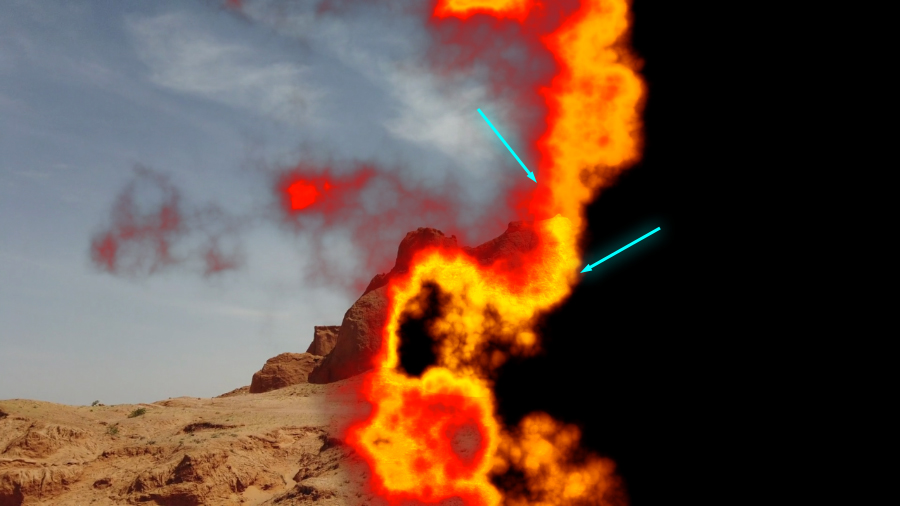
The new version of VSDC Pro includes the long-awaited Paper burn effect. It serves as an impressive transition, especially when you apply it to a still image. The best part about this effect is that it’s very versatile. For example, by changing the main template of the effect, you can achieve the illusion of freezing.
In addition, you can fully control the “flame”, its size, movement speed, burn hole size, and other parameters. In this tutorial, we’ll show you how to apply this transition and how to customize it to your needs.
How to add Paper burn transition in VSDC
To get started, import your footage (or a photo) to VSDC and open the Video effects menu. Find Transitions and select Paper burn. In the Object’s position settings window, click OK.
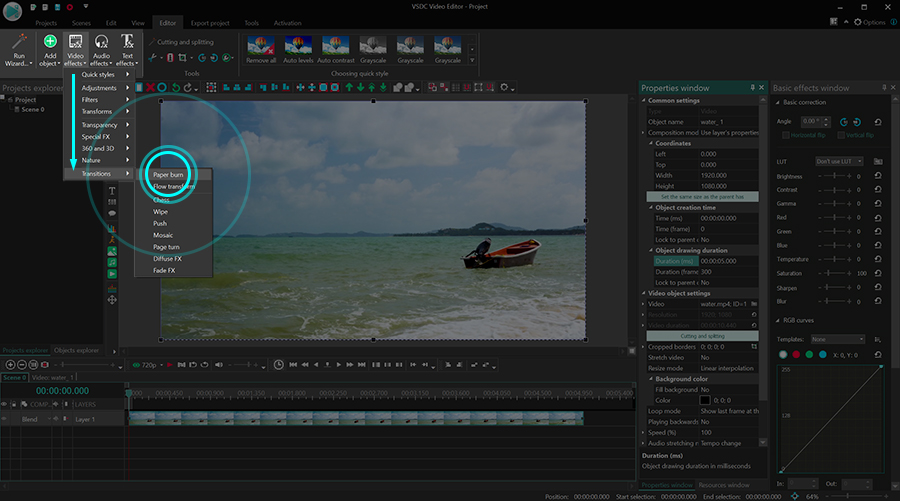
Now that the transition effect is on the timeline, you can move it, change its duration and appearance.
How to adjust Paper burn transition effect
Make a double-click on the main file to get to the transition layer: Paperburn 1. Then make a right mouse-click on the transition and select Properties. The Properties window will slide in from the right-hand side.
There are three groups of settings for the Paper burn effect: Common settings, Adjustment effect settings, and Paper burn effect settings. We'll take a close look at each group below.
Common settings allow you to change the name of the effect layer, set the exact moment of its appearance and duration – by seconds or by frames.
Adjustment effect settings allow you to set the level of transparency for the effect. This means that the effect can be fully opaque or semi-transparent throughout the entire transition or change dynamically.
The dynamic change of transparency is set through the parameters called Initial value and Final value. The former defines the level of transparency for the beginning of the transition; the latter defines the level of transparency for the end of the transition.
For example, if we set the Initial value at 100% (absolutely non-transparent) and the Final value at 10% (almost transparent), the transition will look as follows:
Paper burn effect settings allow you to correct the colors of the flame, its brightness, the size of the burn holes, and other parameters. To have a clear picture of how it works, let's review each parameter one by one.
Template
By default, this effect produces the illusion of burning paper, however, as an alternative, you can select the freezing effect. To decide where on the screen the flame or the freezing process should start, use the options in the Template menu.
Image
By default, the Paper burn effect looks like a blank burning piece of paper. However, you can upload an image, and in this case, instead of a blank piece of paper, there will be a burning image.
Below is the difference between the former and the latter:
Hole size
As the burning process continues, the scene gradually gets covered with burn holes. You can set their size for the beginning and the end of the transition by using the Initial value and the Final value. The higher the value, the bigger the burn holes will be.
Granularity
It's up to you how detailed the edges of the holes will look. To explore the possible degree of detail, you can use the Granularity control. The higher the Granularity value is, the more complex and random the shape of the holes will be. The lower the value, the plainer the holes and the smoothers their edges will be.
Color
The Color parameter defines the color of the outer zone of the flame. Keep in mind, you'll be able to select the color for both the outer and the inner zones to make the effect more realistic.
Intensity
Intensity sets the flame size, and you can change its value during the video playback. For instance, this is how the result may vary if you drastically change the Intensity value at 10% and its Final value at 100%.
Brightness
Similarly to the flame intensity, you can control its brightness and change it over time. This is what the transition will look like if you set the Brightness initial value at 10% and its Final value at 100%.
Color shift
The Color shift parameter allows for shifting the edge of the flame further from the burn holes. The higher its value, the further the edge of the flame will be from the edge of the holes. Like most parameters, this one can be set dynamically through the change of the Initial and Final values.
Keep in mind that you can adjust this parameter for both the inner and outer flame zones.
Time shift before effect appearance (%)
This is a parameter designed to delay or speed up the appearance of the effect in the scene. You can assign a positive or a negative value to it. If you set a negative value, say -50, noticeable burning will start halfway to the end of the transition. If you set a positive value, say, 50, then by the beginning of the transition, half of the image will be burnt already.
Effect speed boost (%)
If you want to speed up the effect, use this parameter. The higher its value, the faster the burning process will be. You can also increase or decrease the effect speed dynamically using the Initial and Final values.
Inner zone color and Inner zone brightness
These parameters allow you to choose the desired color and brightness level for the inner zone of the flame.
Opacity (inner zone)
If you want no inner flame zone in the picture, set the Opacity value at 0. In this case, the flame will take the main color you set previously. If you want the inner flame zone to be bright and solid, set its opacity value at 100. Anything in between will change the look of the flame accordingly.
Blending method
If you're using an uploaded image to create the Page burn effect, you have two ways to blend the flame and the image. The first one is called Plus; the second one is called Overlay. This is what they look like:
Direction
Apart from the size and the speed of the flame, you can also change its direction. There are 8 options you can choose from:
- left to right
- right to left
- top to bottom
- bottom to top
- left top corner to the right bottom corner
- right top corner to the left bottom corner
- bottom left corner to the top right corner
- bottom right corner to the top left corner
Time inversion
By switching this parameter from False to True, you can reverse the page burn effect and create the illusion of a burnt page being restored.
Fade-in
Finally, if you want to make the effect appear more gradually, you can apply the Fade-in option.
Download VSDC 6.7 and try the new transition effect
Along with the Paper burn transition effect, VSDC 6.7 brings the Flow transformation effect, a few text object effects, and an optimized timeline. Make sure to download it from our official website, and if you have any questions, feel free to email us at This email address is being protected from spambots. You need JavaScript enabled to view it.
© 2011-2024, www.videosoftdev.com, FLASH-INTEGRO LLC. Privacy policy | Terms of use | About us
All trademarks referenced herein are the sole property of their respective owners.
Copying any materials from this site allowed only with written consent of Site Administration.