 User Help Manual
  Learn FAQ
  Send us feedback
 ")


- Welcome to the next level of video editing with VSDC's latest release, Version 9...
- Welcome to the latest VSDC update, Version 8.3! We've been working hard and we’r...
- In today’s digital landscape, the popularity of video content is gaining momentu...
- In today's digital world creativity reigns supreme. It offers endless possibilit...
How to Create Effect of Raindrops in VSDC Free Video Editor
Video editing technology has advanced so much, you can now control the weather in your videos! Let’s suppose you want to create an illusion of falling raindrops or severe fog that makes the camera lens look steamy. In VSDC Free Video Editor, you can do all of that – and even more.

Download VSDC Free Video Editor for Windows
The new feature allows you to add the effect of falling raindrops to your video, achieve the foggy glass look, and the best part – you can customize those effects very precisely. That means VSDC doesn’t just provide you with an all-size-fits-all “filter” to lay over your video, but it allows you to control such parameters as the size and the number of water drops, the speed they are falling with, and even imitate raindrops freezing on the camera lens.
Note that you’ll be able to apply this effect to the entire scene or to a particular area using video masking. For example, if there is a window or a glass in the scene you’d like to use this effect on without modifying the entire footage, you’ll be able to do that.
In the tutorial below, we’ll show you how the raindrops video effect works in VSDC, and how you can use it for your projects.
How to add the raindrops effect to a video in VSDC
First, we recommend downloading the latest version of VSDC. Even if you already have this software installed on your PC, it’s always better to upgrade whenever a new version is released.
Once ready, launch VSDC and follow these steps:
- Import your footage to the scene using the Import content button on the start screen.
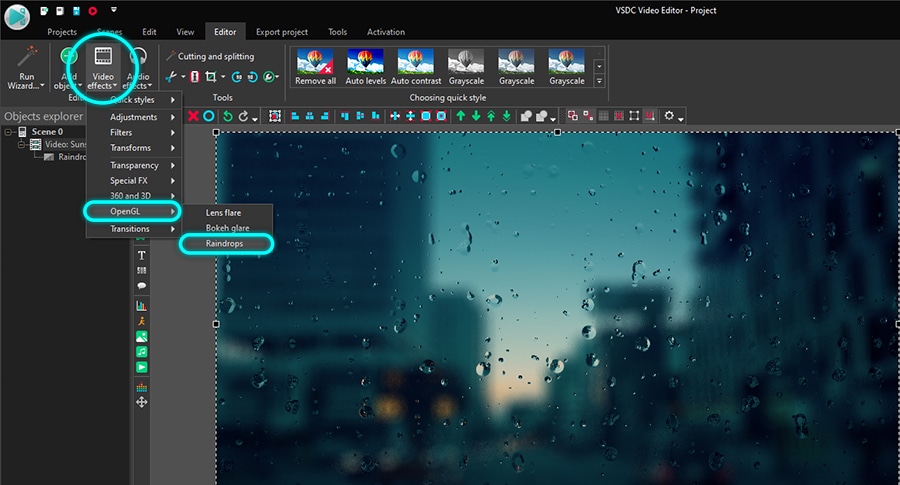
- Make a left-click on the footage and select Video effects. Proceed to OpenGL → Raindrops.
- In the pop-up Object’s position setting window, hit OK.
Now, the default version of the Raindrops effect is applied to your video.
Next, you have a set of tools to fine-tune it to your needs. To get started, make a double-click on the footage, left-click on the effect layer and open the Properties window.
This is what it looks like:
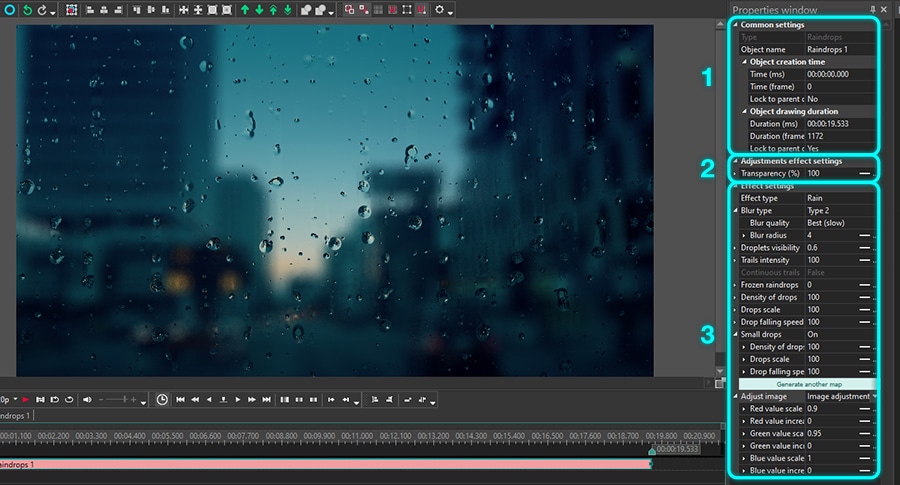
There are three groups of setting available for the raindrops effect in the Properties window:
- Common settings
- Adjustments effect settings
- Effect settings
Common settings allow you to add a title to the effect layer, set the moment when the effect will appear in the video (by seconds or by frames), and the duration of the effect (in seconds or in frames).
Adjustment effect settings enable you to choose the transparency level for the effect. You can have the same level of transparency for the entire effect duration or you can have it gradually increase/decrease to the desired level.
For the latter, the Initial value and the Final value of the Transparency parameter should be different. For example, here is what the effect will look like if we set the Initial value at 100% (completely non-transparent) and the Final value at 10%:
Effect settings include multiple options to change various parameters, such as:
- Intensity of the fog on the glass
- Size and number of raindrops
- Trails that running drops leave on the glass
- And more
Because there is a lot to unveil, this group of settings deserves a review on its own. Below, we’ll take a closer look at each parameter and show you the results they produce when you increase or decrease their values.
Raindrops video effect: advanced settings overview
The first parameter is called Effect type and it opens two options: Rain and Foggy glass. “Rain” creates an imitation of raindrops falling on the glass (or camera lens), and “Foggy glass” creates the look of a steamy glass with water drops and traces here and there.

The next parameter is called Blur type. It allows you to adjust the level of blur and therefore - control the fog intensity. There are three blur types available:
- None – the absence of fog
- Type 1 – the glass is slightly fogged-up
- Type 2 – the glass is covered with fog
If you select Type 1 or Type 2, you can also set Blur quality and Blur radius. The latter defines how much fog there will be on the surface, and you might want to set a dynamic change of this parameter using the Initial and the Final values.
For example, here is how a window becomes more fogged-up over time if you set the Final value for Blur radius higher than the Initial value.
Next comes the Droplet visibility parameter. By changing it, you can make the droplets more distinct. Again, if you want to show the dynamics and increase (or decrease) the visibility of raindrops during the playback, the Initial and the Final values for this parameter should be different.
Here is what the effect will look like if the Initial value equals 1 and the Final value equals 10.
Note that if the Droplet visibility value is equal to 0, no droplets will be visible.
Trails intensity is the parameter that helps you control the intensity of water drop trails. Again, if you want to show the effect progress, use the Initial and Final values.
For example, in the video below, the Trails intensity parameter goes from 0 to 200.
Notice that when the value is 0, there are no trails visible.
The next parameter named Continuous trail will only be available if you choose the Foggy glass effect type and set the Droplet visibility value is above 0. When switched to “True”, this option helps imitate smooth, uninterrupted trails.
If you want to create an illusion of raindrops freezing as they fall on the surface, use the parameter called Frozen raindrops. When its value equals 0, the effect isn’t being applied, but the higher the value is, the deeper the water freezes.

Density of drops allows you to control how many random-size droplets will be added by the effect. The higher the value is, the more of the surface will be covered with raindrops. In the example below, the Density of drops parameter value increases from 0 to 100.

Notice how the number of droplets in the video increases along with the size of some of them.
Drops scale simply allows you to enlarge the drops of water that leave trails. In the example below, the Drops scale value is gradually increased from 20 to 200.

If you want to change the speed of water drops running down, use Drop falling speed. Note that this option will only affect the droplets with trails.
To adjust the look of the water drops that don’t have trails, use the Small drops menu. It includes the parameters similar to the ones we’ve reviewed above: Density of drops, Drops scale, and Drop falling speed.
Finally, the last group of settings is called Adjust image, and it enables you to correct the colors of the raindrop effect. Specifically, you can correct the colors of the footage you’re applying the effect to and the color of the water drops as well.
There are three editing modes available for you:
- Don’t use adjustment (no color correction applied)
- Image adjustment (color correction applied to the footage only)
- Effect adjustment (color correction applied to the water drops):
For the Image and Effect adjustment modes, you get the Red/Green/Blue value scale to multiply values of the selected tones in the footage by the number you input.
For example, this is what Image adjustment will result in if we gradually increase the blue tones.

And this is the result of blue tones increased in the Effect adjustment mode.
Notice that the color adjustment menu also includes Red/Green/Blue value offset parameters. By increasing the value for the selected tones, you increase their intensity by the value you input.
Here is an illustration of gradual Blue value offset increase for the footage.
And notice the difference when we perform a similar parameter adjustment for the effect.

Go ahead and try the new effect available in VSDC
The new effect can be a stylish addition to your video and help create a realistic look of raindrops, fogged-up windows, or just condensate on any surface. If that sounds like something you’ve been willing to try, download the latest version of VSDC and try it for yourself!
Join our community on Facebook and make sure to subscribe to our YouTube channel for weekly editing tutorials.
© 2011-2024, www.videosoftdev.com, FLASH-INTEGRO LLC. Privacy policy | Terms of use | About us
All trademarks referenced herein are the sole property of their respective owners.
Copying any materials from this site allowed only with written consent of Site Administration.