Video Editor

Use free video software to create and edit videos of any complexity from a family greeting card to a company presentation. Cut, merge video files, apply visual and audio effects, use filtration and image correction, make slideshows and add an appropriate soundtrack. Use multi-color Chroma Key and advanced parameters settings to give your video a professional look. All popular video and audio formats are supported.

Read more about Video Editor...

Video Converter

This program is intended for converting video files from one format to another. Nearly all popular video formats are supported (both reading and saving). In addition, the program drastically simplifies the task of converting videos for playback on specific multimedia devices, such as iPhone, Samsung Galaxy or Huawei P30 Pro. The program is extremely easy to use, has a modern interface and all necessary video processing functions.

Read more about Video Converter...

Audio Converter

The audio converter will help you convert audio files from one format to another. All key audio formats and codecs are supported. The program also allows you to manage playlists and meta tags, extract audio from video files and save these tracks on your computer in any format.

Read more about Audio Converter...

Audio CD Grabber

This audio tool is intended for grabbing audio tracks from compact discs and saving them to the user’s computer in any format. Nearly all popular audio formats and codecs are supported. The program can also extract track details from the FreeDB server for automatic file renaming and updating meta tags.

Read more about Audio CD Grabber...

Multifunctionality

Multifunctionality

A wide array of multimedia processing tools in one free video software suite.

High speed

High speed

Our programs use fast
and high-quality algorithms optimized for single and multi-core CPU’s.

Affordability

Affordability

VSDC video software is freely available for download to Windows OS-based PCs and laptops.

Add cinematic bars to a video to achieve a widescreen movie effect

Adding cinematic bars is incredibly easy if you know the right tricks. VSDC Free Video Editor allows you to do that within less than a minute! The technique is simple – you literally add two black bars to your video and place them at the top and the bottom of a scene. No masking, no resizing, no video editing experience needed. See it for yourself in the video below:

Yes, we know that technically to create the “widescreen black bars” effect you should ideally use a professional camera and shoot in a widescreen aspect ratio (which is 21:9). This is exactly how Hollywood movies come out letterboxed – they are originally aimed at wide cinema theater screens, so when we watch them on TV with a standard 16:9 ratio, there is some black space left at the top and the bottom of a screen.

Anyway, since you’re here, you probably didn’t have a chance to shoot a video the right way, so we’re about to show you how to add cinematic black bars quick and easy.

But first, download VSDC Video Editor to your PC (it’s Windows only).

How to create widescreen black bars in VSDC: a step-by-step guide

  1. Launch the program and import your soon-to-be-Hollywood-style movie using the Import content button on the start screen.
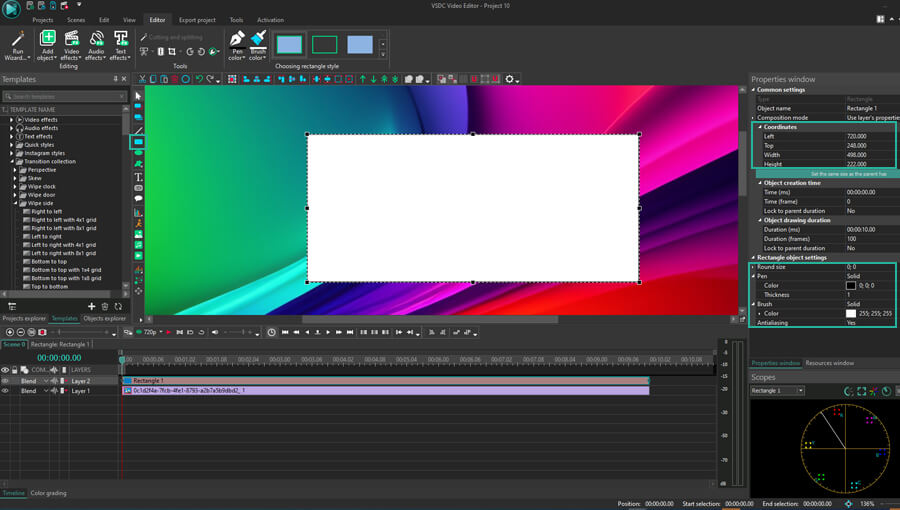
  2. Using the left-side menu, add a rectangle-shaped object to the scene as illustrated below.
  3. Paint the rectangle black using the Brush color icon from the menu at the top or the Properties window Brush color menu.
  4. To stretch the bar exactly to the width of the scene, in the Properties window click on the “Set the same size as the parent has” green button in the Properties window (again, illustrated below). The rectangle will take the space of the entire scene, so all you need is to manually adjust its height as desired.Create cinematic bars
  5. Once your cinematic bar looks the way you want, click on it using the right mouse button and select Duplicate to create an identical one.
  6. Place the widescreen bars at the top and the bottom of a scene as intended.

Note that some part of your video will get covered by the cinematic black bars overlay – this is an inevitable consequence of the method. The good news is you can adjust the height of the bars at any moment, that’s why we recommend previewing the movie before exporting it to make sure that no essential element of your footage is hidden behind the rectangles.

To preview the video, use the red triangle icon right above the timeline. If your video looks choppy or lags, simply change preview resolution – it’s a dropdown menu to the left from the Preview icon. Lagging typically happens when a video file is too large (especially if it is 4K), and it’s the result of the processor being overwhelmed by the volume of information. The less memory your PC has, the more likely you’re to experience the issue. Do not worry, it doesn’t affect the output quality in any way.

When you’re ready, go to the Export project tab and save the video in the required format. Remember that you can change every parameter of the video including its format, codec, quality, framerate, width and height using the “Edit profile” button.

Aside from the cinematic black bars, there are many more tricks you can apply to your video to make it look like a real movie, including the “Video inside text” effect, the picture-in-picture effect, and split screen”.

Feel free to message us on Facebook and subscribe to our YouTube channel to stay tuned with new tutorials.

How to quickly remove a watermark from a video using VSDC Free Video Editor

So, you’re looking for a way to get rid of a watermark in a video for free. Well, you probably already know there’s no perfect way to do that because technically watermarks, just like text objects, are static elements embedded into each video frame. Ideally, you would need the original project files or an expensive watermark remover.

However, there is a couple of roundabout approaches that may be sufficient for you. First, you can quickly blur or pixelate a watermark using the DeLogo filter, so that it will practically get invisible. We’ve demonstrated this method in the video above.

Second, to remove a watermark from a video – if it’s placed in the corner or close to the edge – you can simply crop the borders. This will inevitably change the size of your footage though, you should be aware of that.

In this tutorial, we’ll show you both techniques performed in VSDC. It’s a free video editing software for Windows, and if you haven’t done it yet, download it to your PC first.

Download VSDC

How to remove a watermark from a video for free using VSDC DeLogo filter

This method literally takes less than a minute and it’s an easy way to get rid of video watermarks, logos, GPS coordinates, car numbers, time or date digits embedded to a video.

Here is the entire process broken into steps:

  1. Import your video file to VSDC Free Video Editor.
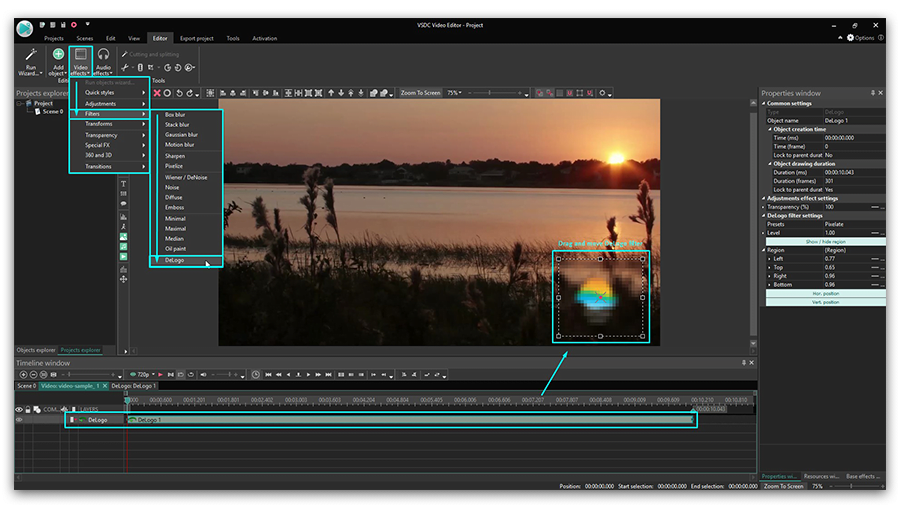
  2. Open the Video Effects tab and proceed to Filters from the dropdown menu. Choose DeLogo.
  3. Notice, a pixelated rectangle-shaped area appearing in the center of the scene. Meanwhile, on the timeline, there will be a new tab opened with the DeLogo filter placed on it. Check the illustration below to get a clearer idea of where to look. How to remove a watermark from a video for free
  4. Once you click on the filter object, you’ll be able to resize it and move it around the scene.

Now, you might want to adjust the filter by making it more intense or less visible. Again, depending on your original video, you may prefer to switch from pixels to blur or mosaic. Here is how to do it:

  1. Open the Properties window on the right side of VSDC interface. If you can’t see it, click on the DeLogo object with the right mouse button and choose Properties.
  2. Find DeLogo filter settings and choose any preset. There are 5 of them: Pixelate, Box blur, Les blur, Mosaic, and Gaussian blur.
  3. In the field below, adjust the level of intensiveness to achieve the desired look.

Once you’re satisfied with the way your video looks, go to the Export project tab and save the video to your PC using one of the preconfigured export profiles.

And since we sometimes receive queries on whether VSDC itself places a watermark on exported videos, we wanted to let you know in advance that it doesn’t. VSDC is absolutely free, it has no trial periods or format limitations, let alone watermarks. Otherwise, it would be slightly unfair to create the “How to remove a watermark from a video tutorial”, right?

Moving on. Sometimes you can make do even without a filter. When a watermark is placed right at the edge of a video, and you can sacrifice a bit of recorded space, cropping is the way to go.

Remove a watermark by cropping it out from a video

How to remove a watermark from your video by cropping its borders

We already have a detailed tutorial on how to crop video borders using different methods, so here is a brief guide for your case:

  1. Import your video to VSDC.
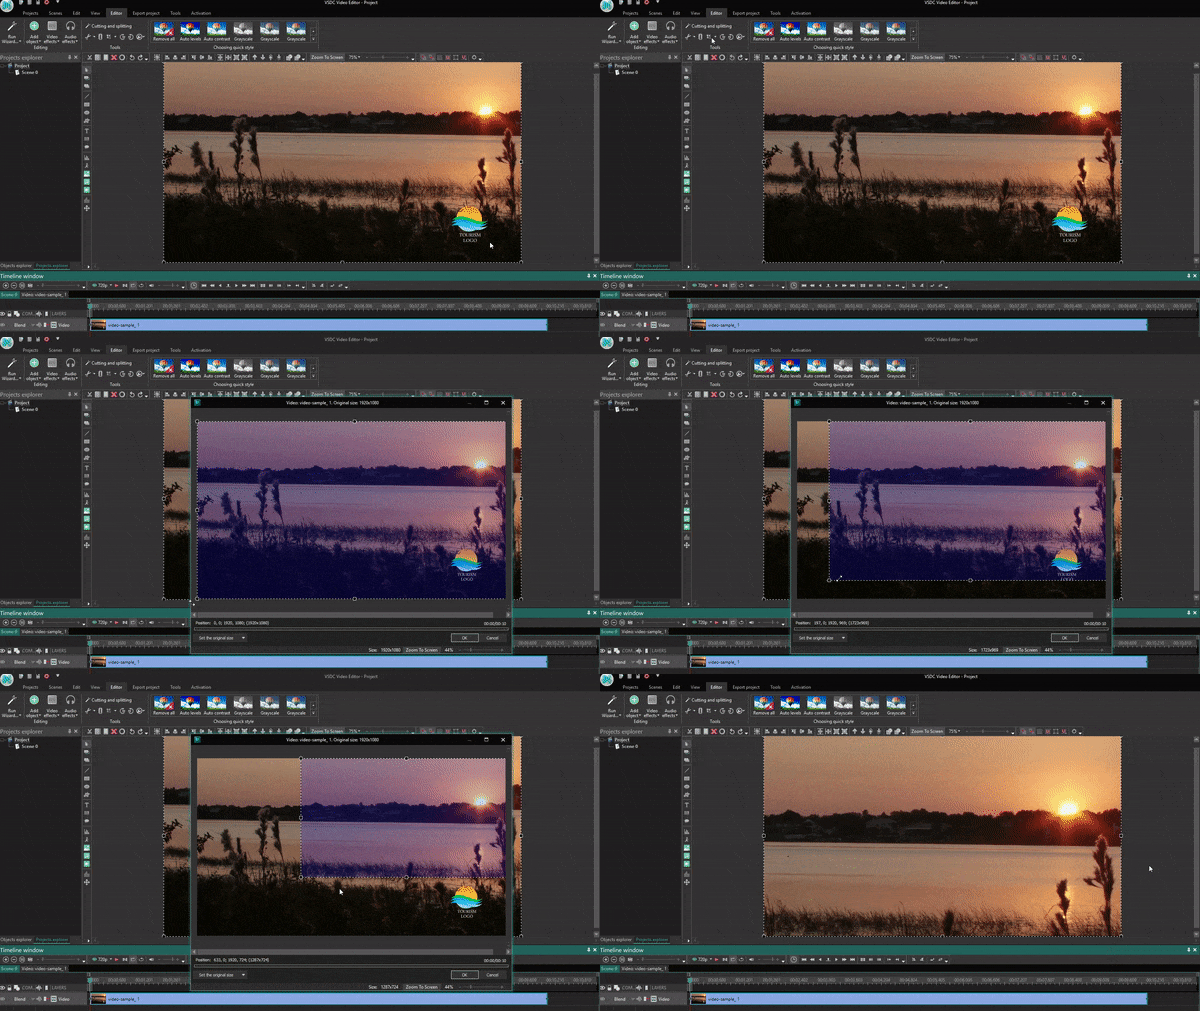
  2. Find the Cutting and Splitting Tools section in the top menu. The Crop borders icon is #3 from the left. Click on it to crop a custom region.
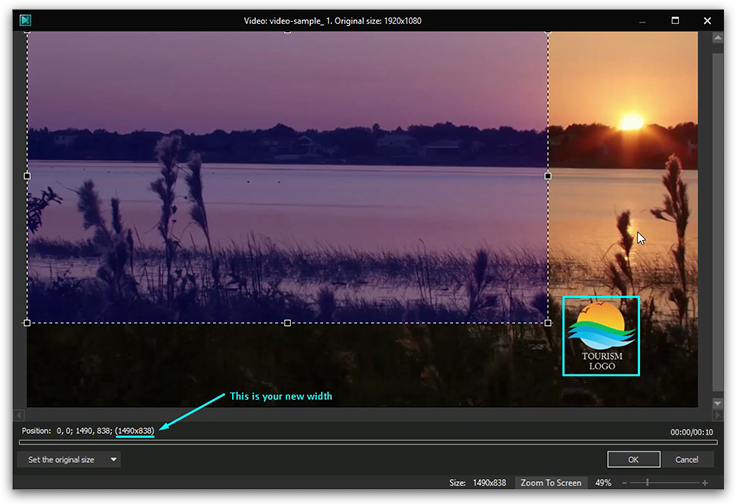
  3. In the new window that will pop up, grab the dashed line of the edge you need to cut and drag it inwards until the watermark is left out the frame.
  4. Click OK to close the cropping window.

You may notice that the size of the video has changed, and thin black borders have appeared on the sides of the video (either left and right, ot top and bottom - depending on where the watermark was placed).

So, if those black borders are an issue for you, you can remove them by tailoring the size of the project to the new size of the video. Here is how.

When you crop the side that contains a watermark, you’ll notice that the width (or the height) parameter will change too. Pay attention to the new number because you’ll need it in a second.

Crop a video to cut out a watermark or logo

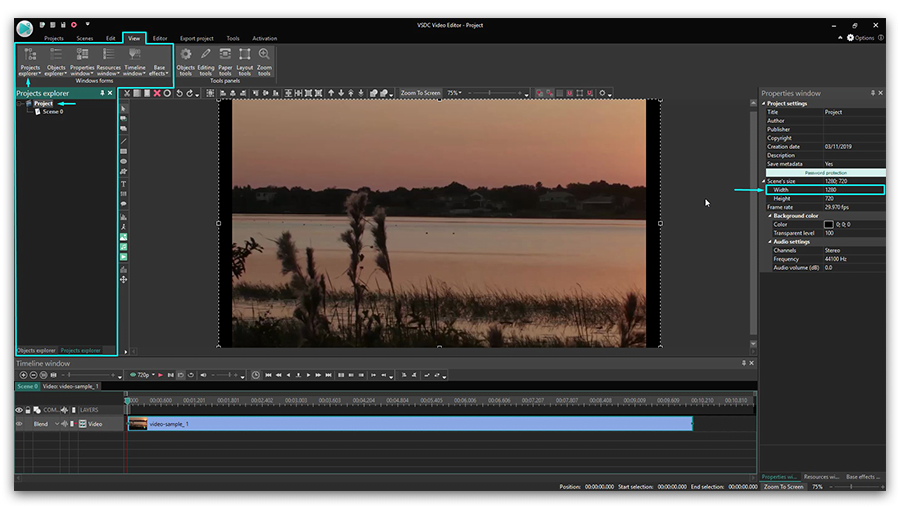
When you’re done cropping, go to the View tab (top menu), proceed to the Projects explorer, click on the Project 1 and notice the Properties window sliding in from the right. In the Properties window, change the required parameter. In our example, we’ve reduced the width.

How to adjust scene width to the width of a video

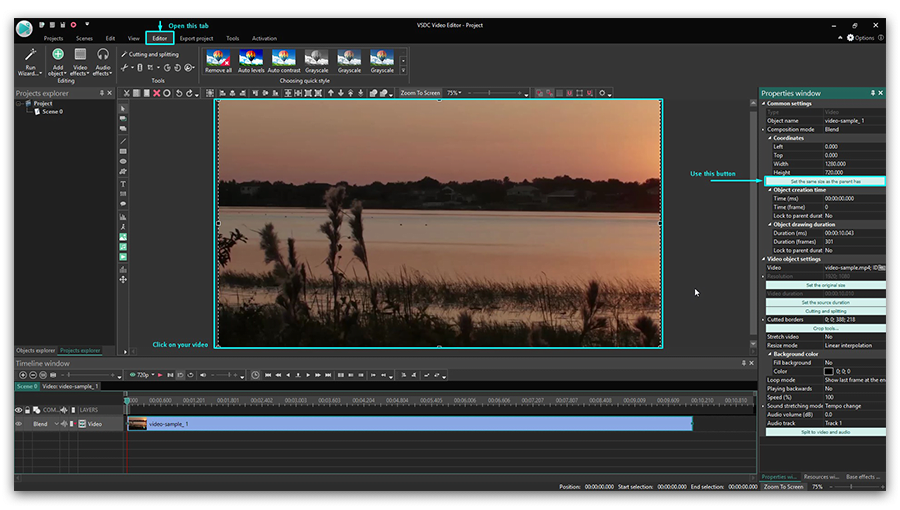
The black border may not disappear right away, but bare with us. Close the Projects explorer window on the left, go back to the Editor tab (top menu) and click on your video. You’ll notice that the Properties window will display new set of parameters. Click the green “Set the same size as the parent has” button to make the video fit the scene size perfectly. See the illustration below.

Technically, this is it, and you can now export the project following the steps described above. Should you have any questions, don’t hesitate to message us on Facebook.

VSDC project size parameters adjustment

Afterword

Please be advised that sometimes a watermark on a video indicates that its owner wanted to prevent their file from being copied, modified, and distributed. Naturally, we don’t recommend to remove watermarks from the videos that are a subject of copyright, unless you’re the copyright holder or you know that it won’t violate the rights of the original video creator.

Now that you know you can use VSDC DeLogo as a watermark remover, here are 5 more tutorials that may pique your interest:

Subscribe to VSDC YouTube channel to receive instant notifications about new tutorials published.

How to use VSDC Free Video Editor to speed up your video

There are many reasons you might want to speed up a video. Be it for the sake of creativity, like in time-lapses of fast-motion effects, or for the sake of functionality – like when you need to show the many-hour process in a couple-minute clip – it’s a relatively easy task.

In this tutorial, we’ll show you how to speed up a video in a free editor named VSDC.

VSDC works on Windows PCs, so if you’re on Mac, head over to iTunes and download iMovie. iMovie is also free and feature-packed, and it’s a video speed editor that works on your OS.

Download VSDC Free Video Editor for Windows

How to speed up a video for free in VSDC

Once you’ve installed the software to your computer, the entire process will take you less than a couple of minutes. Follow these steps:

  1. Launch VSDC Free Video Editor. If you aren’t ready to upgrade to Pro, just ignore the popups by closing them or clicking “Continue”.
  2. Start a new project by importing your content. Only import one video file at a time.
  3. When the footage is on the timeline, you need to decide whether you want to speed up the video entirely or apply the fast-motion effect to a particular part. For the former, jump to step #5. For the latter, you’ll need to split the video first.
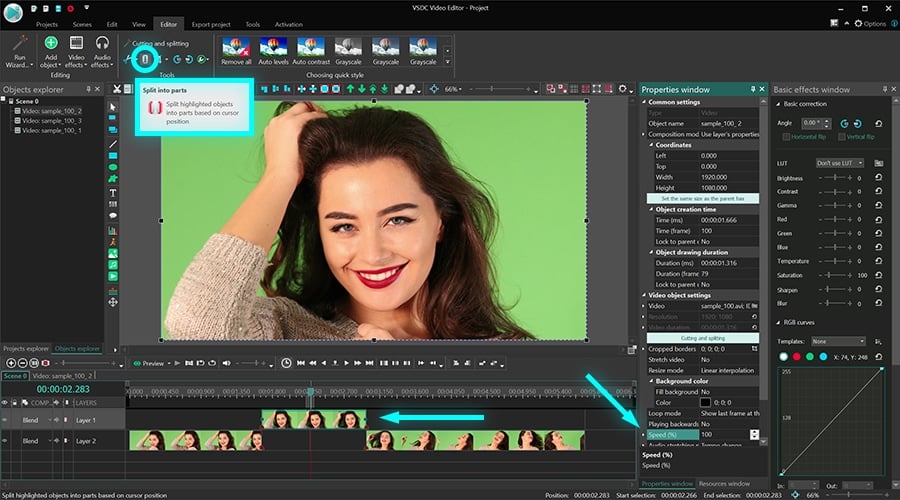
  4. Splitting the video is performed through the Split icon looking like a razor – you’ll find it in the top menu, “Cutting and splitting” section. Just place the timeline cursor where the fast-motion part should begin and split there. Repeat to split out the end of the fragment.
  5. Now, click on the video (or its separated fragment) you want to speed up and proceed to the Properties window. It’s a sticky tab on the right side of the program, but if you don’t see it, use a right mouse button to click on the video and choose Properties from the menu. How to speed up a video for free in VSDC Video Editor
  6. Scroll down to the Speed (%) parameter and increase it until you’re happy with the result. To see how your actions change the playback speed, use the red Preview button.

Technically, if you put 200 instead of the original 100 (%), your clip will be played twice as fast as the original footage. Therefore, 1000% will give you a 10X increase.

Note that when you speed up a video, its sound will automatically follow the tempo. So, you may want to mute the original audio track (use the same Properties window, scroll down to Audio track and choose “Don’t use audio”). To create a music overlay for your fast-motion scene, use the green “Add object” button in the top menu and choose any audio file from your PC. Split it the same way as you would split a video and adjust its position on the timeline to synchronize with the right footage fragment.

Preview your movie before exporting to make sure it looks the way you wanted. If your original file is large, the preview may be lagging a bit. That’s because some computers struggle to process so much information instantly. Don’t worry, it won’t affect the output video in any way, however, you can change the preview quality to solve the issue. Use a little triangle icon right next to the Preview button to decrease preview quality up to 144p.

This is it! Now that you know how to speed up a video and create the famous fast-motion effect in just a couple of clicks, check other tutorials we have:


You can get more information about the program on Free Video Editor' description page.

How to slow down a video: guide to achieving a perfect slow-motion effect

“Tell me they got it in slow motion!” – screams the character of Deadpool after a long intense action scene. And that makes perfect sense because when shooting important events happening at high speed, you might want to slow down the video afterward to show every little detail of a scene. Besides, thanks to the media, we now know that tons of casual everyday things – like water drops or human reactions – will look fantastic if you capture them on a slow-motion video. Hence such high interest for the effect.

So if you’re looking for a free video editor with the slow motion effect on board, this tutorial is for you. We’ll show you how to apply it in the software named VSDC. It works on Windows and it’s absolutely free.

Download VSDC Free Video Editor before starting

How to slow down a video/apply video slow motion effect

To turn a regular video into a slow-mo, all you need is reduce the playback speed. Some video editors only allow you to change speed by a factor of 2, 4, 8, and 16. Unlike them, VSDC has very flexible playback settings and you can apply speed changes using any increments you want. Follow our step-by-step guide and see it for yourself:

  1. Import the footage to VSDC video editor.
  2. If you only want to have a part of the video in slow motion, you’ll need to split the file* and separate this fragment from the main piece. If you want to have the entire video in slow-mo, jump to step #4.
  3. The fastest way to split a video file is using the “razor” located in the quick access “Cutting and splitting” menu at the top. Simply place the timeline cursor at the desired moment and click the Split icon. Repeat to get multiple video fragments if needed.
  4. Select the fragment where you need the video to slow down.
  5. Go to the Properties window on the right. If you don’t see it, click on the video fragment with the right mouse button and select Properties.
  6. Scroll down the menu to the Speed (%) section as illustrated below.
  7. Decrease video speed gradually and use the red Preview button to see the result of your actions.

Slow down a video for free

The way you apply a slow-motion effect in a video editor is pretty straightforward. Reducing the speed by 50% means that your video will slow down by a factor of 2. If you set up a 25% speed – it will be 4 times slower than the original, and so on.

Why you should apply reframing to a slow-motion video, and how to do it

If you’re reducing the playback speed by more than 50%, you may notice that your video is getting choppy. It happens because the video frame rate has dropped drastically. When you slow a video down by 50%, the number of frames per second is 50% down as well. In other words, the footage gets “stretched” in time. This means there are now gaps between the frames, and they may create that unwanted stutter effect. To prevent that, we recommend applying reframing.

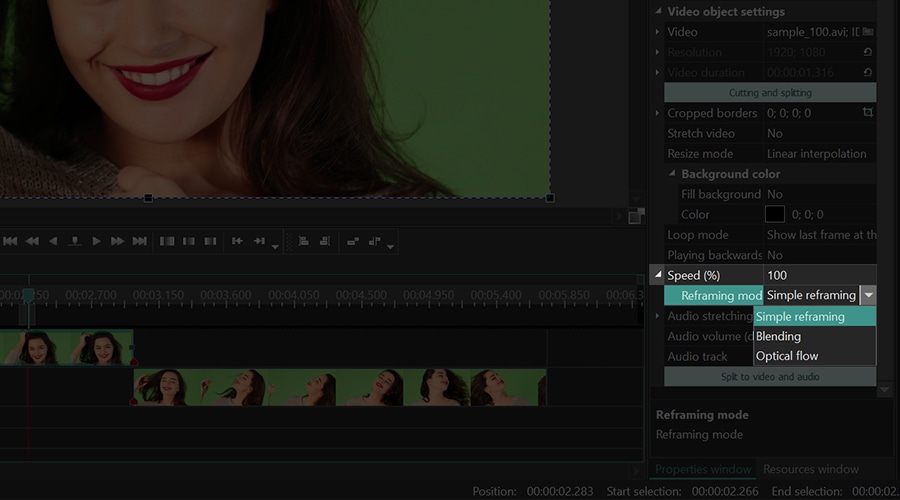
To apply reframing, expand the speed settings menu by clicking on the triangle-shaped button.

How to achieve a perfect slow-motion effect using reframing

There are two reframing modes available in VSDC: Blending and Optical flow. They are powered by different algorithms and produce slightly different results. As a rule, Optical flow is always a better option that guarantees a perfectly smooth slow-motion effect. The only reason why you may not want to use it is the lack of RAM on your PC. Optical flow is based on AI algorithms and requires more computer resources, so if you have a low-end machine, just stick to Blending.

To learn more, you can read our detailed guide to using reframing modes.

Wrapping up

Now that you know how to slow down a video, here are two tips for you:

First, it’s a good idea to make slow-motion fragments a part of your story, but resist creating the entire video in slow-mo. No matter how much you like this effect, too much of it may not be effective to keep the attention of your viewers.

Second, keep in mind that when you slow a video down it affects the audio too. And sometimes it may sound funny and appropriate, but most times it’s absolute nonsense. That’s why you may want to consider muting the original audio track and creating an audio overlay. They say classical music works great with slow-mo videos!

*Having troubles splitting your video file? See our detailed instruction on how to split videos.

Like this tutorial? We have more video editing tricks to help you create an awesome movie project. Check them out:

How to Blur Faces in a Video Using VSDC Free Video Editor: 2 Methods to Try

Blurring out a part of a video is a common task. You may need it to keep the identity of a person anonymous, to make sure the GPS coordinates or the car numbers stay unseen, or just to cover an object that accidentally got into the scene although it was not supposed to. However, 3 times out of 5 what you need is to blur faces in a video.

VSDC Video Editor offers two ways to do it for free. The first one literally takes a couple of seconds and creates an instant “blurred mask” in the shape of a rectangle. It’s also ideal if you just quickly need to blur out such parts of a video as logos, watermarks, numbers, and other small objects. The second way will suit those who need to accurately hide an oddly-shaped object – say, a car or a person – without blurring the surrounding area. It takes a bit more time but provides precise coverage of any object in the footage.


Looking for a way to blur a face in a video for free?

Download VSDC Free Video Editor

How to blur video parts in two clicks

For those searching how to censor a video quickly, there is a built-in filter called DeLogo. Technically it’s a ready-to-use blurred rectangle you place over the chosen object. Here is how to use it.

  1. Add a video to the scene
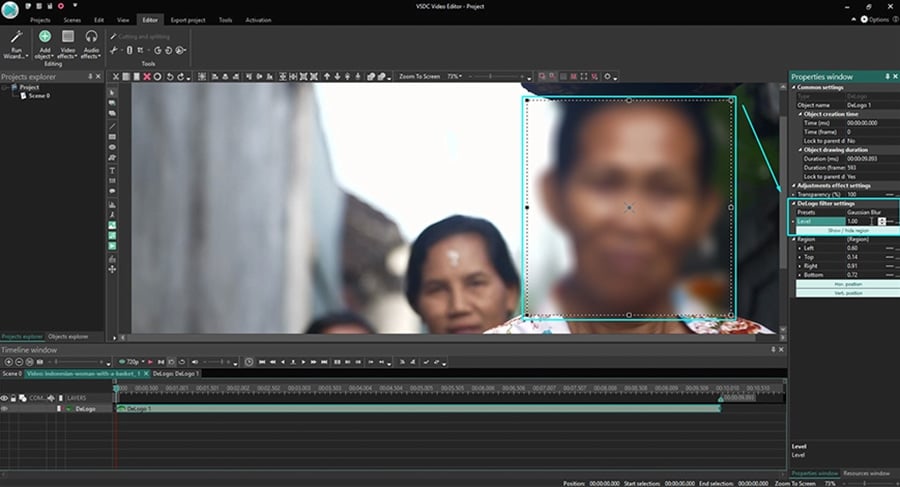
  2. Go to Video Effects, proceed to Filters and choose “DeLogo”. You’ll instantly get a blurred area in the video and a new tab on the timeline with the DeLogo filter – just as illustrated below.
  3. Click once on the DeLogo object on the timeline and you’ll notice the contour of the blurred filter.
  4. Move or resize the filter using its corners or the center point.

How to quickly add a pixel mask in a video

If you want to change the way the filter looks – for instance, you’d like to switch blur to pixels or mosaic – you can do that in the Properties window.

The Properties window is located on the right side. If you can’t see it, use the right mouse button to click on the DeLogo layer on the timeline and choose “Properties” – a window will slide in. Scroll down to “Delogo filter settings”. Choose mosaic, pixels, or any type of blur among filter presets and adjust the level of intensiveness according to your needs. See the illustration below.

How to blur an object in a movie using VSDC

This is it. Go to the Export Project tab and save the video to your PC in the required format.

Below, we’ll talk about how to blur faces in a video precisely following the shape of the object that needs to be covered.

How to blur video objects using a free shape tool

The Delogo filter we’ve talked about above has a pre-designed rectangle shape you can’t change. If you want to blur an custom shape area, you’ll need to use a tool called Free shape. Essentially, the Free shape tool allows you to create any shape manually using the vector drawing technique. Once you finish drawing, you’ll be able to apply the pixelized filter to the shape you’ve created and use it as a mask.

Here is how it works:

  1. Add a video to the scene.
  2. Select Free Shape from the menu on the left-hand side.
  3. Start outlining the object you want to blur by placing points on its border until you get the desired shape. Notice that you can drag control points around and adjust the shape at any moment.

  4. Once you finish, go back to the Scene 0 tab on the timeline. Use the right mouse button to click on the original video layer and select “Copy”. Then make a double-click on the Free Shape layer and paste the video in the Free Shape tab.
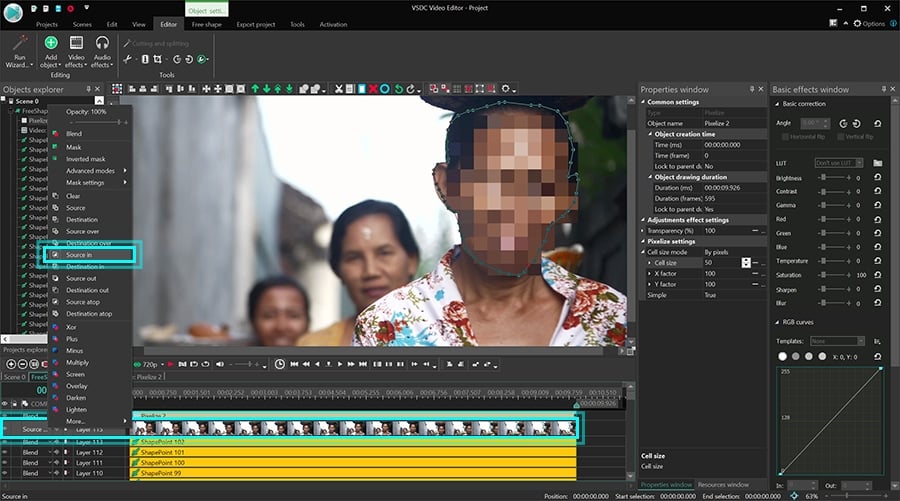
  5. Open the Blending mode menu for the video you’ve just pasted and select “Source in” – as illustrated below.

Here the illustration is the same, but in the screenshot where Inverted mask is signed, you should select Source in

Congratulations, you’ve created an inverted mask. Now, you need to apply the filter to blur the face in the video you’ve created the mask for.

To do that, open the Video effects menu, proceed to Filters and select Pixelize. Click “Ok” in the window that pops up to confirm that you want to apply the effect to the selected video file. You’ll see the result right away.

However, if a person in the video is moving, and you need the blurred mask to follow their movements while keeping the face hidden, you’ll need to apply motion tracking. Motion tracking is a part of the VSDC Pro version available for $19,99 per year. To create a motion-tracked video mask, follow the instructions from this tutorial.

How to blur background in a video using VSDC Video Editor

download window version iconDownload VSDC Video Editor

Now that you know how to blur a face in a video using free software, you may want to check out other editing tutorials:

News

New Transition Addition Methods, RAW/BRAW Files Support and Free Waveform

Welcome to the next level of video editing with VSDC's latest release, Version 9.1! Packed with an array of fresh features and enhancements, this update is designed to make your video editing experience...

VSDC 8.3 – 100+ New Templates, Key Editor Window, AV1 and Enhanced GUI

Welcome to the latest VSDC update, Version 8.3! We've been working hard and we’re ready to present a feature-packed release for you to discover an exciting array of over 100 fresh free video templates,...

Free video editing in 2023: Unlock Your Creativity without Breaking the Bank

In today's digital world creativity reigns supreme. It offers endless possibilities for individuals and brands to captivate audiences and leave a lasting impression. With social media platforms at the...

The Best Online Video Editors in 2023: Benefits and Drawbacks

In today’s digital landscape, the popularity of video content is gaining momentum, with users increasingly turning to video creation both for personal advantage and professionally. When searching for...

VSDC 8.2 – Proxy File Support, Color Keyframes and Vectorscope

We are thrilled to unveil the highly anticipated VSDC video editor 8.2 update. Our team has been hard at work, ensuring that this release is packed with exciting features and enhancements to elevate your...

VSDC 8.1 Brings Multicam, Curve Line Object, Scrolling Text Effect, and More

We’re thrilled to introduce VSDC 8.1. The new version primarily caters to professional videographers, graphic designers, and artists, however, everyday video creators will benefit from the update as...

VSDC 7.2 Takes Its Color Correction Toolset to the Next Level (Plus, Other Updates)

It has been another productive couple of months for the VSDC team, and we’re thrilled to announce the release of VSDC 7.2 – the new version of our video editing suite. Although the majority of updates...

5 Free Pieces of Software for Video Color Correction

If you’re a video creator, there are three reasons why it’s crucial to learn color correction. First, it will help you enhance your videos and make them look professional. Second, it will allow you...

VSDC 7.1 Upgrades GUI and LUT Editor, Adds New Effects and Custom Shortcuts

The new version of VSDC includes two new video effects, expands the functionality of the LUT editor, and makes video editing more convenient by bringing an improved interface, optimized timeline, and custom...

10 Pieces of Truly Free Video Editing Software (with No Watermarks)

Seeing a watermark on your video after spending hours editing it feels infuriating. Yet a few video editing software developers are still using this practice to limit the free usage of their products....
 

Screen Recorder Box

This program allows you to capture the video of your desktop and save it on your PC in various formats. Coupled with a video editor, the program is a great tool for creating presentations, tutorials and demo videos.

Read more about Screen Recorder...


Video Capture Box

The program captures video from external devices and records it to computer in a free format. You can save video from video tuners, webcams, capture cards and other gadgets.

Read more about Video Capture...


Reviewed by


"VSDC Free Video Editor is a surprisingly powerful, if unconventional video editor"

- PC Advisor


"This video editor gives you tons of control and editing power"

- CNet


"The editor handles many common formats and boasts a good deal of capabilities when it comes time to alter lighting, splice video, and apply filters and transitions in post production"

- Digital Trends