Video Editor

Use free video software to create and edit videos of any complexity from a family greeting card to a company presentation. Cut, merge video files, apply visual and audio effects, use filtration and image correction, make slideshows and add an appropriate soundtrack. Use multi-color Chroma Key and advanced parameters settings to give your video a professional look. All popular video and audio formats are supported.

Read more about Video Editor...

Video Converter

This program is intended for converting video files from one format to another. Nearly all popular video formats are supported (both reading and saving). In addition, the program drastically simplifies the task of converting videos for playback on specific multimedia devices, such as iPhone, Samsung Galaxy or Huawei P30 Pro. The program is extremely easy to use, has a modern interface and all necessary video processing functions.

Read more about Video Converter...

Audio Converter

The audio converter will help you convert audio files from one format to another. All key audio formats and codecs are supported. The program also allows you to manage playlists and meta tags, extract audio from video files and save these tracks on your computer in any format.

Read more about Audio Converter...

Audio CD Grabber

This audio tool is intended for grabbing audio tracks from compact discs and saving them to the user’s computer in any format. Nearly all popular audio formats and codecs are supported. The program can also extract track details from the FreeDB server for automatic file renaming and updating meta tags.

Read more about Audio CD Grabber...

Multifunctionality

Multifunctionality

A wide array of multimedia processing tools in one free video software suite.

High speed

High speed

Our programs use fast
and high-quality algorithms optimized for single and multi-core CPU’s.

Affordability

Affordability

VSDC video software is freely available for download to Windows OS-based PCs and laptops.

How to zoom in on a video using VSDC: instant zoom and gradual zoom

Zooming in and out on videos is one of our favorite features because it serves so many goals.

Here is just a couple of ideas on what you can achieve with it:

  • Focus. Drive the attention of your viewers to a particular area or an object in your video.
  • Clarification. Zoom in to give your audience a detailed view of the object you’re talking about in the video. It’s especially relevant for technical tutorials. We use quite a lot on our YouTube channel, actually.
  • Drama. Ta-da! Apply the zoom-in effect just before changing a scene to create a more dramatic transition. Or gradually zoom out on a video to achieve the illusion of scaling.

And we’ve just scratched the surface!

So if you want to start using the zoom-in effect in your videos, you’re on the right page. Below, you’ll find a newbie-friendly step-by-step guide to using zoom in videos. We’ll show you both the instant zoom and the gradual zoom effects. At the end of the article, we’ll also link to the popular zoom-based effects: pan and zoom, zoom fade, and smooth zoom blur transitions.

Before starting, you’ll need to download VSDC Free Video Editor – the software we’ll be using for the tutorial. It’s absolutely free, places no watermarks on your video after export, and has no format limitations.

Download VSDC Free Video Editor (Windows only)

Now, VSDC is a non-linear video editor and provides several ways to apply the zoom-in and zoom-out effects. In this tutorial, we’ll take the easiest approach and show you how to zoom in on a video using the cropping tool. The idea behind it is that you “crop out” the area you need to show closer and set it up to take over the entire scene for the desired time.

Ready to dive in? Follow the instructions below.

How to zoom in on a video instantly

Once you’ve downloaded and launched VSDC on your computer, import a video you’ll be working with. Ideally, it should be high-quality footage so when you zoom in, it won’t look pixelated.

  1. When the video is added to the timeline, place the cursor at the moment in time when you’d like the zoom-in effect to go into action.
  2. Then go to the “Video effects” tab and select “Transforms --> Crop”.
  3. A pop-up window with the object’s position settings will appear. Leave everything as is and press Ok. This way, the effect will start from the cursor position and last until the end of the video.
  4. If you want the zooming effect to last just a few moments, simply grab the borderline of the layer and drag it to the left.
  5. Now go to the Properties window on the right-hand side, scroll down to “Crop effect settings” and click “Crop tools”. You’ll see a contoured frame on the video.
  6. Resize and move the frame to the area you want to zoom in on a video – see the illustration below.
  7. Go back to the Properties window and use the “Apply effect” button. You’ll see that the part of the scene you selected is now cropped and enlarged in the Preview window.
  8. Return the cursor to the beginning of the scene and check the result. Stretch, shrink, or move the Crop effect layer on the timeline if needed.

How to zoom in on a video gradually

Gradual zoom looks smoother and makes a perfect transition between scenes. In VSDC, gradual zoom can be applied via the cropping tool, too. Half of the steps will repeat the above-described path, so feel free to jump to step #5.

  1. When the video is added to the timeline, place the cursor to the moment in time when you’d like the zoom-in effect to go into action.
  2. Then go to the “Video effects” tab and select “Transforms --> Crop”.
  3. A pop-up window with the object’s position settings will appear. Leave everything as is and press Ok. This way, the effect will start from the cursor position and last until the end of the video.
  4. Now go to the Properties window on the right-hand side, scroll down to “Crop effect settings” and click “Crop tools”. You’ll see a contoured frame on the video.
  5. Resize and move the frame to the area you want to zoom in.
  6. Now go to the Properties window and scroll down to the “Cropped borders” menu. There are 4 borders there: Left, Top, Right, and Bottom. Notice that each one has a coordinate and a dash in front of it. Click on the dash once to switch from “Constant parameter value” to “Linear parameter change”.
  7. Once you do that, each border will have 2 coordinate values: one for the beginning of the effect and one for the end of the effect. That means zooming will be stretched over time.
  8. Set the initial values for each border to the following:
    • Left - 0
    • Top - 0
    • Right - 100
    • Bottom – 100
      Notice that the final values should remain untouched since step #5. Having the initial and the final values differ is the whole point of gradual zoom.
  9. Use the “Apply effect” button and preview the result.

Now, using the same logic, you can apply a gradual zoom-out effect. The only difference here will be that the values 0; 0; 100; 100 should be set for the final coordinates of each border.

Remember, you can always adjust the duration of the effect as well as the time it starts and finishes. To do that, grab the Crop layer and move it back or forward on the timeline. Once you’re happy with how the effect looks, go ahead and save the video to your PC using the “Export project” tab.

Awesome effects and transitions involving zooming in on a video

Hopefully, you’ve got the idea and now will be able to replicate the zooming effect for your projects.  Once you get the hang of it, you might want to check out the following video tutorials showing how this feature can be used for adding dynamics to your video:

  • Pan and zoom effect. Also known as Ken Burns effect and originally used to add motion to still images, it allows for focusing on details and panning across the scene.
  • Zoom blur transition is one of the most popular transitions on the Internet. It creates such incredibly capturing dynamics that will probably save even the most boring video.
  • Zoom fade transition looks great when applied to titles as well as images or videos and might serve well for opening scenes.

Some of these tutorials employ VSDC Pro features available in the premium subscription. However, the subscription is only $19.99, it’s valid for a year and is certainly worth the money if you’re enthusiastic about video editing.

Subscribe to VSDC YouTube channel for more inspiration!


You can get more information about the program on Free Video Editor' description page.

3 easy ways to remove audio from video in VSDC

Way too often decent videos come with a low-quality sound. The reasons vary: unexpected noises in the background, wind whistling, or even a microphone mistakenly covered by the operator’s finger. As a result, while editing the footage, you might need to remove the sound from the video and replace it with music or a voice recording.

There are several ways to do that including two-click tricks that will let you mute a video in literally 3 seconds. In the article below, we’ll describe three methods and explain the benefits of each. We’ll also look into further steps you might want to take – say, removing audio noise or changing the volume of a part of the audio.

For the tutorial, we’ll be using free video editing software named VSDC. It’s designed for Windows OS and requires minimum system resources.

Download VSDC Free Video Editor

Essentially, there are two ways to remove sound from a video: by muting it and by deleting the original audio track completely from the file. The former is the easiest and the fastest option if you just need to silence the video. The latter is more convenient if you want to replace the original audio with a new soundtrack. Let’s go over each method.

How to remove audio from video: method #1

We’ll start with a quick trick where the original audio track remains a part of the file but becomes absolutely silent. To try it out, import a video file to VSDC Free Video Editor and follow these two steps:

  1. Use the right mouse button to click on the video you need to mute.
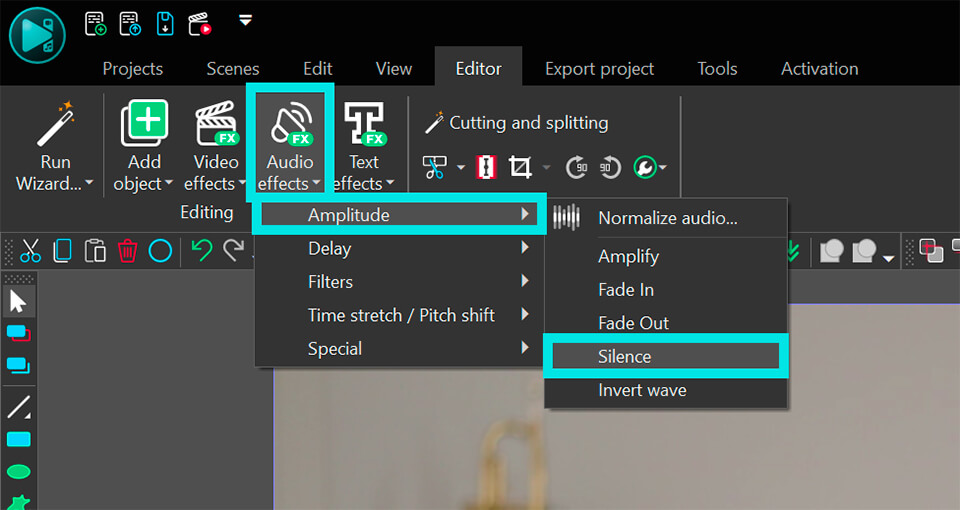
  2. Select “Audio effects --> Amplitude --> Silence” as illustrated below.

How to remove sound from a video


Now, essentially, what you do is add a “Silence” layer over the video. It means the audio remains a part of the file but gets muted by the filter. And since you can easily shrink, stretch, and move layers with a mouse, this method will work for silencing the entire video or muting just a part of it. For the latter, adjust the size of the “Silence” layer with a mouse and move it to the part of the footage you need to mute.

Quick tip: if the main reason you want to remove audio from video is the background noise, you might also consider noise-reducing filters available in VSDC. A detailed tutorial on noise reduction is published here.

How to mute audio in a video: method #2

That first method was easy, wasn’t it? Now, the next method is two clicks longer (which makes it 4 clicks). Here is how to perform it:

  1. Import a video you need to mute to VSDC Free Video Editor.
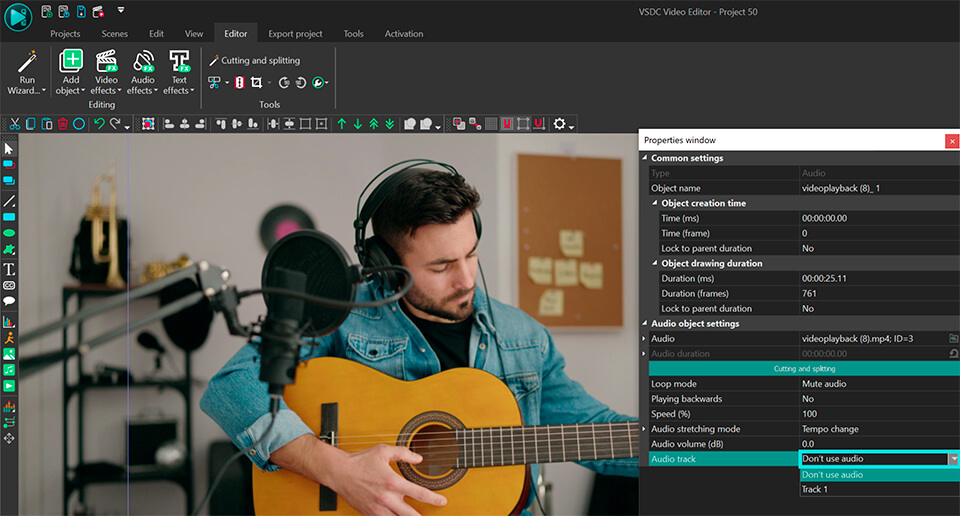
  2. Use the right mouse button to click on the video and select “Properties”. The “Properties window” will slide in from the right-hand side of the editor.
  3. Scroll down to the “Audio track” field and switch to “Don’t use audio”.

How to quickly remove audio from a video in VSDC

This method gives you less flexibility. When you use it, you technically choose to disregard the sound of the selected file entirely. That doesn’t, however, prevent you from adding an audio file to the project and using it as a new soundtrack.

How to remove sound from video by deleting the audio track: method #3

If you prefer, you can go one step further and delete the audio track of your file completely. To do that, follow the steps below:

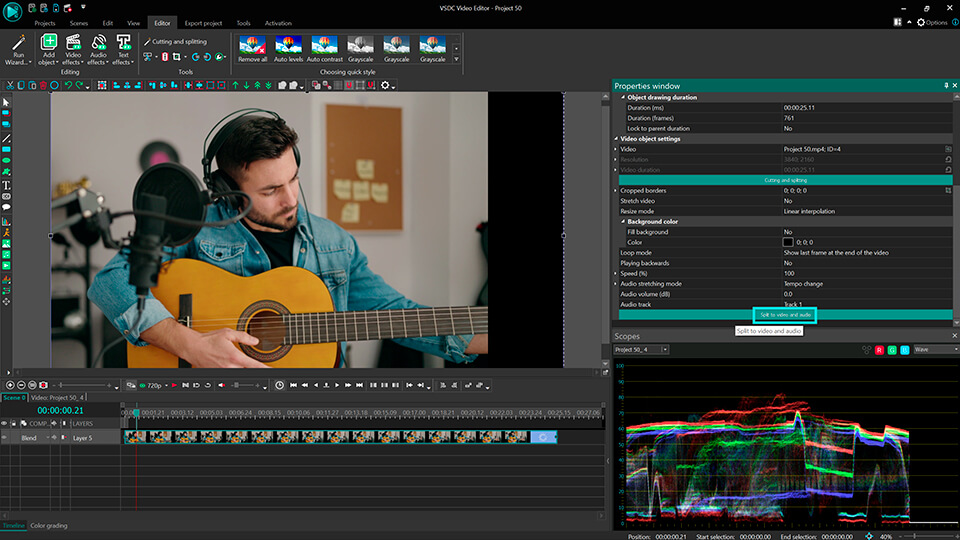
  1. Use the right mouse button to click on the file you need to mute and select “Properties” from the menu. The “Properties window” will slide in from the right-hand side.
  2. Scroll down to the very bottom and use the light green “Split to video and audio” button. Once you do, you’ll see that the soundtrack now appears as a separate layer on the timeline.
  3. Select it and hit Delete.

simple remove audio from a video clip

Having a soundtrack layer separated is also convenient when you need to cut out or modify a fragment of the audio. Here is a detailed video on how to change the volume of a part of the audio in VSDC.

How to replace audio with another soundtrack or voice commentaries

We’ve shown you 3 methods to remove audio from a video. Now, let’s see what to do next. In most cases, you don’t want your video to stay silent, so you might need to upload a new soundtrack. To do that, just click the “Add object” button and choose “Audio” or use the Shift + A keyboard combination. Once the uploaded audio track is on the timeline, adjust the sound to go along with the video by moving the new track along the layer. If you need to trim the file or cut out a part of it, use this tutorial. Splitting audio files in VSDC works exactly the same way as splitting videos.

Finally, if you need to record voice comments for the video, you can do that right in VSDC as well. The voice capturing tool is available in the free version of the program and it allows you to create voiceovers with minimum effort. You’ll be able to add the voice recording to the timeline as a new layer and adjust it just like you would do with any other audio file. Watch our instructions on adding voice over video here.

Now that you know how to mute, remove, and replace an audio track, go ahead and try it for yourself. Pick the most convenient method and start your montage experiments!

Drop us a message on Facebook if you have any questions and subscribe to our YouTube channel for more tutorials.


You can get more information about the program on Free Video Editor' description page.

Animated charts in VSDC Free Video Editor: a beginner’s guide

The most difficult part of any presentation is to maintain the attention of the audience, especially when there are numbers involved. Data visualization typically works well, however still pictures and diagrams won’t impress anybody these days. That’s why infographics have become so popular, and therefore – animated charts as well.

Animated charts used in a presentation can help you illustrate business growth, analyze market trends, and visualize development predictions.  In the instructions below, we’ll show you how to create dynamic animated charts in a free video editing software called VSDC.

Download the latest version of VSDC here.

How to start working with charts in VSDC

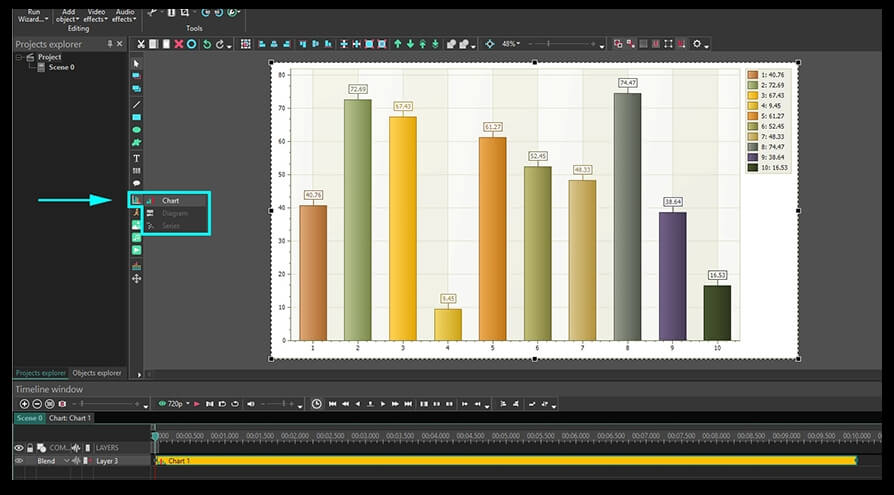
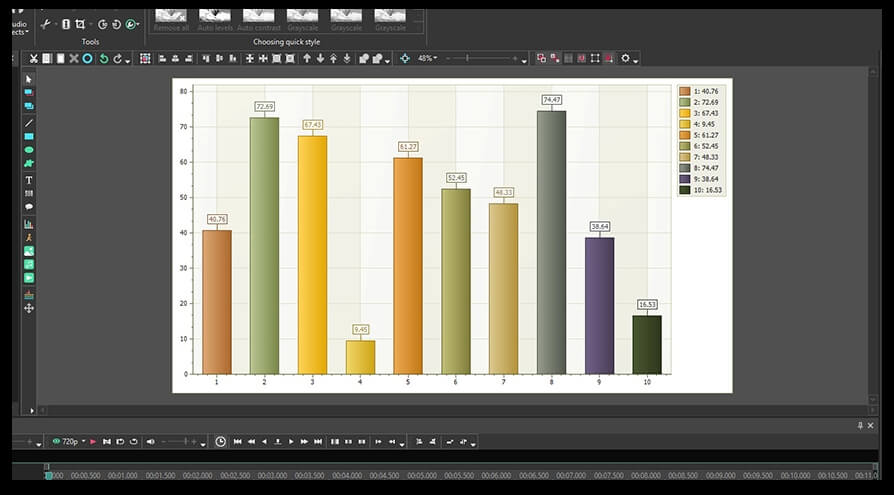
Once you’ve installed and launched the program, open the “Editor” tab and click the “Add object” button located in the menu at the top of the interface. Select “Chart” from the dropdown menu to add a chart to the scene. You can also use the dedicated icon How to create animated charts for free in the menu on the left-hand side or the Ctrl + C combination. In the pop-up window you’ll be asked to confirm the object’s position on the timeline – just click Ok. A generic chart template will be placed in the scene once you perform this action.

Adding a chart to a scene in VSDC Free Video Editor

Note that the “Add chart” icon on the left provides 3 options: adding a chart, a diagram, or a “Series” layer. These are the layers that help you fine-tune a chart on different layers. Each new layer is opened with a double-click on the previous one. Thus, by clicking on the “Chart” layer twice, you move to the “Diagram” layer and so on. One chart can contain several 2D diagrams.

Chart setup layers in VSDC

Let’s review each setup layer for you to have a better understanding of where to resort for a necessary parameter.

Chart

This is the first layer you start working with and it allows for setting the general appearance of the chart. Here are the parameters available here:

  • The time of chart appearance in the scene and its duration time;
  • Colors of axes, borders, and background;
  • Axes and borders titles;
  • Data direction and alignment.

Diagram

When you make a double click on the “Chart” layer, you get to the second level of settings, called “Diagram”.

The settings on the “Diagram” level are similar to the settings on the “Chart” level. The main difference is that here you’ll be able to edit each diagram individually when there are multiple diagrams in a chart. Here are the properties you can work with:

  • Diagram style (2D diagram, 3D pie, funnel, pyramid, etc.)
  • The time of the appearance in the scene and the duration time for each diagram;
  • Diagram title;
  • Colors of each diagram axes and background;
  • Format of axes and borders titles.

Series

The last layer you get to by clicking on the Diagram level twice is called “Series”. It allows for adjusting the data displayed in the chart. Here is what you can set up in particular:

  • The moment of data appearance and its duration time in the scene;
  • Chart legend, its format, color theme and location;
  • Series properties style (for instance, if you’ve chosen a 3D diagram style earlier, you’ll need to choose a corresponding properties style such as Pie 3D, Torus 3D, etc.);
  • Format, color, and location of the chart data;
  • Labels shape, colors, and size;
  • The appearance dynamics of the data, etc.

How to create and design a chart in VSDC: basic principles

Now, let’s go over creating a 2D chart in VSDC in details. Follow the steps below.

Step 1. We’ve already touched upon the first step of creating a chart. You need to open the “Editor” tab and click the “Add object” button. From the dropdown menu, select “Chart” to get a generic chart template with several bars as illustrated below.

Generic chart template in VSDC

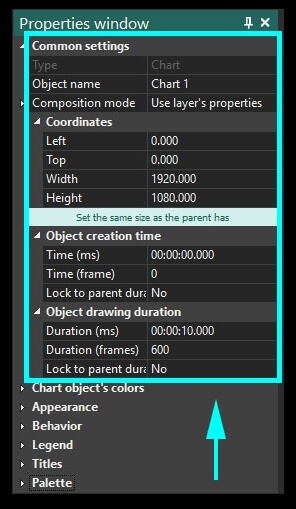
Step 2. Using the right mouse button, click on the “Chart” layer and select “Properties” from the menu – the “Properties window” will slide in from the right-hand side.

The first menu section here is called “Common settings”. This is where you can type a name for the chart layer, its precise location in the scene, the time of appearance and duration. Note that you can set up the appearance moment and the duration using frames or milliseconds.

2D chart template in VSDC

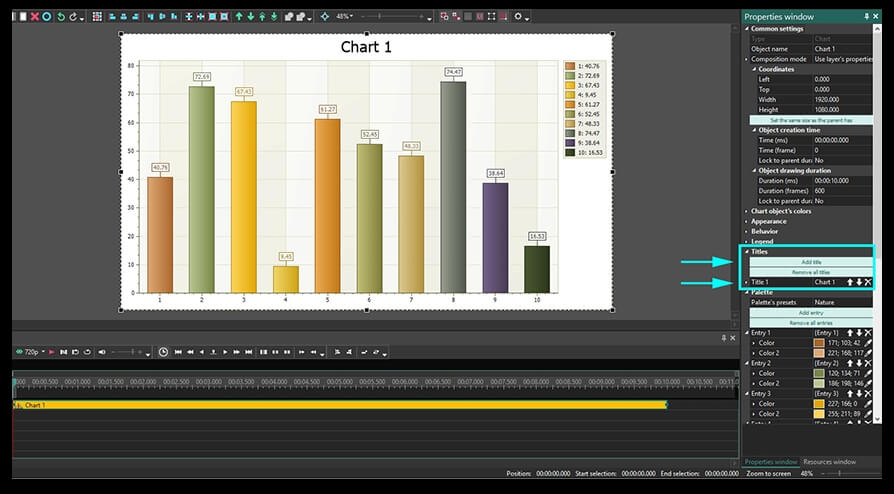
Step 3. To add a title right to the chart object, scroll down to the “Titles” section and type the desired name in the field called “Title 1”.

How to add a title to a chart in VSDC

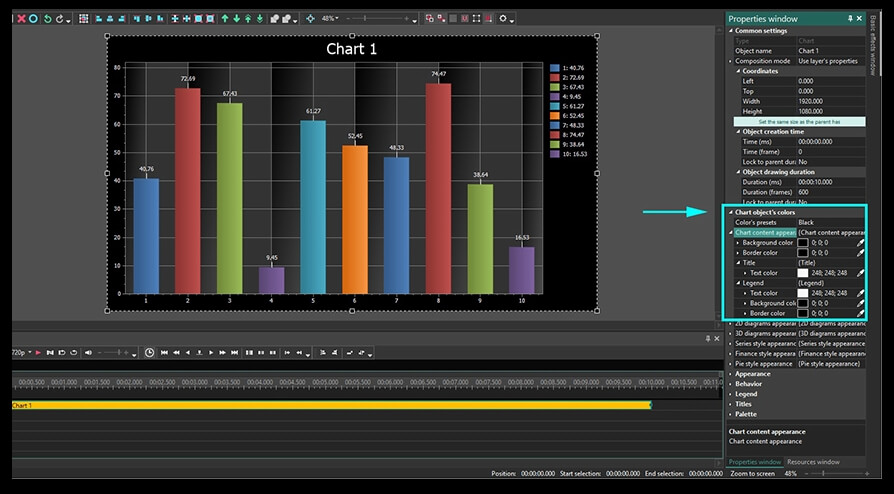
Step 4. To edit colors of the chart, go to the section called “Chart object’s colors” and either select colors manually or apply one of the presets. For example, in the illustration below, we’ve chosen the black preset to apply the black-and-white style to the background, the legend, the data, and the borders.

How to apply color presets to a 2D diagram in VSDC

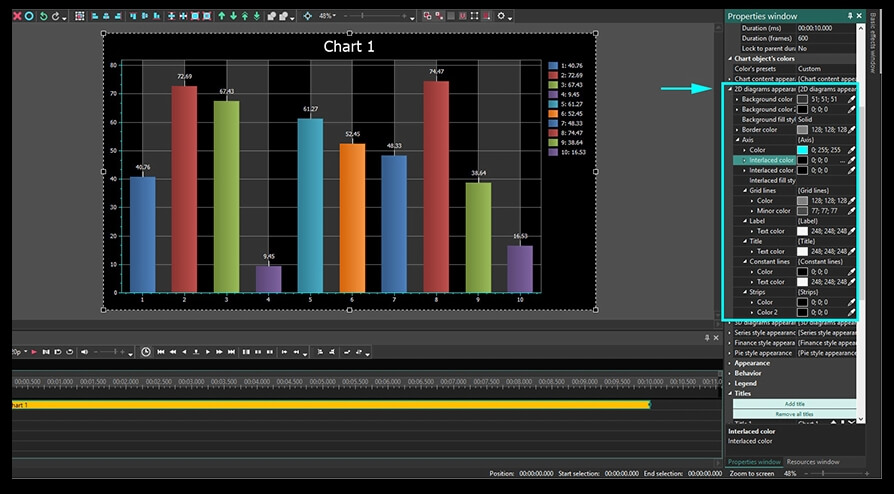
Step 5. To change the color theme of the gridline area, open the section called “2D diagrams appearance” located in the same “Chart object’s colors” menu. For example, in the illustration below we’ve adjusted the following parameters:

  • Background – black and gray (comes in the selected color preset).
  • Axis color – light blue.
  • Interlaced color and Interlaced color 2 - black.

2D diagram appearance settings

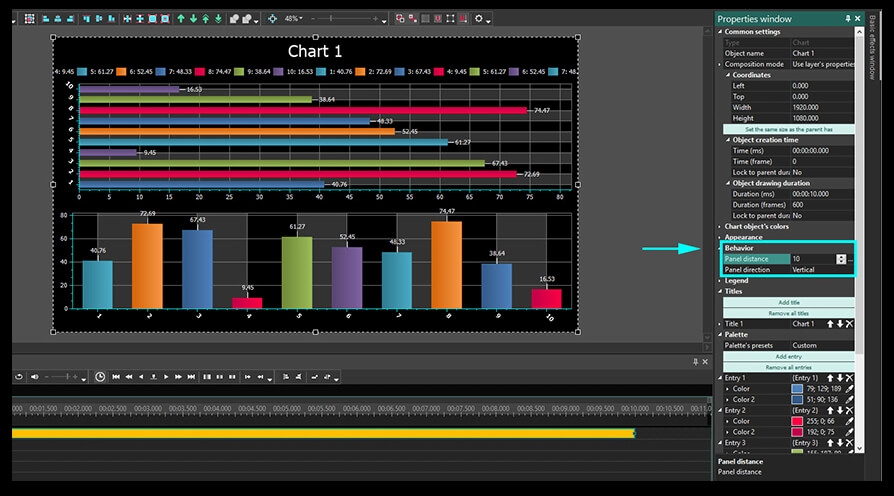
If you have added multiple diagrams to the chart, you can set up the distance between them as well as their style and position regarding each other – horizontal or vertical, rotated or not.

Chart horizontal and vertical alignment

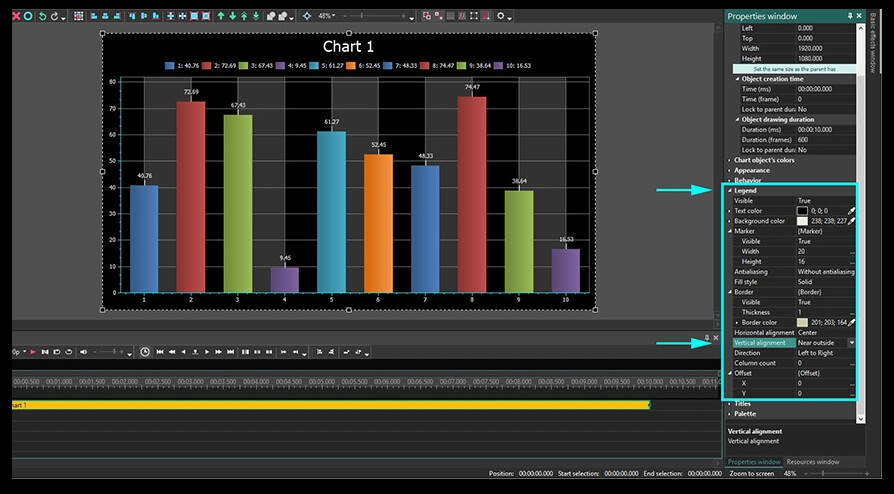
Step 6. Finally, you can set up colors of the chart’s legend: its background, text, frame, labels as well as the legend’s position. In the example below, we’ve left the color theme selected with the preset, however, we’ve changed the legend’s position. Check the following parameters:

  • Horizontal alignment – center
  • Vertical alignment – near outside
  • Direction – left to right
  • Column count - 0

Chart legend settings

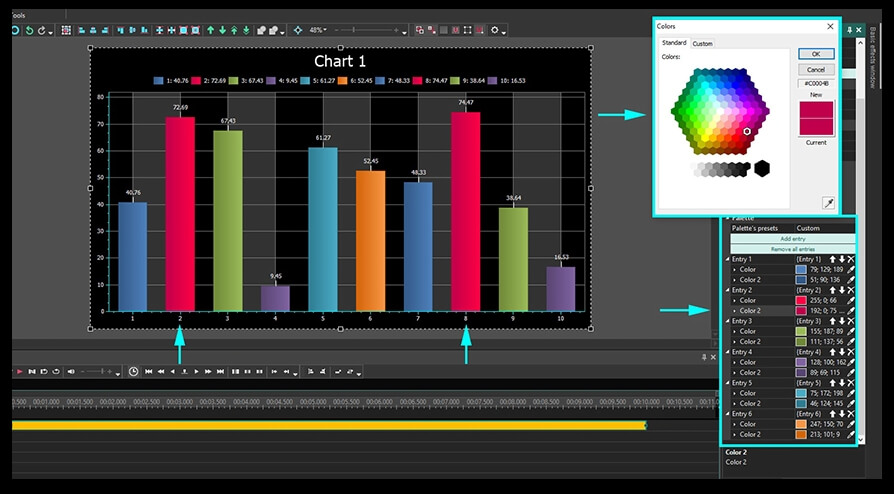
Step 7. The next step will be filling bars with color. If you want to have the Gradient effect, you need to select 2 colors for each bar. In the menu on the right-hand side, bars are indicated as “Entry 1”, “Entry 2”, etc. For example, in the illustration below, we’ve filled each bar with a gradient of the same tone colors.

Setting up chart bar colors using gradient

The arrows “up” and “down” in each entry field allow you to apply the selected color to the previous or the next bar. The X icon removes all the changes made to the entry.

All the parameters selected in the “Properties window” for the “Chart” layer are applied to the entire chart. If you want to modify the appearance of each diagram in the chart, make a double-click on the “Chart” layer and select the diagram you want to work with.

How to design the appearance of a selected diagram

In case you have multiple diagrams in a single chart, here is how you can edit each one independently.

Make a double click on the “Chart” layer to get to the “Diagram” layer. On the timeline, you’ll see each diagram as a separate layer. If you want to add a diagram, you can do it manually by clicking the “Add chart” icon and choosing “Diagram” option this time.

Make a right mouse button click on the diagram you want to edit and choose “Properties” – the “Properties window” will slide in from the right-hand side.

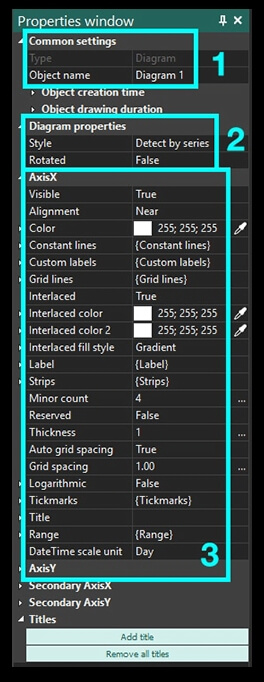
2D diagram properties reviewed in details

  1. The “Common settings” menu is similar to the one for the “Chart” layer.
  2. The “Diagram properties” menu allows to choose the diagram style (2D diagram, 3D pie, funnel, etc.) and the direction of the bars – horizontal or vertical.
  3. The axis X and Y settings allow for choosing colors, thickness, and other parameters for each axis. Secondary axis X and Y are exactly the same as the primary ones and located on the opposite sides of the chart.

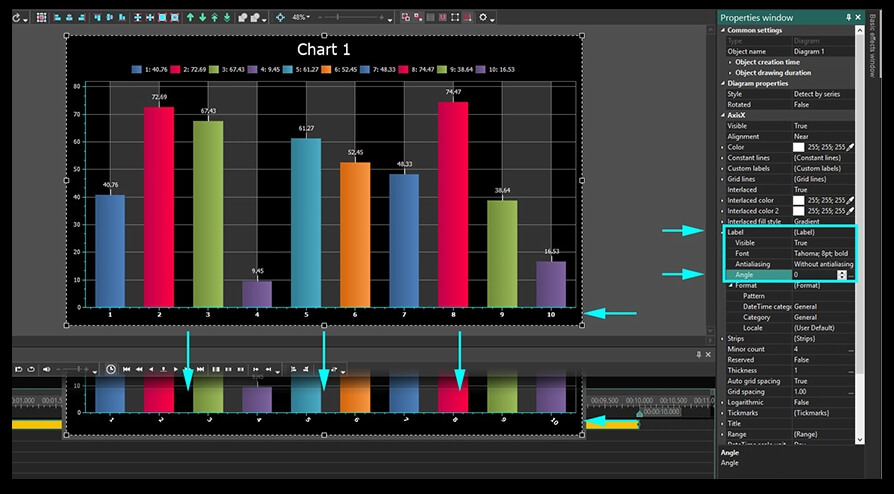
Finally, you can change the axis titles here. Specifically, you can edit their font, format, angle, and other parameters as illustrated below.

Setting up chart labels and tick marks

If you want to go into the details, you can also adjust the thickness of tick marks, change their number, length, and everything in between to make your chart unique and impeccable.

Range

The reason why “Range” is described in a separate paragraph is that it is directly related to chart animation settings.

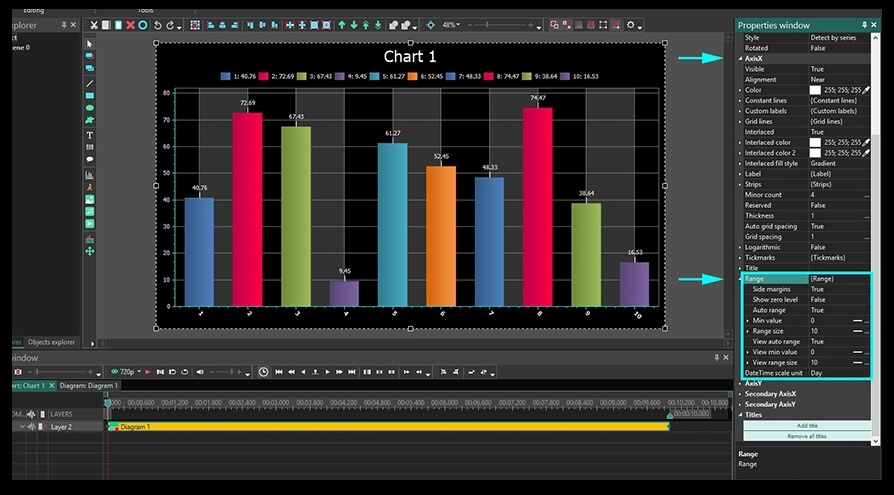
First of all, you should find the field “Axis X – Range – Auto range/View auto range” and switch both settings to “False”. Do the same for Axis Y. The “Auto range” allows for setting the minimum and maximum axis values. Meanwhile, the “View auto range” parameter allows for setting the minimum and maximum axis values that will be visible during the chart playback. You should always make sure that the former has higher values than the latter.

How to set up range parameters

To illustrate everything we’ve just said above, let’s select the following settings in the Range menu for our example chart:

1. Auto range field:

Minimum value:

  • Initial value – 0. This is the minimum possible axis scale value for the first frame.
  • Final value – 0. This is the minimum possible axis scale value for the last frame.

Range size:

  • Initial value – 100. This is the maximum possible axis scale value for the first frame.
  • Final value – 100. This is the maximum possible axis scale value for the last frame.

How to set up range for dynamic charts in VSDC

2. View auto range field (these parameters define the displayed axis scale limits)

View minimal value:

  • Initial value – 0. This is the minimum displayed value for the first frame.
  • Final value – 10. This is the minimum displayed value for the last frame.

View range size:

  • Initial value – 20. This is the maximum displayed value for the first frame.
  • Final value – 70. This is the maximum displayed value for the last frame.

You can see how your video presentation changes as you input various values by using the “Preview” button on the left-hand side above the timeline.

Animated chart preview by frames

                  First frame                                                                                                                          Last frame

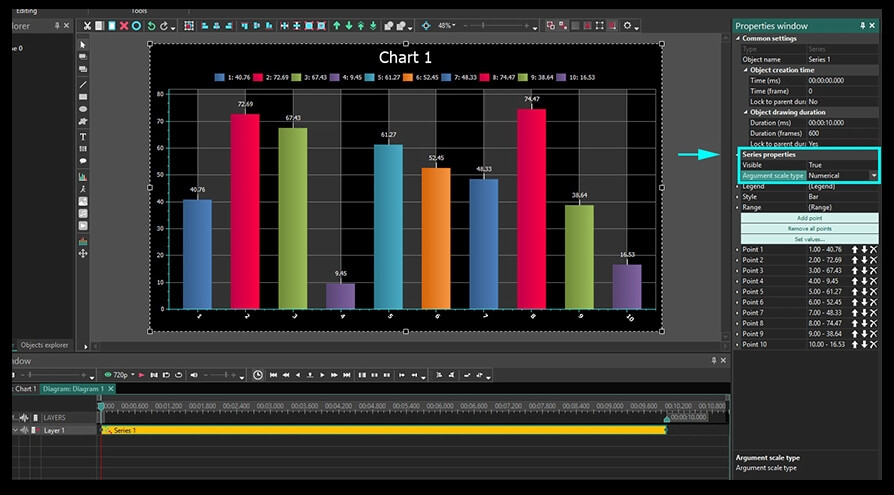
If in the process you’re facing format issues (for instance, when your scale starts with 1 instead of 0), go to the “Series” layer and select the “Numerical” Argument scale type in the Series properties menu.

How to work with the “Series” layer

The final layer is called “Series” and it includes parameters related to the data displayed in the animated chart. Make a double-click on the “Diagram” layer to open the “Series” layer, then use the right mouse button to open the “Properties window”.

The “Common settings” menu is similar to what you’ve seen on the “Chart” and “Diagram” layer. That’s why let’s go straight to the “Series properties” menu.

Series properties layer in VSDC animated chart menu

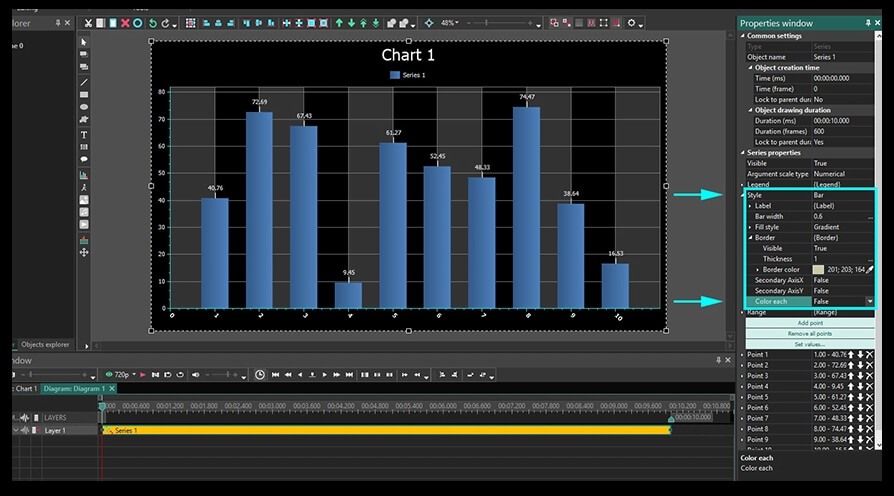
Legend. Here you can change the title of the legend. Keep in mind that it will only be visible if all the data on this layer (bars in our case) have the same color. To achieve that, you need to select “False” in the following field: “Style – Border – Color each”. Here is what it will look like:

Setting up chart bars style in VSDC

Range. Now, let’s switch to the Range menu settings. Just like you’ve seen on the “Diagram” layer, there are minimum value and range size fields.

Similarly, the minimum value includes two parameters:

  • Initial value. Here, you need to put the number of bars that will not be displayed during the first frame. In other words, if you type “2” as the initial value here, the first two bars will be skipped, and the playback will start from the 3rd one.
  • Final value. Here, you need to specify how many bars will not be displayed during the final frame. So, if you type “5”, that will mean bars #1-5 will not be visible in the last frame.

Note that the color from the bar that gets excluded from the playback is applied to the following bar displayed during the playback. To be more precise, if the first bar is yellow and the second bar is blue, but the first one will not be displayed during the first frame, the second bar becomes yellow automatically during the playback.

Range size also has two key parameters:

  • Initial value. Here, you decide how many bars in total will be displayed in the first frame. For example, if you put “2”, there will be only 2 bars displayed in the video starting the first one (indicated in the Minimum value field).
  • Final value. Here, you decide how many bars will be displayed in the last frame. For example, if you put “10” – there will be 10 bars visible in the last frame (starting from the first one displayed.

How to set up properties for a particular bar in the diagram

You can edit each bar in the diagram using the “Series” layer. Bars are indicated as “Point 1”, “Point 2”, etc. So, for each point, you can set up initial and final parameters – value, titles, and colors that will be displayed at the beginning of a video and at the end.

Setting values for animated chart dynamics

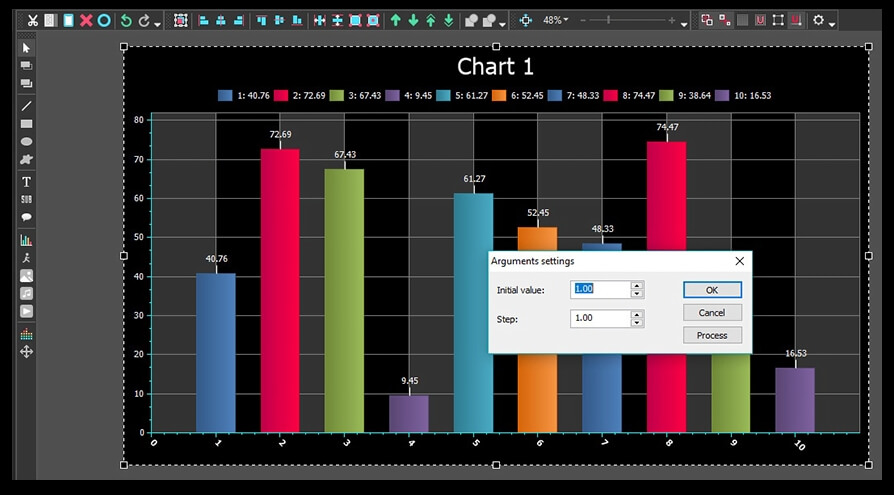
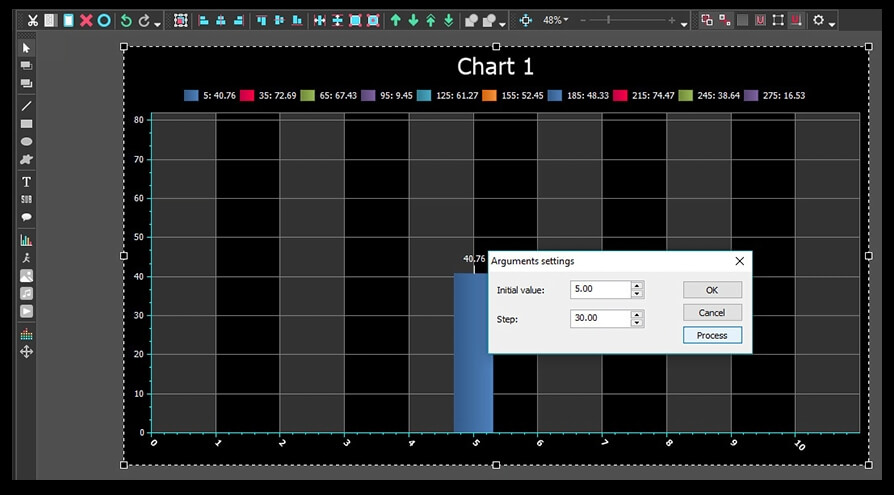
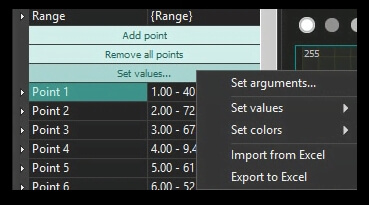
To do it, use the “Set values” button and select “Set arguments” from the pop-up menu. Once you do that, proceed with typing the initial value and the step.

  • Initial value. This parameter defines the value on the Axis X for the first bar in the diagram. By default, it’s always 1 – see the illustration above.
  • Step. Here, you set up an interval between bars. By default, it’s always 5.

After you set the values, click «Process» and then «Ок».

Setting up the number of chart bars visible in each frame

The second menu option once you click the “Set values” button is called “Set random values”. It creates random Axis Y values for all the bars. The more times you click on this option, the more random values will be applied.

Similarly, the following “Set colors” option allows for setting random colors for the bars or using a palette.

Animated diagram settings

How to work with charts from Excel files

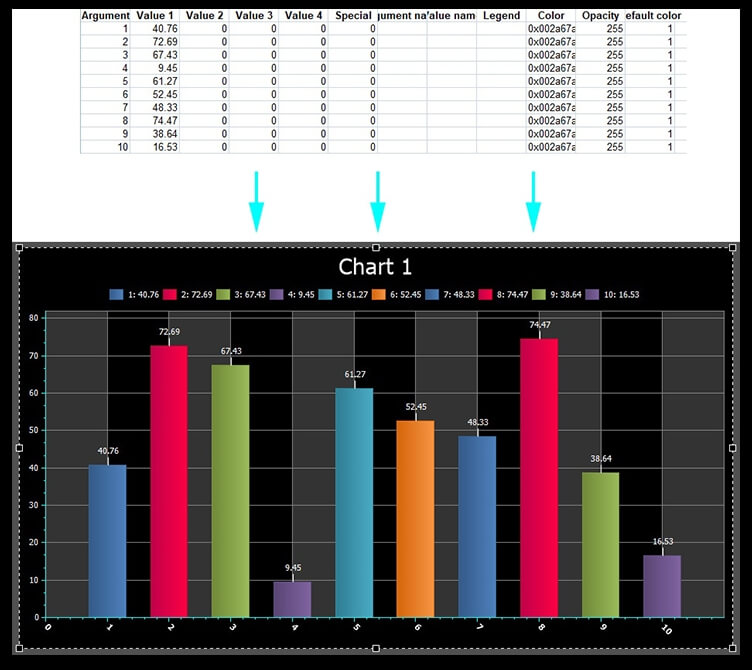
In addition to everything above said, you can build charts based on the data from an Excel spreadsheet uploaded to VSDC. To activate this feature, go to “Series – Set values – Import from Excel”. For correct upload, you need to format the data the following way:

Creating a chart in VSDC based on an Excel file

In the illustration above, the “Argument” column contains Axis X values for each bar, and the “Value 1” column contains values for Axis Y.  If you need to export chart data to an Excel file, proceed to “Series – Set values – Export to Excel”.

How to set up chart dynamics

We’ve finally approached the most exciting and the shortest part of our instruction – applying dynamics to a chart. The point of a dynamic chart is that its elements (bars, for instance) change their values on both Axis as the video continues.

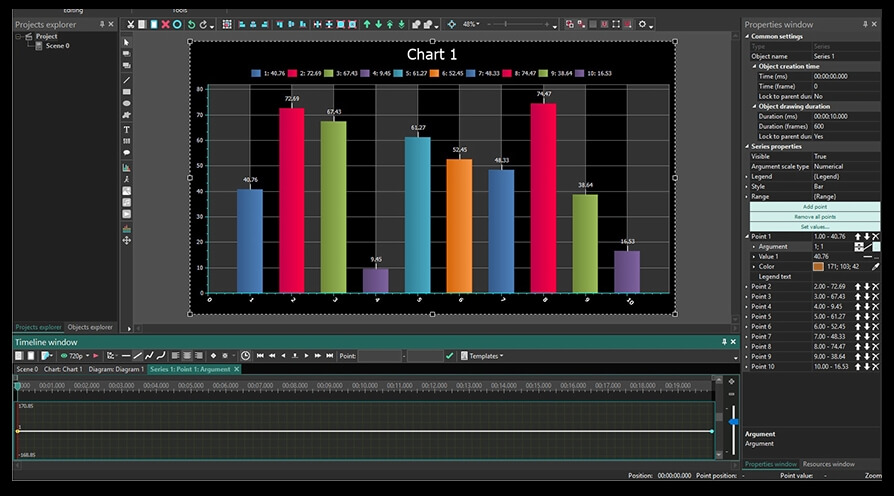
To apply dynamics to a chart, you need to open the following setting on the “Series” layer: “Series properties – Points”. Then, select the point you’re planning to apply dynamics to and find the “Argument” or the “Value” field. Click on the three-dot <…> icon and you’ll see a straight trajectory in the timeline.

Adding a trajectory to an animated chart in VSDC

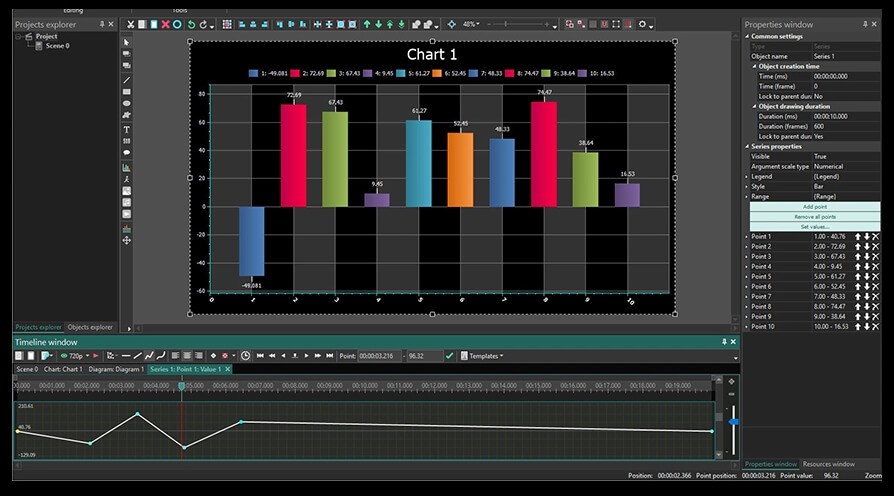
This trajectory corresponds with the value of the chosen bar on the Axis X or on the Axis Y – depending on whether you chose the “Argument” or the “Value” field. By making double clicks on it, you can create control points and drag them around modifying the trajectory. By dragging control points up and down you apply positive or negative values for a particular chart bar in a chosen time moment.

Below is an illustration of dynamics applied to the Point 1.

Modifying an animated chart trajectory

Now go ahead and try to design your first animated chart in VSDC!

Looking for more awesome tutorials? Check out our YouTube channel and ask any question on our Facebook page.


You can get more information about the program on Free Video Editor' description page.

How to quickly add a watermark to a video using VSDC

Do you need to protect your clips from being copied? Or willing to promote your brand through video content? Video watermarks are a proven way to do that. They may appear as text or as an image, and they can cover most of the visual part - stretched to the dimension of the video - or sit quietly in the corner.

If it sounds like something you’ve been looking for, keep reading this tutorial. We’ll show you how to add a watermark to a video using free video editing software called VSDC. After you read the instructions, placing a watermark over a video will take you two-three minutes or even less. And unlike a watermark on a picture, this one won’t be easy to remove because it will be literally embedded into each frame of your video (in fact it’s highly unlikely anyone will be able to remove it at all).

Download VSDC Free Video Editor here

Technically, a watermark is an added object placed over footage and visible throughout the entire video. In other words, you need to have an extra layer in your project where a watermark - your text or your logo - will be located. We’ll start with a text watermark and then show you how you can create a watermark with your logo or any other image. You may want to check out the video tutorial before reading the text instructions below.

How to add a text watermark to a video

After downloading and launching VSDC on your computer, go ahead and import the video you want to place a watermark on.

1. Once it is placed on the timeline, you’ll need to add a text to your video. The corresponding icon is located on the left-hand side of the menu and looks like a “T” letter.
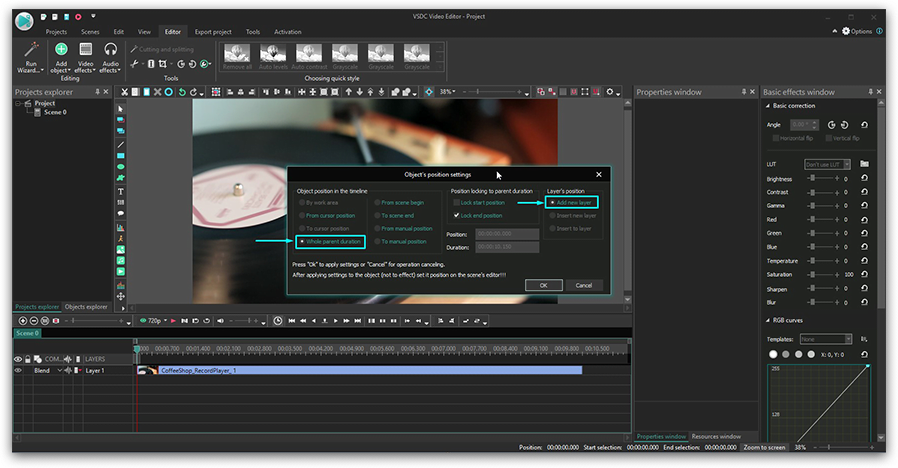
2. When you click on the “T” icon, the “Object’s position settings” window will pop up. Choose “Whole parent duration” in the first column.
3. Place the cursor on the scene to create a space for the watermark. If you misplace it – no worries, you’ll be able to move the watermark at any moment.
4. Type text in the field you’ve just created. You’ll notice that a text editing menu has appeared at the top of the interface – use it to design your watermark.
5. Play around with the settings changing font, size, thickness, and other parameters of the text. If you want to use a specific font, and it’s absent from the dropdown menu, download it to your PC first – and then VSDC will “pick it up” automatically. There are multiple websites where you’ll find free fonts to download, here is a list of them.
6. Here, you can decide how thick the borders of the letters should be and adjust the text opacity to make the watermark transparent. The latter is located in the “Text color” tab – see the illustration below.

7. Click on the watermark with the left mouse button and use the dragging motion to place it exactly where you want in the scene. If in the process of editing, you’ve added more files to the timeline, make sure that the text layer is the same size as your entire project. You can stretch the layer manually if needed.
8. Once ready, go ahead and save the video to your computer using the “Export project” tab.

How to add a logo watermark to a video

If you need to add a watermark to a video, and you need it to be an image – say, your logo or any other creative – you can do that too. Ideally, you want to use a high-quality PNG image with a transparent background, however, colored logos will do as well. Here is how the process goes step by step:

1. After you import the video to VSDC, go ahead and click on the “Add object” icon. Select “Image” and upload the creative from your computer.
2. In the “Object’s position settings” window, select “Whole parent duration” in the first column. How to add a logo watermark to a video
3. Move it around and resize if necessary.
4. Go to the “Tools” menu located at the top of the interface and click on the icon that looks like a wrench – the Opacity setting will be available there. Adjust the scale until the image is at the right transparency level.
5. Make sure the layer with the watermark on your timeline is exactly the same size as the entire video unless you only want it to appear for a particular moment.
6. Save the video to your PC using the “Export project” tab.

Now that you know how to add a watermark to a video, go ahead and explore our 3 most popular tutorials:


You can get more information about the program on Free Video Editor' description page.

How to edit video colors in VSDC: a quick tutorial

Working with colors in a video is a huge and exciting topic. Typically, you would think of color correction either for practical reasons or for a creative calling. Sometimes you need a quick fix because the footage has been recorded with issues - poor light, gloomy day, wrong camera setup. Other times you might want to get artsy and just play with the colors, achieve a certain style or an atmosphere in your video.

There are solutions for each case. It all depends on your level of experience and the time you’re willing to invest in the process. In the tutorial below, we’ll show you how to quickly edit colors of a video using Instagram-style filters, LUTs, and standard manual color adjustments in VSDC – a free video editor for Windows OS. We’ll also teach you to change the color of an object in a video or a photo.

Download VSDC Free Video Editor

If you’re looking for more professional-level color correction techniques, check out our tutorials on working with RGB curves and Hue & Saturation color wheel.

How to edit video colors in one click: LUTs and Instagram-style filters

Let’s start with the easy part. If you have no particular color-related issues in the video and simply want to make it pop with a beautiful color combination, you’ll love quick filters available in VSDC.

Here is how to apply one-click Instagram-style filters to your video:

  1. Click on the video you want to correct.
  2. Open the Quick style menu at the top of the program interface.

  3. Click on any style to get real-time preview. Every applied style will be displayed in the menu in a light-gray frame confirming that the style has been selected.
  4. To deselect a chosen style, click on it once again. To remove all the applied styles, click on the corresponding button at the top left corner of the Quick style menu.

As you can see, there are 37 filters for you to play with including a selection of old movie styles and blurs. You can apply multiple styles to the same video and even create templates to apply the same combination to other files.

Next comes the set of LUTs. LUTs are one of those magic tools that make your poorly colored video look like a major motion picture. Technically, a LUT (look-up table) is a set of pre-selected color parameters the software will apply to your video or an image to make it look a particular way.

LUTs are widely used by videography professionals. There are 10 of them already configured and available in VSDC, plus you can find LUT packs online to download them to your computer and apply through the editor.

Here is how to find the corresponding menu:

  1. Click on the necessary video with the right mouse button.
  2. Select Video Effects --> Adjustments --> LUT.
  3. In the next tab on the timeline, you’ll find a LUT1 layer. Click on it with the right mouse button and select Properties.
  4. The Properties window will slide in from the right-hand side.
  5. Click on the LUT effect settings and select any of the available options while checking the result in the preview window.

How to change video colors by adjusting contrast, saturation, and other parameters

If you want to edit video colors manually by adjusting its brightness, temperature, contrast, and other parameters, you’re welcome to do so. Just go the Video Effects tab, scroll down to Adjustments and select the set of parameters you need to change.

Say, you want to change Hue and Saturation levels. Once you select this option from the menu, you’ll notice a new tab with an HSV 1 layer on the timeline. Click the layer with the right mouse button and select Properties from the menu. The Properties window will slide in from the right-hand side. Find “HSV effect settings” and manually change the levels as it’s demonstrated in the video above.

How to change the color of an object in a video or in an image

In the last part of this tutorial, we’ll teach you to change the color of an object in a video using a tool called Gradient. Gradient allows you to make a gradual blend between various colors. Naturally, you can apply the same effect to photos as demonstrated below. Below, there is a video guide and text instructions for you to follow.

Step 1. Add an image or a video to the editor.

Step 2. Create a shape using the left-hand side menu and place it over the area you’re planning to edit. In this case, we use the Ellipse, but there is also a Rectangle and a “Free shape” adjustable to any form. The shape will serve as a mask and define the area color correction will be applied to.

Step 3. When you add a shape to the scene, go to the upper menu and select an ellipse style #3 - a colored one without borders.

Step 4. Make a double click on the ellipse layer and add one more ellipse to separate the area you’ll apply gradient color correction to – just like illustrated below.

Step 5. Go to the Properties window on the right and choose to paint background color black. Note: it’s the intersection of these two ellipses that will be visible in the end.

Step 6. Now go to the Blending menu on the left-hand side of the timeline and select “Inverted mask” – you’ll instantly see which area you’ll be working with.

Step 7. Go to the main scene (Tab “Scene 0”), highlight the ellipse and go to the Properties window to select Gradient from the dropdown “Fill background” menu.

Step 8. Open “Gradient settings” and select the appropriate gradient type. Try applying different colors and changing the direction of the gradient vector.

Step 9. Check different blending modes to get the result you had in mind.

Please note that the “Inverted mask” tool is only available in VSDC Pro version that is $19.99 per year. The rest of the video color changing tools and filters described in this tutorial are available for free.


You can get more information about the program on Free Video Editor' description page.

News

New Transition Addition Methods, RAW/BRAW Files Support and Free Waveform

Welcome to the next level of video editing with VSDC's latest release, Version 9.1! Packed with an array of fresh features and enhancements, this update is designed to make your video editing experience...

VSDC 8.3 – 100+ New Templates, Key Editor Window, AV1 and Enhanced GUI

Welcome to the latest VSDC update, Version 8.3! We've been working hard and we’re ready to present a feature-packed release for you to discover an exciting array of over 100 fresh free video templates,...

Free video editing in 2023: Unlock Your Creativity without Breaking the Bank

In today's digital world creativity reigns supreme. It offers endless possibilities for individuals and brands to captivate audiences and leave a lasting impression. With social media platforms at the...

The Best Online Video Editors in 2023: Benefits and Drawbacks

In today’s digital landscape, the popularity of video content is gaining momentum, with users increasingly turning to video creation both for personal advantage and professionally. When searching for...

VSDC 8.2 – Proxy File Support, Color Keyframes and Vectorscope

We are thrilled to unveil the highly anticipated VSDC video editor 8.2 update. Our team has been hard at work, ensuring that this release is packed with exciting features and enhancements to elevate your...

VSDC 8.1 Brings Multicam, Curve Line Object, Scrolling Text Effect, and More

We’re thrilled to introduce VSDC 8.1. The new version primarily caters to professional videographers, graphic designers, and artists, however, everyday video creators will benefit from the update as...

VSDC 7.2 Takes Its Color Correction Toolset to the Next Level (Plus, Other Updates)

It has been another productive couple of months for the VSDC team, and we’re thrilled to announce the release of VSDC 7.2 – the new version of our video editing suite. Although the majority of updates...

5 Free Pieces of Software for Video Color Correction

If you’re a video creator, there are three reasons why it’s crucial to learn color correction. First, it will help you enhance your videos and make them look professional. Second, it will allow you...

VSDC 7.1 Upgrades GUI and LUT Editor, Adds New Effects and Custom Shortcuts

The new version of VSDC includes two new video effects, expands the functionality of the LUT editor, and makes video editing more convenient by bringing an improved interface, optimized timeline, and custom...

10 Pieces of Truly Free Video Editing Software (with No Watermarks)

Seeing a watermark on your video after spending hours editing it feels infuriating. Yet a few video editing software developers are still using this practice to limit the free usage of their products....
 

Screen Recorder Box

This program allows you to capture the video of your desktop and save it on your PC in various formats. Coupled with a video editor, the program is a great tool for creating presentations, tutorials and demo videos.

Read more about Screen Recorder...


Video Capture Box

The program captures video from external devices and records it to computer in a free format. You can save video from video tuners, webcams, capture cards and other gadgets.

Read more about Video Capture...


Reviewed by


"VSDC Free Video Editor is a surprisingly powerful, if unconventional video editor"

- PC Advisor


"This video editor gives you tons of control and editing power"

- CNet


"The editor handles many common formats and boasts a good deal of capabilities when it comes time to alter lighting, splice video, and apply filters and transitions in post production"

- Digital Trends