Video Editor

Use free video software to create and edit videos of any complexity from a family greeting card to a company presentation. Cut, merge video files, apply visual and audio effects, use filtration and image correction, make slideshows and add an appropriate soundtrack. Use multi-color Chroma Key and advanced parameters settings to give your video a professional look. All popular video and audio formats are supported.

Read more about Video Editor...

Video Converter

This program is intended for converting video files from one format to another. Nearly all popular video formats are supported (both reading and saving). In addition, the program drastically simplifies the task of converting videos for playback on specific multimedia devices, such as iPhone, Samsung Galaxy or Huawei P30 Pro. The program is extremely easy to use, has a modern interface and all necessary video processing functions.

Read more about Video Converter...

Audio Converter

The audio converter will help you convert audio files from one format to another. All key audio formats and codecs are supported. The program also allows you to manage playlists and meta tags, extract audio from video files and save these tracks on your computer in any format.

Read more about Audio Converter...

Audio CD Grabber

This audio tool is intended for grabbing audio tracks from compact discs and saving them to the user’s computer in any format. Nearly all popular audio formats and codecs are supported. The program can also extract track details from the FreeDB server for automatic file renaming and updating meta tags.

Read more about Audio CD Grabber...

Multifunctionality

Multifunctionality

A wide array of multimedia processing tools in one free video software suite.

High speed

High speed

Our programs use fast
and high-quality algorithms optimized for single and multi-core CPU’s.

Affordability

Affordability

VSDC video software is freely available for download to Windows OS-based PCs and laptops.

How to use VSDC as a 4K video editing software: tips’n’tricks

Shooting ultra HD videos used to be a prerogative of video editing professionals, but those times are over. Nowadays action cameras are eagerly adopting this new format while video hosting services like YouTube are offering its users the ability to upload 4K clips introducing more and more amateurs to this new technology. But where do we stand with 4K video editing software? Is it already available to wide audiences?

According to numerous articles on the Internet if you are planning to work with 4K videos – the money spent on the actual camera is the least of your expenditures. They say that unless you are willing to invest over $2500 on computer upgrades, ultra HD video editing isn’t for you. Fortunately, the Internet is not always right and there are much cheaper ways to edit a 4K video. One of the easiest methods is to find the right software, capable of utilizing even average hardware to the full.  We suggest that you download free VSDC Video Editor. VSDC is known for its comparatively low system requirements and the capability to process 4K footage even on low-end computers with limited memory.

Below, we’ll help you get started with VSDC and provide a few tips on editing 4K videos in particular.
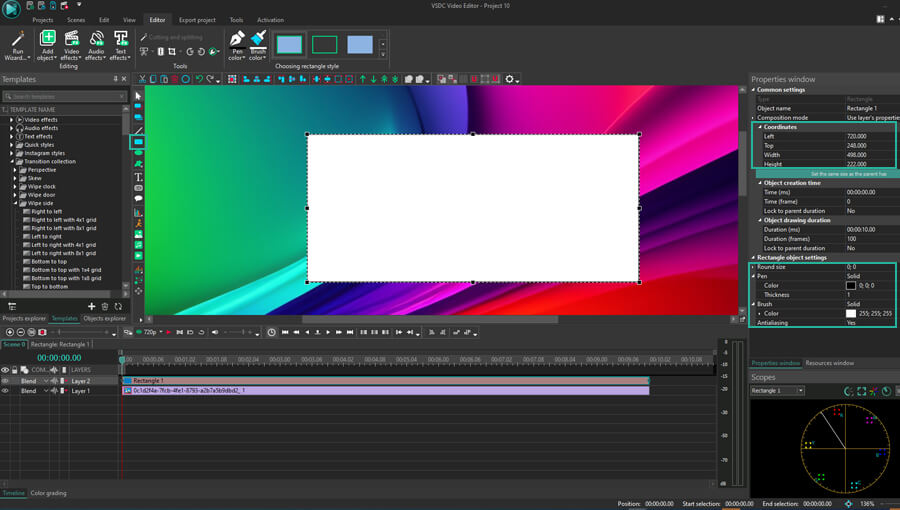
Video import

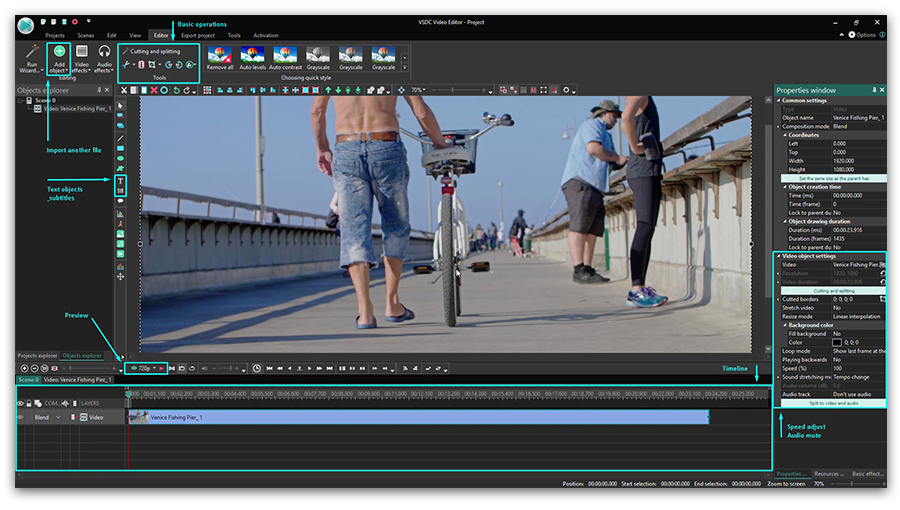
Upon completing the installation process, launch VSDC and click the “Import Content” button from the top menu. Select your 4K video from the computer. This way your video will be imported to the scene without quality loss and the whole editing scene will be adjusted to your ultra HD video parameters.

Color correction

Now it’s time for the actual editing. 4K videos work as a magnifying glass exaggerating the upsides as well as the downsides of your clips, so attention to detail is necessary.

How to edit 4K video: color correction features in VSDC

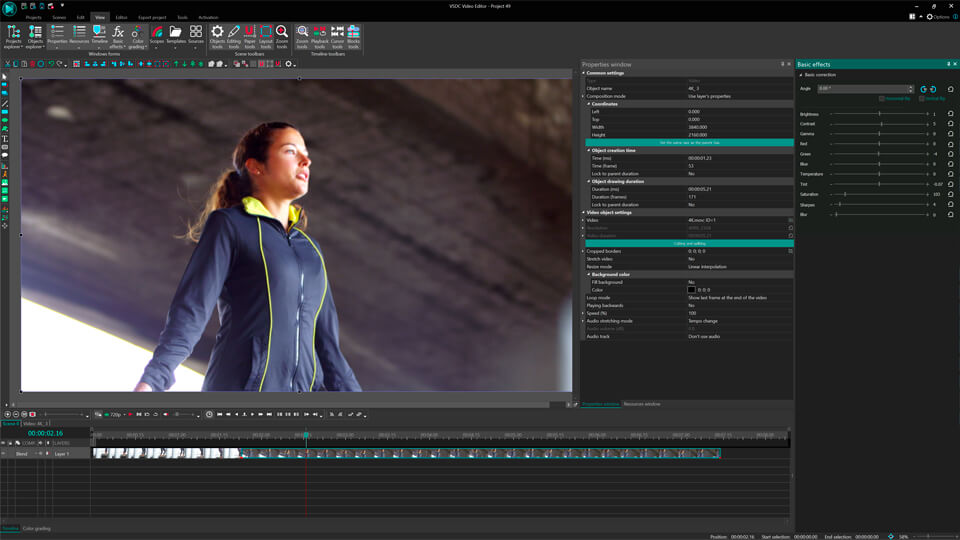
Ultra-realistic videos oftentimes deserve color correction to mask either the bad weather or poor lightning. To improve the color spectrum, proceed to the top left corner of the and select “Video Effects” >> “Adjustment”. Choose between available options to enhance contrast, gamma and other visual aspects of your clip.
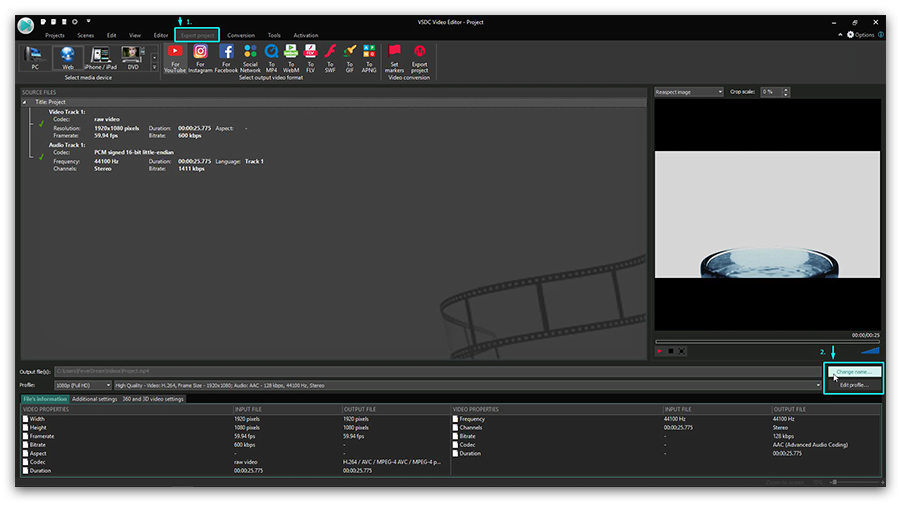
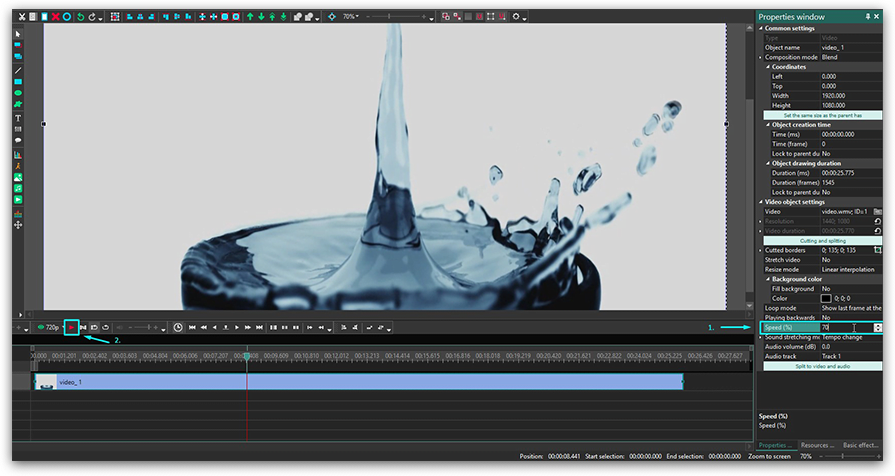
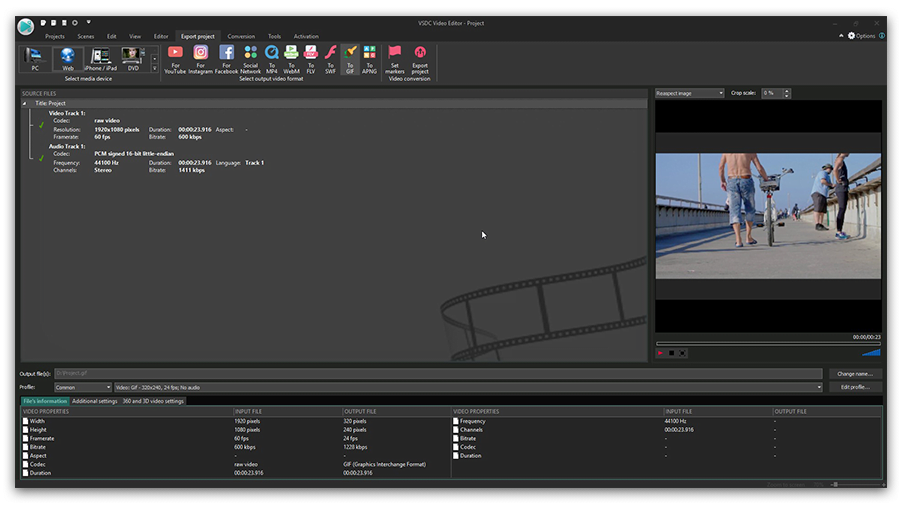
Video export

When you are done with editing, it’s time to export your full HD video. Proceed to the top menu and select “Export Project” >> “Web” >> “For YouTube”. Choose a name for your file and the location where you want to save it in the “Output file(s)” field. Complete the process by clicking the “Export Project” tab. This may take some time depending on your hardware.

If you still have any questions about exporting you 4k video, please refer to a one-minute video instruction below.
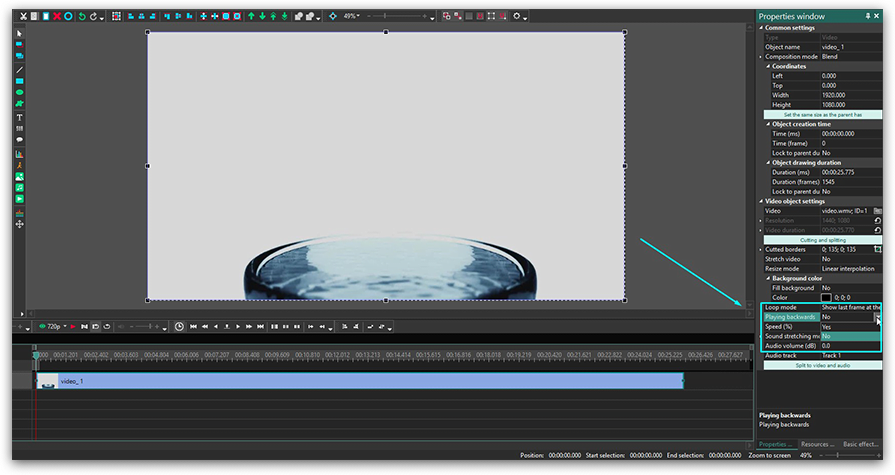
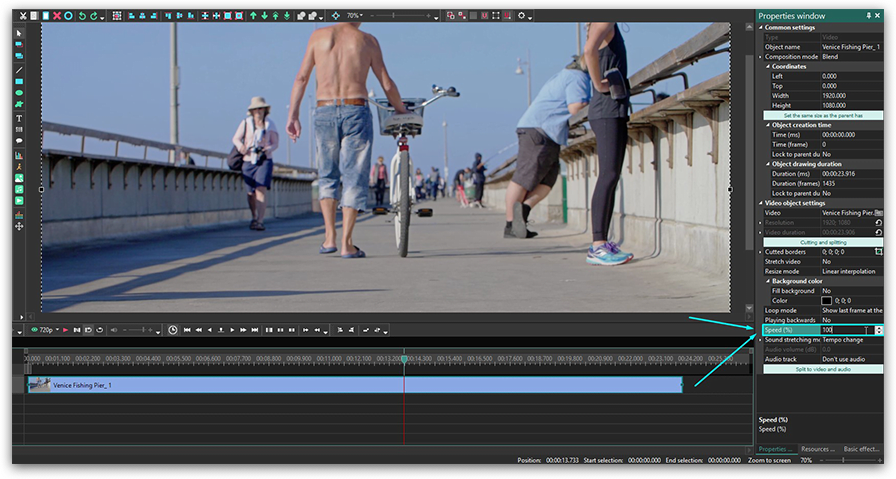
Want to reduce 4k?

If 4k is too cumbersome for you to work with or the video it doesn’t fit on your storage device you can always shrink the size of your clip with VSDC. For this matter import your video, select the “Export Project” tab and proceed to the “Edit Profile” section. Find the “Profile Filter” option to choose the necessary resolution. 1080 (Full HD) or 720 (HD) will most likely be more than enough for the intended outcome. Press “Apply Profile” to save changes and move on with exporting your project from the top menu.

Bonus features

If you are planning to edit many 4K videos you might want to increase the processing speed. This is made possible with the Pro version of VSDC that allows for hardware acceleration. The Pro version leverages the capacity of your video card (if the video card supports it) speeding up 4K video export.

If you purchased the Pro version, make sure you activate hardware acceleration in the program options. Hardware acceleration is not the only bonus you get with a Pro version of VSDC.

If you are shooting videos with an action camera, you will most definitely find video stabilization tool useful. You will find a detailed instruction on how to use it here. If you prefer visual guides, there is a video instruction for your convenience.

Another feature that may come in handy is advanced resizing. When you import a 4K video to the editor and resize it making it occupy only a part of your scene, you normally lose quality. Well, that’s not the case with the Pro version of VSDC. Advanced resizing methods will help you prevent quality loss and enjoy your videos in the best resolution possible. If you want to learn more about resizing and other advanced features of the pro version, feel free to refer to a detailed guide.

That’s it for now. Enjoy your 4K experience!


You can get more information about the program on Free Video Editor' description page.

How to Reverse a Video with VSDC Free Video Editor

Video reversing has become a popular feature among both experienced and amateur video bloggers these days. There are many online applications designed for these purposes out there, but they don’t guarantee the security of your private content, have a very poor toolset and impose certain processing limitations that wouldn’t allow you to edit hefty high-quality videos.

This how-to guide is aimed to show you one of the fastest, easiest and yet reliable ways to impress your family and friends with this stunning effect.

How to quickly reverse a video in VSDC

First off, download free VSDC Video Editor. Unlike online editors, VSDC doesn’t require you to upload private content on the Internet. In addition, the free version of the editor doesn’t have those unpleasant limitations for video sizing, allowing you to work with high-quality videos shot with a GoPro for instance. Finally, the output video is free of any watermarks on it.

Once you are done with the installation process, launch the editor and click the “Import Content” button from the top menu.

Select the desired video file from your computer with a double-click. Click “Finish” in the new window to complete the import. Now that you have imported the video, it is ready to be edited. Proceed to the side menu at the right corner of the screen (called Properties window). Find the “Playing backwards” section. You may have to scroll down to find it. By default, you will see a “no” to the right of this section indicating that the video hasn’t been reversed yet. Proceed to the dropdown section and select the “yes” value.

VSDC Editor. Reverse Video Menu

You are almost done. Now it’s time to save your video. Select the “Export project” tab at the top of your screen. Here you can choose the desired file format, the name for your video and the location where you want to save it. You may also choose the quality of the exported file in this menu.

VSDC Editor. Export Reversed Video Menu

As soon as you are ready, click the “Export project” tab again and select the red “Export project” button right next to the red flag. Wait for a brief moment until the export is complete and – voila! Go ahead and share your video with friends.

Now let’s recap the whole process.

Additional Tips and Tricks

Reversing a video is presumably not the only feature you might need when editing your clip. Cutting and splitting the video before export may also come in handy. For this matter, select the imported video on a timeline and go to the “Editor” tab at the top of your screen. Choose the necessary cutting and splitting tools to crop your video.

Another important feature is video speed adjustment. Remember the part of the menu with the “Playing backwards” section? Well, that’s exactly where the speed adjustment options are located. You will find the speed percentage indicator right under the “Playing backwards” setting.

VSDC Editor - Adjust Speed Menu

Type in the desired speed value and make sure you preview the altered speed video to see if you like the result. Here you will find more detailed guides on how to slow down or speed up your videos.

The last feature that we will cover in this tutorial is sound adjustment. Let’s be honest – reversed audio is rarely as good as a video. Luckily we don’t have to dig deep to find sound control options with VSDC Editor. We will return to the very same Properties window we used for the initial reverse and speed adjustments.

  1. Select the video on a timeline, scroll down the right-hand menu to the very bottom and you will see the “Audio track” setting.
  2. Choose the “Don’t use audio” option from the dropdown list and enjoy the silence.
  3. Alternatively, you may add a different soundtrack to it. To import new content, go to the top menu and select the “Editor” tab. Click the “Add an object” button and select “Audio” from the dropdown list. Choose the audio file you want to import and press “ok”.
  4. Adjust the length of your audio file with the same tools you used for cutting and splitting your video.
  5. Don’t forget to preview your work before exporting the clip.

You may learn more about working with the volume of video files in this tutorial.

Well, now you are armed and ready to reverse your video. If something remains unclear, feel free to refer to this brief video instruction to visualize the whole process.


You can get more information about the program on Free Video Editor' description page.

Color correction with RGB curves in VSDC Free Video Editor

Oftentimes even when we use professional cameras for video shooting, we get upsetting results: gloomy or overexposed compositions, glares, black background. And if it’s an important event you were trying to capture, there comes huge disappointment. There can be many reasons why your footage came out in poor quality but what really matters is whether it can be fixed. And luckily, in many cases, it is possible, even if you aren’t a professional.

In this article, we will show you how to process photos and videos using simple color correction techniques. Specifically, we’ll be working with RGB curves to change brightness and contrast levels in VSDC Free Video Editor.

Download VSDC to your PC (the program runs on Windows only)

How to open the RGB curves dialog window

After you have installed and launched the program, import the file that needs to be edited. By clicking on it, go to the bottom part of the timeline and select "Color Correction." On the vertical panel in the opened window, click on the icon shaped like three different colored dots - "RGB curves." Upon clicking, the curves dialogue window will unfold.

Changing the brightness and contrast - the basic principles

RGB curves area

Working with brightness and contrast of the image is one of the basics of color correction. To change these two parameters in VSDC, the so-called “method of shifting control points in the composite curve mode” is used. Control points are arbitrary points that belong to the curves of the color channels: red, green, and blue.

The composite curve mode is set by default, and when you open the RGB working area, it is indicated by a white circle (see the illustration on the right). In the graph, the horizontal axis reflects the original brightness values ​​of the pixels, and the vertical axis - the desired (output) values ​​that you get in the editing process. The maximum pixel brightness value is 255. Initially, when an image is loaded into the program, all the original pixel brightness values ​​are equal to the output. That’s why the composite curve is a straight diagonal line passing through the points with coordinates (0; 0) and (255; 255). Points in the lower left corner correspond to black color (shadows), points in the upper right corner correspond to white color (light areas of the image).

A double-click on a specific area of the composite curve provides the necessary control point. Moving the control points (up and down, right or left) of the curve will change the overall color of the image by adjusting the brightness and contrast.

There are several ways to change the position of control points:

  • dragging manually with the mouse.
  • using the arrow keys on the keyboard (up, down, right, left).

By changing the coordinates of the points in the lower left area of the graph, you adjust the dark tones in the image. Meanwhile, the upper right area can be used to adjust the light tones, and when you work with the middle region of the curve, it affects medium tones of the video.


Adjusting the brightness of an image in practice

Let’s now jump from theory to practice. By moving the control point up, as shown in the illustration below, you increase the output value of the pixels relative to the input value. In other words, higher (brighter) values are now assigned to the pixels in a given area, which means that the brightness of the video is increased. In the example below, we took a point in the region of dark tones with coordinates (0; 0). An increase in the output value of this point (upward shift) led to the brightening of the dark areas of the image: the black pixels (with the initial value of 0; 0) acquired a more gray tint.

Now, for a clearer example, let's do the opposite and darken the bright areas of the image. By shifting the control point down, you reduce the output pixel values in a given area, which means you lower the brightness. In the example below, a point of the light-colored area with the coordinates of the maximum value (255; 255) was taken as a guide. Reducing the output value of this point led to the darkening of the bright areas of the image.

Contrast level adjustment

The contrast level of the image directly depends on the composite curve inclination angle. Remember that the original curve has a tilt angle of 45°? Increasing the tilt angle increases the contrast level and on the contrary: decreasing the angle reduces the contrast level.

If in the editing process the curve takes on a non-linear look (for example, an S-shaped composite curve), then the contrast level is characterized by the angle of inclination of the tangent built to a specific control point, as shown in the illustration below.

  • If the tilt angle is less than 45° - the contrast level of the corresponding image area is lowered (1);
  • If the tilt angle is more than 45° - the contrast level of the corresponding image area is increased (2).

So, what do you do if constructing imaginary tangents is not one of your talents? To find out the degree of change in contrast, you can use the simplest mathematical operations:

  • Determine the largest and smallest values along the horizontal axis (input values) and the vertical axis (output values).
  • Calculate the difference between the highest and the lowest values for each of the axes (input and output option):
    (Inputmax – Inputmin) = Differenceinput.
    (Outputmax – Outputmin) = Differenceoutput.
  • Compare the input and the output difference values: the one with a larger difference in values is considered more contrastive.

As an example, consider an image that has the following data:
Inputmin=0;
Inputmax=150.

As a result of adjustments, the image acquires the following values:
Outputmin=30;
Outputmax=250.

Determine the difference between the minimum and maximum values:
Differenceinput=150
Differenceoutput.=220

Comparing the resulting values, we can conclude that the output version of the image has more contrast than the input version (220> 150).

This way, using several control points, you can simultaneously adjust the brightness and the contrast levels in the areas of dark, light and medium tones independently. An extra control point can be deleted by clicking on it and pressing Delete.

Next, we will look at several ways to simultaneously change the levels of brightness and contrast you can apply in practice.


1. Linear brightness and contrast increase.

To simultaneously increase both brightness and contrast, you need to move the control point with coordinates (255; 255) to the left, say, to the value (200; 255).

Therefore, you will get:

  • the slope of the curve is greater than 45°, which means a higher level of contrast;
  • the input value for the white point will be reduced to 200, and the output will take the value - 255. This will automatically increase the brightness level, since the output value of bright tones will be higher than the input.

2. Linear brightness increase with a decrease in contrast

To increase the brightness of the entire image while reducing the contrast, you need to drag the point with the coordinates (0; 0) up, for example, to the value (0; 50).

This way you get the following results:

  • the slope of the curve will be less than 45 degrees, which means that the contrast level will decrease;
  • the input value for the black point will remain unchanged - 0, while the output value will be increased to the level 50, which will increase the brightness level and mute / brighten the dark areas of the image.

3. Non-linear brightness increase

As a control point, we’ll take the one with the coordinates (127; 127) - it corresponds with the middle tones of the image. Then we’ll move it up to the value (127; 170).

We will get the following results (see the illustration below):

  • the overall tonal range remains unchanged;
  • the output value for the selected control point will be increased to 170, which indicates an increase of the brightness level in the mid-tone region;
  • the contrast level in the shadow area will be increased since the angle of inclination of the tangents constructed to the guiding points in this area will be more than 45° (2). The image details that were shadowed will become clearer;
  • the level of contrast in the area of ​​light tones will be lowered since the angle of inclination of the tangents built to the control points in this area will be less than 45° (1). Details in the light areas of the image will become less clear.

4. Linear brightness and contrast levels decrease

To simultaneously reduce the brightness and contrast of the entire image, you must drag the control point with the coordinates (255; 255) down. For example, drag it to the value (255; 200).

This way we get the following:

  • the slope of the curve will be less than 45°, which means a lower level of contrast;
  • the output value for the white tones control point will be reduced to 200, with an input value of 255. This means the brightness level will be lowered (since the output value is greater than the input value) and the bright areas of the video will be muted (without affecting the dark areas significantly).

5. Linear brightness decrease with increased contrast

To reduce the brightness of the entire image while simultaneously increasing the contrast, move the control point with coordinates (0; 0) - black color - to the right, for example, to a value (50; 0).

This way we get the following results:

  • the slope of the curve will be more than 45°, which indicates that the level of contrast increases;
  • the input value for the black point will be increased to 50, while the output value will be 0 indicating a decrease of the brightness level (output value is less than the input value). As a result, the dark areas of the image will become even darker and lose their distinguishable details.

6. Non-linear brightness decrease

As in the case with the non-linear brightness increase, we leave the black (0; 0) and white (255; 255) color points unchanged. As a control point, we take the one belonging to the mid-tone region, with coordinates (127; 127). By moving this control point down, for example, to the level (127; 70), we get the following results:

  • the overall tonal range remains unchanged;
  • the output value for the selected control point will be reduced to a value of 70, which indicates a decrease in the brightness level;
  • the contrast level in the region of highlights will be increased since the angle of inclination of the tangents constructed to the control points in this region will be more than 45° (2). Image details in bright areas will become clearer;
  • the contrast level in the shadow area will be lowered since the angle of inclination of the tangents constructed to the control points in this area will be less than 45° (1). This means that the details in the dark areas of the image will become less clear, yet they will not turn into black spots either.

7. Linear contrast increase

Since the level of contrast directly depends on the difference between the values of the lightest and darkest points of the image, the simplest way to increase the contrast of the image is to reduce the gap between the input values of the black and white points. In other words, we need to increase the input value for the black point (shift it to the right) and decrease it for the white point (shift it to the left). For a more detailed correction, see paragraphs 1 and 5.

8. Linear contrast decrease

Similarly to the previous example, the easiest way to reduce the overall level of image contrast is to bring the output values for the black and white points closer together, i.e. decrease the output value for the white point (shift it down) and increase it for the black point (shift it up).

After that, refer to the instructions in paragraphs 2 and 4.

9. How to work with an S-curve

If you need to increase the contrast of the mid-tones only, you should use an S-shaped curve. First, double click to create three control points on the curve. For example, place one in the mid-tone area (128; 128), one in the shadow area, and one in the area of light tones.

Leave the position of the first control point unchanged, shift the second one down (according to the principle described in paragraph 6), and drag the third point up (according to the principle described in paragraph 3). This way, the dark and the light areas of the image will become flatter. The angles of inclination of the tangents built to the control points in these areas will be less than 45°. That means the image details located in the darkest and lightest areas will become less clear, meanwhile, the mid-tones of the image become more contrasting.

Of course, the process of using an S-shaped curve will be slightly different for each image. However, the basic principle remains the same: by increasing the number and changing the position of the control points, it is possible to achieve both amplification and weakening of the visualization of details in the dark, light and medium tones independently.

10. Using the inverse S-shaped curve

The operation principle of this curve is opposite to the operation principle of the above described S-shaped curve.

To reduce the contrast of mid-tones with a simultaneous increase in clarity in the area of shadows and highlights, do the following:

  • double-click to create at least three control points. As in the previous example, you can take the midpoint (128; 128), the point in the shadow area and the point in the light area.
  • leave the position of the first point unchanged, move the second point up, and the third one - down.

This way, the light and dark areas of the image become more contrasting because the angles of inclination of the tangents built to the control points in these areas will be more than 45°. The image details in these areas will become clearer, while the mid-tones become flatter.

How to use color channels to edit a video or an image

Working with color channels is one way to perform color correction in the RGB mode.

Each color in the RGB color space is achieved by mixing three basic colors: red (Red), green (Green) and blue (Blue). According to the theory we all know, if you mix red and green you get yellow; the mix of red and blue results in purple; the mixture of blue and green results in blue, and so on.

Color channels overview

The brightness of each color is set at a value between 0 and 255. The point with zero values for all three curves (0; 0; 0) corresponds to the black color, and the point with the maximum values (255; 255; 255) – corresponds to white.

To switch to the color correction mode of an individual RGB curve, you need to select the desired color channel in the RGB color space.

Double-click on a particular section of the composite curve will create a control point. When you move the control points (up & down, right & left) of the curve, you change the overall color of the image by adjusting the brightness of a particular color in the selected area.

The principles of working with RGB channel curves are similar to the principles of changing the brightness and contrast levels of a video:

  • By moving the control point of a particular channel up, you assign richer values of the selected color to the pixels in a given region.
  • By shifting the control point down, you assign lower brightness values to the pixels of the selected color channel.

Please note that this process enhances other color channels in the editing area. In the example below, you can see that the decrease in the brightness of image mid-tones in the red channel has led to an increase in the values of blue-green colors and overall darkening of the image.

VSDC – Free MP4 Video Editor for Windows Reviewed

How to edit MP4 video for free on a Windows PC

MP4 is probably the most common video format because the majority of recording devices including cameras, smartphones, and drones produce MP4 files. It’s also the most widely recognizable format that can be opened by iOS and Android phones, most TVs, gaming devices, and DVD players.

Naturally, many people are either looking for a way to quickly edit MP4 videos or to convert their videos into MP4 and edit them afterward. If you’re one of them, this tutorial is for you.

Meet VSDC, a free MP4 video editor for Windows with no watermarks or quality restrictions. VSDC is your best bet because it’s a one-stop shop for working with multimedia files. You can use it when you need a powerful converter, a full-featured MP4 video editor, or when you just need a quick MP4 video splitter to break down your footage into multiple fragments.

Download the latest version of VSDC

We’ve compiled this tutorial, based on the most common tasks involving MP4 video editing. Keep reading it to learn:

  • How to edit MP4 videos using VSDC
  • How to split MP4 videos into parts
  • How to add music to an MP4 video
  • How to remove audio from MP4
  • How to slow down or speed up MP4 videos
  • How to reverse an MP4 video
  • How to create a GIF from MP4 (or convert it to any other format after editing)
  • How to make MP4 video file - instruction for export project from video editor to mp4 file

Here is exactly what you get when you install VSDC Free Video Editor to your PC

Before we jump to a more detailed review of how to edit MP4 videos in VSDC, here is what you’re getting when you install this video editor to your PC.

First of all, this software is very lightweight and requires minimum resources of your PC. That means you can safely use it even if you have a slightly outdated computer with not-so-much memory left. To be precise, you’ll only need 256Mb of RAM and 50Mb of free disk space.

Downloading VSDC may take a few minutes depending on your Internet connection, and when you launch the program, here is what the start screen looks like.

VSDC - free MP4 video editor start screen overview

VSDC has a PRO version you’ll be offered to upgrade to after installation. At this point, you can simply close the promotional banner (or click “Continue” if it pops up at the export stage) if you aren’t ready to upgrade.

The suite includes multiple tools, and it’s not just an MP4 video editor. There is also a video grabber, an instrument for capturing desktop screen, a slideshow creator, a video converter, a voice recorder, and a YouTube uploader.

To start working, click on the large “Import content” button and choose a video file from your PC. A “Project settings” window will pop up, and unless you want to change any parameters – resolution, framerate, size of the video – just click “Finish”.

How to edit MP4 videos on Windows

Now that you have a file uploaded to VSDC, take a look at the key menu sections you’ll need for editing it.

VSDC Free Video Editor interface

Once imported, the file is automatically placed on the timeline – your main working area. You’ll be using the green cursor for splitting videos precisely and the red Preview button for checking the results of your actions. If your PC processor struggles with the file size, the video may look choppy during the preview. It doesn’t affect the output file in any way, however, for your convenience we recommend decreasing preview quality using the dropdown menu to the left from the Preview button.

Now, the top ribbon menu contains all the basic tools you’ll need for your project. Add new audio, video, or image files using the green round button and refer to the Cutting and Splitting menu for – you guessed it – cutting and splitting. The latter is also your go-to tab if you need to crop or rotate an MP4 video. Some other tasks, such as playback speed or audio adjustments, are performed in the Properties window – a sticky tab on the right. We’ll get to it in a couple of paragraphs. And finally, the Export project tab is where you get to save the file to your PC after editing.

Now that you have a better understanding of VSDC interface, let’s proceed with some basic tasks this MP4 video editor will help you with.

How to use VSDC as an MP4 video splitter

Splitting an MP4 video is no different from splitting any other video file:

  • Place the cursor at the exact moment you want to split the video into parts.
  • Hit the icon looking like a razor from the Splitting and Cutting menu at the top.
  • Click anywhere on the timeline to cancel the selection of the entire video, then select the fragment you need and hit Delete or drag it across the timeline – depending on your final goal.

Free MP4 video splicer

How to add music to an MP4 video/How to remove audio from MP4

To add music to an MP4 file, simply hit the green Add object button and choose a soundtrack from your PC. The audio file will be placed on the timeline, and you’ll be able to split and drag it just like you would do with a video file. To adjust the volume, you’ll need to select the audio file and go to the bottom of the Properties window menu where the Audio volume parameter is available.

Sometimes you may need to do the opposite: extract or remove audio from the MP4 file. Here is how to do it:

  1. Click on the video file or a fragment you’re working with to select it on the timeline.
  2. Go to the Properties window and scroll down to the very bottom.

    How to add or remove music from an MP4 video file

  3. If you choose “Split to video and audio”, you’ll get the sound of your video as a separate track on the timeline (see the illustration, the audio track is placed above the video on the timeline). Splitting is a good idea when you need to apply audio effects, adjust the volume, cut out an audio fragment – in other words, work with the existing audio more precisely.
  4. If you need to remove audio from your video completely, you can either delete the audio track you’ve just got by splitting the file OR you can choose “Don’t use audio” in the Audio track menu section highlighted in the illustration above.

How to slow down or speed up MP4 videos/ How to reverse an MP4 video

To slow down an MP4 video, you need to reduce the playback speed of your file. This is a very easy task:

  1. Select the fragment of the video you want to slow down.
  2. Go to the Properties window and scroll down to the Speed% menu section.
  3. Change the speed according to your needs. For instance, setting the speed at 50% will make your video twice slower.

Slowing down and speeding up an MP4 video

If you need to speed up an MP4 file, use the same settings to increase the speed % to the desired level. We have a separate detailed tutorial on how to speed up a video and achieve a fast-motion effect, if you’d like to learn more.

Finally, if you’re trying to find out how to reverse an MP4 video, switch from “No” to “Yes” in the dropdown “Play backward” menu above the Speed% parameter as illustrated above.

Remember that when you change the video playback speed, its audio adapts automatically. Therefore, you might want to mute it or replace it with a more appropriate soundtrack.

How to create a GIF from MP4 (or convert it to any other format after editing)

If you just need to convert an MP4 video file to any other format, we recommend using a free video converter. But if you want to create a GIF from MP4 after editing, just select the corresponding format at the export stage as illustrated below.

Converting an MP4 video file to a GIF or any other format in VSDC

As you can see, there is a large number of other formats you can choose based on your goals. Besides, VSDC allows you to save videos using social media profiles. That means if you’re planning to publish your clip to Facebook, Twitter, Instagram, YouTube, or Vimeo, the program will apply the parameters required by these social media platforms to your file automatically. And if you need to adjust video quality, you can do so using the “Edit profile” button in the lower right corner of the Export screen.

Then use the preview window for a final look and hit the Export project button when ready.

Final thoughts on VSDC as a free MP4 video editor

MP4 is an industry standard supported by most devices and multimedia software. One of its key benefits is high image quality preserved due to the H.264 codec. So, when you need to edit an MP4 video file, you should take this factor into consideration because some free video editors put severe limitations on the file formats and resolution at the export level.

When it comes to VSDC, not only does it allow you to keep the highest quality of the video, it also supports H.265/HEVC – the successor of H.264 codec. That means even if your video is in 4K, you’ll be able to keep its preciseness after editing.

If you’d like to learn more on what VSDC Free Video Editor is capable of, check out its YouTube channel.

Add cinematic bars to a video to achieve a widescreen movie effect

Adding cinematic bars is incredibly easy if you know the right tricks. VSDC Free Video Editor allows you to do that within less than a minute! The technique is simple – you literally add two black bars to your video and place them at the top and the bottom of a scene. No masking, no resizing, no video editing experience needed. See it for yourself in the video below:

Yes, we know that technically to create the “widescreen black bars” effect you should ideally use a professional camera and shoot in a widescreen aspect ratio (which is 21:9). This is exactly how Hollywood movies come out letterboxed – they are originally aimed at wide cinema theater screens, so when we watch them on TV with a standard 16:9 ratio, there is some black space left at the top and the bottom of a screen.

Anyway, since you’re here, you probably didn’t have a chance to shoot a video the right way, so we’re about to show you how to add cinematic black bars quick and easy.

But first, download VSDC Video Editor to your PC (it’s Windows only).

How to create widescreen black bars in VSDC: a step-by-step guide

  1. Launch the program and import your soon-to-be-Hollywood-style movie using the Import content button on the start screen.
  2. Using the left-side menu, add a rectangle-shaped object to the scene as illustrated below.
  3. Paint the rectangle black using the Brush color icon from the menu at the top or the Properties window Brush color menu.
  4. To stretch the bar exactly to the width of the scene, in the Properties window click on the “Set the same size as the parent has” green button in the Properties window (again, illustrated below). The rectangle will take the space of the entire scene, so all you need is to manually adjust its height as desired.Create cinematic bars
  5. Once your cinematic bar looks the way you want, click on it using the right mouse button and select Duplicate to create an identical one.
  6. Place the widescreen bars at the top and the bottom of a scene as intended.

Note that some part of your video will get covered by the cinematic black bars overlay – this is an inevitable consequence of the method. The good news is you can adjust the height of the bars at any moment, that’s why we recommend previewing the movie before exporting it to make sure that no essential element of your footage is hidden behind the rectangles.

To preview the video, use the red triangle icon right above the timeline. If your video looks choppy or lags, simply change preview resolution – it’s a dropdown menu to the left from the Preview icon. Lagging typically happens when a video file is too large (especially if it is 4K), and it’s the result of the processor being overwhelmed by the volume of information. The less memory your PC has, the more likely you’re to experience the issue. Do not worry, it doesn’t affect the output quality in any way.

When you’re ready, go to the Export project tab and save the video in the required format. Remember that you can change every parameter of the video including its format, codec, quality, framerate, width and height using the “Edit profile” button.

Aside from the cinematic black bars, there are many more tricks you can apply to your video to make it look like a real movie, including the “Video inside text” effect, the picture-in-picture effect, and split screen”.

Feel free to message us on Facebook and subscribe to our YouTube channel to stay tuned with new tutorials.

News

New Transition Addition Methods, RAW/BRAW Files Support and Free Waveform

Welcome to the next level of video editing with VSDC's latest release, Version 9.1! Packed with an array of fresh features and enhancements, this update is designed to make your video editing experience...

VSDC 8.3 – 100+ New Templates, Key Editor Window, AV1 and Enhanced GUI

Welcome to the latest VSDC update, Version 8.3! We've been working hard and we’re ready to present a feature-packed release for you to discover an exciting array of over 100 fresh free video templates,...

Free video editing in 2023: Unlock Your Creativity without Breaking the Bank

In today's digital world creativity reigns supreme. It offers endless possibilities for individuals and brands to captivate audiences and leave a lasting impression. With social media platforms at the...

The Best Online Video Editors in 2023: Benefits and Drawbacks

In today’s digital landscape, the popularity of video content is gaining momentum, with users increasingly turning to video creation both for personal advantage and professionally. When searching for...

VSDC 8.2 – Proxy File Support, Color Keyframes and Vectorscope

We are thrilled to unveil the highly anticipated VSDC video editor 8.2 update. Our team has been hard at work, ensuring that this release is packed with exciting features and enhancements to elevate your...

VSDC 8.1 Brings Multicam, Curve Line Object, Scrolling Text Effect, and More

We’re thrilled to introduce VSDC 8.1. The new version primarily caters to professional videographers, graphic designers, and artists, however, everyday video creators will benefit from the update as...

VSDC 7.2 Takes Its Color Correction Toolset to the Next Level (Plus, Other Updates)

It has been another productive couple of months for the VSDC team, and we’re thrilled to announce the release of VSDC 7.2 – the new version of our video editing suite. Although the majority of updates...

5 Free Pieces of Software for Video Color Correction

If you’re a video creator, there are three reasons why it’s crucial to learn color correction. First, it will help you enhance your videos and make them look professional. Second, it will allow you...

VSDC 7.1 Upgrades GUI and LUT Editor, Adds New Effects and Custom Shortcuts

The new version of VSDC includes two new video effects, expands the functionality of the LUT editor, and makes video editing more convenient by bringing an improved interface, optimized timeline, and custom...

10 Pieces of Truly Free Video Editing Software (with No Watermarks)

Seeing a watermark on your video after spending hours editing it feels infuriating. Yet a few video editing software developers are still using this practice to limit the free usage of their products....
 

Screen Recorder Box

This program allows you to capture the video of your desktop and save it on your PC in various formats. Coupled with a video editor, the program is a great tool for creating presentations, tutorials and demo videos.

Read more about Screen Recorder...


Video Capture Box

The program captures video from external devices and records it to computer in a free format. You can save video from video tuners, webcams, capture cards and other gadgets.

Read more about Video Capture...


Reviewed by


"VSDC Free Video Editor is a surprisingly powerful, if unconventional video editor"

- PC Advisor


"This video editor gives you tons of control and editing power"

- CNet


"The editor handles many common formats and boasts a good deal of capabilities when it comes time to alter lighting, splice video, and apply filters and transitions in post production"

- Digital Trends