Video Editor

Use free video software to create and edit videos of any complexity from a family greeting card to a company presentation. Cut, merge video files, apply visual and audio effects, use filtration and image correction, make slideshows and add an appropriate soundtrack. Use multi-color Chroma Key and advanced parameters settings to give your video a professional look. All popular video and audio formats are supported.

Read more about Video Editor...

Video Converter

This program is intended for converting video files from one format to another. Nearly all popular video formats are supported (both reading and saving). In addition, the program drastically simplifies the task of converting videos for playback on specific multimedia devices, such as iPhone, Samsung Galaxy or Huawei P30 Pro. The program is extremely easy to use, has a modern interface and all necessary video processing functions.

Read more about Video Converter...

Audio Converter

The audio converter will help you convert audio files from one format to another. All key audio formats and codecs are supported. The program also allows you to manage playlists and meta tags, extract audio from video files and save these tracks on your computer in any format.

Read more about Audio Converter...

Audio CD Grabber

This audio tool is intended for grabbing audio tracks from compact discs and saving them to the user’s computer in any format. Nearly all popular audio formats and codecs are supported. The program can also extract track details from the FreeDB server for automatic file renaming and updating meta tags.

Read more about Audio CD Grabber...

Multifunctionality

Multifunctionality

A wide array of multimedia processing tools in one free video software suite.

High speed

High speed

Our programs use fast
and high-quality algorithms optimized for single and multi-core CPU’s.

Affordability

Affordability

VSDC video software is freely available for download to Windows OS-based PCs and laptops.

8 Motion Tracking Ideas to Try in VSDC Video Editor

Have you heard the news? There is a new kid motion tracking software on the block. It’s called VSDC Pro, and it is perfect for anyone from the beginner to the intermediate level of video editing experience.

If you’ve never tried VSDC, it’s a solid video editor for Windows with tons of features available for free. In this article, however, we’ll focus on its motion tracking tool which is a part of VSDC Pro – the upgraded version of the software. We’ll briefly talk about what motion tracking is, show you how to perform motion tracking in VSDC Pro (super easy!), and of course, bring lots of examples for your inspiration.

Before we get started, you can download VSDC here. The package brings a free version, and you’ll be able to upgrade it to Pro whenever you want (it’s just $19.99 per year).

Ready to dive in? Let’s do it.

What is motion tracking?

In the world of video editing, motion tracking is a process of tracking the movements of an object within a scene. Once the movement trajectory has been tracked, it can be applied to any other object that initially was not in a video: a piece of text, an image, an icon, a mask, captions – and practically any clipart.

For instance, let’s say you want to place an arrow above the head of a moving football player to help viewers always keep the player in sight. And because the player is constantly moving around the field, you’ll need the arrow to move along. That’s exactly the case where you’d want to use motion tracking. To solve the task, you’ll need to track the player’s head movement, then add an image of an arrow to the scene right above the player’s head, and assign the movement trajectory to it.

There are many other motion tracking examples used in post-production including tracked masks and moving text. We’ll cover them in a couple of paragraphs.

In the meantime, let’s use that same football game example to see exactly how motion tracking works in VSDC Pro, so you would have a better idea of what you’re getting yourself into.

How do you do motion tracking in VSDC Pro?

Motion tracking is often considered a fairly advanced effect. For newbies, it may even sound intimidating. But if you’re serious about video editing, eventually you will feel the need to master it anyway.

Besides, you’ll be surprised how much easier-than-it-sounds motion tracking is! Below is a detailed guide to applying motion tracking in VSDC Pro. It only has 7 steps:

Step 1. Import the main video to VSDC.

How to create a movement map in the VSDC Motion Tracking tool

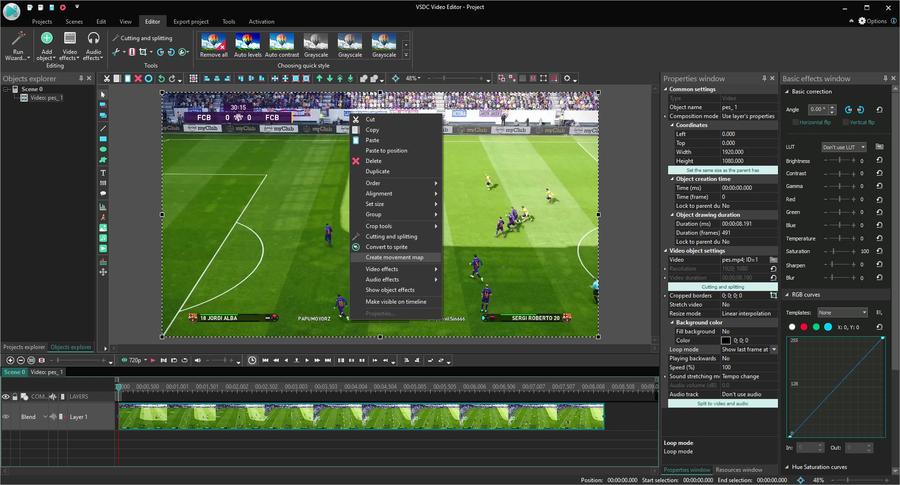
Step 2. Make a right-click on it and select “Create movement map” from the menu. The pop-up window will ask you to confirm the folder on your PC where the movement map will be saved. Just check the file name and hit “Save”.

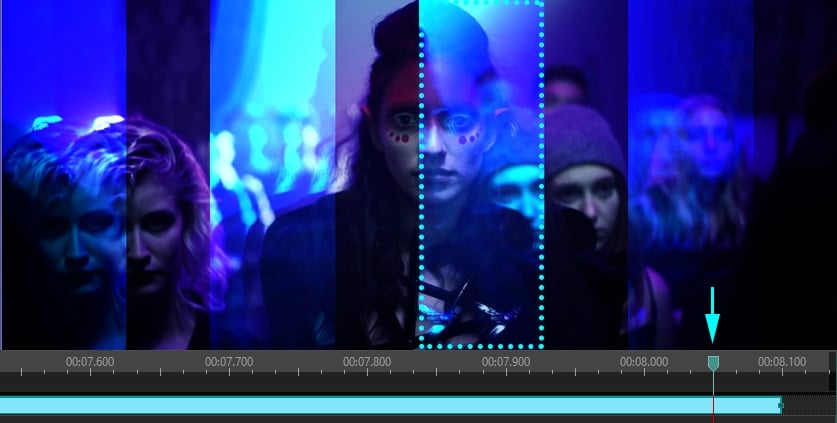
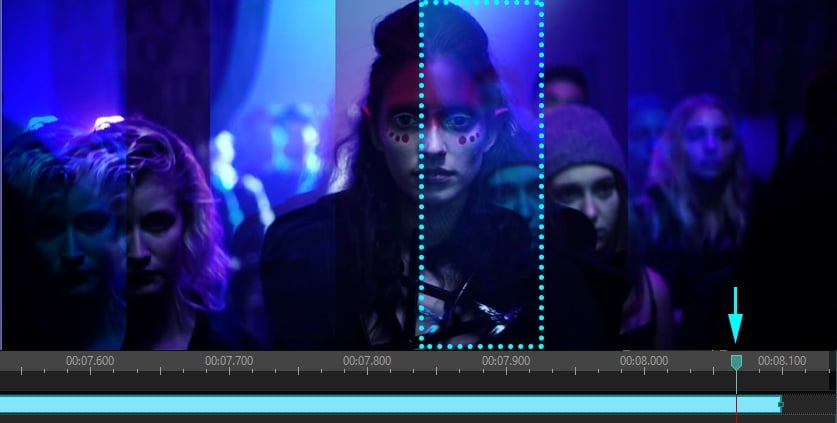
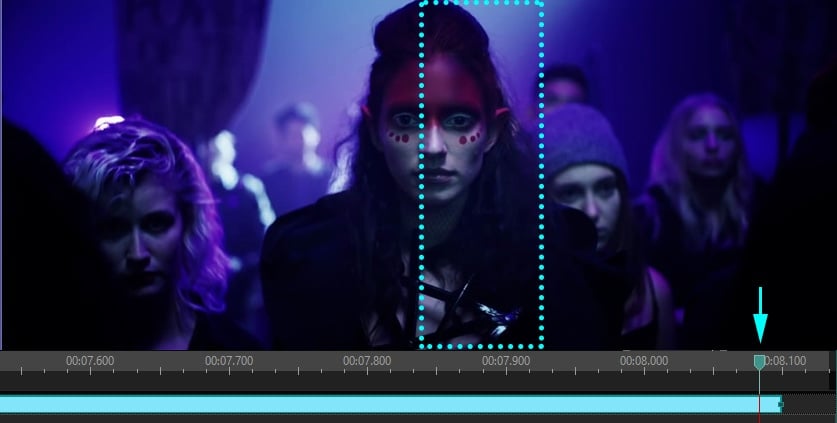
Step 3. Now the Motion Tracker menu is activated, and you should see a red frame with a dot in the center of it. Grab it and place over the object you need to track. Resize the frame to make sure that the object is placed exactly in the center. Hit “Start analysis”.

Step 4. As the video progresses, you’ll see a green line being drawn – that’s the trajectory or the movement map. At the next step, you’ll apply it to another object. Once the map is finished, hit “Apply editing” if it looks good to you.

Object tracking path built by VSDC Motion Tracker

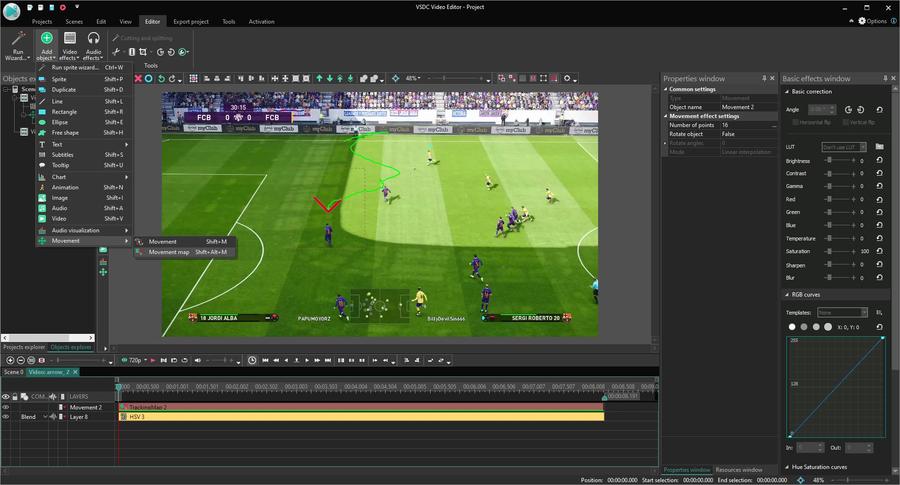
Step 5. Time to have some fun! Use the “Shift + I” hotkey combination to import the image you’re planning to assign the trajectory to. In our case, that is a .PNG image of an arrow. (To import the image, you can also use the round green “Add object” button at the top).

Step 6. Resize the image if needed and place it at its starting point. Then make a double-click on it.

Step 7. Use the “Shift + Alt +M” combination to apply the movement map you created a moment ago (alternatively, use the “Add object” --> “Movement” --> “Movement map” sequence). In the pop-up window, select the name of the map you are working with and click “Ok”.

How to assign a movement map to an image in VSDC Video Editor

At this point, you might want to use the Preview button to make sure everything looks the way you planned. If necessary, you can adjust the size and position of the image at any time.

This is it! Go ahead and export the video to your computer in the desired format.

8 Motion tracking ideas and examples for you to try

Now that you have the basic knowledge of how motion tracking works, let’s put it into practice. Motion tracking is widely used for both creative and informational purposes. And as you can see, the feature is incredibly versatile – you’re only limited by your imagination!

To ignite your creativity, we’ve compiled a list of examples of how motion tracking can be used in videos. Feel free to borrow any of the ideas for your project.

Example #1. Censor objects in a video with motion-tracked masks

Probably the most popular use case for motion tracking is caused by the need to add some sort of censorship to a video. For example, you may want to censor the face of a person appearing in a scene, hide car plates, street names, or brand logos.

Now, blurring a face in a video can be done quickly and easily with a free filter if that person is staying still in the video. If they are moving around, however, the only proper way to keep the face hidden is by using motion tracking software. The reason being you need to have that mask moving together with the person to maintain their face covered.

So, how would adding a censorship mask be different from adding an arrow icon or an image? Essentially, instead of importing ready-made clipart, you’ll need to actually create a blurred mask, place it over the face of a person, and assign the trajectory to it.

To help you figure this one out, here is a detailed video tutorial:

If you want to cover a person’s face with a smiley face, a Snapchat or an Instagram-style mask (because it’s so much more fun than pixels!), just look for the desired clipart in the .PNG format with transparent background.

Example #2. Level up your videos with motion-tracked text

Motion-tracked text looks very impressive. And there is a variety of text types you can work with: titles, captions, calls to action – practically anything. Below, you’ll find 6 ideas to use motion-tracked text in a video.

But how do you stick text to (or on) a moving object? Basically, you can do it using the same logic as with images and masks:

  1. Import the main video to VSDC and create a movement map by tracking the motions of the chosen object.
  2. Next, instead of importing clipart, simply add a piece of text to your video using the “Shift +T” hotkey combination (or the green round “Add object” button).
  3. Adjust the style and the size of the text and make a double-click on its layer on the timeline.
  4. Finally, use the “Shift + Alt + M” hotkey combination and assign the movement map to the text object.

Now, where can you use motion-tracked text in a video? Here are a few ideas.

1. Create an animated title for the intro

If you already have a logo or any other object appearing in your video intro, you can easily attach a piece of text to it. It can be a channel title, a website address, your motto, your username – you name it!

2. Make on-screen texting look more captivating

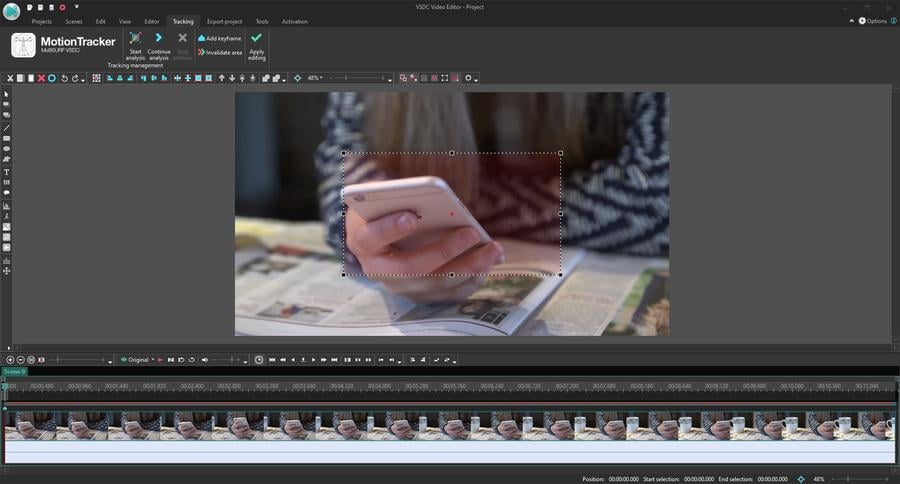
To replicate the effect of on-screen texting like the one used in the Sherlock TV show, all you need is to track the movement of a phone and assign the trajectory to the “text message”.

Naturally, you can use the same approach to visualize the character’s thoughts or… speech if that makes sense.

3. Use motion-tracked opening credits

Some movies use motion-tracked opening credits and that helps captivate the viewers’ attention from the get-go. Can you replicate that? Certainly. While you may not need 3d text for that (that’s what’s used in most cases), you can download one of the fancy fonts from the free font library to create eye-catching cinematic credits for your video. Then apply motion tracking and gradual disappearance to the text to make the whole part look professional.

4. Add motion-tracked captions

Motion-tracked captions look unobtrusive but stylish and informative. They can come in really handy for creating the context for the audience, especially when there is no narration. You’ve surely seen such captions in TV commercials helping to convey a story of the brand. They are especially popular among sports brands and wearables.

For instance, look at how Fitbit employs captions and callouts to highlight unique selling points of their product in the Super Bowl commercial.

5. Enhance real estate videos

If you’re shooting videos for business, there is plenty of room for motion tracking – regardless of your niche. Take real estate footage as an example. Instead of providing additional information, numbers, facts and stats in the form of headlines or subtitles, go ahead and try adding motion-tracked text to the frames you want to emphasize the most.

How to use motion tracking for real-estate videos

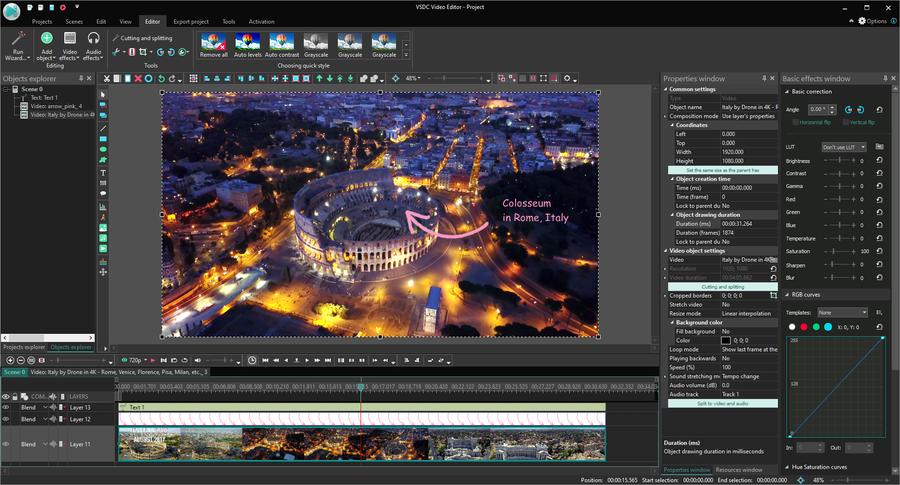
6. Upgrade your travel videos

Travel videos are usually great as they are, but they often contain so much information that it becomes hard to maintain an unprepared viewer’s attention. And even if you’ve created a voiceover for your footage, some details are better perceived visually. So why not make a clip easier (and more captivating) for your viewers to watch by adding geolocation tags, arrows, titles, or quick facts related to the exact places you’re showing in a video?

Motion tracking is a perfect technique for this purpose because it allows you to attach a piece of text or an icon precisely to the object you’re talking about in the video.

How to make travel videos more captivating with motion-tracked text

Quick tips before you get started with motion tracking in VSDC

If you have a clear idea of the end result, bringing it to reality won’t take much time or effort. If you’re a complete beginner and never used motion tracking before, here are a few tips for a smooth start:

  1. When you place the red tracking frame over the object you’re planning to track, make sure it’s inside the frame entirely. However, don’t make it sit “too tight”. The software will be able to detect the movement better if the frame contains bits of contrasting colors or shapes around the tracked object.
  2. If the movement trajectory goes in the wrong direction or if the software “loses” the tracked object out of sight, you can adjust the path manually. To learn how to do that, we recommend reading the motion tracking tutorial prepared for VSDC users.
  3. Remember that the object you place over your main video should be at the top layer on the timeline. You can move files to different layers manually using drag’n’drop.

Ready to give it a try?

Then download VSDC to your computer and start experimenting. Check our YouTube channel for more ideas and drop us a line on Facebook.

download windows versionDownload Free Video Editor

Beginner’s guide to using motion tracking in VSDC

In the VSDC team announced the release of motion tracking – a long-awaited tool that allows you to register object’s movements in a video and assign the same trajectory to other elements: texts, images, or filters. A common example that probably comes to mind is a pixelated censorship mask placed over a moving object – but motion tracking possibilities go way beyond that. For instance, you can make a text title move along with the object it belongs to. Or you can create an image that will be following an assigned object in a video.

To help you get the hand of motion tracking in VSDC faster, we’ve prepared a detailed tutorial. You’ll learn how the tool works, what a movement map is, how to create a trajectory and assign it to an object. We’ll also explain what to do if a tracked object changes its size or shape and gets “lost” by the tracking software.

Before getting started, we highly recommend downloading the latest version of VSDC.

1. How to activate Motion tracking in VSDC

Motion tracking is a paid feature available as a part of VSDC Pro edition. So, if you already have the VSDC Pro license, just download the latest version of the editor, and you’ll be able to access Motion tracking among the built-in tools.

Another option is available for those who want to use motion tracking without upgrading to VSDC Pro. To do that, you’ll need to download the Motion tracking plugin from the official website and install it on your PC. The plugin is paid, and it allows you for activating the Motion tracking tool right in the free version of VSDC Video Editor.

2. Getting started with motion tracking in VSDC: how to create a movement map

To get started, launch the program and import a video file with a moving object. Next, you’ll need to create a map based on the trajectory of this object’s movement. It’s called a movement map.

Here is how you do it:

  1. Make a click on the video using the right mouse button.
  2. From the context menu, select “Create movement map”.
  3. Now, select (or confirm) the folder on your PC to store the map. Hit “Save”. Adjustable frame to define the area where the tracked object is located in VSDC
  4. In the preview window, you’ll see a frame defining the tracked object. Resize and move it to ensure that the tracked object fits the frame and takes most of its space.
  5. Use the “Start analysis” button in the Motion tracker menu at the top to launch the tracking process.

  6. As the playback progresses, the movement map will be gradually appearing in the preview window, drawn in green. At the end of the video, check the trajectory and if it’s accurate, click the «Apply editing» button. This way, the movement map will be saved to your PC and VSDC will automatically switch to the regular video editing mode.

3. How to assign a movement map to another object

Once the movement map is ready, you can assign it to any object: an image, an icon, a title, or a mask. As an example, we’ll show you how to create a piece of text that will follow an object in a video.

Here is how to get started:

  1. First, use the left-hand side menu to add a text object to the scene.
  2. Make a double-click on the text layer.
  3. Open the “Add object” menu at the top and select “Movement” -> “Movement map”.
  4. In the Object’s position settings window, select the movement map you previously saved on your PC and hit OK.
  5. Notice that the settings window also allows you to change the starting point for the map. This means you can start applying the trajectory to the object from the beginning of the scene, from the cursor position, or manually.

4. What is a tracking loss region

Sometimes the software may “lose” the tracked object in the process. It typically happens if the object gets overlapped by the surroundings and stops being visible in the scene. Other scenarios include the object changing its size, color, shape, or appearance completely (a person turns into a car just like in Transformers, for instance).

As a result, you get a so-called “tracking loss region” – the gap between the moment when the program “loses” the object and registers it again.

In such cases, Motion tracker builds an approximate trajectory that the object is expected to take while moving through the tracking loss region. You can always manually adjust this trajectory by adding keyframes to the required areas.

Here is how it’s done:

  1. On the timeline, place the cursor at the moment when the program loses the object. Adjust and relocate the tracking frame according to the new object’s position.
  2. Now, click the “Continue analysis” button to launch tracking from that moment.
  3. If the object gets “lost” more than once during the playback, repeat these steps for each time.

What to do when a tracked object disappears from sight - tracking loss area in VSDC

If you need to select a piece of the trajectory on the movement map to delete it, you can do that manually, too. Place keyframes at the beginning and at the end of the piece you want to cut out, then select it and hit “Delete”.

Please note that sometimes tracking loss regions appear earlier than the object really disappears from sight. In this case, you might need to expand the tracking loss region to adjust it with more precision.

Follow these steps to modify the tracking loss region:

  1. First, place additional keyframes to specify the tracking loss region on the timeline.
  2. Make a double-click on the resulting piece of the map.
  3. Use the icon named “Invalidate area” to define the piece as a region where the object’s movement was tracked incorrectly.
  4. Finally, make manual adjustments using keyframes.

Once the map looks as expected, hit the “Apply editing” button to save it and switch VSDC to the video editing mode.

To quickly switch between keyframes in the Motion Tracker mode, use the “right” and “left” arrow keys on your keyboard.

5. Movement map settings: overview

Once you’ve assigned the movement map to an object, you can go ahead and fine-tune the available settings for higher movement precision. To access the settings, make a double-click on the object – this will open a new tab with a layer called “Movement map”. All the adjustments to the Movement map can be done in the Properties window on the right-hand side. If you can’t find the Properties window, click on the layer with the right mouse button and select “Properties” from the menu.

Movement map settings window in VSDC

Below, we’ll explain what each Properties window parameter means:

Coordinates (X/Y) – initial coordinates of the object in the preview window.

Object creation time (ms/frame) – the moment you want to assign the movement map to the added object.

Object duration time (ms/frame) – this parameter defines for how long you want to apply the movement map to that object. Just like the previous parameter, this one can be defined either by milliseconds or by frames.

The Movement map setup menu includes the following parameters:

  • Movement map – the map used in the project.
  • Mapped video – the video used for drawing the movement map. If you specify the video file here, its parameters and the parameters of the map will be automatically adjusted to each other. If you leave this field blank, the movement map will not adjust to the parameters of the video.
  • Lost process – the object’s movement mode in the tracking loss area. Using this parameter, you can decide how the object should be moving while in the tracking loss area. There are three options to choose from:
    1. Approximate trajectory – the object remains visible while the program draws its estimated movement trajectory.
    2. Hide object – when the object reaches the tracking loss area, it disappears.
    3. Do not process map – the object moves according to the trajectory you’ve drawn. To draw the missing piece of trajectory, you’ll need to use the “Movement” tool.

Please note that if you don’t draw the trajectory for the tracking loss area, the object will be moving according to the «Approximate trajectory».

Although it may seem complicated, the Motion tracking tool in VSDC is actually quite easy to use and requires zero special knowledge or experience. As long as you follow the instructions and use the preview window, you’ll be able to achieve the desired result.


Got any questions? Drop us a message on Facebook.

Need more ideas? Subscribe to our YouTube channel.

How to apply the right size for Instagram video content

Although a major part of Instagram content is created via smartphones, sometimes you may need to edit videos on a desktop before uploading them online. That is especially relevant when you are shooting high-quality videos or if you want to use parts of the same footage for different Instagram video types. The latter can mean a lot of manual resizing.

download windows versionDownload VSDC Video Editor 8.2

How to Edit & Export High Quality Instagram TV with VSDC

To help you with this pain point, we’ve created a guide showing how you can quickly adapt any footage to a perfect Instagram video size.

To adjust video dimensions, we’ll be using VSDC. It is a free video editing software for Windows, and it’s perfect for minor video alterations as well as advanced level montage with picture-in-picture effect, color correction, sound editing, and more.

Looking for a convenient PC video editor?

Download VSDC now

The reason why VSDC is so good for adjusting videos for Instagram size requirements is its convenient export profiles. Once you’re done editing, the software allows you to quickly select output video parameters pre-configured specifically for Instagram. Moreover, if you want, you’ll be able to change any of these parameters and save your custom export profile for future use.

Sounds like something you’ve been looking for? Then let’s go ahead and see how it works.

But first, what is the recommended Instagram video size?

The answer to that question will depend on the video type you’re planning to publish. As of today, Instagram allows you to post:

  • Feed videos (minimum – 3 seconds; maximum – 1 minute)
  • Instagram stories (minimum – 1 second; maximum – 15 seconds)
  • IGTV (minimum – 15 seconds; maximum – 10 minutes)

Recommended Instagram video size for feed posts

The general requirements for all Instagram videos are:

  • MP4 format (also known as MPEG-4)
  • H.264 codec
  • 30 fps (frames per second)
  • 1080px maximum width

A lower 600px width resolution is acceptable, but you should keep in mind that it might not be the best user experience for your audience. Instagram is the most visual social media platform and striving for quality pays off.

Now, when it comes to the best Instagram video dimensions and aspect ratio, you have a few options.

For a regular feed post, you can use any aspect ratio between 1.91:1 (Landscape mode) and 4:5 (Portrait mode). Obviously, the latter is more efficient if you want to grab the attention of your followers because it takes more space on a smartphone screen. The best Instagram video dimensions here will be 1080 x 1350 and 864 x 1080 pixels. If you didn’t use the vertical mode to shoot the video though, it might be better to go with the good old square aspect ratio (1:1). In that case, the 1080 x 1080 is the way to go.

For Stories, Instagram video size should be 1080 x 1920 pixels. This is a vertical-only space, and you’ll need to shoot in a portrait mode to make the video look authentic.

Finally, for IGTV, you can either upload a vertical video with a 9:16 aspect ratio, or a horizontal video with an aspect ratio of 16:9. But keep in mind that when an IGTV video is watched in the feed, it’s loaded in a portrait mode, so vertical orientation wins again.

How to apply correct Instagram video size in VSDC

Assuming you’re done editing your video, here is how to find the right video export profile:

  1. Go to the Export project tab.
  2. Select “Web” in the upper left-hand menu, then proceed to “For Instagram”.
  3. Next, select the width of your video from the “Profile” dropdown menu: 600px, 1080px or 1080px (Full HD).
  4. From the dropdown menu to the right, choose among Square, Landscape, and Vertical orientation.
  5. In the upper left corner of the Preview window, use the “Reaspect image” option if needed.
  6. Finally, save the video to your PC using the “Export project” button.

How to apply Instagram video size in VSDC

If you need to change the width, the height, or the framerate of the output video, you can do so by clicking the “Edit profile” button right below the Preview window. And if you need to create a custom export profile, check out this short video tutorial.

How to quickly cut a video into parts for Instagram

If your video is longer than the allowed maximum, you may need to split the video file into parts and then publish a sequence of Instagram Stories or a carousel. The easiest way to do that is by using markers:

  1. In the same Export project tab, go to the upper right-hand corner and click the “Set markers” button. A new “Cutting and Splitting” window will pop up.
  2. By moving the handler, add markers exactly where you want to cut the video.
  3. Use the “Apply changes” button.
  4. Now, open the “Additional settings” tab under the “Profile” menu.
  5. Uncheck the “Join scenes to single” box and check the “Split file by markers” box.
  6. Export the project. The video will be saved into multiple files as indicated by markers.

How to split Instagram video into parts before publishing

Final tips on posting Instagram videos

Applying the right Instagram video size isn’t that tricky if you have software that applies all the parameters automatically. Optimizing its quality and posting can be tricky though. So, here are the final recommendations before you jump to working with your content:

- Make sure your video is in MP4 format. If it’s not, use a video converter.

- Maintain the high quality of the video because Instagram may compress it. That involves proper camera settings, lossless file transfer from desktop to mobile, and correct dimensions.

- Use subtitles where applicable. Remember that most people scroll through the feed with sound off, so create text insertions if your message loses its clarity when muted.

- Finally, consider using social media management software for scheduling Instagram publications. Not only does it save time, but it also allows you to conveniently post right from your desktop. If you’ve never heard of social media management tools, check out Buffer and Hootsuite.

Questions about adjusting video size? Let us know by sending a message via Facebook page or drop us a line at This email address is being protected from spambots. You need JavaScript enabled to view it..


You can get more information about the program on Free Video Editor' description page.

The ultimate guide to working with Glitch effect in VSDC

Glitch effect is one of the hottest videography trends right now. It’s widely used in music videos, video games, movies – you name it. And it’s not surprising given how cool distorted videos look!

Digital distortion makes a video more dynamic and creates an illusion of ephemerality. But not all glitch effects are created equal. Sometimes you may not achieve the desired result just by applying a standard filter. First, there are many distortion variations – and each one creates its own unique effect. Second, sometimes you might want to customize the effect by switching the glitch type and adjusting its intensiveness.

If you’re serious about learning the art of digital distortion, VSDC is the best free video editor for that purpose. Not only will you be able to quickly add a glitch effect to a video, but you’ll also be able to adjust the distortion manually. In the tutorial below, we’ll show you exactly how to do it.

Download VSDC Free Video Editor

So, the Glitch effect typically imitates software errors or a bad signal, and results into picture tearing, static noise, etc. Usually, it looks like:

  • Wavy image distortion.
  • Frozen frames.
  • Inverted colors.

Let’s take a closer look at how the Glitch effect works in VSDC.

How to apply a glitch effect to a video in VSDC

Once you’ve downloaded and launched the editor, import the video you want to distort. To apply the Glitch effect, follow three easy steps:

  1. Open the “Video Effects” menu.
  2. Go to the “Special FX” section and select “Glitch”.
  3. In the “Object position settings” pop-up window, press OK.

How to quickly create a video glitch effect for free

This way, you’ve just applied one of the default glitch presets to a video. VSDC has 8 different presets – each one creates a unique effect. To choose another one, go to the Properties window on the right-hand side and find the “Glitch effect settings” window. Select any preset and check the preview window for a real-time result. You can always tweak the parameters and create your own custom preset.

For instance, this is how the same video may look when you apply different default Glitch presets to it:

If you’re happy with the result, just go ahead and save the video using the “Export project” tab.

However, if you want to precisely adjust the effect, we will show you how to do it below. You’ll learn what every Glitch effect parameter is responsible for, and how to adjust the distortion by changing its type and intensiveness.

Glitch effect settings in VSDC: getting started

To get started, make a right mouse click on the Glitch effect layer on the timeline and select “Properties” from the menu.

Go to the “Properties window” on the right-hand side and find the “Glitch effect settings” menu. Apart from the above-mentioned presets, you’ll see 6 parameters:

  • Glitch transfer power (%)
  • Glitch effect power (%)
  • Glitch intensity (%)
  • Use stage 1
  • Use stage 2
  • Use stage 3

VSDC glitch effect settings menu

In this context, a stage means the processing stage, and every processing stage contains a one distortion effect type. Distortion types include RGB offset, motion blocks, pixels shift, and more. You’ll find all the options in the dropdown menu titles “Effect type”. And if a stage can only include one distortion effect - Glitch is actually a combination of stages.

In other words, a Glitch effect in VSDC is a unique composition of various distortion types.

Glitch effect can include from one to three processing stages - each containing a unique distortion. Those distortion effects can be applied to a video simultaneously or one after another. Note, that if you change any Glitch parameter (Glitch transfer power, Glitch effect power, Glitch intensity), you consequently apply the adjustment to all stages.

Common effect settings

If you’re an aspiring creator, VSDC is a great choice for many reasons. One of them is the ability to fine-tune almost every single parameter manually. For example, VSDC allows you to set up the moment the effect appears in the video as well as the duration of the effect.

To do that, use the “Common effect settings” in the Properties window. The “Object creation time” parameter enables you to define the appearance of the effect precisely by frames or milliseconds. And the “Object drawing duration” parameter helps select the duration of the effect.

Glitch effect parameters reviewed in details

Time to go back to the Glitch effect. As we’ve mentioned earlier, there are eight ready-to-use presets and the ability to create your own. As soon as you change any default parameter, you create a new preset that gets named by its order number – Glitch 9, Glitch 10, etc. Later, you’ll be able to save and rename it.

Before we start reviewing the parameters, let’s break down the video distortion process in VSDC and see how exactly it works.

When you apply the Glitch effect to a video in VSDC, the software breaks every video frame into segments or blocks. Think of them as reflection blocks because every block reflects some element in the video frame. By altering the distance between blocks, changing their number and the level of opacity, you can control the way distortion looks.

Going back to the Glitch effect parameters, there are three of them in the main menu:

  1. Glitch transfer power (%) either shifts blocks closer to the elements they reflect or moves them further away from each other. The higher the value – the further blocks are. If the value for this parameter is 100%, the distance between the blocks and the elements is maximum and equal to ¼ of the frame width.360 video export settings in VSDC
  2. Glitch effect power (%) defines the level of opacity applied to the reflection blocks. If its value is 0%, blocks are absolutely transparent. If the value is 100%, blocks are completely non-transparent.
  3. Glitch intensity (%) sets the number of blocks appearing in the frame. When the intensity is 100%, the maximum possible number of blocks are displayed. If the intensity value is 0%, none of the blocks will be displayed.

By playing with these parameters, you can fully control the number of reflection blocks, their level of opacity, and how far they are placed from the reflected elements.

Moreover, you can apply a dynamic change to any of these parameters. That means that the value will gradually change as the video is playing. For example, blocks can be a bit more transparent at the beginning of the video, and non-transparent – at the end of it. To achieve dynamic change, the “Initial value” and the “Final value” parameters in the menu should be different.

How to work with Glitch effect processing stages

The next level of settings is “stages”. You’ll find three processing stages in the menu, and each contains a distortion effect: RGB offset, random color filling, pixels shift, and others. You can use up to three different stages in one Glitch effect and create a unique composition that will be available as a custom preset.

By default, the “Use stage 2” and “Use stage 3” parameters are checked as “False”. That means the effect currently uses only one processing stage. If you want to add stages, simply switch “False” to “True”.

At the stage level, you get to work with the following parameters:

  • Stage order
  • Stage intensity (%)
  • Stage transfer power (%)
  • Stage effect power (%)
  • Effect type
  • Transfer type
  • Frequency
  • Fade in duration
  • Fade out duration

Glitch processing stage settings in VSDC

Let’s take a close look at each parameter.

Stage order allows you to change the order of processing stages by applying order numbers to them. This setting is relevant only if you’re using more than one stage. If the stage order value is “0”, the stages will go one after another in default order: stage 1, stage 2, stage 3.

Stage intensity (%) defines the number of reflection blocks in a frame. Stage intensity is calculated as a percentage of Glitch intensity. In other words, if Glitch intensity is 50%, and Stage intensity is 50%, then the number of blocks will be 25% from the maximum – because 50% х 0,5 = 25%.

Delta value here is an interval between the minimum and maximum possible number of blocks. This parameter defines the stage intensity that will be randomly selected at different moments throughout the playback. When the delta value is zero, the minimal and the maximum stage intensity values are equal.

The calculations of the minimum and maximum go as follows:

Max. value = Stage intensity value;

Min value = Stage intensity - (stage intensity x delta value).

For instance, if Glitch intensity is 50%, stage intensity is 50%, and delta value is 20%, during the playback you’ll see between 20% and 25% reflection blocks from the maximum possible number.

Here are the calculations for this example:

Max. stage intensity = 50%

Min. stage intensity = 50%-(50%*0.2) = 40%

Max. Glitch intensity = 50%*0.5 = 25%

Min. Glitch intensity = 50%*0.4 = 20%

Stage transfer power (%) defines how far the blocks are shifted from the elements they reflect.

Stage transfer power is calculated as a percentage of Glitch transfer power. For instance, if Glitch transfer power is 50%, and stage transfer power is 50%, the distance between reflection blocks and the element they reflect will be 25% from the maximum – where the maximum is ¼ of frame width.

Stage transfer power has three additional parameters:

  • Initial value
  • Final value
  • Delta value

The initial value defines the distance between reflection blocks and reflected elements for the beginning of playback. Final value – as the name suggests – defines the distance for the end of playback. Delta value sets up the interval between the maximum and the minimum possible block shift that will be happening randomly during the playback.

The maximum value here is equal to the value you set for the “stage transfer power” parameter. The minimum value can be calculated with the following formula:

Stage transfer value – (Stage transfer value x Delta value)

Stage effect power (%) enables you to set the desired level of opacity for reflection blocks.

Stage effect power is calculated as a percentage of Glitch effect power. For instance, if the Glitch effect power is 50%, and Stage effect power is 50%, then the level of opacity will be 25% (because 50% of 50% is 25%). 0% would mean that blocks are absolutely transparent, and 100% would mean that they are completely non-transparent.

Just like with the stage transfer power settings, VSDC allows you to set the opacity of reflection blocks differently for the beginning and the end of playback.

Effect type is a dropdown menu with 12 distortion effect types you can choose from.

Transfer type defines the way reflection blocks are placed in the frame. It includes four options:

  • Serial exchange – blocks appear in plain sequence one after another based on their size and the distance between them.
  • Symmetric exchange – blocks are displayed symmetrically based on their parameters.
  • Copy with mirror edges – blocks are mirrored. If a part of any block falls outside of the frame, that part is copied and displayed on the opposite side of the frame:How to achieve mirrored reflection blocks in video distortion
  • Copy with transparent edges – the part of a block that falls outside of the frame is not mirrored on the opposite side but becomes fully opaque.

Transparent video distortion blocks

To adjust the transfer type even more precisely, you can use the following parameters available in the menu:

  • Block width (%) – block width, calculated as a percentage of the frame width.
  • Block height (%) – block height, calculated as a percentage of the frame height.
  • Block X distance (%) – the horizontal distance between the beginning of the first block and the beginning of the following block, where 100% is the frame width.
  • Block Y distance (%) – the vertical distance between the beginning of the first block and the beginning of the following block, where 100% is the frame height. How to measure distortion block parameters in VSDC
  • Start offset (%) – horizontal distance between the very first block and the top left corner of the frame.

Frequency (ms) – this parameter defines how frequently blocks change in one millisecond. In other words, if the frequency value is 0, blocks will be still during the entire playback. If the frequency value is equal to 10, you’ll see 10 block combinations change over a millisecond.

Fade in duration (ms) – the gradual appearance of the effect in the video. If the value is 0, the position and the intensity of the blocks will be defined by Glitch effect power and Stage effect power.

If it’s anything different from zero, the gradual appearance of the blocks will be stretched to the period defined in milliseconds. For instance, if the fade-in duration value is 100, you’ll see the original video in the first frame, and the distortion effect gradually appearing in the next 100 milliseconds.

Video Glitch effect - distortion fade-in appearance - first stage


Video Glitch effect - distortion fade-in appearance - second stage


Video Glitch effect - distortion fade-in appearance - third stage

Fade out duration (ms) – similarly, this is the parameter that sets up gradual disappearance of the effect at the end of its playback.


If the fade-out duration value is zero, at the end of the effect playback, the position and the intensity of the blocks will be defined by Glitch effect power and Stage effect power. If the fade-out duration value is 100, for example, that means the effect will be gradually disappearing during the last 100 milliseconds of its playback.

Video Glitch effect - distortion fade-out disappearance - first stage


Video Glitch effect – distortion fade-out disappearance - second stage


Video Glitch effect – distortion fade-out disappearance - third stage


And that’s the end of our tutorial. Are you ready to start using the Glitch effect in your videos?

Then download VSDC to your PC and start with the tricks described in this guide.

And if you’re keen on video editing, subscribe to our YouTube channel – we publish easy-to-follow video tutorials weekly!

How to add moving objects to a video

Making text or pictures move in a video is a lot of fun. And it’s much easier than it may seem at first sight. Moreover, montage experience is really unnecessary as long as you have a clear idea of what you’re trying to achieve.

Such effects are often used in music clips or commercials, and the example we’re going to use below is also quite popular: it’s a paper plane moving around a route map.

To achieve the effect of moving objects, we’re using the latest version of VSDC Video Editor.

download windows versionDownload Free Video Editor

How to make an object move in a video

For our example, we’ll need an image of a map and a .PNG image of a paper plane with a transparent background. If you don’t have the required files, you can easily find them on free stock multimedia websites.

To start your project, launch VSDC on your PC and use the “Import content” button to add the image of a map. Then use the “Add object” button from the upper menu of the program and add the image of a paper plane to the scene. Place it to the starting position from where the movement will begin.

Make a double click on the paper plane file - a new tab will open. Now, go to the left-hand side menu and find a button named “Add movement” 
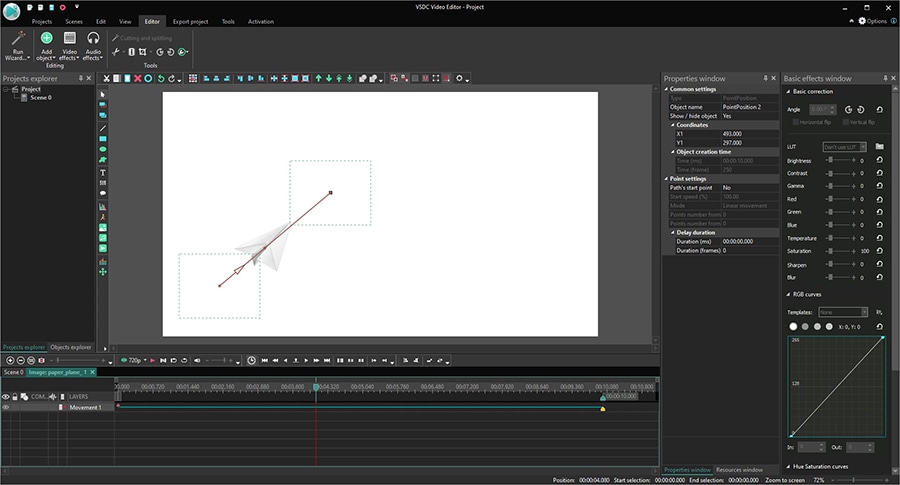
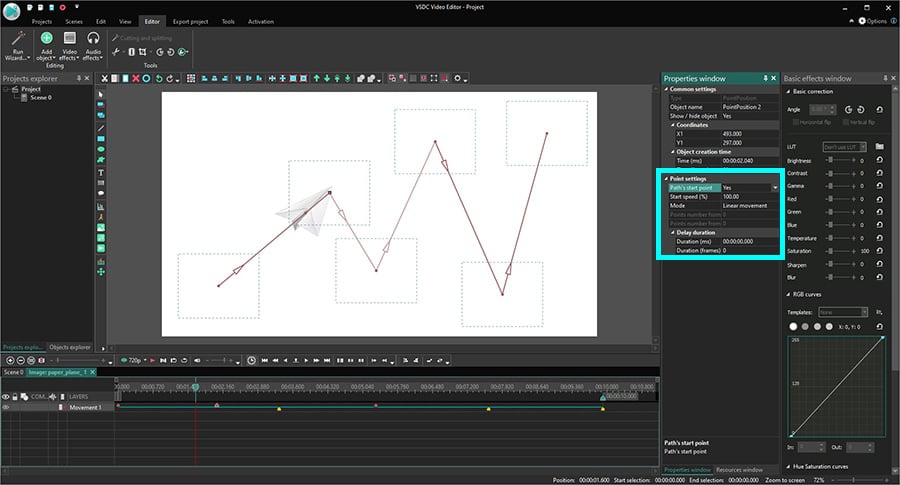
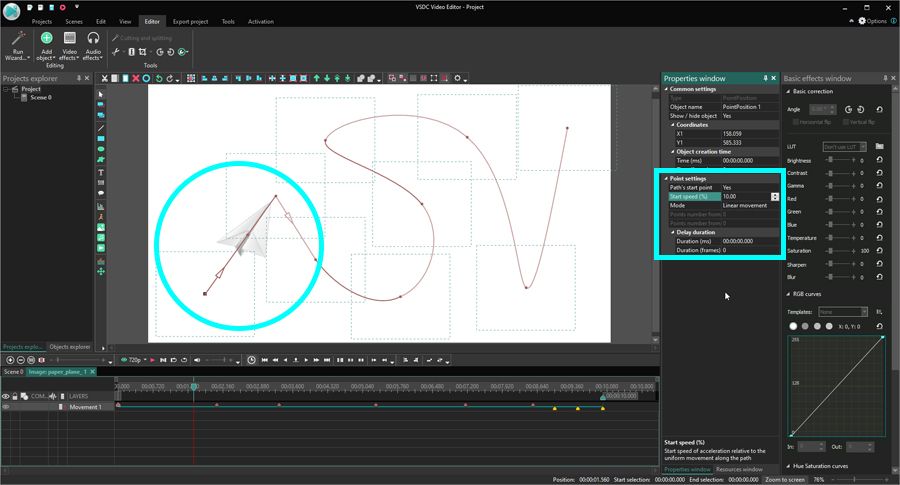
or use the Shift + M hotkey combination. In the “Object position parameters” pop-up window, click “Ok”. A control point will appear in the center of the paper plane. It’s called the path’s start point and it will start the movement trajectory.

Basic object movement in a video. Path's start point

Decide where the plane should move next and make a mouse click there. This will be your first movement vector. If you need to move any of these two points, place a mouse over it until the cursor looks like a white cross. Then grab the point and drag it wherever you need.

A 2-point object movement trajectory in a video available in the free version of VSDC

If you only want to move an object from point A to point B, you need just one movement vector. If you’re planning to build a more complex trajectory with 3 control points or more, you’ll need several vectors.

The free version of VSDC allows you to create a one-vector movement path. That is from point A to point B. If a trajectory has 3 points or more, you’ll need VSDC Pro.

To add another movement vector, go back to the left-hand side menu and use the corresponding movement button again. Then click anywhere on the scene to draw a new direction. Repeat as many times as needed to finish the trajectory.

How to fine-tune object movement in a video

Congrats! You’ve mastered the basics of object movement. Now, let’s see how to adjust it by making the trajectory smoother, and the movement more natural-looking. Oh, and you’ll also learn to rotate the object on the go.

First things first. There are two levels of object movement settings in VSDC:

  1. The trajectory adjustment via control points and passing points
  2. The object movement style settings

Below, we’ll talk about both.

Understanding control points and passing points

As we’ve mentioned earlier, the movement trajectory consists of control points and passing points. Let’s try to figure out what they are.

Control points (also, path’s start points) define the beginning of any given movement vector. Initially, you only have one control point – it’s the very first one created in the center of an object. The rest of the points are called passing points.

They help correct the movement trajectory.

You can always switch the mode of any given point and make it a control point or vice versa. To do it, select a point you want to change and go to the “Properties window” on the right-hand side. Find the “Point settings” menu and switch to “Yes” in front of the “Path’s start point” parameter.

What are control points and passing points in VSDC object movement feature

On the timeline, control points are pink, passing points are yellow.

Why would you want to switch a point’s mode and turn one of the passing points into a control point? Great question! The most common reason is separating a piece of the movement path for in-depth editing. For example, if you want the object to move slower on a particular piece of the path, make sure that the points this piece starts and ends with are control points.

How to make an object move smoothly and naturally in a video

Let’s go back to our example. VSDC allows for applying spline movement mode, and that means we can make the paper plane move more naturally in a video – smoothly and even slower at some points.

Spline movement can be achieved within a few easy steps:

  1. First, click on the second point on your trajectory and go to the Properties window on the right-hand side.
  2. Make it a control point by switching to “Yes” in the “Path’s start point” field.
  3. To make the plane’s movement through the selected piece of path slower, reduce the “Start speed %” value. In our example below, we’ve set a 10% starting speed.
  4. To make the path smooth, find the “Point settings – Mode” parameter and switch from linear to spline movement mode. This setting will only be applied to the piece of the trajectory between the selected point and the next control point.How to change object movement speed in a video
  5. If you’d like to make the movement path even curvier, go ahead and increase the value for the “Points number from previous/next path” parameters.
  6. Finally, to make the object linger at the path’s start point, find the “Delay duration” menu. For a 2-second delay, put the «00:00:02:000» value in front of the “Duration (ms)” line.

How to make an object rotate while moving

Ready for the next level?

Now that you know how to change the movement trajectory and the speed of the object, it’s high time you learned about rotation.

Here are the steps you’ll need to take:

  1. Click on any part of the path to select it and go to the “Properties window”.
  2. Find the “Rotate object” field and switch to “True” – that will activate the rotation settings menu.
  3. In the “Rotate angles” field, switch from “Constant parameter value” to “Linear parameter change”. Then set the desired values for the beginning and the end of the movement. For our example, we used 0 and 360 degrees. Check how the rotation looks using preview.

In case you need an even more detailed rotation adjustment, click on the “…” icon in front of the “Rotate angle” field. It will open the trajectory on the timeline with a “Templates” menu above it. Pick any template (we used “ZigZag”), and you’ll see a “Template settings” window pop up.

These parameters will help you set up the rotation more precisely. Let’s take a quick look at them:

  • Minimum and maximum curve values. These values define the minimum and maximum object inclination angles relative to the movement trajectory.
  • Frequency. This parameter specifies how frequently the rotation direction changes – therefore, how many zigzags there are on the timeline. Note that the rotation direction changes as the object starts moving up or down the zigzag.Dynamic object movement effect settings
  • Phase. This setting moves the first control point of the zigzag. In other words, by moving it up or down, you can adjust the initial object inclination angle relative to the trajectory.
  • Minimum and maximum duration. By changing these parameters, you define how long the object stays in the highest and lowest points of the zigzag. When the object reaches the maximum or the minimum value zone, it stops rotating until it’s time to resume the movement up or down the zigzag again.Precise object rotation settings in VSDC

There you have it. Now you can make any object move in a video, plus, you can precisely control its trajectory and even rotation. What’s next? Go ahead and try it for yourself!

If you have questions left, check out this video tutorial below or email us at This email address is being protected from spambots. You need JavaScript enabled to view it.


You can get more information about the program on Free Video Editor' description page.

News

New Transition Addition Methods, RAW/BRAW Files Support and Free Waveform

Welcome to the next level of video editing with VSDC's latest release, Version 9.1! Packed with an array of fresh features and enhancements, this update is designed to make your video editing experience...

VSDC 8.3 – 100+ New Templates, Key Editor Window, AV1 and Enhanced GUI

Welcome to the latest VSDC update, Version 8.3! We've been working hard and we’re ready to present a feature-packed release for you to discover an exciting array of over 100 fresh free video templates,...

Free video editing in 2023: Unlock Your Creativity without Breaking the Bank

In today's digital world creativity reigns supreme. It offers endless possibilities for individuals and brands to captivate audiences and leave a lasting impression. With social media platforms at the...

The Best Online Video Editors in 2023: Benefits and Drawbacks

In today’s digital landscape, the popularity of video content is gaining momentum, with users increasingly turning to video creation both for personal advantage and professionally. When searching for...

VSDC 8.2 – Proxy File Support, Color Keyframes and Vectorscope

We are thrilled to unveil the highly anticipated VSDC video editor 8.2 update. Our team has been hard at work, ensuring that this release is packed with exciting features and enhancements to elevate your...

VSDC 8.1 Brings Multicam, Curve Line Object, Scrolling Text Effect, and More

We’re thrilled to introduce VSDC 8.1. The new version primarily caters to professional videographers, graphic designers, and artists, however, everyday video creators will benefit from the update as...

VSDC 7.2 Takes Its Color Correction Toolset to the Next Level (Plus, Other Updates)

It has been another productive couple of months for the VSDC team, and we’re thrilled to announce the release of VSDC 7.2 – the new version of our video editing suite. Although the majority of updates...

5 Free Pieces of Software for Video Color Correction

If you’re a video creator, there are three reasons why it’s crucial to learn color correction. First, it will help you enhance your videos and make them look professional. Second, it will allow you...

VSDC 7.1 Upgrades GUI and LUT Editor, Adds New Effects and Custom Shortcuts

The new version of VSDC includes two new video effects, expands the functionality of the LUT editor, and makes video editing more convenient by bringing an improved interface, optimized timeline, and custom...

10 Pieces of Truly Free Video Editing Software (with No Watermarks)

Seeing a watermark on your video after spending hours editing it feels infuriating. Yet a few video editing software developers are still using this practice to limit the free usage of their products....
 

Screen Recorder Box

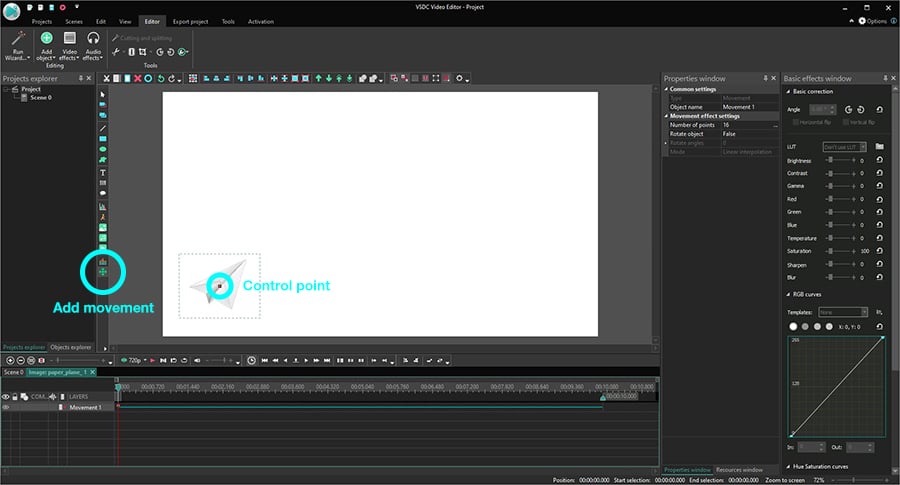
This program allows you to capture the video of your desktop and save it on your PC in various formats. Coupled with a video editor, the program is a great tool for creating presentations, tutorials and demo videos.

Read more about Screen Recorder...


Video Capture Box

The program captures video from external devices and records it to computer in a free format. You can save video from video tuners, webcams, capture cards and other gadgets.

Read more about Video Capture...


Reviewed by


"VSDC Free Video Editor is a surprisingly powerful, if unconventional video editor"

- PC Advisor


"This video editor gives you tons of control and editing power"

- CNet


"The editor handles many common formats and boasts a good deal of capabilities when it comes time to alter lighting, splice video, and apply filters and transitions in post production"

- Digital Trends