 User Help Manual
  Learn FAQ
  Send us feedback
 ")


How to Apply Instagram Size to Your Videos on PC
Even if you shoot your videos on a smartphone, sometimes you may need to edit them on your PC before publishing. That is especially relevant if you want to add advanced-level effects or use the same footage for different Instagram video types.
To help you out, we’ve created a guide to adapting any footage to a perfect Instagram video size using VSDC, free video editor for Windows PC. VSDC is great for minor video alterations as well as professional video production, color correction, and special FX – and most importantly, it leaves no watermark on your videos after export.
The editor provides convenient, pre-configured profiles for Instagram, so there’s no need to manually adjust the width and height of the video.
Let’s go ahead and see how to quickly resize a video for Instagram feed, Instagram stories, Reels, and IGTV.
Download VSDC Free Video Editor
How to apply correct Instagram video size
The easiest way to resize video for Instagram on PC is by creating a blank project for Instagram. This way, your footage will automatically adjust to the Instagram aspect ratio requirements. Here is how it works.
Step 1. Create a blank project
Launch VSDC on your computer and hit Blank project to create a new, custom-sized project. In the pop-up settings window, select Instagram and open the Resolution menu to see your options.

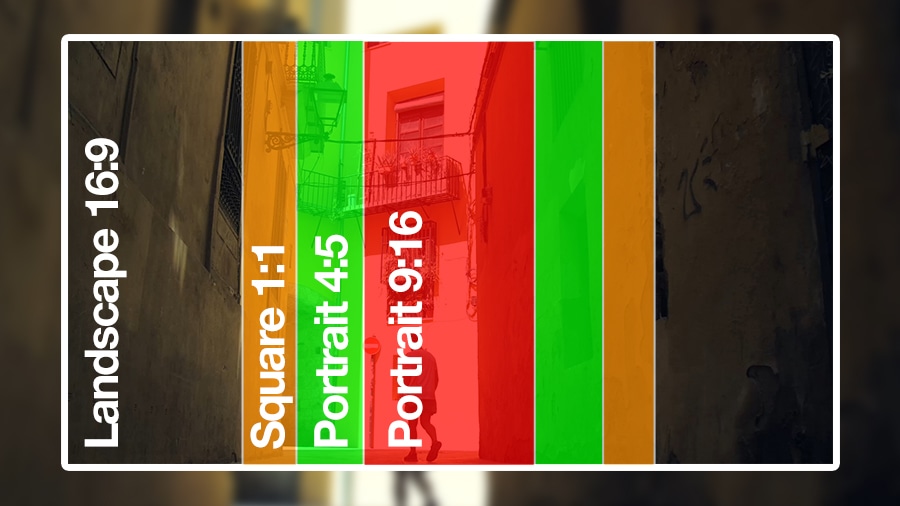
Depending on the type of publication you’re creating, you should consider the following dimensions:
- Video for Instagram feed – 4:5 or 1:1 (max. 1080x1080 or 1080x1350)
- Video for Instagram stories, Reels, and IGTV – 9:16 (max. 1080x1920)
Notice that for all three resolutions – vertical, square, and landscape – different options are available. As a rule of thumb, you want to choose the highest quality to keep the best look of the video.
When you’re done, hit Finish.
Step 2. Import your video
Once you’ve opened the scene, import your video using the Add object menu or the toolset on the left-hand side. Notice that the video will be placed within the resolution you selected previously. This means that the gaps between the scene size and the video size will be filled with the background color.

By default, the background color is black, but you can change it in the pop-up settings window at the first step.
Step 3. Resize the video
At this point, you have two options. You can either export the video “as is" (with gaps) or resize it to fit the size of the scene. In the former case, proceed to the Export tab and save your movie. In the latter case, hit the Crop button and select Custom region.

In the pop-up cropping window, proceed to Set size in accordance with the scene’s aspect ratio ➝ Set the maximum size. Notice that the resizing frame is interactive, and you can shift it to make sure the framing is right.
Once you’re happy with framing, hit OK.
Step 4. Export your video
If you’re ready to export the video, go to the Export project tab and hit Export project to start conversion. Notice that your project parameters are already selected: it’s the profile configuration you’ve set at the beginning. However, you can still adjust the profile using the options in the dropdown menu.

And that’s it! This way, you’ll be able to quickly resize your video for Instagram feed, stories, IGTV, and Reels.
What are the recommended Instagram video settings?
The general requirements for all Instagram videos are:
- MP4 format (also known as MPEG-4)
- H.264 codec
- 30 fps (frames per second)
- 1080px maximum width
A lower 600px width resolution is acceptable, but of course, it would worsen the viewing experience for your audience. Remember that Instagram is the most visual social media platform, and striving for quality pays off, especially if you’re using it to promote your brand or blog.
For the best Instagram video dimensions and aspect ratio, you have a couple of options.
For a regular feed post, you can use any aspect ratio between 1.91:1 (Landscape mode) and 4:5 (Portrait mode) . Obviously, the latter is more efficient if you want to grab the attention of your followers because it takes more space on a smartphone screen. The best Instagram video dimensions here will be 1080 x 1350 and 864 x 1080 pixels. If you didn’t use the vertical mode to shoot the video though, it might be better to choose the good old square aspect ratio (1:1). In that case, the 1080 x 1080 is the way to go.
For Stories and Reels, the ideal aspect ratio is 9:16 or 1080 x 1920 pixels. This is a vertical-only space and, ideally, you’ll need to shoot in a portrait mode to make the video look authentic.
Finally, for IGTV, you can either upload a vertical video with a 9:16 aspect ratio, or a horizontal video with an aspect ratio of 16:9. But keep in mind that when an IGTV video is watched in the feed, it’s loaded in a portrait mode, so vertical orientation wins again.
Bonus. How to quickly cut a video into parts for Instagram
If your video is longer than the allowed maximum, you can quickly split the video file into parts with the desired duration. This is especially relevant if you’re planning to publish a sequence of videos for Instagram Stories or a carousel.
The easiest way to split the file before export is by using markers. While in the Editor tab, place the playhead where you want to split the file and select the marker tool. In the pop-up window, switch to Segmentation marker and hit OK.

Following the same steps, create as many markers, as you need. Once ready, switch to the Export project tab and open Additional settings. Check the box “By markers" and uncheck the box “Join scenes to single".

Proceed to export the project. The video will be saved into multiple files based on the markers you’ve created. And since you can now upload videos to Instagram from a desktop, all you need to do is open your account in the browser and upload files.
Final tips on posting Instagram videos
Applying the right Instagram video size isn’t that tricky, as long as you understand the dimensions and framing. Here are the final recommendations before you jump to working with your content:
- make sure your video is in MP4 format. If it’s in a different format, use a video converter.
- keep in mind that Instagram may compress the quality of your video. To maintain the highest quality, pay attention to your camera settings and use lossless file transfer solutions.
- use subtitles where applicable. Remember that most people scroll through the feed with sound off, so create text insertions if your message loses its clarity when muted.
Finally, consider using social media management software for scheduling Instagram publications. Not only does it save time, but it also allows you to conveniently post right from your desktop. If you’ve never heard of social media management tools, Buffer and Hootsuite are great tools to start.
Questions about adjusting video size? Let us know by sending a message via Facebook page or drop us a line at This email address is being protected from spambots. You need JavaScript enabled to view it..
You can get more information about the program on Free Video Editor description page.
© 2011-2024, www.videosoftdev.com, FLASH-INTEGRO LLC. Privacy policy | Terms of use | About us
All trademarks referenced herein are the sole property of their respective owners.
Copying any materials from this site allowed only with written consent of Site Administration.