 User Help Manual
  Learn FAQ
  Send us feedback
 ")


How to Use Time Remapping in VSDC
If you’re familiar with the object movement feature available in VSDC, you’ll be excited to learn about time remapping. Time remapping allows you to slow down, speed up, or reverse object movement in a selected part of its movement path. As a result, you’ll be able to create really impressive effects, like this one:
The new feature is available in VSDC Pro starting version 6.9. Below, we’ll show you how it works.
How to use time remapping in VSDC
Currently, time remapping can only be applied to moving objects. This includes images, shapes, titles, icons, or any other 3rd-party objects added to the scene. Here is how to get started.
Create a moving object
To make an object move in a video, you need to add it to the scene, double-click it, and hit the movement icon from the left-side menu. Then place the cursor where the movement destination is and adjust the vector.
The object movement feature is newbie-friendly and straightforward, but if you’re unfamiliar with it, we have a detailed guide for you.
Open the time remapping graph
Once you’ve created the movement path, right mouse-click the movement layer on the timeline and select Properties. In the Properties window, find Time remapping, and hit the 3-dot icon to access the graph.
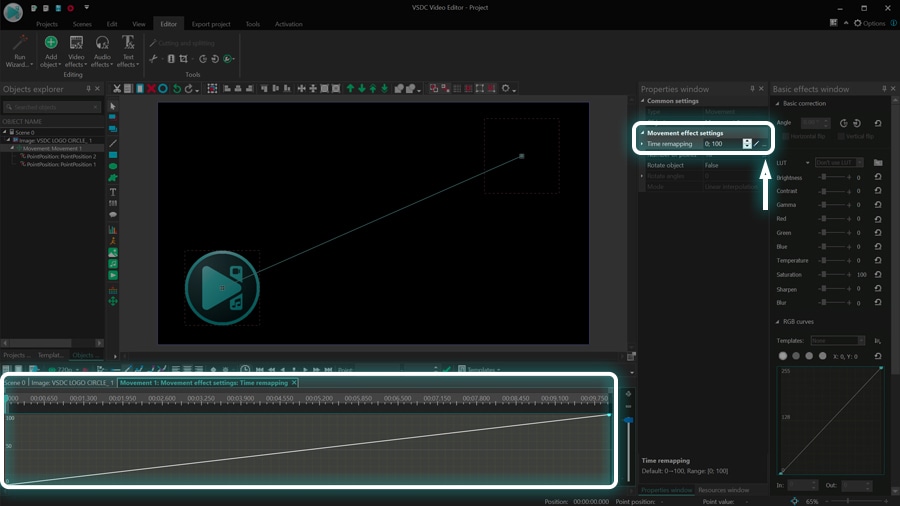
This graph illustrates object movement over time, and the two axes define two different aspects of it. The X axis reflects the duration of the movement effect: the left part of the timeline is the beginning of it, and the right part is the end. The Y axis reflects the object’s movement path: the bottom part of the timeline is the beginning of the path, and the top part is the end.
By modifying the graph, you can modify the object movement progress. For example, you can make the object go slower or faster through certain parts of the path, or even send it in the opposite direction. All it takes is a couple of keyframes placed in the right spots! Let’s see how you can create them.
Understanding keyframes and the Y axis
Keyframes are control points that allow you to break the graph – and therefore, the movement path – into sections so that you can work with each section independently. You can create keyframes manually by double-clicking the graph or use the templates from the menu. For this tutorial, we’ll use the former option.
Notice that the first keyframe (Y:0) indicates the initial object position on the path. The last keyframe (Y:100) is the end of the path.
As long as the graph is continuously ascending from 0 to 100, the object will be moving from point A to point B following the movement vector you created. We call it the original, unmodified time flow.
Now, let’s see what happens when we change the graph.
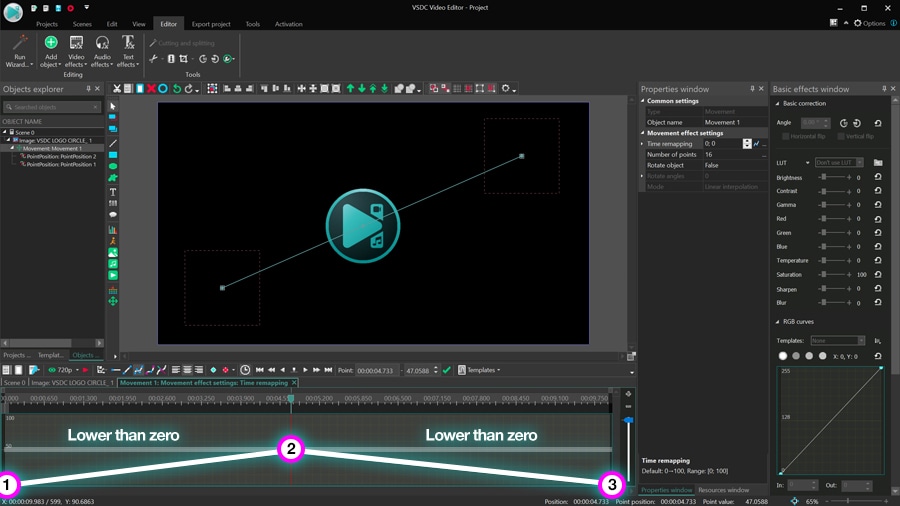
We’ve already mentioned that the Y axis indicates the time flow for the object. Below is a simple illustration of how you can reverse it. Suppose you want the object to go halfway through the movement vector and then go back to the initial point, at the same speed. All you need to do is create a keyframe in the middle of the graph and drag the last keyframe from 100 to 0.
Let’s break it down. The object was moving along the movement path up to the breaking point – the keyframe we created. Then, instead of continuing the movement, it started heading back because instead of continuing to ascend, the second part of the graph descends back to Y:0 which indicated the initial point on the movement path for the object. In other words, according to the Y axis, the start and the end of the movement path became the same.
Here is another way to look at it. If the angle between two subsequent keyframes is greater than zero degrees, the object time flow in this section goes in the original direction. However, if the angle between two subsequent frames is less than 0 degrees, the object time flow goes in the reversed direction.
For example, if you apply the ZigZag template from the template menu, you’ll get an object bouncing between the sides of the scene.
Note that the movement effect will continue for as long as the object is present in the video.
Understanding the X axis
Now that you have an idea of the time direction for the object, let’s go back to the drawing board and see how you can tweak movement speed at any given point in time.
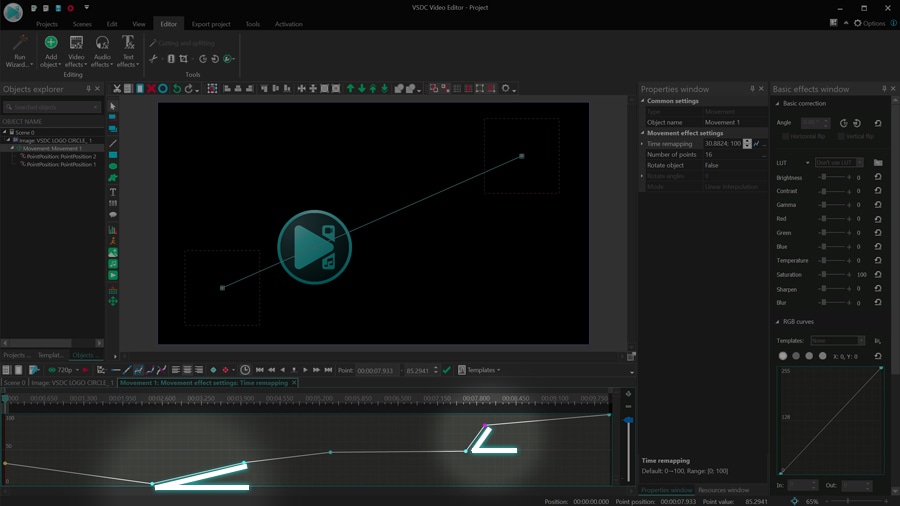
Suppose you want the object to reach the middle of the way, slow down for a second, and continue at a slightly higher speed. To achieve that, place a keyframe one second past half the graph and drag it down to make that segment of the graph flatter. Here is what the result will look like:
Here is how it works. By adding a keyframe, you’ve created a new section on the graph, and by dragging the keyframe down you’ve decreased the movement speed for that section.
Suppose you want the object to briefly speed up in the middle of the path and then go back to normal speed for the rest of the way. That’s easy! Drag the new keyframe up to the desired angle and mirror its position with the central keyframe to create identical angles on the graph.
The takeaway from these two examples? The angle between two subsequent keyframes defines object movement speed. The greater the angle, the higher the movement speed is; the lower the angle, the lower the speed is.
Congratulations! By now, you should have a good understanding of how time remapping works for a single movement vector animation. However, in many cases, the object movement path contains two vectors or more. Let’s see how the time remapping graph will look in these cases, and how you should approach it.
Time remapping for multi-vector movement path
If you’ve created a movement path consisting of multiple vectors, on the time remapping graph, each vector will be represented by a light-gray rectangle. The purpose of these rectangles is to help you visualize the position of each vector in time and create keyframes accordingly.
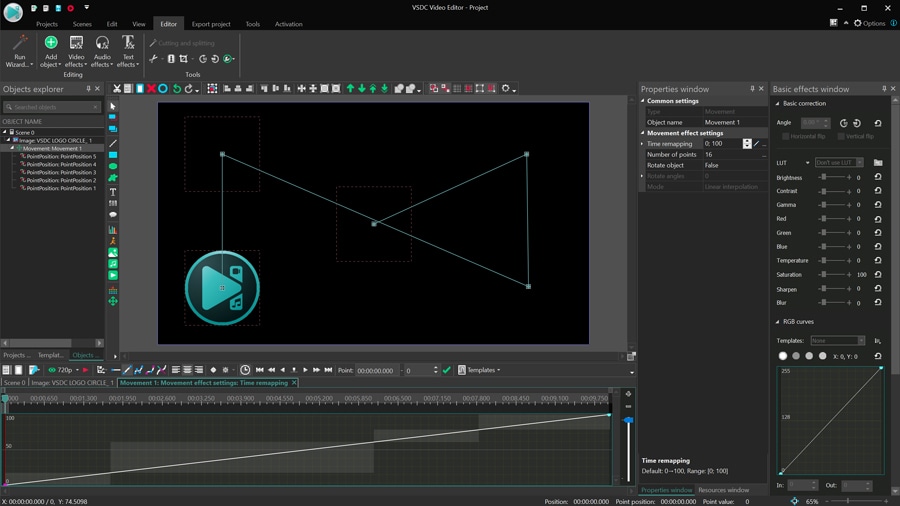
The general approach to multi-vector movement paths is no different from what we’ve described above. However, there’s one tricky part you should keep in mind. If you decide to change any vector position in the scene, the gray rectangles will shift accordingly. The tricky part is that if you’ve already created keyframes on the graph based on those movement vectors, you’ll have to manually shift them too.
Essentially, you need to remember that keyframes aren’t attached to movement vectors. So if you want the object to move through a certain vector with a certain speed, and you’re moving that vector around, make sure to double-check the keyframes.
Have full control of object animation with remapping
Time remapping is a powerful tool, and we’re excited to introduce it in the new version of VSDC. Although we’ve gone through every step of applying this feature, there’s much more to discover. For instance, you can incorporate object rotation, transition effects, and even motion tracking.
Download VSDC 6.9 now and try it for yourself!
You can get more information about the program on Free Video Editor description page.
© 2011-2024, www.videosoftdev.com, FLASH-INTEGRO LLC. Privacy policy | Terms of use | About us
All trademarks referenced herein are the sole property of their respective owners.
Copying any materials from this site allowed only with written consent of Site Administration.