 User Help Manual
  Learn FAQ
  Send us feedback
 ")


- Welcome to the next level of video editing with VSDC's latest release, Version 9...
- Welcome to the latest VSDC update, Version 8.3! We've been working hard and we’r...
- In today’s digital landscape, the popularity of video content is gaining momentu...
- In today's digital world creativity reigns supreme. It offers endless possibilit...
How to Record YouTube Videos (Ethically)
So, you want to screen record YouTube videos on your computer. Technically, it’s easy. However, from the legal standpoint, there are a couple of nuances you should keep in mind. Let’s start with these nuances and then move on to the technical part of the tutorial.
Things to keep in mind before recording videos on YouTube
YouTube is rather strict about copyright law. That means it’s forbidden to bluntly copy content from YouTube for further usage and distribution. On the other hand, if your purposes are creative or educational – meaning that you’re only using fragments of the original video and add your comments, teaching elements, research findings, or criticism – the copyrighted materials may be considered acceptable based on the doctrine of fair use.
This is exactly why many reaction videos and memes are remaining unpunished by the platform.
We also suggest that you read the 4 factors of fair use. These factors elaborate on the doctrine and explain, for instance, that you can’t gain profit from the video you produce by recording someone else’s video on YouTube. You also can’t prevent the copyright owner from gaining profit from their original work.
That being said, we have no right to provide any legal advice on copyright law. So, if you’re in doubt, you should talk to your lawyer.
How to record a YouTube video using VSDC Free Screen Recorder
If you’ve decided to proceed, you should first download the VSDC screen recorder. It’s a completely free screen recorder for Windows that allows for saving recorded videos in high quality.
Once you have a clear idea of what exactly you need to record, open the video at the required moment, select the highest quality, check the sound and subtitles. Then follow the suggested steps below.
Step 1. Select the area you want to capture
Launch the VSDC Screen Recorder on your PC. The VSDC dashboard is very straightforward: all the key tools are accessible right on the main panel.
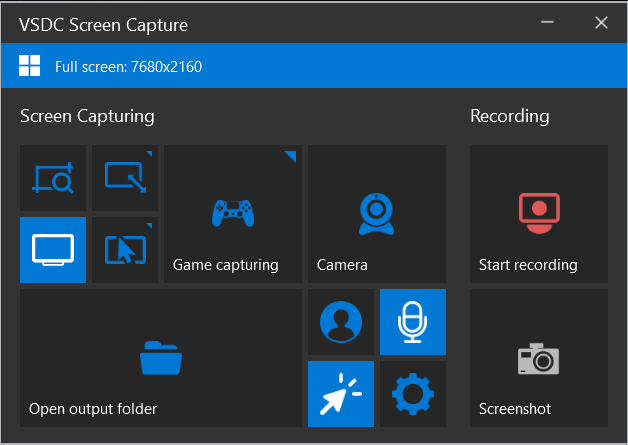
The four screen capturing modes help you select the area on the screen you want to capture. The bottom-left button activates the full-screen capturing mode; the rest of the options allow you to select the desired area either manually or via resolution-based presets.
Quick tip. By default, all screen recordings are saved in the original resolution, at a 30 fps rate and about 50% of the original quality. These parameters are considered optimal, so they are pre-selected by default. If you want to change them, open the settings, switch to Export, and set the desired configuration.
Step 2. Record the video from YouTube
Once you’ve selected the screen capture area, all you need is to hit Start recording – then hit the play button on YouTube.
If you want to record the video in a full-screen mode, select the full-screen capturing mode first and hit Start recording; then open the full-screen playback mode on YouTube and hit Play.
Quick tip. You can record a YouTube video and your webcam video at the same time – which is quite handy if you’re creating a reaction video. To do that, enable the camera feature on the dashboard before starting the recording. Read a more detailed tutorial here.
Step 3. Watch the result and make edits
Once you stop recording, the video goes straight to the folder indicated on the panel. You can open the output folder right from the program.
To cut out the unwanted pieces of footage, you can use the VSDC Free Video Editor. It will also work well if you need to place text, add music, overlay an image or another video. Find a list of video editing guides here.
© 2011-2024, www.videosoftdev.com, FLASH-INTEGRO LLC. Privacy policy | Terms of use | About us
All trademarks referenced herein are the sole property of their respective owners.
Copying any materials from this site allowed only with written consent of Site Administration.