 User Help Manual
  Learn FAQ
  Send us feedback
 ")


- Welcome to the next level of video editing with VSDC's latest release, Version 9...
- Welcome to the latest VSDC update, Version 8.3! We've been working hard and we’r...
- In today’s digital landscape, the popularity of video content is gaining momentu...
- In today's digital world creativity reigns supreme. It offers endless possibilit...
How to Use the Particle Effect in VSDC Free Video Editor
Particles is a beautiful effect you often see in music videos, sci-fi movies, and romantic clips. It’s a surefire way to create depth and achieve the desired atmosphere in a video. The most popular types of particles used for this effect are snowflakes, leaves, raindrops, and dust. However, any image can be used as a particle, including your own logo.
In this tutorial, we’ll show you how to apply the particle effect in VSDC Free Video Editor. It’s available starting from version 6.6, so make sure to download it from the official website.
Before moving to the text version of the tutorial, feel free to watch this video:
Once ready, visit the particle template gallery and download the collection you like. These templates are free, but you will only be able to open them in VSDC.
How to apply the particle effect in VSDC
To get started, import your video to VSDC and place the cursor on the timeline, right where you’d like the effect to start displaying. Next, open the Video effects menu, proceed to Nature, and select Particles – the effect layer will be added in a new timeline tab. From the right-hand side, you’ll see the Properties window: it contains three groups of settings you’ll be using to customize the effect.
The first group, titled Common settings, allows you to name the effect layer on the timeline, manually set the moment the effect appears in the video and the duration of the effect – in frames or in seconds.
The second group, Adjustments effect settings,contains one parameter: Transparency. Transparency defines the visibility level of the effect and can be either constant or dynamic. The latter means that you can gradually change the visibility of the particles, from transparent to non-transparent or back.
To apply the gradual change, you’ll need to use the parameters called Initial value and Final value. Keep in mind that 100 will mean that the particles are completely non-transparent and 0 will mean they are completely transparent. For instance, this is what the effect will look like if you set the Initial value at 10, and the Final value at 100.
The third group of settings is called Particle effect settings, and this is where you can change particle appearance and their movement style. We’ll take a closer look at this group of settings below.
How to select particle template
Once you apply the particle video effect, you’ll be able to change their size, movement speed and direction, quantity, and even position in the video. But first, you’ll need to select the type of particles you want to use. To do that, you’ll be using the Template groups and Template dropdown menus.
If you have already downloaded templates from the gallery, use the Browse icon to upload the template collection from your PC. If you have more than one collection uploaded, use the dropdown menu to select the one you need.
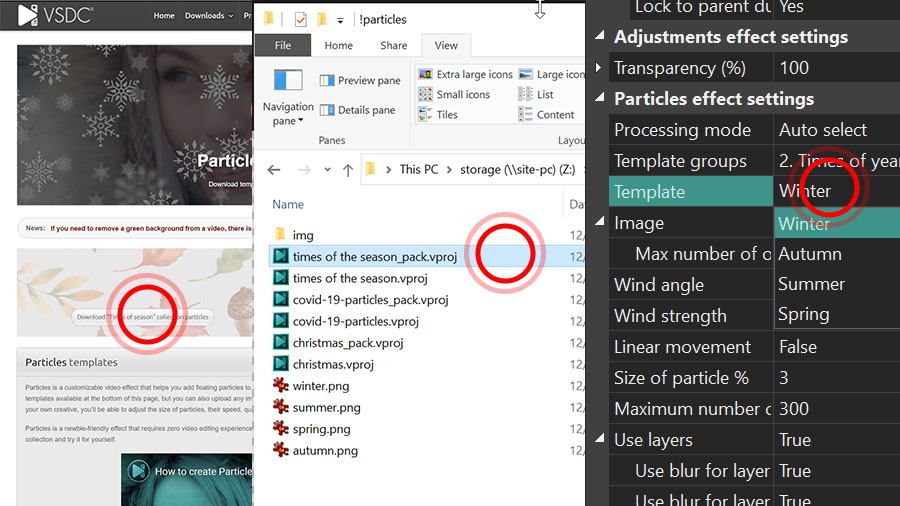
Each collection has several templates. In our example, the collection named “Seasons” includes snowflakes, green leaves, orange leaves, and waterdrops. Use the Template dropdown menu to preview the particles available in the collection.
You can upload your own image and use it as a particle as well. To do that, click the Browse icon located in front of Image.
Notice that the Image parameter also allows you to set the Maximum number of objects. This is not, however, the number of particles displayed in the video. The maximum number of objects is the parameter defining into how many pieces the original particle image will be divided. If the maximum number of objects equals 1, the entire image will be displayed. If you increase the value to 2, the original image will be divided into two parts, and so on.
Wind angle enables you to change the wind direction, which defines the direction of the particle movement.
Wind strength affects the particle movement speed. The higher its value is, the faster the particles move.
The following parameter in the list of settings is called Linear movement and it has two modes: True and False. The former means that the particle movement will be linear and defined by the wind angle you’ve set up earlier. The latter means that the particle movement will be more chaotic.
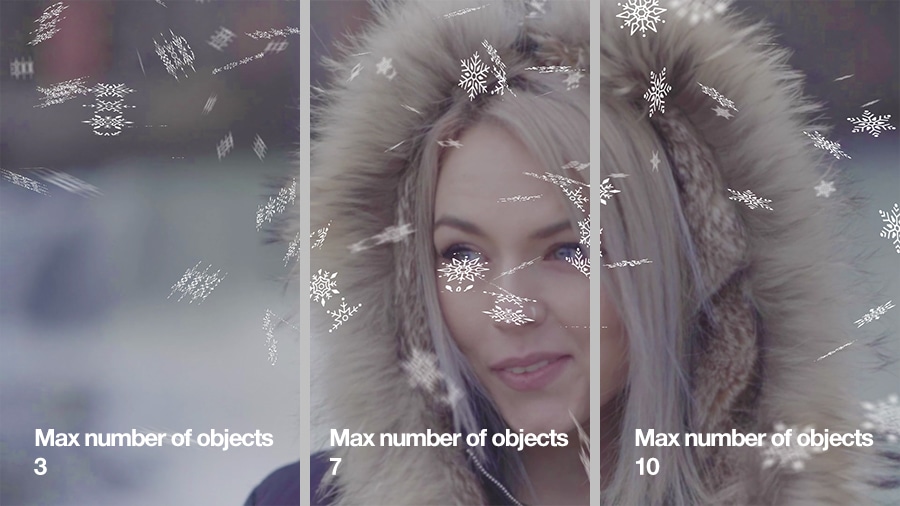
Size of particle % and Maximum number of particles should be self-explanatory. Use these parameters to change the size and quantity of the particles displayed in a single frame.
The following parameter is called Use layers. It allows you to create depth and perspective by treating the three layers of the video – foreground, middle ground, and background – differently. If you activate the “True” mode, particles will be of different size on each layer. Plus, you’ll be able to blur and rotate them on the selected layers too.
Blur levels are applied to the particles located on the blurred layers and help you make them look less distinct.
Finally, the Rotate object option enables you to apply rotation to the particles. If you switch this parameter to “False”, there will be no rotation. If you activate rotation by switching to “True”, you’ll be able to set up rotation on each layer.
Try the new particle effect in your next video
The new effect gives you a lot of flexibility and provides yet another creative approach to movie making. Download the latest version of VSDC and try it for yourself.
Want to stay tuned and find out more about the effects available in VSDC? Then subscribe to our YouTube channel.
© 2011-2024, www.videosoftdev.com, FLASH-INTEGRO LLC. Privacy policy | Terms of use | About us
All trademarks referenced herein are the sole property of their respective owners.
Copying any materials from this site allowed only with written consent of Site Administration.