 User Help Manual
  Learn FAQ
  Send us feedback
 ")


- Welcome to the next level of video editing with VSDC's latest release, Version 9...
- Welcome to the latest VSDC update, Version 8.3! We've been working hard and we’r...
- In today’s digital landscape, the popularity of video content is gaining momentu...
- In today's digital world creativity reigns supreme. It offers endless possibilit...
How to Create Video or GIF with Transparent Background in VSDC
Videos and GIFs with transparent background are very handy for applying special effects, creating custom transitions or animated title templates.
If you have just a little bit of imagination and you know how the idea of transparent backgrounds work, you’ll be able to perform real magic tricks.
In the tutorial below, we’ll show you how to make a video background transparent and how to remove background from a GIF using a free video editor for Windows called VSDC. You can download VSDC here.
But before we start, let’s get a couple of frequently asked questions out of the way.
How can a video have a transparent background?
Some people think they can take any video and just remove its background leaving the selected parts or object only. Spoiler alert: it doesn’t work that way.
The only way to create a video with a transparent background is to have it initially shot in front of a green screen. Once you upload a green screen video to VSDC (or any other video editor that has the Chroma Key tool), you can remove the green color from it, thus leaving the background transparent.
Basically, the same rule applies to GIFs with transparent background – especially given that most GIFs are just converted videos.
Which video formats support transparency?
The reason why many people fail to export videos with a transparent background is that most video formats and codecs don’t support transparency.
If you want to avoid the common export mistake, you should remember: transparency only works with the MOV (PNG lossless codec) and GIFs.
Now that we’ve sorted things out, let’s see how to create a video with a transparent background in VSDC. We’ll assume you already have a video with a green background. If not, you can practice on free stock footage from marketplaces like Videvo and Pexels.
How to create a video with transparent background in VSDC
Step 1. Launch VSDC and click the Import content button on the start screen. Then select the green screen video from your PC.
Step 2. In the Project’s settings window that pops up, find Opacity and set it at zero. Then click Finish.
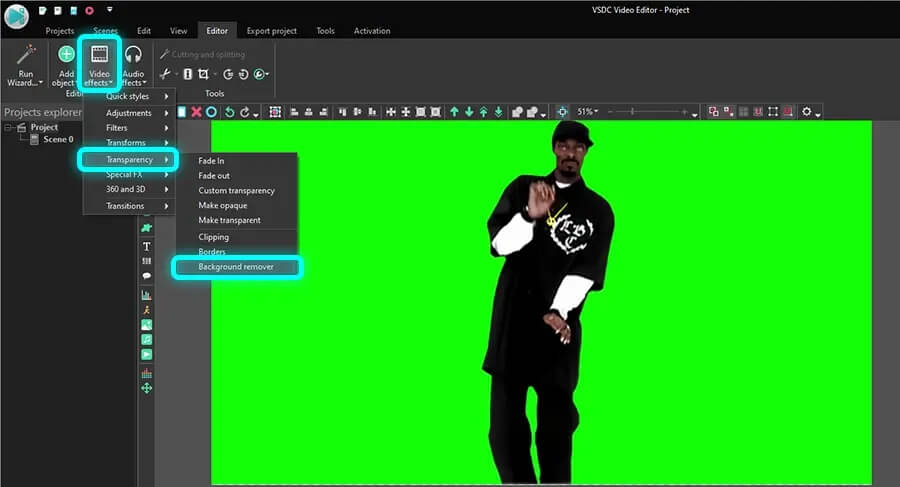
Step 3. Open the Video effects menu, proceed to Transparency >> Background remover. In the pop-up window, click Ok.
Step 4. If there is a green light border remaining around the object, go to the Properties window and manually change the Brightness threshold and the Chromaticity threshold parameters until the green color disappears. For more detailed guidance, check out our tutorial on removing background from a video.
Step 5. Once ready, open the Export project tab. Among “Media devices” (top left corner), select PC. Among “Output video formats”, select MOV. Find the “Edit profile” button under the preview window and click on it to change the codec of the video. On the Video settings menu, select Video codec >> PNG lossless. Hit Apply profile and export the project.
And this is it! In just five easy steps, you’ve got a video with a transparent background. You can now place it over any other video or image and create mind-blowing effects:
Now, if you need to create a GIF with a transparent background, everything works exactly the same way. You can either export the video you were working on as a GIF instead of a MOV file by selecting Web >> GIF on the Export project tab, or you can import a GIF with a green background to VSDC and follow the background removal steps described above.
If you’re having a hard time removing green shades around the object, chances are that the lighting was uneven during the shoot. It’s also a common issue if a model in your video has loose hair: the space between hairs gets very stubborn when it comes to removing green background. The best solution in this case would be to switch to the HSL chromakey mode. HSL is only available in the premium version of VSDC (you can get it for $19,99 per year), but it’s the most effective solution if you’re struggling with green screen videos.
Before we wrap this up, here is one more trick you can do with transparent background videos.
How to create animated text with transparent background
So far, we’ve been talking about removing a background from the video. In this last part of the tutorial, we’ll talk about creating a quick transparent background intro.
Let’s suppose, you want to have an animated title on a transparent background, so you could use it multiple times without creating the entire intro from scratch. Or you might need to have a transparent background overlay with moving icons, shapes, or images.
Here is how to do it.
Step 1. Launch VSDC and hit the Blank project button. In the Project’s settings window, set the Opacity at 0% and click Finish.
Step 2. Add text using the T icon from the left-hand side menu. Add the placeholder to the scene, type the title, and adjust its style using the text editing menu. Similarly, if you need to add an icon or a PNG image, you should use the Shift + I hotkey combination to import the desired file from your PC.
Tip: it might be convenient to place a contrasting rectangle to the scene, one layer below the text layer on the timeline. This way, it will be easier to preview the effects applied to the text title. Once you’re done editing, just delete the rectangle and save the video with transparent background as originally planned.
Step 3. Make a double-click on the text and use the Movement button from the left-hand side menu. Then point the vector to the place in the scene where you want the text to move.
Note that the free version of VSDC only allows for creating one movement path that consists of 2 control points. If you need to create a trajectory with more than 2 points, you should consider VSDC Pro.
Step 4. You can apply any effects from the Video effects menu to the text title to make its appearance (and disappearance) more impressive. For instance, in the example above, we used a simple Diffuse transition. To quickly apply it, right-click on the text layer, select Video effects >> Transitions >> Diffuse.
Step 5. Once ready, go to the Export tab and save the video in the MOV format with PNG lossless codec selected.
As you can see, this is a very basic version of an animated title, but our goal was to show you the key principles. The ball is in your court now! Use your imagination, get inspired by other video tutorials, and combine the techniques you’ve learned. Just go ahead and experiment! You have all the tools for creating an awesome video.
© 2011-2024, www.videosoftdev.com, FLASH-INTEGRO LLC. Privacy policy | Terms of use | About us
All trademarks referenced herein are the sole property of their respective owners.
Copying any materials from this site allowed only with written consent of Site Administration.