 User Help Manual
  Learn FAQ
  Send us feedback
 ")


5 Free Pieces of Software for Video Color Correction
If you’re a video creator, there are three reasons why it’s crucial to learn color correction. First, it will help you enhance your videos and make them look professional. Second, it will allow you to color-match several clips so they look more consistent. Finally, color correction can help you fix overexposed, underexposed, and washy footage — all three being the result of poor lighting conditions or wrong camera settings.
However, when you’re just getting started, you might not be ready to commit to purchasing expensive programs. Thankfully, there is free software you can use to practice.
For this article, we’ve reviewed 5 video editors for color correction. These editors include all the essential tools for both primary and secondary color correction, as well as other features to help you create a beautiful movie. And the best part is, they happen to be free.
Let’s get started.
VSDC Free Video Editor
VSDC is a free video editor for Windows PC. It works well for basic editing, as well as professional-level montage with effects. In addition to the video editing feature set, it includes add-ons like a video recorder, a screen recorder, and a voice recorder. VSDC offers both primary and secondary color correction tools.
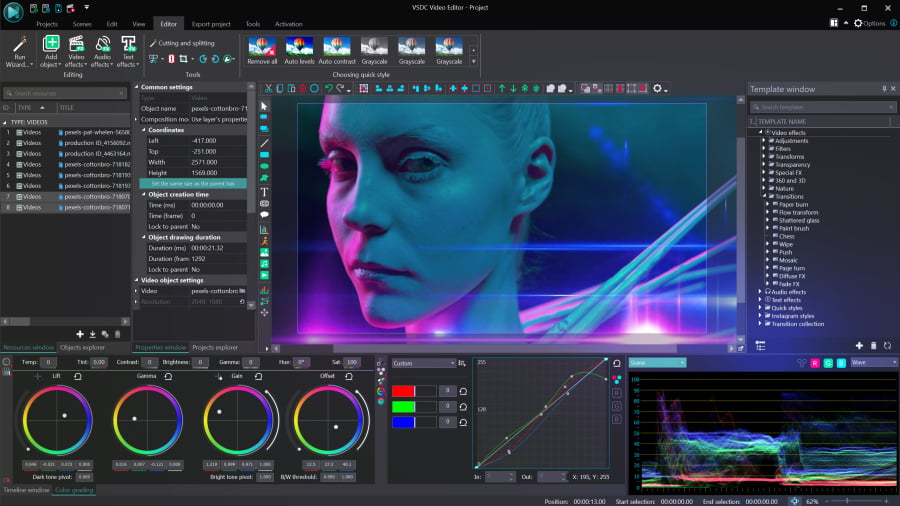
When talking about color correction, creators usually refer to primary color correction and secondary color correction. Primary color correction implies “broad strokes,” or adjustments that affect the overall video aesthetics. Such adjustments include white balance, brightness and contrast levels, and color tone correction. In VSDC, you can perform primary color correction using the Lift, Gamma & Gain color wheels, black & white balance points, RGB and Hue & Saturation curves, as well as manual color controls (brightness, contrast, gamma, saturation, temperature, etc.).
This means that you can fix overexposed or underexposed videos, correct highlights, midtones, and shadows, and just quickly enhance the way your video looks. To analyze the color distribution and perform clip color match, you can use the dedicated Color scopes window.
For secondary color correction, which implies correcting isolated colors or scopes of color tones, you can use the built-in LUT editor. For example, you can adjust a specific color tone on the video by making it more saturated or less powerful — this works well for artifacts and skin tone correction. Also, you can entirely swap certain colors in the video or make them change dynamically.
VSDC has a Pro version if you’re interested in using tools like masking, video stabilizer, or motion tracking. However, if you’re only looking for video color correction software, all the features are free, and you’ll be able to export your footage in up to 4K quality without format or duration limits.
Davinci Resolve
Davinci Resolve is an award-winning video color correction software. It will work for you if you intend to become a video editing professional, and if you own a powerful computer. While being the most sophisticated tool on the list, Davinci demands a lot of resources, and you should keep that in mind before considering this program.
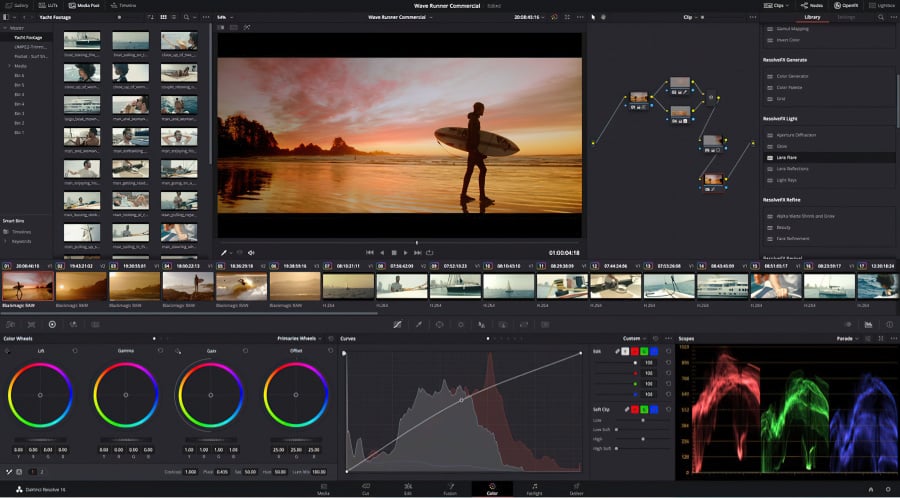
Just like VSDC, Davinci Resolve is likely to take you a couple of days to get comfortable with, but as soon as you get the hang of it, you’ll probably want to look no further.
The primary color correction instrument in Davinci Resolve is a set of color wheels that help you work with highlights, midtones, and shadows: Lift, Gamma, Gain & Offset. You can also quickly adjust brightness (luma) and contrast levels in the video.
Two features that make Davinci unique are nodes and stills. Nodes allow you to encapsulate all the applied color correction operations within a node, save it and apply it to multiple clips as a whole. Stills allow you to use videos or images you like as a reference, copy their color distribution schemes, and apply them to your video. While clip color matching, you can use color scopes and compare the colors of your video and the screengrab used for reference.
If you have a powerful enough machine, and you’re serious about mastering color correction, Davinci Resolve is certainly worth trying. It works on both Windows and Mac OS, places no significant restrictions, or watermarks at the export, and allows you to save videos in up to 1080p.
Lightworks
Lightworks is another well-known NLE used by professional filmmakers. This video editor is lightweight, cross-platform (works on Windows, Mac, and Linux), and it has an excellent selection of intuitive tools for both color correction and color grading.
Even if you have zero to no experience, Lightworks makes primary color correction simple. One of its main tabs, named VFX, offers a choice of several tools: Balance, Main, RGB, HSV, and Curves. As a rule, you want to start by setting a white, black, and gray balance for your footage. From there, you can manually set up the saturation, gamma, contrast, brightness, and gain values. Finally, you can use the curves to work with color channels, and wheels to work with highlights, midtones, and shadows. To perform clip color matching and ensure that the light and balance are consistent across every clip, you can use different types of color scopes.
Additionally, the free version of Lightworks supports third-party LUTs and plugins. You can use them both for color correction and color grading purposes (if you’re curious about the difference between the two, scroll down to the end of the article).
Although Lightworks offers a fully functioning free version of its video editor, some features, including advanced color correction features, advanced scopes, and premium filters, are behind the paywall. The good news is that the paid version starts at $9.99 per month which is still more affordable than high-end video editing software like Adobe Premiere.
If you choose to stick with the free version of Lightworks, it will allow you to edit videos at zero cost with no watermarks at the export. The only significant limitation is a 720p resolution cap.
Hitfilm (formerly Hitfilm Express)
Hitfilm is widely known as a VFX editor. It brings an array of built-in special effects and a variety of add-on integration options. However, you can also use Hitfilm to perform color correction on your footage before playing with the special effects it has to offer.
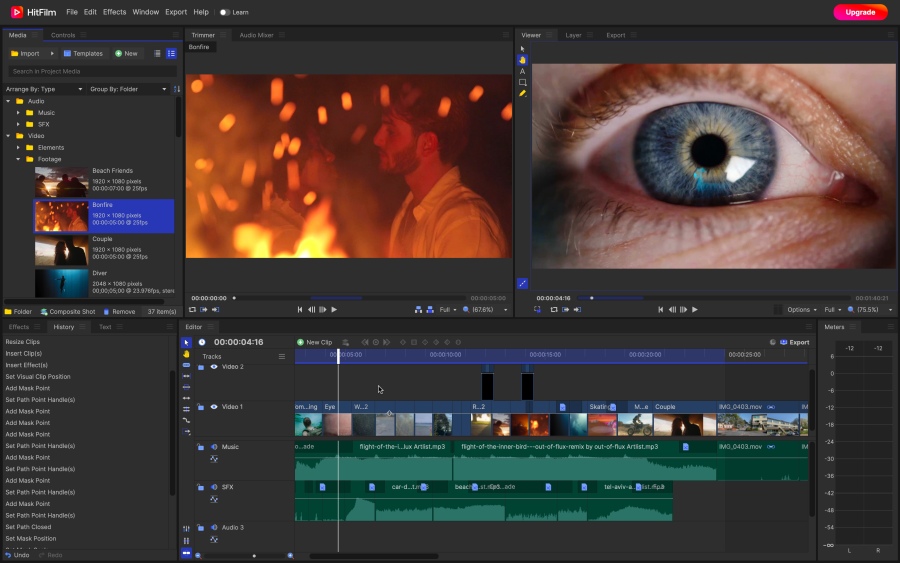
The key color correction tools available in Hitfilm are curves, color scopes, presets, and Hue & RGB keys. With this program, you can perform all the essential correction steps, from gauging color component information with different scope types – to achieving a nearly cinema-level look with coloring presets.
One useful feature that makes Hitfilm stand out is the use of video masking for color correction. This means that you can apply color correction to a selected object or area by creating a new layer with a mask for it. This trick comes in handy when you need to correct the skin color tone of an actor or remove artifacts.
Hitfilm works on Windows 10, 11 and MacOS 10.15. The free version allows you to export videos in HD quality, use professional visual effects, and benefit from proxy files. Some advanced color correction features belong to the paid version of Hitfilm; it’s available on a subscription basis and starts at $7.5 per month.
iMovie
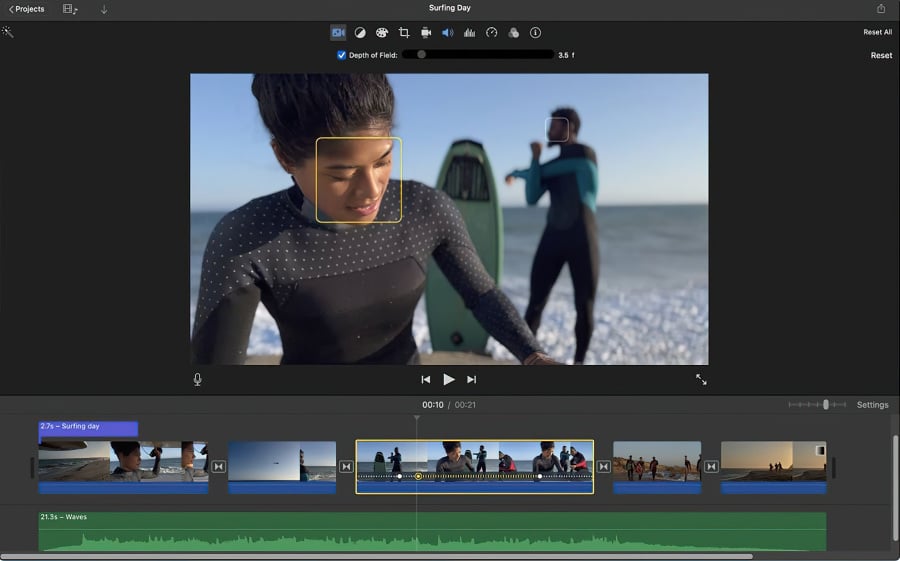
iMovie is an easy-to-use editor for Mac OS. It provides basic color correction tools that will work if you’re getting started and need to quickly adjust the look of your video without dealing with color wheels and RGB curves. iMovie comes preinstalled on Mac computers and it’s completely free.
Color correction tools in iMovie can be divided into two groups: automatic adjustment and manual adjustment. The automatic adjustment toolset allows you to enhance video colors based on the skin tone, use the white balance picker, and match color tones in several clips. This third option comes in handy if you’re merging multiple videos shot in dramatically different light conditions. iMovie helps fine-tune the contrast and brightness settings and match all videos to the clip of your choice.
Essentially, automatic color correction tools in iMovie improve the contrast and remove a color cast in the video to make it look more professional. Manual color correction tools allow you to adjust shadows, contrast values, highlights, color saturation, and temperature values using sliders.
While iMovie doesn’t include color wheels, curves, or LUTs, its automatic adjustment algorithm can be sufficient for basic-level color correction.
What’s the difference between color correction and color grading?
Although in both cases you get to work with the colors of the video, color correction and color grading are two different techniques. When you perform color correction, it typically means that you want to enhance the video by making it look more natural and vibrant. If you’re merging several pieces of footage shot in different lighting conditions, color correction also means color-matching clips and making sure they have the same level of brightness, contrast, and gamma.
Color grading is also aimed at enhancing your video, but this technique doesn’t mean just color balance adjustment. Instead, editors use color grading to create a certain mood and visual aesthetics, express their artistic vision, so that the colors in the video become a part of the story. Color grading often means using filters and changing color tones; it always comes after color correction.
Some great examples of unique, memorable color grading works are Melancholia (dramatic cool color tones), Sin City (black-and-white effect, plus color isolation used to create a resemblance with a comic book), Batman (dimmed colors, dark tones), and, of course, movies like La La Land, Pirates of the Caribbean, and Scott Pilgrim.
Which software is best for video color correction?
There’s no short answer to this question, and here is why. Technically speaking, color correction tools – such as color wheels, black-and-white balance pickers, HSL curves, and contrast, brightness & gamma controls – are either very similar or the same, regardless of the video editing software. As long as you understand the main principles of color correction, and how each of these tools works, you can perform it in any program.
So how do you choose a program for video color correction? For starters, you can narrow your search by looking at system requirements. For example, if your computer is low on RAM, you may need to eliminate Davinci Resolve because it requires a powerful machine to perform well; or if you’re a Mac user, you’ll have to eliminate VSDC because this video editing software only works on Windows PC.
Next, think of other tools or effects you might need for your projects. For example, if you’re planning to use special effects a lot, no video editing software beats Hitfilm. If you need elaborated audio editing tools, Lightworks might be an excellent choice.
Once you have 2-3 options left, go ahead and test the remaining programs. Only then will you be able to choose the software you’re comfortable with. And if you fail to find everything you need in a single program, it’s a common practice to use several solutions for video editing.
© 2011-2024, www.videosoftdev.com, FLASH-INTEGRO LLC. Privacy policy | Terms of use | About us
All trademarks referenced herein are the sole property of their respective owners.
Copying any materials from this site allowed only with written consent of Site Administration.